CI-202 Instruction Manual rev. 6/21/2017
1554 NE 3
rd
Ave, Camas, WA 98607, USA
Phone (360) 833-8835 Fax (360) 833-1914
20
THEORY OF OPERATION
Overview of the Parts of the Instrument
The CI-202 consists of a number of sub-systems. It has a laser width scanner that is capable of
measuring the width of an object in its objective 500 times a second to a resolution of 0.1
mm. The entire instrument is controlled by a microcomputer system that allows the user
unparalleled flexibility in configuring the instrument to make measurements accurately, easily,
and quickly.
The Width Scanner
When the instrument is in the scanning mode, a rotating mirror causes a laser beam to scan
across the objective 500 times a second. This beam is reflected off the special surface of the
scan board and received by a light sensor inside the unit. The level from this sensor is
compared to a threshold.
The output of the “comparator” is fed to the microcontroller, which
monitors the intervals during the width scan.
Computing the Parameters
The CI-202 measures only two parameters directly: width and length. From these it derives
area, perimeter, aspect ratio, and shape factor from each scan.
Each time the meter senses the leaf has progressed 1 mm, the computer will check if the width
reading is a non-zero value.
If the width measurement is non-zero, the computer takes the following actions:
The width measurement is added to the area accumulator.
If the width measurement is greater than the currently stored maximum width, the
maximum width is updated.
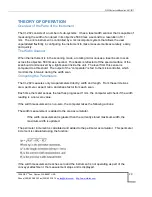
The perimeter increment is calculated and added to the perimeter accumulator. This perimeter
increment is calculated using the function:
If the width measurement reaches zero and the instrument is not operating as part of the
conveyer attachment, the measurement stops and is displayed.


