background image

9

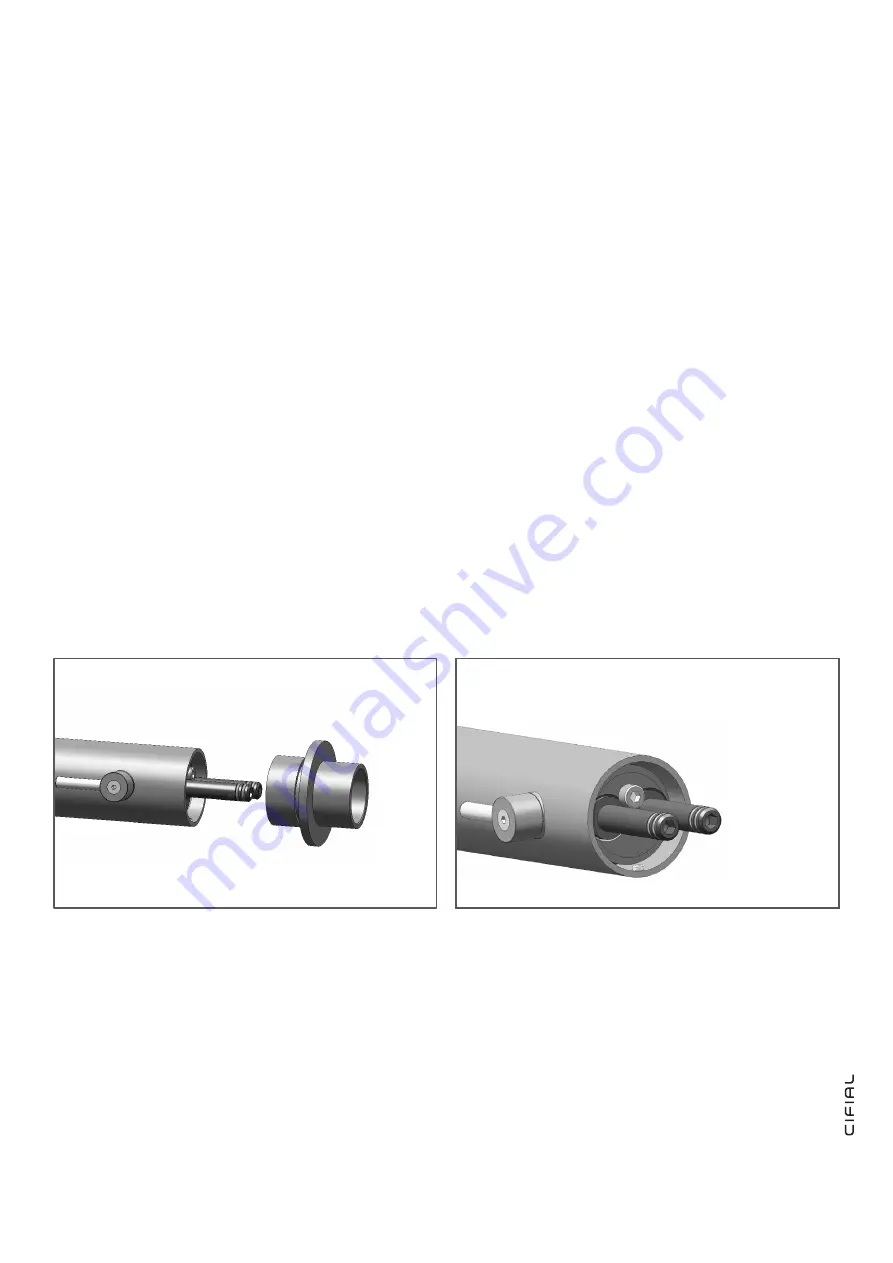
Instruções de limpeza dos filtros

a. 

Desligar o abastecimento de água e a válvula.

b.

 Desaperte o parafuso de fixação no corpo da torneira 

com a chave sextavada de 2 mm fornecida.

c. 

Puxe o corpo da torneira de maneira a o separar da 

roseta.

d.

 Neste ponto, você terá acesso aos dois tubos de ali-

mentação e ao parafuso sextavado que estão localizados 

no interior da torneira. Desaparafuse o parafuso usando a 

chave sextavada de 4 mm fornecida. 

e.

 Retire os tubos de alimentação e desmonte os filtros.

f. 

Limpe os filtros debaixo de água a correr. Se necessário, 

substituir por novos.

g. 

Reinstalar os filtros. Reinstalar os tubos de alimentação 

e fechar a central com o parafuso utilizando a chave sexta-

vada.

h. 

Instale novamente o corpo da torneira na base fixando-o 

à roseta com o perno.

i. 

Ligue o abastecimento de água.

j. 

Verifique possíveis fugas.

MANUTENÇÃO

MAINTENANCE

Filters cleaning instructions 

a. 

Shut-off the water supply and the valve.

b.

 Release the set screw at the faucet body using the 2 mm 

Allen Key.

c.

 Pull out the Faucet body and separate it from the rosette.

d.

 At this point you will have access to the two nipples and 

the Allen screw that are located at the internal side of the 

faucet. Unscrew this screw using the provided 4mm Allen 

key.

e.

 Pull out the nipples and dismount the filters.

f.

 Wash the filters under running water. If needed, replace the 

filters with new ones.

g.

 Restore the filters. Restore the nipples and close the cen-

tral screw using the Allen key.

h.

 Reassemble the faucet body to the base with the rosette 

setting the screw.

i.

 Re-establish the incoming water supply.

j. 

Make sure that there is no water leakage.

Cuidado e limpeza de cromados e acabamentos especiais.

NÃO 

use esfregão de aço ou artigos de limpeza que con-

tenham álcool, ácidos, abrasivos ou semelhantes. O uso de 

quaisquer produtos de limpeza, de manutenção ou sub-

stancias proibidas podem danificar a superfície da torneira. 

Para a limpeza da superfície da torneira use APENAS sabão 

e água, em seguida seque com um pano limpo ou toalha. 

Quando fizer a limpeza dos azulejos das paredes, as tornei-

ras devem ser protegidas de qualquer projeção de produtos 

abrasivos.

Care and cleaning of chrome and special finishes.

DO NOT 

use steel wool or cleansing agents containing 

alcohol, acid, abrasives, or the like. Use of any prohibited 

cleaning or maintenance products or substances could dam-

age the surface of the faucet. For surface cleaning of faucet 

us ONLY soap and water, then wipe dry with clean cloth or 

towel. When cleaning bathroom tile, the faucets should be 

protected from any splattering of harsh cleansers.

Summary of Contents for 3215001

Page 1: ...TORNEIRA ELETR NICA DE PAREDE 3215001 WALL MOUNTED ELECTRONIC FAUCET 3215001 MANUAL DE MONTAGEM E INSTRU ES ASSEMBLEY AND INSTRUCTIONS MANUAL...

Page 2: ...DO PACK PACK CONTENTS INFORMA O DE PR INSTALA O PRE INSTALLATION INFO INSTALA O INSTALLATION AJUSTE CONFIGURA ES RANGE ADJUSTMENT SUBSTITUI O DE BATERIA BATTERY REPLACEMENT MANUTEN O MAINTENANCE LIST...

Page 3: ...ing valve Self adjusting sensor 80 mm 240 mm 90 seconds 70 C TORNEIRA ELETR NICA DE PAREDE 3215001 WALL MOUNTED ELETRONIC TAP 3215001 Fonte de alimenta o Press o min de gua Press o max de gua Alcance...

Page 4: ...tr nica Spout and attachments incl electronic unit Perno M4x4 M4x4 set screw Capa protetora tempor ria Temporary protection cover 2x Parafuso 6x1 1 2 2x Srew 6x1 1 2 2x Buchas 5x25 2x Screw anchors 5x...

Page 5: ...o do sensor da torneira use um escoador com um acabamento n o refletivo n o use o acabamento cromado N o instale um escoador brilhante na dire o do sensor 1 To avoid reflection problems keep a distanc...

Page 6: ...he adjustable tilting plate by pressing it smoothly If the sensor range is not satisfactory please refer to the section entitled Settings adjustment INSTALA O INSTALLATION 1 Feche o fornecimento de gu...

Page 7: ...d distance 9 Check the distance you have set and if it is not satisfactory repeat steps 1 7 10 Turn on the water supply Regula o do alcance 1 Feche o fornecimento de gua 2 Desligue a fonte de alimenta...

Page 8: ...mpre que as m os do utilizador se aproximem do alcance do sensor A pilha 9V deve ser substitu da dentro de duas sema nas do seguinte modo 1 Corte o fornecimento de gua 2 Para ter acesso a pilha 9V des...

Page 9: ...rew this screw using the provided 4mm Allen key e Pull out the nipples and dismount the filters f Wash the filters under running water If needed replace the filters with new ones g Restore the filters...

Page 10: ...10 LISTA DE PE AS SPARTE PARTS LIST Kit Sensor Sensor Kit V lvula solen ide Solenoid valve Tampa das pilhas Battery cover Filtro Filter 07220082 07500065 06500001 08530014...

Page 11: ...ma dos 8 bar Ligar os conetores entre a unidade eletr nica e a solen ide Desaparafuse a solen ide extraia o pist o e a mola da solen ide e limpe os Use um removedor de cal c rio se necess rio Quando s...

Page 12: ...gher than 8 bar Connect the electronic unit connectors to the solenoid Unscrew solenoid pull out the plunger and the spring from the solenoid and clean them Use scale remover material if needed When r...

Page 13: ...IAL cobrar igualmente o valor da desloca o e da m o de obra realizada 3 1 VALORES A COBRAR Desloca o 0 40 km a contar a partir da localiza o do revendedor CIFIAL M o de obra 25 00 hora m nimo a cobrar...

Page 14: ...5665966 983XX884D 01 www cifial eu...

Reviews: