


42
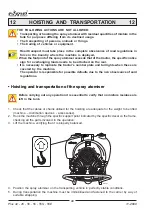
Plus 42 - 45 - 50 - 55 - 55S - 55E
11-2000
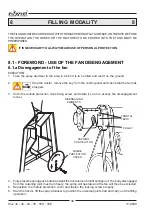
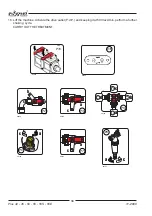
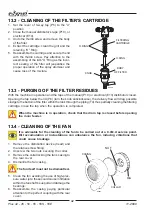
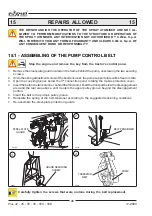
13.2 - CLEANING OF THE FILTER’S CARTRIDGE
1. Set the lever of 3-way tap (P5) to the “d”
position
2. Close the manual distributor’s taps (P10), or
electrical (E10).
3. Undo the thumb screw and remove the body
of the filter.
4. Extract the cartridge: clean the grill and the
retaining “O” Ring.
5. Reassemble the cartridge and secure the lid
with the thumb screw. Pay attention to the
assembling of the lid’s “O” Ring as the incor-
rect sealing of the filter will jeopardise the
proper operation of the spray atomiser and
cause loss of the mixture.
13.3 - PURGING OF THE FILTER RESIDUES
With the machine in operation and the taps of the manual (P10) or electrical (E10) distributor closed.
Opening the tap below the lid (P8) (turn the knob anticlockwise), the delivery flow will drag possible
sludge to the bottom of the filter within the tank through the piping (T4) thus partially cleaning the filtering
cartridge. Close the tap when the operation is completed.
When the machine is in operation, check that the drain tap is closed before opening
the main feeder.
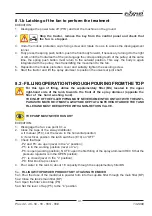
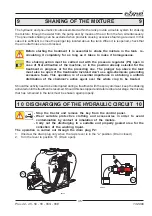
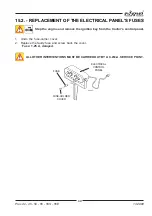
13.4 - CLEANING OF THE FAN
It is advisable for the cleaning of the fan to be carried out at a C.I.M.A service point.
Dirt accumulation or incrustations can unbalance the fan, inducing vibrations that
could cause breakage
00036
FILTERING
CARTRIDGE
O.RING
O.RING
BODY
OF FILTER
KNOB
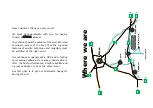
1. Remove the distribution device (head) and
the relative elbow fitting.
2. Unscrew the two nuts securing the collar.
3. Remove the collar locking the fan’s casing to
the rear cover.
4. Dismantle the fan casing.
The fan itself must not be dismantled..
5. Clean the fan avoiding the use of high-pres-
sure water jets: these could cause infiltration
within the fan shaft’s support and damage the
bearings.
6. Reassemble the casing paying particular
attention to the perfect coupling with the rear
cover.
00097
CASING
NUT
COLLAR
FAN


