C I R R U S
A I R P L A N E M A I N T E N A N C E M A N U A L
M O D E L S R 2 0
51-20
Page 11
All
EFFECTIVITY:
1
Define sanding area with marker and fill area with a cross-hatch of other random
pattern. Allow a short drying period before sanding until depth tracer is dry to the
touch.
2
Sand repair area in a random pattern until depth tracer is gone. Frequently clean
repair surface of contaminants using vacuum and paint brush.
(g)
For sandwich penetration damage requiring foam core replacement, replace foam core.
(h)
For sandwich penetration damage requiring sandwich structure replacement, replace sec-
tion.
(i)
For solid laminate and composite sandwich structure, sand repair area:
1
Define sanding area with marker.
Note:
Laminate that is 2-ply or less does not require a taper.
2
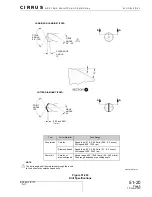
Sand repair area in a random pattern so that face of damaged laminate tapers to a
1:50 ratio (i.e., taper length is 50 times the thickness of the laminate). Frequently
clean repair surface of contaminants using vacuum and paint brush.
(j)
If applicable, prepare Expanded Metal Mesh (EMM) surface:
CAUTION:
Do not sand EMM after it becomes shiny. EMM is very thin and can easily
be sanded through.
1
At perimeter of EMM, use 80 grade sand paper or finer to lightly sand existing EMM
until shiny.
2
Prepare perimeter of existing EMM so that replacement EMM overlaps existing
EMM by at least 0.2 inch (5.0 mm).
(k)
Solvent clean repair area.
(l)
Dry repair area.
(6)
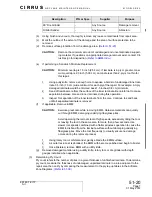
After the extent of damage is determined, repair plies may be made. A template is used to assist
in cutting the correct shape and size of glass-fabric. Release film or clear plastic sheet may be
used for template construction.
Once the template is made, glass-fiber cloth can be cut. Use clean, sharp scissors or a razor
knife. Dull tools will catch and pull fibers, distorting the fabric. To reduce the likelihood of stress
risers developing post repair, round the edges of the repair plies when cutting. Exercise caution
when cutting and handling the glass-fiber cloth to maintain fiber orientation. Do not handle glass-
fabric materials with bare hands.
When three or less repair plies are required, a 1.0 inch (2.5 cm) minimum overlap of all repair
plies is required. When more than three repair plies are required, a 0.5 inch (1.3 cm) minimum
initial overlap is required along with each subsequent ply extending 0.5 inch (1.3 cm) minimum
beyond the previous plies.
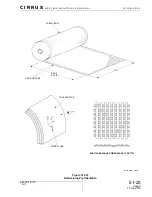
It is difficult to determine the fiber orientation of a piece of cloth once the selvage edge has been
removed. If the selvage edge is unknown the fabric must be discarded. When cutting plies, hold
template against the fabric as this will reduce the chance of distorting the material. Ensure tem-
plate is positioned in the proper orientation. The template should be kept with the repair ply.
To determine number of repair plies to prepare, reference the ply lay-up tables in the Airframe
Zone Diagrams.
If no repair ply quantity is shown, always prepare and install
twice as many repair plies as original lay-up in order to ensure that original strength is achieved.
01 May 2012


