4
METHOD OF USE
Opening the lock (basic version without accessories) with servo-assisted
control.
Turn the mechanical key 30°- 40° in the opening direction and then turn in the
opposite direction to bring the key back to its extraction position. The lock opens
automatically.
Opening and closing the lock (version with accessories)
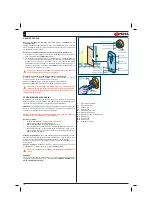
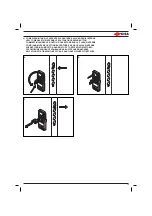
1 - Bring a previously-stored electronic key (N) close to the reading area (L1).
The green LED (L3-M4) fl ashes.
2 - To close the door, just bring it close; with automatic closing mode active, the
lock will close automatically with engagement of the dead-bolts, while with
automatic closing mode deactivated, the lock will only close with the latch-bolt
engaged. The red LED (L2-M3) lights to indicate closure with the dead-bolts
engaged.
Important: a lock with accessories can also be opened with the
mechanical key (emergency opening).
Enabling and disabling automatic closing
Press button (M2) for 5 seconds to activate or deactivate the automatic withdrawal
of the dead-bolts.
Yellow LED (M5) lit: automatic closing function enabled
Yellow LED (M5) off: automatic closing function disabled
Important: with the function disabled, closing and opening occur
with the engagement and withdrawal of the latch-bolt, while with the
function enabled, both the latch-bolt and the dead-bolts are activated.
OPERATION WITH A MECHANICAL KEY
This lock has been designed for electronic operation: however, in the event of
electronics failure, the lock can nevertheless be operated using the cylinder
mechanical key.
NOTE: the lock electronic operation is only possible when the mechanical key
has been removed or is in its extraction position: the presence of a turned key
in the cylinder will prevent all automatic functions.
Do not use the cylinder mechanical key for your door’s everyday use when
the electronic system is active.
Light signals:
• Green LED lit: door open or not safely closed.
• Red LED lit: door safely closed.
• Yellow LED lit: automatic deadbolt closing.
• Red LED fl ashing and green LED steady: the door will not close correctly.
Check with your mechanical key that the deadbolts are sliding smoothly when
the door is closed. Let out the deadbolts to their 3
rd
throw position (safely
closed door) and press the opening button.
Power failure: When the voltage supply goes below a pre-set threshold, all the
LEDs go off (energy saving mode), but the lock continues to accept controls until
the battery programmed disconnection time.
After receiving an input in the energy saving phase, the LEDs will light up for
5 seconds
Flat battery: red fl ashing LED upon opening on all the peripherals connected
to the system (e.g. red LEDs M3 and L2).
Important: any LED signals on the outside protector device shall
last for 10 seconds.
WARNING:
in the event of operation troubles a LOGIC RESET may be necessary (see
INSTALLER MODE) to reset the whole system.
L: Outside
protector
L1: Reading area
L2: Red LED
L3: Green LED
M: Inside
escutcheon
M1: Opening button
M2: Automatic closing button
M3: Red LED
M4: Green LED
M5: Yellow LED
N: Electronic
key
GB
L: Outside
protector
L1: Reading area
L2: Red LED
L3: Green LED
M: Inside
escutcheon
M1: Opening
button
M2: Automatic
closing button
M3: Red LED
M4: Green LED
M5: Yellow LED
N: Electronic
key
L1: Reading
area


