background image

32

Cisco 6100 Thermal Upgrade Kit Installation Procedures

78-10158-01

Installing the Cisco 6100 Thermal Upgrade Kit

Attach Fan Tray Power Connections for a Dual-Power Feed

To attach the fan tray power connections to the fuse and alarm panel for a dual-power feed, complete
the following steps:

Step 1

Use a socket driver or a Phillips-head screwdriver to remove the clear cover over the fan tray
power connections.

Step 2

Measure enough wire (14 to 18 AWG copper solid or stranded wire) to connect each of the fan tray
power connections to the fuse and alarm panel.

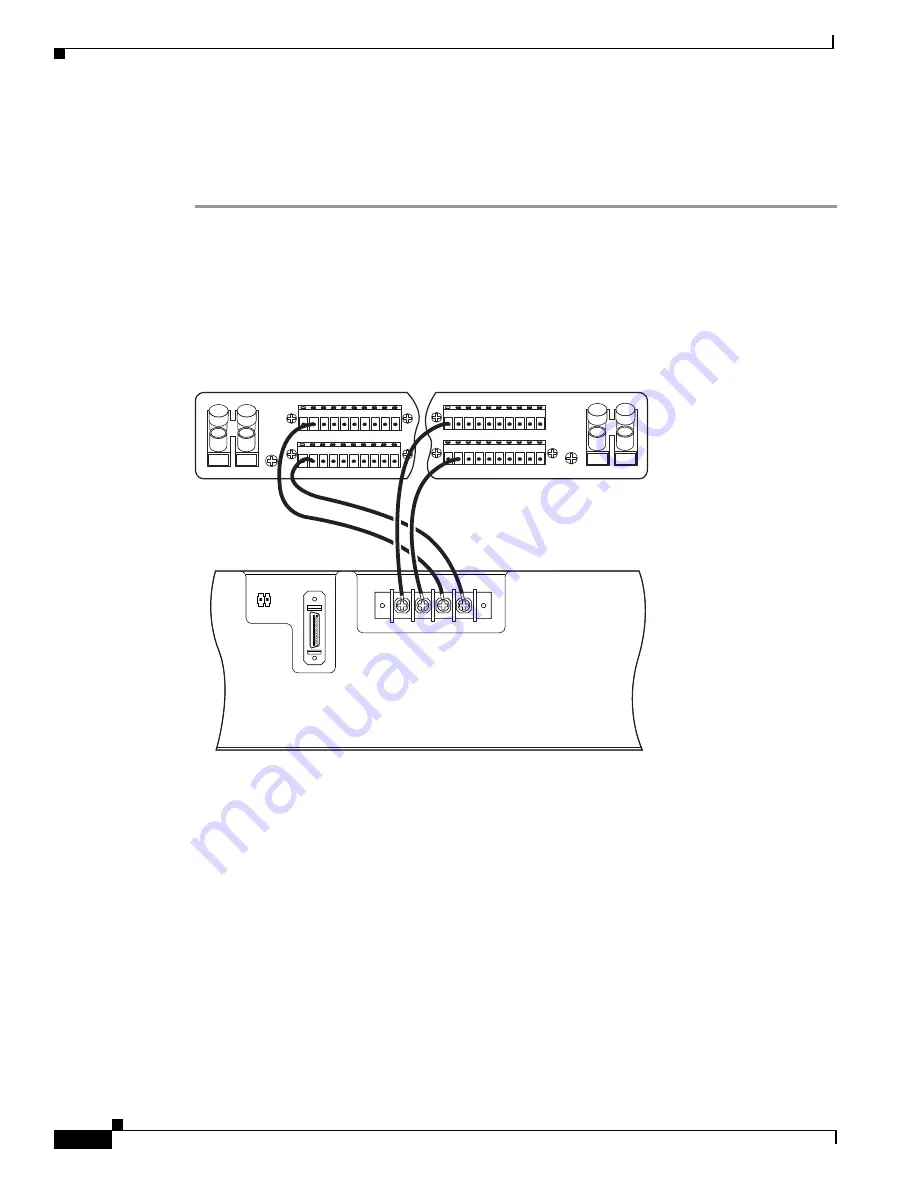
Figure 17 shows the power connections from the fan tray to the fuse and alarm panel for a
dual-power feed.

Figure 17

Power Connections for the Fan Tray—Dual-Power Feed

Step 3

Use a wire stripper to remove the casing from both ends of the wires.

Step 4

Use a Phillips-head screwdriver to attach a wire to the –48VA power input connection on the fan
tray (P1).

Step 5

Attach the wire to the fuse and alarm panel NEG DC connector. See Figure 17 for correct placement.

Step 6

Use a Phillips-head screwdriver to attach a wire to the –48VB power input connection on the fan
tray (P1).

Step 7

Attach the wire to the fuse and alarm panel NEG DC connector. See Figure 17 for correct placement.

Step 8

Use a Phillips-head screwdriver to attach a wire to a –48RTN power return connection on the fan
tray (P13).

Step 9

Attach the wire to a fuse and alarm panel POS RTN connector.

1 2 3 4 5 6 7 8 9 10

NEG

NEG

POS

POS

NEG DC

NEG DC

POS RTN

POS RTN

B

A

1 2 3 4 5 6 7 8 9 10

1 2 3 4 5 6 7 8 9 10

1 2 3 4 5 6 7 8 9 10

26376

P2

J1

P1

FAN

P2

J1

-48VB

RT

N

-48V

A

RT

N

+

_

-48V

RTN -48V

RTN

Fan tray

Summary of Contents for 6100

Page 1: ...t flexi ATU C modules Contents These release notes describe the following topics Installation Prerequisites page 1 General Safety Precautions page 6 Installing the Cisco 6100 Thermal Upgrade Kit page 9 Related Documentation page 51 Cisco Connection Online page 51 Documentation CD ROM page 52 Installation Prerequisites This section provides the following prerequisites needed to install the thermal ...

Page 2: ...e fans Air filter Thermal guard Required when installing dual port DMT 2 ATU C or quad port flexi ATU C modules in the Cisco 6100 Cisco 6100 chassis ventilation cover New power rating label Direct Connect configuration already installed in the rack with a Cisco 6100 and Cisco 6120 Tools A 3 16 inch flat head screwdriver A Phillips head screwdriver A one quarter inch socket driver or wrench Necessa...

Page 3: ...sed for Cisco 6100 chassis power connections 14 to 18 AWG black and red copper solid or stranded Used for fan tray power connections 12 AWG or thicker green or green with yellow stripes copper stranded Used for the Cisco 6100 chassis grounding 14 AWG or thicker green or green with yellow stripes copper stranded Used for the fan tray grounding Ferrites that yield an impedance greater than 200 ohms ...

Page 4: ...te the typical power required for each Cisco 6100 Series component After you calculate the typical power determine the minimum fuse value for each component that is wired to the fuse and alarm panel Use Table 3 to calculate the minimum fuse rating necessary for each of your Cisco 6100 Series system components Note The power rating label supplied on the rear of each chassis and fan tray indicates t...

Page 5: ...stem in a rack Ensure that vertical hole spacing on the rack rails meets standard EIA 310 C requirements of 1 inch 2 54 cm spacing All portions of the rack are equal to or less than the NEBS maximum allowances of 12 inches 30 48 cm 2 Enter 11W for the DS3 STM3 for the subtending host if you are installing a subtended network 3 Enter 48W for the DS3 or OC 3c network interface module 4 Enter 7W for ...

Page 6: ...nded using ground straps to eliminate the risk of ESD damage to the equipment Modules are subject to ESD damage whenever they are removed from the chassis Caution If the modules are installed when you apply power to the system you could damage the modules and the chassis Warning This warning symbol means danger You are in a situation that could cause bodily injury Before you work on any equipment ...

Page 7: ...r chassis while you install or remove a module or a fan Exposed circuitry could constitute an energy hazard Warning An exposed wire lead from a DC input power source can conduct harmful levels of electricity Be sure that no exposed portion of the DC input power source wire extends from the terminal block plug Warning Blank faceplates and cover panels serve three important functions they prevent ex...

Page 8: ... wiring connections Warning The power supply circuitry for the equipment can constitute an energy hazard Before you install or replace the equipment remove all jewelry including rings necklaces and watches Metal objects can come into contact with exposed power supply wiring or circuitry inside the DSLAM equipment This could cause the metal objects to heat up and cause serious burns or weld the met...

Page 9: ...f Installing the Cisco 6100 Thermal Upgrade Kit The following sections detail the installation procedures for upgrading your Cisco 6100 chassis to accommodate dual port DMT 2 or quad port flexi ATU C modules Warning Only trained and qualified personnel should be allowed to install replace or service this equipment Note Before installing and cabling the equipment be aware of standard safety practic...

Page 10: ...subtended network configuration if applicable 6 Disconnect the Cisco 6100 power connections 7 Disconnect the Cisco 6100 from the Cisco 6120 if applicable 8 Disconnect the Cisco 6100 chassis ground 9 Stabilize the rack if applicable 10 Move any Cisco 6100 Series system hardware components if applicable 11 Install the fan tray in the rack 12 Install the thermal guard on the Cisco 6100 chassis 13 Ins...

Page 11: ...emove power to the system with one of the following methods Remove the fuses from the fuse and alarm panel Turn off the breakers in the fuse and alarm panel 23 Apply the power to the system 24 Verify that the fan tray is operational 25 Reseat all of the modules 26 Connect the network interface module to the network if applicable 27 Attach the Cisco 6100 chassis ventilation cover 28 Attach the new ...

Page 12: ... chassis The fan tray is installed directly below the Cisco 6100 chassis Figure 1 Direct Connect with a POTS Splitter Configuration in the Cisco 6100 Warning Two people are required to lift the chassis Grasp the chassis underneath the lower edge and lift with both hands To prevent injury keep your back straight and lift with your legs not your back Cisco 6100 CAP DMT 2 or Flexi ATU Cs 32210 Fan tr...

Page 13: ...nd install the thermal guard you will need to complete the following steps to disconnect the ViewRunner system Step 1 Open the optional rear door if your system has one Step 2 Use a Phillips head screwdriver to remove the two backplane screws that hold the plastic ESD shield over the system I O card Keep these backplane screws and the plastic ESD shield for use when you reconnect the ViewRunner sy...

Page 14: ...3 Disconnect the optical fiber going to the transmit and receive connectors in the inset on the front panel of the OC 3c network interface module Step 4 Pull the fiber through to the front of the chassis Step 5 Close the front door of the chassis Disconnect the Subtended Network Configuration If have a subtended network configuration and you need to prepare the rack to accommodate the fan tray and...

Page 15: ... head screwdriver to remove the clear cover over the Cisco 6100 power connections Step 2 Disconnect the wires connecting the Cisco 6100 chassis to the fuse and alarm panel POS RTN and NEG DC connections as shown in Figure 2 dual power feed and Figure 3 single power feed These wires will be replaced with a larger gauge wire later in the procedures Figure 2 Power Return Connections for the Cisco 610...

Page 16: ...will need to disconnect the Champ cables from the Cisco 6100 connectors J39 through J44 to the Cisco 6120 connectors J1 through J6 Table 6 shows the corresponding Cisco 6100 and Cisco 6120 connectors 1 2 3 4 5 6 7 8 9 10 Cisco 6130 P13 48V_A 48RTN 48V_B 48RTN NEG NEG POS POS NEG DC NEG DC POS RTN POS RTN B A 1 2 3 4 5 6 7 8 9 10 1 2 3 4 5 6 7 8 9 10 1 2 3 4 5 6 7 8 9 10 18394 Table 6 Cisco 6100 an...

Page 17: ...rmal guard you will need to stabilize the rack for the new hardware components Verify that your Cisco 6100 Series system is installed from the bottom to the top of the rack so that the rack remains stable If your system is not installed from the bottom to the top of the rack make the necessary adjustments to the rack as discussed in the Move Cisco 6100 Series System Hardware Components section on ...

Page 18: ...ommodate the fan tray 3 RUs if your racks are not side by side The top of the fan tray should be flush with the bottom of the chassis Use the mounting screws and a Phillips head screwdriver to bolt the Cisco 6100 in the rack Gently remove the Cisco 6100 chassis from the rack if your racks are side by side Note Remove each Cisco 6100 chassis from the rack if you have a side by side rack configurati...

Page 19: ...ne Cisco 6100 chassis in a Direct Connect with a POTS splitter configuration you must install a fan tray under each chassis Step 1 Place the fan tray chassis on a flat and stable surface for example a table top Step 2 Locate the first fan and unscrew the thumbscrew that holds the fan in place the screw at the top of each fan as shown in Figure 4 Figure 4 Fan Tray Thumbscrews 23717 Cisco 6100 STATU...

Page 20: ...splitter Allow an additional 1 RU of space between the fan tray and the POTS splitter This space allows for the intake plenum and for cabling back to front for the OC 3c network interface module Step 7 Use four mounting screws and a Phillips head screwdriver to bolt the fan tray in the rack above the POTS splitter See Figure 1 for the correct placement of the fan tray Step 8 Align a fan with the f...

Page 21: ...LOF OCD PERF LOS LOF OCD PERF DS3 STM ALARM ACTIVE STATUS ACO SCM ATU C 1 ACTIVE STATUS ATU C 2 ATU C ATU C 1 ACTIVE STATUS ATU C 2 ATU C ATU C 1 ACTIVE STATUS ATU C 2 ATU C ATU C 1 ACTIVE STATUS ATU C 2 ATU C ATU C 1 ACTIVE STATUS ATU C 2 ATU C ATU C 1 ACTIVE STATUS ATU C 2 ATU C ATU C 1 ACTIVE STATUS ATU C 2 ATU C ATU C 1 ACTIVE STATUS ATU C 2 ATU C ATU C 1 ACTIVE STATUS ATU C 2 ATU C ATU C 1 AC...

Page 22: ...TATUS ATU C 2 ATU C ATU C 1 ACTIVE STATUS ATU C 2 ATU C ATU C 1 ACTIVE STATUS ATU C 2 ATU C ATU C 1 ACTIVE STATUS ATU C 2 ATU C ATU C 1 ACTIVE STATUS ATU C 2 ATU C ATU C 1 ACTIVE STATUS ATU C 2 ATU C ATU C 1 ACTIVE STATUS ATU C 2 ATU C ATU C 1 ACTIVE STATUS ATU C 2 ATU C ATU C 1 ACTIVE STATUS ATU C 2 ATU C ATU C 1 ACTIVE STATUS ATU C 2 ATU C ATU C 1 ACTIVE STATUS ATU C 2 ATU C ATU C 1 ACTIVE STATU...

Page 23: ... ATU C 2 ATU C ATU C 1 ACTIVE STATUS ATU C 2 ATU C ATU C 1 ACTIVE STATUS ATU C 2 ATU C ATU C 1 ACTIVE STATUS ATU C 2 ATU C ATU C 1 ACTIVE STATUS ATU C 2 ATU C ATU C 1 ACTIVE STATUS ATU C 2 ATU C ATU C 1 ACTIVE STATUS ATU C 2 ATU C ATU C 1 ACTIVE STATUS ATU C 2 ATU C ATU C 1 ACTIVE STATUS ATU C 2 ATU C ATU C 1 ACTIVE STATUS ATU C 2 ATU C ATU C 1 ACTIVE STATUS ATU C 2 ATU C ATU C 1 ACTIVE STATUS ATU...

Page 24: ...TM ALARM ACTIVE STATUS ACO SCM ATU C 1 ACTIVE STATUS ATU C 2 ATU C ATU C 1 ACTIVE STATUS ATU C 2 ATU C ATU C 1 ACTIVE STATUS ATU C 2 ATU C ATU C 1 ACTIVE STATUS ATU C 2 ATU C ATU C 1 ACTIVE STATUS ATU C 2 ATU C ATU C 1 ACTIVE STATUS ATU C 2 ATU C ATU C 1 ACTIVE STATUS ATU C 2 ATU C ATU C 1 ACTIVE STATUS ATU C 2 ATU C ATU C 1 ACTIVE STATUS ATU C 2 ATU C ATU C 1 ACTIVE STATUS ATU C 2 ATU C ATU C 1 A...

Page 25: ...ion Note Make sure your wire is as short as possible to make the connection Step 3 Use a wire stripper to remove the casing from both ends of the wires Step 4 Use a 3 16 inch flat head screwdriver to loosen the screw on the rack Step 5 Hook one end of the copper wire around the screw on the rack Step 6 Tighten the rack screw over the copper wire Step 7 Loosen the compression screw provided on the ...

Page 26: ...er wire around the screw on the rack Step 6 Tighten the rack screw over the copper wire Step 7 Loosen the compression screw provided on the grounding lug of the fan tray The grounding lug is located in the upper left corner of each chassis viewed from the rear Step 8 Insert the other end of the copper wire under the compression screw Step 9 Tighten the compression screw over the copper wire Note D...

Page 27: ...ons Caution To prevent the system from powering up do not install the fuses at this time If the fuses are already installed in the fuse and alarm panel remove them You can replace the fuses after the system is wired You can wire the power connections from the Cisco 6100 to the fuse and alarm panel for either dual or single power feed Note The clear cover was removed in the Disconnect the Cisco 610...

Page 28: ...ut connections to the fuse and alarm panel Figure 11 shows the Cisco 6100 power input connections wired to the fuse and alarm panel Figure 11 Power Input Connections for the Cisco 6100 Dual Power Feed Step 2 Use a wire stripper to remove the casing from both ends of the wires Step 3 Use a Phillips head screwdriver to attach a wire to the 48V_A power input connection on the Cisco 6100 P13 Step 4 Lo...

Page 29: ...r a dual power feed Figure 13 Power Return Connections for the Cisco 6100 Dual Power Feed Step 10 Use a wire stripper to remove the casing from both ends of the wires Step 11 Use a Phillips head screwdriver to attach a wire to a 48V power return connection 48RTN on the Cisco 6100 P13 Step 12 Loop the wire through the ferrite as shown in Figure 12 Step 13 Attach the wire to a fuse and alarm panel P...

Page 30: ...nnect each of the Cisco 6100 power connections to the fuse and alarm panel Figure 14 shows the Cisco 6100 power connections wired to the fuse and alarm panel for a single power feed Figure 14 Power Connections for the Cisco 6100 Single Power Feed Step 2 Use a wire stripper to remove the casing from both ends of the wires Step 3 Use a Phillips head screwdriver to attach a wire to the 48V_A power in...

Page 31: ...return connections to each other Step 11 Use a socket driver or a Phillips head screwdriver to attach the clear cover over the Cisco 6100 power connections Attach Fan Tray Power Connections Power is fed from the fuse and alarm panel to the fan tray by a terminal block connector with four dual power connections P1 located at the top of the fan tray backplane Figure 16 shows the location of the powe...

Page 32: ... Tray Dual Power Feed Step 3 Use a wire stripper to remove the casing from both ends of the wires Step 4 Use a Phillips head screwdriver to attach a wire to the 48VA power input connection on the fan tray P1 Step 5 Attach the wire to the fuse and alarm panel NEG DC connector See Figure 17 for correct placement Step 6 Use a Phillips head screwdriver to attach a wire to the 48VB power input connecti...

Page 33: ...er connections to the fuse and alarm panel Figure 18 shows the power connections from the fan tray to the fuse and alarm panel for a single power feed Figure 18 Power Connections for the Fan Tray Single Power Feed Step 3 Use a wire stripper to remove the casing from both ends of the wires Step 4 Use a Phillips head screwdriver to attach a wire to the 48VA power input connection on the fan tray P1 ...

Page 34: ... You must connect the fan tray alarm contacts so that the fan tray alarms can be transmitted to the ViewRunner management software Caution If fuses are already installed in the fuse and alarm panel remove them You can replace the fuses after the system is installed Do not power up the system while you install and connect the system To connect the fan tray alarm contacts complete the following step...

Page 35: ...apping tool to attach the wire to the contacts Step 4 Wire P2 on the backplane of the fan tray to P15 pin 8 on the backplane of the Cisco 6100 to connect the Fan Alarm contact Use a wire wrapping tool to attach the wire to the contacts Cisco 6100 32211 P2 J1 Fan tray FAN P2 J1 48VA RTN 48VB RTN 1 2 1 2 P14 P17 P15 E2A VISUAL AUDIBLE FAN ALARM MIN MAJ CRIT ACO MIN MAJ CRIT ACO MIN MAJ CRIT P16 SHOR...

Page 36: ...onnects the module from the backplane Step 3 Carefully slide the module forward and away from the backplane connection Step 4 Repeat Step 2 through Step 3 for each module in the Cisco 6100 chassis and each POTS module in the Cisco 6120 chassis Verify DIP Switches Verify that all of the DIP switches are set on SW1 and SW2 to the OFF position Figure 21 Warning Systems using a Cisco 6100 chassis must...

Page 37: ...at ferrites are added to the coaxial cables that you use to cable the DS3 subtending I O card to the system I O card to reduce the radiation EMI susceptibility to high frequency noise between 30 and 200 MHz If the ferrites are not present use either the ferrites that were shipped with the DS3 network interface module or ferrites that yield an impedance greater than 200 ohms 20 percent at 100 MHz 4...

Page 38: ... inch If the minimum bend radius exceeds one quarter of an inch the cable might not work properly Figure 24 Thin Coaxial Cable Through Ferrite Step 3 Attach a ferrite as close as possible to the remaining end of the cable see Figure 23 or Figure 24 for ferrite installation Tie wrap the cable directly behind the ferrite Step 4 Attach the end of the cable used in Step 3 to the receive DS3 BNC connec...

Page 39: ...ne Step 9 Tie wrap the transmit and receive cables coming from the DS3 subtending I O card where the cables meet after coming from the ferrites and every 1 foot thereafter for a total of 15 feet as shown in Figure 25 Figure 25 Ferrite Close to DS3 BNC Connectors on DS3 Subtending I O Card TX 1 RX 1 TX 2 RX 2 P1 P2 P3 P4 J5 J2 J1 J4 J3 DS3 subtending I O card Ferrite DS3 BNC connector DS3 BNC conne...

Page 40: ...for a total of 15 feet as shown in Figure 26 Figure 26 Ferrites Close to DS3 BNC Connectors on System I O Card Note If you have one subtending host chassis with two subtended node chassis the second subtended node chassis connects to the TX2 and RX2 DS3 BNC connectors on the DS3 subtending I O card J1 TX RX P1 P2 J7 D25 C25 B25 A25 E25 D1 C1 B1 A1 E1 System I O card DS3 BNC connector DS3 BNC conne...

Page 41: ... screws installed on the DS3 subtending I O card b Use a Phillips head screwdriver and the backplane screws you removed in the Disconnect the Subtended Network Configuration section on page 14 to attach the plastic ESD shield to the DS3 subtending I O card see Figure 27 Figure 27 Plastic ESD Shield Installation 28927 Standoff screw ESD shield DS3 subtending I O card Existing standoff screw Existin...

Page 42: ...to the fuse and alarm panel are wired as shown in Figure 11 or Figure 14 Step 4 Verify that the power connections from the fan tray to the fuse and alarm panel are wired as shown in Figure 17 or Figure 18 Step 5 Check the polarity of the 48 VDC connections to each chassis by attaching a voltmeter with the minus lead on 48RTN and the plus lead on 48V_A Ensure that the meter reads between 36 VDC and...

Page 43: ... each step completely before moving on to the next step Note All modules must be fully seated in the chassis A push on the faceplate of each module is required for the module to be fully seated Step 1 Reseat the xTU C modules in the Cisco 6100 a Lift up on the ejector tab and gently apply pressure to the bottom of the faceplate while pushing the module into the slot b Push on the faceplate of each...

Page 44: ... Windows Direct Connect Provisioning Guide or the ViewRunner for HP OpenView Direct Connect Provisioning Guide for software upgrade procedures Reconnect the Network Interface Module to the Network If you disconnected the network interface module in the Disconnect the Network Interface Modules section on page 14 complete the steps in the following sections to reconnect the subtended network configu...

Page 45: ...3 STM ALARM ACTIVE STATUS ACO SCM ATU C 1 ACTIVE STATUS ATU C 2 ATU C ATU C 1 ACTIVE STATUS ATU C 2 ATU C ATU C 1 ACTIVE STATUS ATU C 2 ATU C ATU C 1 ACTIVE STATUS ATU C 2 ATU C ATU C 1 ACTIVE STATUS ATU C 2 ATU C ATU C 1 ACTIVE STATUS ATU C 2 ATU C ATU C 1 ACTIVE STATUS ATU C 2 ATU C ATU C 1 ACTIVE STATUS ATU C 2 ATU C ATU C 1 ACTIVE STATUS ATU C 2 ATU C ATU C 1 ACTIVE STATUS ATU C 2 ATU C ATU C ...

Page 46: ...d on the backplane plastic cover Step 2 Peel the backing off the new power rating label Step 3 Attach the new power rating label directly over the current power rating on your chassis as shown in Figure 29 Ensure that the C on the current power rating is not covered by the new label Note If you cannot locate your current power rating label please attach the new power rating label to the backplane ...

Page 47: ...e Disconnect ViewRunner section on page 13 complete the steps in the following sections to reconnect the ViewRunner system Step 1 Connect one end of the Ethernet cable to the RJ 45 10BaseT LAN connector on the system I O card Step 2 Connect the other end of the Ethernet cable to one of the following A PC running ViewRunner for Windows software A UNIX system running ViewRunner for OpenView software...

Page 48: ...k Interface Modules section on page 14 to attach the plastic ESD shield to the system I O card see Figure 31 Figure 31 Plastic ESD Shield Installation Tips For step by step instructions on provisioning a Direct Connect configuration refer to the ViewRunner for Windows Direct Connect Provisioning Guide or the ViewRunner for HP OpenView Direct Connect Provisioning Guide 28926 Standoff screw Existing...

Page 49: ...Step 2 Lift the two latches on the rear door as shown in Figure 32 as you close the rear door The rear door closes left to right seen from the rear of the chassis Figure 32 Securing the Rear Door with the Latches Step 3 Release the latches after the rear door is in place 26875 P14 P17 P15 E2A VISUAL AUDIBLE FAN ALARM MIN MAJ CRIT ACO MIN MAJ CRIT ACO MIN MAJ CRIT ANALOG TEST I F RING TIP P18 48V_B...

Page 50: ...bscrews Run the Connection Test Procedures To verify that the system is connected and running properly follow the connection test procedures in the Cisco 6100 with NI 1 Direct Connect Installation Guide 26389 P17 P15 E2A VISUAL AUDIBLE FAN ALARM MIN MAJ CRIT ACO MIN MAJ CRIT ACO MIN MAJ CRIT ANALOG TEST I F RING TIP P18 48V_B 48RTN 48V_A 48RTN P13 MODEM POOL A OUT J45 J48 P3 P9 J39 J42 MODEM POOL ...

Page 51: ...em CBOS provides a comprehensive command set and web interface that allow you to configure your Cisco CPE modem or router A complete list of all released Cisco 600 Series documentation is available on the World Wide Web at http www cisco com univercd cc td doc product dsl_prod c600s index htm Cisco Connection Online Cisco Connection Online CCO is Cisco Systems primary real time support channel Mai...

Page 52: ...nt is to be used in conjunction with the documents listed in the Related Documentation section Access Registrar AccessPath Any to Any AtmDirector Browse with Me CCDA CCDE CCDP CCIE CCNA CCNP CCSI CD PAC the Cisco logo Cisco Certified Internetwork Expert logo CiscoLink the Cisco Management Connection logo the Cisco NetWorks logo the Cisco Powered Network logo Cisco Systems Capital the Cisco Systems...

Reviews: