background image

 Guide to using your CISCO IP 6961 phone at Imperial College 


Issued on 11.02.2013                                       Page 1 of 6                                      Produced by Karen Vincent 
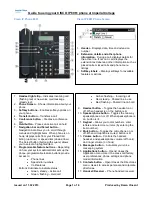
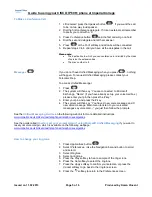
 

Cisco IP Phone 6961 


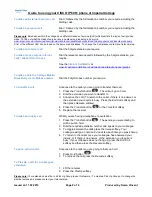
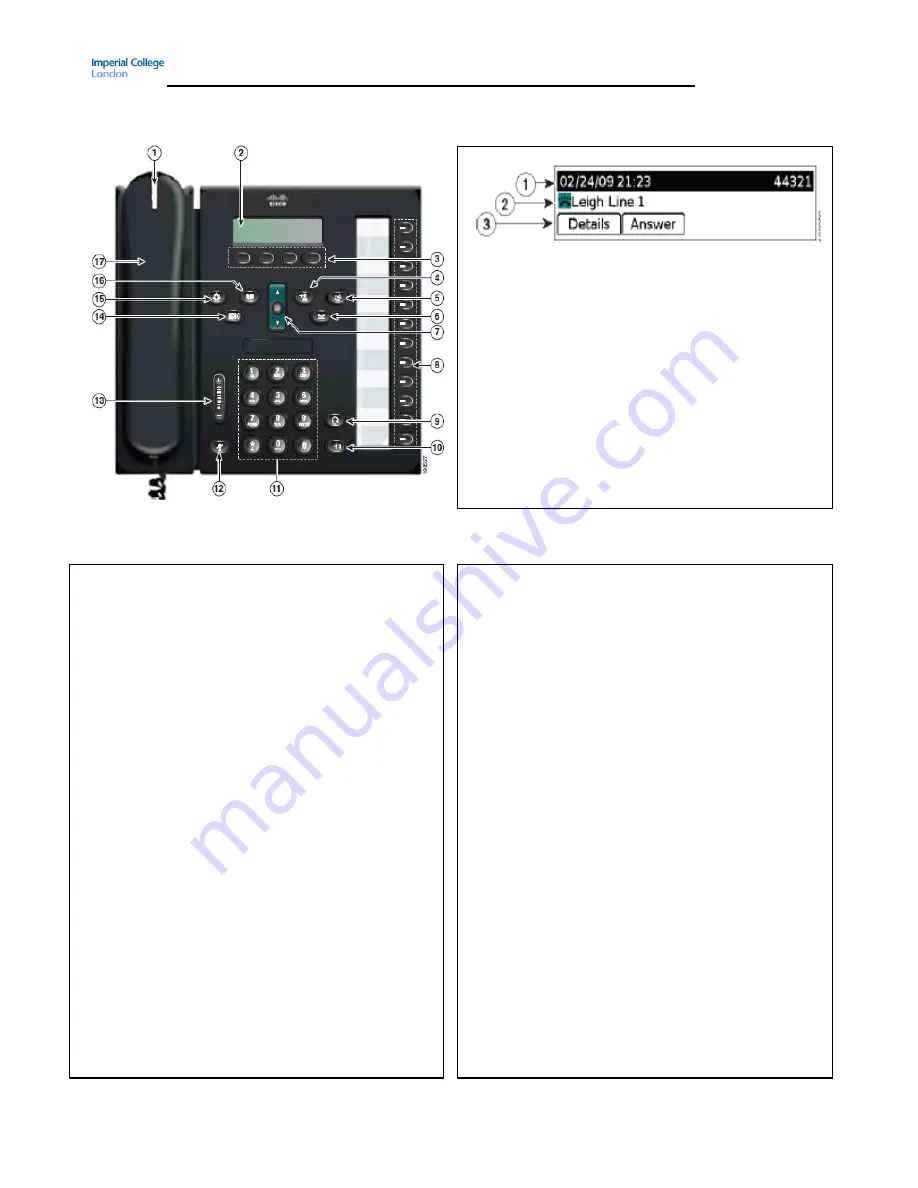
Cisco IP 6961 Phone Screen 


Amber, flashing 

– Incoming call 


Red, steady 

– Shared line in use 


Red, flashing 

– Shared line on hold 


9. 

Headset button


– Toggles the headset on or 

off. When headset is on, the button is lit. 

10. 

Speakerphone button


– Toggles the two way 

speakerphone on or off. When speakerphone is 
on, button is lit. 

11. 

Keypad


– Allows you to dial numbers, enter 

letters and select menu items (by entering the 
item number). 

12. 

Mute button


– Toggles the microphone on or 

off. When microphone is muted, button is lit. 

13. 

Volume button


– Controls the handset, 

headset, and speakerphone volume (off hook) 
and ringer volume (on hook) 

14. 

Messages button


– Auto-dials your voice 

messaging system 

15. 

Applications button


– Opens/ closes the 

Application menu. Use it to access call history, 
user preferences, phone settings and phone 
model information. 

16. 

Contacts button


– Open/ closes the Directories 

menu. Uses it to access personal and corporate 
directories. 

17. 

Handset/ Receiver


– Phone handset/ receiver  


1. 

Handset light strip


– Indicates incoming call 

(flashing red) or new voice mail message 
(steady red). 

2. 

Phone Screen


– Shows information about your 

phone 

3. 

Softkey buttons


– Enables softkey options on 

your phone 

4. 

Transfer button


– Transfers a call 

5. 

Conference button


– Creates a conference 

call 

6. 

Hold button


– Places an active call on hold 

7. 

Navigation bar and Select button


– 

Navigation bar allows you to scroll through 
menus and highlight items. When phone is on 
hook, displays calls from your Placed Call 
listing (up arrow) or speed dials (down arrow). 
The Select button (button with square) allows 
you to select a highlighted item. 

8. 

Programmable feature buttons


– Depending 

on how your system administrator sets up the 
phone, programmable feature buttons provide 
access to: 


Phone lines 


Speed-dial numbers 


Call features 

Buttons illuminate to indicate status: 


Green, steady 

– Active call 


Green, flashing 

– Held call 


1. 

Header


– Displays date, time and extension 

number 

2. 

Extension details and other phone 
information

 - During a call, displays details for 

the active line. If not on a call, displays the 
extension text label and other information such as 
placed calls, missed calls and phone menu 
listings 

3. 

Softkey labels


– Displays softkeys for available 

features or actions.  

Summary of Contents for 6961 - Unified IP Phone Standard VoIP

Page 1: ...Receiver Phone handset receiver 1 Handset light strip Indicates incoming call flashing red or new voice mail message steady red 2 Phone Screen Shows information about your phone 3 Softkey buttons Enables softkey options on your phone 4 Transfer button Transfers a call 5 Conference button Creates a conference call 6 Hold button Places an active call on hold 7 Navigation bar and Select button Naviga...

Page 2: ...re To transfer a call Announce to the caller you are going to transfer their call 1 Press the Transfer button The call will go on hold 2 Dial the extension you wish to transfer to 3 Announce the call To return to the caller if there is no answer or the extension you require is busy Press the End Call softkey and then press Resume softkey 4 Press the Transfer button or the Transfer softkey 5 Replac...

Page 3: ...aller internal caller who are still on the Aastra Ericsson Telephone Exchange who ring your fixed extension will not be directed to your mobex How to use pick up a Monitor Pick On a Cisco IP 6941 Phone you can have the spare Programmable Up button feature buttons see 3 on the diagram above programmed up as a Monitor Pick Up button which illuminates and rings if requested To request a Monitor Pick ...

Page 4: ...lect Call History Use the Navigation bar and button to scroll and select 3 Navigate to relevant call using Navigation bar 4 Press the Select button centre of Navigation bar with square on it or press the softkey Call Please note For Missed Calls and Received Calls you must prefix the external call entry you chose to dial by pressing EditDial with a 9 or 7 otherwise the first digit the system will ...

Page 5: ...change Name if you have already set up your voicemail box please enter your pin then press the key 3 Enter your pin and press the key 4 The system will then say You have X new voice message and X new email message Main menu to listen to your voicemail messages say voicemail you just then follow the prompts See the Unified Messaging Guides on the following web link for more detailed instructions ww...

Page 6: ...Do Not Disturb i e stop the phone ringing 1 Press DND Screen will change and display DND is on To Deactivate the Do Not Disturb i e allow the phone to ring 1 Press DND Screen will change and display DND is off briefly before returning to the default screen For the Imperial College Dial 0 Externally 020 7 589 5111 Switchboard All internal calls for the Imperial College switchboard by dialing 0 will...

Reviews: