R E V I E W D R A F T — C I S C O C O N F I D E N T I A L
3-9
Cisco 7500 Series Installation and Configuration Guide
OL-5008-03 B0
Chapter 3 Installing a Cisco 7500 Series Router
Installing the Cisco 7505
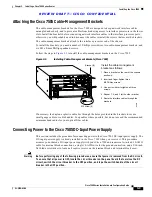
Attaching the Cisco 7505 Cable-Management Brackets
The cable-management brackets for the Cisco 7505 are designed to keep network interface cables
untangled and orderly, and to prevent cables from hindering access to interface processors in the lower
slots. Install the brackets before connecting network interface cables to the interface processor ports;
otherwise, you will probably need to disconnect the cables to install the screws that secure the brackets.
The cable-management brackets attach to the interface processor end of the chassis.
To install the brackets, you need a number 1 Phillips screwdriver, two cable-management brackets, and
six M3 x 8-mm Phillips panhead screws.
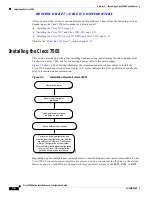
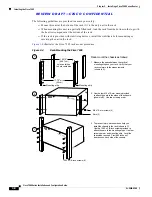
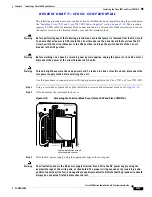
Follow the steps in
Figure 3-5
to install the cable-management brackets on the Cisco 7505.
Figure 3-5
Installing Cable-Management Brackets (Cisco 7505)
If necessary, feed nylon or plastic cable ties through the holes provided in the brackets to secure
small-gauge cables or cable bundles. Loop cables where possible, but do not exceed the recommended
minimum bend radius for your optical-fiber cables.
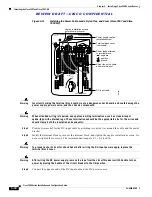
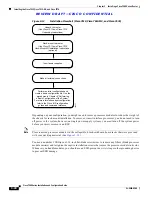
Connecting Power to the Cisco 7505 DC-Input Power Supply
This section includes the procedure for connecting power to the Cisco 7505 DC-input power supply. The
DC-input power supply is already installed in the Cisco 7505 when you receive it. This procedure
assumes you ordered a DC-input power supply with your Cisco 7505 and requires a twin-lead, 10-AWG
cable for terminal block connections, a single 10-AWG wire for the ground connection, and a 3/16-inch
flat-blade screwdriver to loosen all captive screws on the terminal block and terminal block cover.
Warning
Before performing any of the following procedures, ensure that power is removed from the DC circuit.
To ensure that all power is OFF, locate the circuit breaker on the panel board that services the DC
circuit, switch the circuit breaker to the OFF position, and tape the switch handle of the circuit
breaker in the OFF position.
Install the cable management
brackets as follows:
1. Place a bracket on the rear of the chassis,
as shown.
2. Insert and finger-tighten three
M3 Phillips screws.
3. Use a screwdriver to tighten all three
screws.
4. Repeat 1, 2, and 3 for the other bracket.
5. Route the interface cables through the
brackets.
Bracket (2)
M3 screw (6)
H2847
EJ
EC
T
SL
O
T
0
SL
O
T
1
N
O
R
M
AL
C
PU
H
AL
T
R
ES
ET
C
O
N
SO
LE
ROUTE SWITCH PROCESSOR


