7-4
Cisco 7500 Series Installation and Configuration Guide
OL-5008-03 B0
Chapter 7 Maintaining Your Cisco 7513, Cisco 7513-MX, and Cisco 7576 Router
Maintenance Procedures for the Cisco 7513, Cisco 7513-MX, and Cisco 7576
Step 3
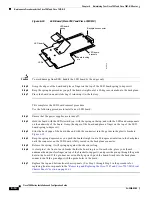
Use a flat-blade screwdriver to loosen the captive screw that secures the power supply to the chassis
frame.
Figure 7-1
Removing a Power Supply (Cisco 7513, Cisco 7513-MX, and Cisco 7576 AC-Input
Power Supplies Shown)
Step 4
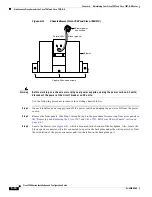
Grasp the power supply handle and pull the power supply about halfway out of the bay (approximately
8 inches [20 cm]); then with your other hand under the power supply, pull it completely out of the bay.
Figure 7-2
Supporting the Power Supply (Cisco 7513, Cisco 7513-MX, and Cisco 7576 AC-Input
Power Supply Shown)
Caution
To maintain agency compliance requirements and meet EMI emissions standards in Cisco 7513, Cisco
7513-MX, and Cisco 7576 chassis with a single power supply, a power supply blank must remain in the
power supply bay adjacent to the power supply. Do not remove this blank from the chassis unless you
do so to install a redundant power supply.
Note
To prevent system problems, do not mix AC-input and DC-input power supplies.
Warning
High current levels on the power supply connections at the rear of the power supply bay are exposed
with the power supply or blank removed. Do not insert anything conductive into the open power
supply bay while power is ON.
H5265
Captive screws
0
I
AC
OK
FAN
OK
OUTPUT
FAIL
0
I
AC
OK
FAN
OK
OUTPUT
FAIL
POWER
B
H5267
0
I
AC
OK
FAN
OK
OUTPUT
FAIL


