background image

c) Use a tape measure and level to verify that the rails are at the same height and horizontal.

Step 4

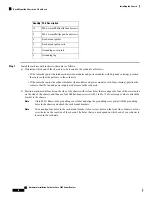
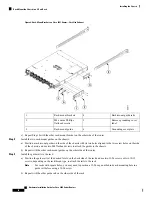
Insert the router into the rack and attach:

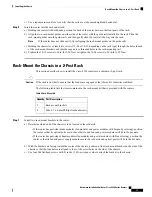
a) Holding the router with both hands, position the back of the router between the front posts of the rack.
b) Align the two rack-mount guides on either side of the router with the guide rails installed in the rack. Slide the

rack-mount guides onto the guide rails, and then gently slide the router all the way into the rack.

If the router does not slide easily, try realigning the rack-mount guides on the guide rails.

Note

c) Holding the chassis level, insert two screws (12-24 or 10-32, depending on the rack type) through the holes in each

of the rack-mount brackets and into the cage nuts or threaded holes in the rack-mounting rail.

d) Tighten the 10-32 screws to 20 in-lb (2.26 N.m) or tighten the 12-24 screws to 30 in-lb (3.39 N.m).

Rack-Mount the Chassis in a 2-Post Rack

This section describes how to install the Cisco 8201 router into a cabinet or 2-post rack.

If the rack is on wheels, ensure that the brakes are engaged or that the rack is otherwise stabilized.

Caution

The following table lists the items contained in the rack-mount kit that is provided with the routers.

Table 3: Rack-Mount Kit

Part Description

Quantity

Rack-mount brackets

2

M4 x 0.7 x 6-mm Phillips flat-head screws

8

Step 1

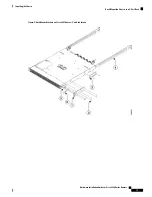
Install two rack-mount brackets to the router:

a) Determine which end of the chassis is to be located in the cold aisle:

• If the router has port-side intake modules (fan modules and power modules with burgundy coloring), position

the router so that its optical ports are in the cold aisle, and fans and power modules will be in the hot aisle.

• If the router has port-side exhaust modules (fan modules and power modules with blue coloring), position the

router so that its fan and power supply modules are in the cold aisle and optical ports will be in the hot aisle.

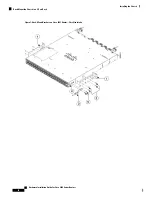
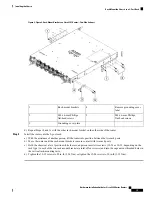
b) With the bracket ears facing toward the center of the chassis, position a front rack-mount bracket on the side of the

chassis so that the four holes are aligned to four of the screw holes on the side of the chassis.

c) Use four M4 flat-head screws with 23 in-lbs (2.6 N-m) torque value to attach the bracket to the chassis.

Hardware Installation Guide for Cisco 8200 Series Routers

17

Installing the Chassis

Rack-Mount the Chassis in a 2-Post Rack

Summary of Contents for 8200 Series

Page 1: ... Guide for Cisco 8200 Series Routers First Published 2020 03 15 Americas Headquarters Cisco Systems Inc 170 West Tasman Drive San Jose CA 95134 1706 USA http www cisco com Tel 408 526 4000 800 553 NETS 6387 Fax 408 527 0883 ...

Page 2: ... 2020 Cisco Systems Inc All rights reserved ...

Page 3: ...tatements for NEBS 5 Installation Guidelines 6 Procure Tools and Equipment 6 Accessory Kit 7 Prepare Your Location 7 Prepare Yourself 8 Prepare Rack for Chassis Installation 9 Clearance Requirements 10 Installing the Chassis 13 C H A P T E R 3 Rack Mount the Chassis 13 Rack Mount the Chassis in a 4 Post Rack 13 Rack Mount the Chassis in a 2 Post Rack 17 Ground the Chassis 20 Connect AC Power to th...
Page 4: ...talling the Transceiver Module 32 Attach the Optical Network Cable 33 Removing the Transceiver Module 34 Connect Interface Ports 34 Connect a Fiber Optic Port to the Network 34 Disconnect Optical Ports from the Network 35 Maintain Transceivers and Optical Cables 35 Verify Chassis Installation 35 Replace Chassis Components 37 C H A P T E R 5 Replace Fan Modules 37 Replace Power Supply 39 LEDs 41 C ...

Page 5: ...ep buffers more flexible packet operations and enhanced programmability The Cisco 8200 series routers presently comprises Cisco 8201 Router It provides 10 8 Tbps of network bandwidth with dramatically lower power consumption than contemporary 10 Tbps systems The Cisco 8201 Router is a fixed port high density one rack unit form factor router Supported ports include 24x 400G QSFP56 DD and 12x 100G Q...

Page 6: ...Hardware Installation Guide for Cisco 8200 Series Routers 2 Cisco 8200 Series Routers Overview Cisco 8200 Series Routers ...

Page 7: ...VE THESE INSTRUCTIONS Warning Safety Guidelines on page 3 Compliance and Safety Information on page 4 Laser Safety on page 4 Energy Hazard on page 4 Preventing Electrostatic Discharge Damage on page 5 Cautions and Regulatory Compliance Statements for NEBS on page 5 Installation Guidelines on page 6 Procure Tools and Equipment on page 6 Prepare Your Location on page 7 Prepare Yourself on page 8 Pre...

Page 8: ... always be made first and disconnected last To prevent personal injury or damage to the chassis never attempt to lift or tilt the chassis using the handles on modules such as power supplies fans or cards these types of handles are not designed to support the weight of the unit Hazardous voltage or energy is present on the backplane when the system is operating Use caution when servicing Compliance...

Page 9: ...gulatory compliance statements and requirements are discussed in this section The intrabuilding port s of the equipment or subassembly must use shielded intrabuilding cabling wiring that is grounded at both ends Statement 7003 Warning The intrabuilding port s of the equipment or subassembly must not be metallically connected to interfaces that connect to the OSP or its wiring These interfaces are ...

Page 10: ...izers before mounting or servicing the chassis in the rack Airflow around the chassis and through the vents is unrestricted Cabling is away from sources of electrical noise such as radios power lines and fluorescent lighting fixtures Make sure that the cabling is safely away from other devices that might damage the cables Each port must match the wave length specifications on each end of the cable...

Page 11: ...n the accessory kit of the routers The rack mount kit present in the accessory kit contains the screws and brackets required for installation Items in Accessory kit 2 Accessory Kit 2 NEBS Items in Accessory Kit 1 Accessory Kit 1 Router NA NA Rack mount kit and ground lug kit 8200 1RU KIT Cisco 8201 Router NA NA Rack mount kit and ground lug kit 8200 2RU KIT Cisco 8202 Router Prepare Your Location ...

Page 12: ...the chassis from the sealed antistatic bag The figures show how to cuff the ESD strap around the wrist and the ground cord that connects the cuff to the ground ESD wrist straps are the primary means of controlling static charge on personnel Hardware Installation Guide for Cisco 8200 Series Routers 8 Prepare for Installation Prepare Yourself ...

Page 13: ... standard The Cisco 8201 router rack mount kit contains the rack mounting brackets for 19 inch rack To install the chassis in a 23 inch rack or an ETSI rack you need adapter plates to accommodate the 19 inch rack mount brackets Note The spacing between the posts of the rack must be EIA 310 D 1992 19 inch rack compatible wide enough to accommodate the width of the chassis Hardware Installation Guid...

Page 14: ... For information on bolting the rack to the floor consult a company that specializes in floor mounting kits such as Hilti see Hilti com for details Make sure that floor mounting bolts are accessible especially if annual retorquing of bolts is required Ensure that the rack in which the chassis is being installed is grounded to earth ground Note Clearance Requirements The chassis requires front to b...

Page 15: ...assis 1 More 6 0 in 15 24 cm rear clearance for removal and installation of power supplies and fan modules 5 6 0 in 15 24 cm front clearance for air intake exhaust 2 20 01 in 50 82 cm Chassis depth 3 Hardware Installation Guide for Cisco 8200 Series Routers 11 Prepare for Installation Clearance Requirements ...

Page 16: ...Hardware Installation Guide for Cisco 8200 Series Routers 12 Prepare for Installation Clearance Requirements ...

Page 17: ...unting the chassis in a 2 post rack When the Cisco 8200 Series Routers use port side exhaust fans and power supplies the maximum temperature is reduced by 5 degrees C for example 35 degrees C at sea level or 30 degrees C at 1500 meters Note Rack Mount the Chassis in a 4 Post Rack This section describes how to install the router in a 4 post rack If the rack is on wheels ensure that the brakes are e...

Page 18: ...er supply modules are in the cold aisle b Position a rack mount bracket on the side of the chassis with its four holes that are aligned to four of the screw holes on the side of the chassis and then use four M4 flat head screws with 23 in lbs 2 6 N m torque value to attach the bracket to the chassis Only 8201 Remove the grounding cover label and align the grounding cover plate with the grounding h...

Page 19: ...Figure 5 Rack Mount Brackets on Cisco 8201 Router Port Side Intake Hardware Installation Guide for Cisco 8200 Series Routers 15 Installing the Chassis Rack Mount the Chassis in a 4 Post Rack ...

Page 20: ...d use two M4 flat head screws to attach the guides to the chassis b Repeat with the other rack mount guides on the other side of the router Step 3 Install the guide rails to the rack a Position the guide rails at the desired levels on the back side of the rack and use two 12 24 screws or two 10 32 screws depending on the rack thread type to attach the rails to the rack For racks with square holes ...

Page 21: ...t the rack is otherwise stabilized Caution The following table lists the items contained in the rack mount kit that is provided with the routers Table 3 Rack Mount Kit Part Description Quantity Rack mount brackets 2 M4 x 0 7 x 6 mm Phillips flat head screws 8 Step 1 Install two rack mount brackets to the router a Determine which end of the chassis is to be located in the cold aisle If the router h...

Page 22: ...Figure 7 Rack Mount Brackets on Cisco 8201 Router Port Side Intake Hardware Installation Guide for Cisco 8200 Series Routers 18 Installing the Chassis Rack Mount the Chassis in a 2 Post Rack ...

Page 23: ...e router into position between the two rack posts b Move the router until the rack mount brackets come in contact with two rack posts c Hold the chassis at a level position while the second person inserts two screws 12 24 or 10 32 depending on the rack type in each of the two rack mount brackets a total of four screws and into the cage nuts or threaded holes in the vertical rack mounting rails d T...

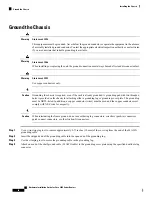
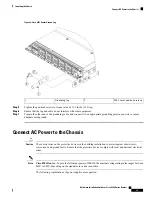
Page 24: ...ounding cover plate The ground lug must be NRTL listed In addition a copper conductor wires must be used and the copper conductor must comply with NEC code for ampacity Caution When terminating the frame ground do not use soldering lug connectors screwless push in connectors quick connect connectors or other friction fit connectors Caution Step 1 Use a wire stripping tool to remove approximately 0...

Page 25: ...er to the Chassis The chassis relies on the protective devices in the building installation to protect against short circuit overcurrent and ground faults Ensure that the protective devices comply with local and national electrical codes Caution Cisco 8201 Router To provide full output power of 2000 W the nominal voltage rating value ranges between 200V to 240V depending on the standards in variou...

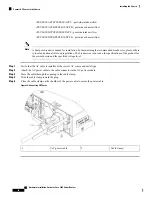
Page 26: ...product for the current drawn and the specified voltage level Note Step 1 Verify that the AC cable is installed in the correct AC source and outlet type Step 2 Attach the AC power cable to the cable connector in the AC power module Step 3 Place the cable through the opening in the cable clamp Step 4 Slide the cable clamp toward the plug Step 5 Close the cable clamp on the shoulder of the power cab...

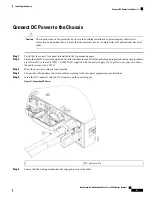
Page 27: ...oper lockout tag out procedures are followed Use the cable PID 72 100992 02 supplied with the power supply If you prefer to use your own cable the cable size must be 6 AWG Step 3 Dress the power according to local practice Step 4 Connect the office battery and return cables according to the fuse panel engineering specifications Step 5 Insert the DC connector into the DC receptacle on the power sup...

Page 28: ...Step 7 Turn on the circuit breaker at the power source Hardware Installation Guide for Cisco 8200 Series Routers 24 Installing the Chassis Connect DC Power to the Chassis ...

Page 29: ...rom the transceiver To maximize the effectiveness and life of your transceivers and optical cables ensure the following Wear an ESD preventative wrist strap that is connected to an earth ground whenever you handle transceivers Do not remove and insert a transceiver more often than is necessary Repeated removals and insertions can shorten its useful life Keep the transceivers and fiber optic cables...

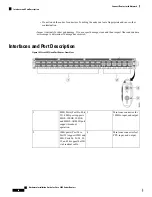
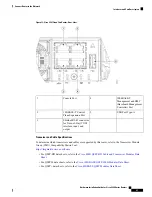
Page 30: ... 12 Cisco 8201 Fixed Port Router Front View Mini coax connector for 10MHz input and output 3 400G Ports Port 0 to Port 23 400G port supports 40GE 100GE 200GE and 400GE All 400G port support breakout operation 1 Mini coax connector for 1 PPS input and output 4 100G ports Port 24 to Port 35 support 100G and 40G Ports 24 26 28 30 32 and 34 support 4x10G via breakout cable 2 Hardware Installation Guid...

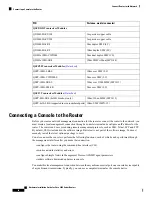
Page 31: ...transceivers and cables are supported by this router refer to the Transceiver Module Group TMG Compatibility Matrix Tool https tmgmatrix cisco com home For QSFP DD data sheets refer to the Cisco 400G QSFP DD Cable and Transceiver Modules Data Sheet For QSFP28 data sheets refer to the Cisco 100GBASE QSFP 100G Modules Data Sheet For QSFP data sheets refer to the Cisco 40GBASE QSFP Modules Data Sheet...

Page 32: ...nsole terminal and configure an IP address for the router The router can be accessed using remote management protocols such as SSH Telnet SCP and FTP By default SSH is included in the software image But telnet is not part of the software image You must manually install the telnet optional package to use it You also can use the console to perform the following functions each of which can be perform...

Page 33: ... kit Step 3 Route the RJ45 rollover cable as appropriate and connect the cable to the console port on the chassis If the console or modem cannot use an RJ45 connection use the DB9F RJ45F PC terminal adapter Alternatively you can use an RJ45 DSUB F F or RJ45 DSUB R P adapter but you must provide those adapters What to do next You are ready to create the initial router configuration Create the Initi...

Page 34: ...name Administrative User Dialog Enter root system username Entry must not be null Enter root system username cisco Enter secret Use the configure command to modify this configuration User Access Verification Username cisco Password RP 0 RP0 CPU0 ios Step 3 Enter a new password to use for this router The software checks the security strength of your password and rejects your password if it is not c...

Page 35: ...e management port MGMT ETH provides out of band management which lets you to use the command line interface CLI to manage the router by its IP address This port uses a 100 1000 Ethernet connection with an RJ 45 interface To prevent an IP address conflict do not connect the MGMT 100 1000 Ethernet port until the initial configuration is complete Caution Before you begin You must have completed the i...

Page 36: ...0 Gigabit QSFP optical transceiver Figure 14 400 Gigabit QSFP DD Transceiver Module Required Tools and Equipment You need these tools to install the transceiver modules Wrist strap or other personal grounding device to prevent ESD occurrences Antistatic mat or antistatic foam to set the transceiver on Fiber optic end face cleaning tools and inspection equipment Installing the Transceiver Module Th...

Page 37: ...onnection Inspect and clean the MPO connector end faces just before you make any connections Grasp the MPO connector only by the housing to plug or unplug a fiber optic cable The transceiver modules and fiber connectors are keyed to prevent incorrect insertion Note The multiple fiber push on MPO connectors on the optical transceivers support network interface cables with either physical contact PC...

Page 38: ...ct Interface Ports You can connect optical interface ports with other devices for network connectivity Connect a Fiber Optic Port to the Network 40G 100G 2x100G or 400G transceivers are supported on Cisco 8200 series routers Some transceivers work with fiber optic cables that you attach to the transceivers and other transceivers work with pre attached copper cables You must install a transceiver i...

Page 39: ...n After installing the chassis use the following show commands to verify the installation and configuration in the EXEC mode If you detect any issues take corrective action before making further configurations Description Command Displays the operational status of the node show platform Displays information about the field replaceable units FRUs including product IDs serial numbers and version IDs...

Page 40: ...y running the show alarms command Users can use the show alarms brief system active command to verify active alarms in the system Critical temperature threshold When a critical threshold is exceeded a critical alarm occurs and the following actions occur displays system messages sends SNMP notifications if configured logs environmental alarm event that can be reviewed by running the show alarms co...

Page 41: ...tem Please keep the replacement fan modules ready prior to attempting this task The routers support FAN 1RU PI port side intake airflow and FAN 1RU PE port side exhaust airflow fan modules Note The airflow direction must be the same for all power supply and fan modules in the chassis Note Step 1 To remove a fan module follow these steps a Press two latches on the fan module and grasp the handle of...

Page 42: ... a fan module follow these steps a Hold the fan module with the LED at the top b Align the fan module to the open fan tray slot in the chassis and press the module all the way into the slot until the left and right latches click and are locked on the chassis Hardware Installation Guide for Cisco 8200 Series Routers 38 Replace Chassis Components Replace Fan Modules ...

Page 43: ...curs contact your customer service representative for replacement parts Replace Power Supply Use this procedure to replace the AC or DC power supply units Be sure to power down the fixed configuration PDU power distribution unit before removing it from the chassis Step 1 If the power supply is connected to a AC or DC circuit shut off the circuit at the circuit breaker Step 2 Disconnect the PSU cab...

Page 44: ...Figure 17 Cisco 8201 Router Remove Power Supply Power supply 1 Hardware Installation Guide for Cisco 8200 Series Routers 40 Replace Chassis Components Replace Power Supply ...

Page 45: ...Port Status LEDs on page 44 Chassis LEDs Attention Status Synchronization and GPS LEDs are located both at the far left of the front of the chassis and also on the back of the chassis Figure 18 Chassis LEDs Front View of Cisco 8201 Chassis Hardware Installation Guide for Cisco 8200 Series Routers 41 ...

Page 46: ...is operational and has no active major or critical alarms Green Status The auto or manual FPD upgrade is in progress Flashing Green The module is in one of the following states Power cycle Reload or reimage Shutdown Amber The module has minor alarm Flashing Amber Power up failure which prevents the CPU from booting Red The module has active major or critical alarms Flashing Red The module is power...

Page 47: ...ng correctly Green GPS The GPS interface is not provisioned or the GPS inputs are not working correctly Off Fan Tray LED Fan tray modules are located on the back of the chassis Each fan tray module has a Status LED Figure 20 Fan Tray LED Cisco 8201 Chassis Status Color LED Fan is operating normally Green STATUS Fan tray is inserted and pending to come online Amber Fan has failed Flashing Amber The...

Page 48: ...transmitting power to the router Flashing Green Power supply failure due to one of the following conditions Over voltage Over current Over Temperature Fan failure Amber Power supply is operating but a warning condition has occurred due to one of the following conditions High temperature High power Slow fan Flashing Amber Power supply units are not receiving power Off Port Status LEDs Each port has...

Page 49: ...le 6 Port Status LEDs one per port Description LED Color Port is administratively shut down Off Port is administratively enabled and the link is down Amber Port is administratively enabled and the link is up Green Hardware Installation Guide for Cisco 8200 Series Routers 45 LEDs Port Status LEDs ...

Page 50: ...Hardware Installation Guide for Cisco 8200 Series Routers 46 LEDs Port Status LEDs ...

Reviews: