background image

3-14 

Operation 

4038501 Rev C 

Setting Up Transponders


HMS Transponder 

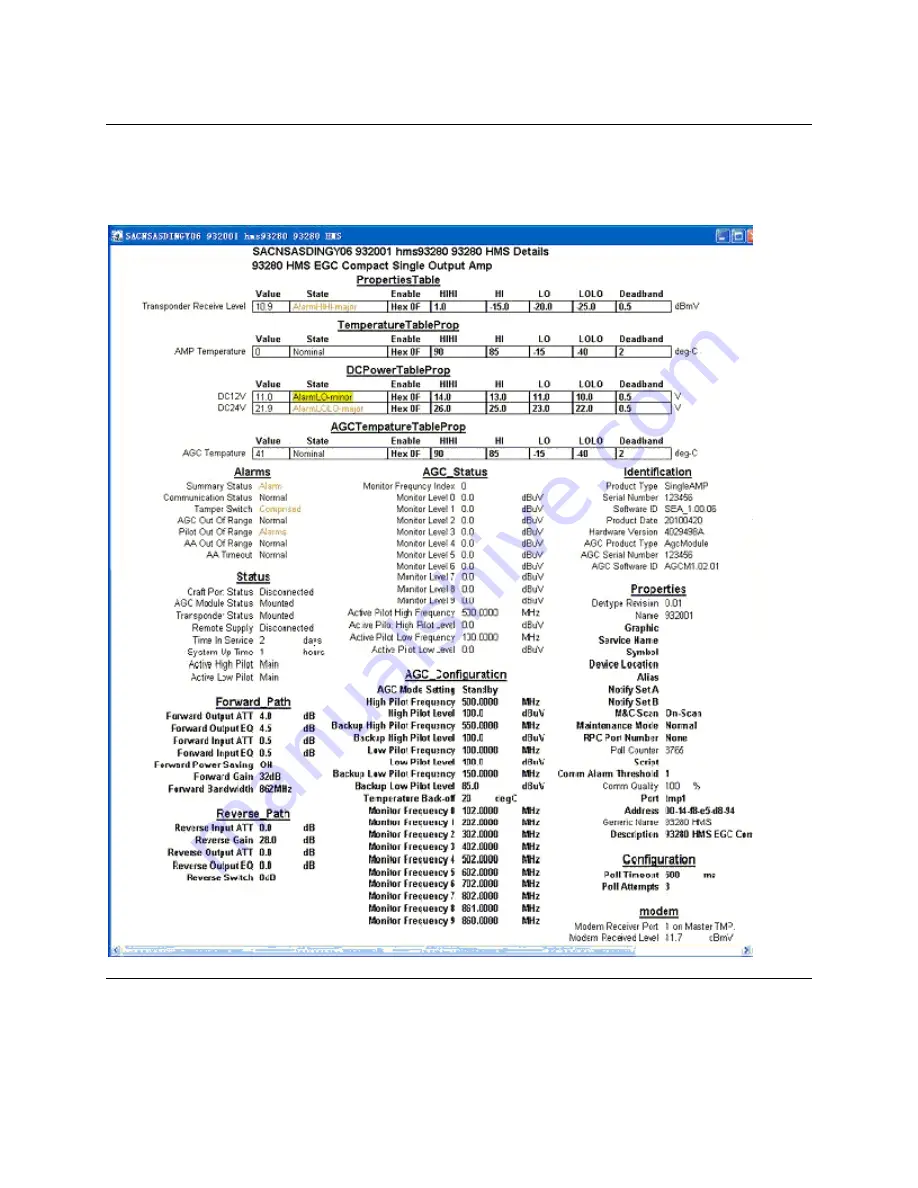
Use an HMS transponder to set up the parameters that are highlighted in the 
following illustration. 


Continued on next page 

Summary of Contents for A93280

Page 1: ...Compact Single Output EGC Amplifier A93280 Installation and Operation Guide ...

Page 2: ...f the flash points to the terminal device You may find this symbol affixed to the product This symbol indicates a protective ground terminal You may find this symbol affixed to the product This symbol indicates a chassis terminal normally used for equipotential bonding You may find this symbol affixed to the product This symbol warns of a potentially hot surface You may find this symbol affixed to...

Page 3: ...tion We reserve the right to change this publication at any time without notice This document is not to be construed as conferring by implication estoppel or otherwise any license or right under any copyright or patent whether or not the use of any information in this document employs an invention claimed in any existing or later issued patent Copyright 2011 Cisco and or its affiliates All rights ...

Page 4: ...nting the Amplifier 2 4 Chapter 3 Operation Overview 3 1 Starting Up the Amplifier 3 2 Setting Up the Amplifier with a Computer 3 3 Setting Up the Amplifier with a Handheld Terminal 3 8 ROSA Element Management System 3 13 Setting Up Transponders 3 14 Starting Up the Amplifier with the AGC Module 3 16 Setting Up the AGC Module 3 17 Functions of the AGC Module 3 18 Temperature Back off 3 20 Chapter ...

Page 5: ...ymous This document uses ground ing for clarity but it can be interpreted as having the same meaning as earth ing Electric Shock Hazard This equipment meets applicable safety standards WARNING To reduce risk of electric shock perform only the instructions that are included in the operating instructions Refer all servicing to qualified service personnel only Electric shock can cause personal injury...

Page 6: ...n Do not install near any heat sources such as radiators heat registers stoves or other equipment including amplifiers that produce heat Place this equipment close enough to a mains AC outlet to accommodate the length of this equipment s power cord Route all power cords so that people cannot walk on place objects on or lean objects against them This may pinch or damage the power cords Pay particul...

Page 7: ...ack should be such that the amount of airflow required for safe operation of this equipment is not compromised Elevated Operating Ambient Temperature Only install this equipment in a humidity and temperature controlled environment that meets the requirements given in this equipment s technical specifications CAUTION If installed in a closed or multi unit rack assembly the operating ambient tempera...

Page 8: ...ains 2 terminal outlet in which one socket is wider than the other Note If this plug cannot be fully inserted into the outlet try reversing the plug If the plug still fails to fit contact an electrician to replace the obsolete 2 terminal outlet Grounding Terminal If this equipment is equipped with an external grounding terminal attach one end of an 18 gauge wire or larger to the grounding terminal...

Page 9: ...sed for long periods of time Connection to 48 V DC 60 V DC Power Sources If this equipment is DC powered refer to the specific installation instructions in this manual or in companion manuals in this series for information on connecting this equipment to nominal 48 V DC 60 V DC power sources Circuit Overload Know the effects of circuit overloading before connecting this equipment to the power supp...

Page 10: ...tatic discharge can degrade components and cause failures Take the following precautions against electrostatic discharge Use an anti static bench mat and a wrist strap or ankle strap designed to safely ground ESD potentials through a resistive element Keep components in their anti static packaging until installed Avoid touching electronic components when installing a module Fuse Replacement To rep...

Page 11: ...les should be of single braided shielded type and have conductive connector bodies and backshells with cable clamps that are conductively bonded to the backshell and capable of making 360 connection to the cable shielding Exceptions from this general rule will be clearly stated in the connector description for the excepted connector in question Ethernet cables should be of single shielded or doubl...

Page 12: ...ply with applicable safety laser safety and EMC regulations codes and standards to ensure safe operation in its intended environment Do not make modifications to this equipment Any changes or modifications could void the user s authority to operate this equipment Modifications have the potential to degrade the level of protection built into this equipment putting people and property at risk of inj...

Page 13: ... WARNING Allow only qualified and skilled personnel to install operate maintain and service this equipment Otherwise personal injury or equipment damage may occur Who Should Read This Guide This guide is intended for personnel who are responsible for installing setting up monitoring and maintaining this product In This Guide This guide is divided into the following chapters Topic See Page Chapter ...

Page 14: ...Information Overview Introduction This chapter describes general information about the amplifier In This Chapter This chapter contains the following topics Topic See Page Overview Diagram 1 2 Power Supply 1 3 Plug in Modules 1 5 Power Saving Modes 1 6 ...

Page 15: ...1 2 Introduction 4038501 Rev C Overview Diagram Overview Diagram The following illustration is the block diagram of the amplifier ...

Page 16: ...wer supply for mains supply the correct voltage is labeled on the side of the amplifier The amplifier has factory mounted mains cable and plugs which according to approval provisions may not be altered The power unit is double insulated and supplies only this single amplifier Rating labels for 100 240 VAC power supply Continued on next page ...

Page 17: ...ifier The amplifier can be supplied with 24 65 VAC via coaxial cables max 7A or directly to the AC input max 15A Rating label for 24 65 VAC power supply CAUTION Permanently exceeding the maximum remote current draw may result in damage to the amplifier Fuses Fuse 5 AT for 100 240 VAC 560852 Fuse 6 3 AT for 24 65 VAC 1006647 Fuse 10A for input output port 4018230 Note All fuses must be replaced by ...

Page 18: ...nput Output 42 54 MHz 4008154 4008155 65 87 MHz 589690 589691 AGC Module optional AGC module 4031283 can be installed to monitor and control the output level of the amplifier The AGC module also provides downstream Auto Alignment and has three LEDs to indicate its status For more information about installing the AGC module see Compact Automatic Gain Control Module for Compact EGC Amplifier Mountin...

Page 19: ...ving mode the power consumption will be reduced by approximately 2 W Low Gain Mode In addition when the forward gain of the amplifier is lower than 32 dB the amplifier will be set to the low gain mode with an additional 3 W of power consumption reduced See the following table for power reductions of two power saving modes Conditions Power reduction W Power Saving On 2 Low Gain Mode 3 ...

Page 20: ...ed and skilled personnel should attempt to install operate maintain and service this equipment WARNING Allow only qualified and skilled personnel to install operate maintain and service this equipment Otherwise personnel injury or equipment damage may occur In This Chapter This chapter contains the following topics Topic See Page Tools and Accessories 2 2 Site Requirements 2 3 Mounting the Amplifi...

Page 21: ...flat tip screwdriver Clamp the inner conductor and PE conductor M5 screws Mount the amplifier Ø 1 0 mm grounding wire Connect Protective Earth PE to the PE terminal Torque Specifications The following table provides the torque specifications Fastener Torque Specification Screw on the lid Tighten from 6 5 Nm to 7 Nm 58 in lb to 62 in lb RF input output port connector Tighten from 5 Nm to 6 Nm 44 in...

Page 22: ... this equipment WARNING Allow only qualified and skilled personnel to install operate maintain and service this equipment Otherwise personal injury or equipment damage may occur Operating Temperature Requirements The external operating temperature range is 40 to 55 C 40 to 131 F Before you install make sure the environment is within the range specified WARNING Avoid damage to the amplifier Operati...

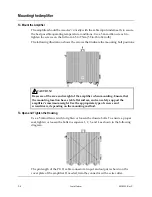
Page 23: ...f the size and weight of the amplifier when mounting Ensure that the mounting location has a stable flat surface and can safely support the amplifier s maximum weight Use the appropriate type of screws and screwdrivers depending on the mounting method To Open and Tighten the Housing Use a 5 mm Allen wrench to tighten or loosen the closure bolts To ensure a proper seal tighten or loosen the bolts i...

Page 24: ...authorized personnel are not allowed in the site area otherwise physical injury or equipment damage may occur In This Chapter This chapter contains the following topics Topic See Page Starting Up the Amplifier 3 2 Setting Up the Amplifier with a Computer 3 3 Setting Up the Amplifier with a Handheld Terminal 3 8 ROSA Element Management System 3 13 Setting Up Transponders 3 14 Starting Up the Amplif...

Page 25: ... Up the Amplifier When the amplifier is powered up the green LED on the power supply board illuminates to indicate that the power is on as illustrated below In case the LED is flashing a short circuit may have occurred in the power supply ...

Page 26: ... To set up the amplifier via the LCI software you must connect the amplifier either to a USB port with an LCI USB cable or to a serial port Follow the steps below to set up the amplifier 1 Start the LCI software Result An LCI Detect Configuration window appears Note If you use a serial port on the computer type the desired serial port name into the COM Port box such as COM1 2 Click Node Products a...

Page 27: ...plays all settings of the amplifier as illustrated below Note AGC_Status and AGC_Configuration categories are only available when the AGC module is mounted Otherwise this column is blank 5 Double click the parameter you want to set up in the configuration window Result A dialog box appears Continued on next page ...

Page 28: ... Computer Continued 6 Either type a value in the text box select the desired option button or select the desired value in the dialog box as illustrated below 7 Click Execute to validate the change Result The change is effective right away Continued on next page ...

Page 29: ...tegory Adjustable Item Notes Forward Path Forward Gain 32 or 40 dB Forward Output ATT 0 to 8 dB Forward Output EQ 0 to 14 dB Forward Input ATT 0 to 18 dB Forward Input EQ 0 to 18 dB Forward Power Saving Off or On Forward Bandwidth 862 MHz or 1 GHz Reverse Path Reverse Input ATT 0 to 20 dB Reverse Interstage ATT 0 to 8 dB Reverse Output ATT 0 to 18 dB Reverse Output EQ 0 to 15 dB Reverse Switch 0 d...

Page 30: ...igh Pilot Level 85 to 120 dB V Low Pilot Frequency 47 to 1002 MHz Low Pilot Level 85 to 120 dB V Backup Low Pilot Frequency 47 to 1002 MHz Backup Low Pilot Level 85 to 120 dB V Temperature Back Off 20 10 0 10 20 30 40 50 60 or AUTO degC Monitor Frequency 0 47 to 1002 MHz Monitor Frequency 1 47 to 1002 MHz Monitor Frequency 2 47 to 1002 MHz Monitor Frequency 3 47 to 1002 MHz Monitor Frequency 4 47 ...

Page 31: ...mation see Operation Instructions Handheld Programming Terminal type 91200 part number A541365 Shortcuts The menu item numbers can be used as shortcuts To enter a menu press the item number For example if you want to enter the submenu Reverse Mode press number keys 3 and 1 continuously This key sequence displays the Reverse Mode menu See Menu Structures and Operations on page 3 8 to determine the ...

Page 32: ...ead only Mounted or Not Mounted 132 AGC Module Read only Mounted or Not Mounted 14 Power Supply 141 Remote Supply Read only 142 24 VDC Read only 143 12 VDC Read only 15 Temperature Read only 1 C step 2 Forward Submenu1 Submenu2 Actions 21 Fwd Input Att Read write Set Fwd input attenuation 0 18 dB Unit in 0 1 dB 0 5 dB step 22 Fwd Input EQ Read write Set Fwd input EQ 0 18 dB unit in 0 1 dB 0 5 dB s...

Page 33: ... nothing Copy the parameters from one product and store those parameters into a handheld EEPROM Parameters for both AGC module and Amplifier Select AMP AMP AGC or Not Exist Abort or Execute 412 Setting 2 413 Setting 3 414 Setting 4 415 Setting 5 416 Setting 6 417 Setting 7 418 Setting 8 419 Setting 9 42 To Product 421 Setting 1 Select and copy a setting to product If no valid setting exists you ca...

Page 34: ...are version of amplifier 6 TP Module Submenu1 Submenu2 Actions 61 TP SW ID Read only only when using HMS 62 MAC ADDR Read only 63 IP ADDR Read write only when using HMS Set IP address 64 MASTER RESET Read write Select Abort or Reset 65 FREQ 651 STATUS Read only 652 FREQ SCAN Read write only when using HMS Select Disable or Enable 653 BAUDRATE Read write only when using SMC Select 9600 19200 38400 ...

Page 35: ...ency 47 1002 MHz Unit in 0 0001 MHz 726 BkPilotLo Level Read write Backup Pilot Low Level 85 120 dB V Unit in 0 1 dB V 73 Temp Backoff Read write 20 deg C 10 deg C 0 deg C 10 deg C 20 deg C 30 deg C 40 deg C 50 deg C 60 deg C or AUTO 74 Function Read write AA AGC FixGain Standby AA AGC FixGain or Standby In case of alarms flashing an exclamatory mark in AA AGC FGain Standby 75 Alarm Read only Norm...

Page 36: ...erview Diagram on page 1 2 The level measured by the transponder will be attenuated by approximately 40 dB relative to the output signal at output The transponder transmitter level is adjusted to the same level as the other reverse signals The level from the transponder will be attenuated by approximately 30 dB when injected at the reverse path Use a handheld terminal which contains the necessary ...

Page 37: ...3 14 Operation 4038501 Rev C Setting Up Transponders HMS Transponder Use an HMS transponder to set up the parameters that are highlighted in the following illustration Continued on next page ...

Page 38: ...ION The SMC transponder can only be recognized by the amplifier when it is set to IEP mode To change the mode connect a handheld part number A91200 11 to the LCI interface of the transponder For detailed information see Compact Transponder 91051 Mounting Instructions part number 744610 The USB LCI interface part number A91220 10 can t be used on the LCI port of the SMC transponder ...

Page 39: ...tomatically to 4 dB after the AGC module is plugged in On the other hand if such values are not less than 4 dB they will be kept These values are shown on the handheld display or in the ROSA Element Management system Description of LED Indications The following table lists LED status and description LED Status Description Red Warning out of AGC range Red fast flashing Warning auto alignment is out...

Page 40: ...e status of the AGC module 2 Press to navigate to menu 7 AGC Module and press to open the submenu Go to 71 Pilot Settings in the submenu by pressing again 3 Press to enter the submenu 711 Pilot Hi Freq and press to change the value of pilot high frequency The menu title 711 Pilot Hi Freq will be flashing when the value can be changed Use the number keys to enter the desired value and press E N T E...

Page 41: ...dicators Meanwhile the current input attenuator and equalizer values remain and the AGC module goes into Standby mode No input attenuator equalizer can be adjusted In this case an alarm is activated either shown on the LED indicators the handheld or in the ROSA Element Management system See page 3 16 for the descriptions of LED indicators Meanwhile the current input equalizer value remains but the...

Page 42: ...out the values of the output attenuator and equalizer are set back to those in effect before the AGC function is performed The AGC module stays in AGC mode monitoring the pilot levels and the 10 selected frequencies in a cycle the same as in Standby mode However the amplifier doesn t adjust the output attenuator and equalizer until the level of any of the 4 pilots goes back to its detected level r...

Page 43: ...e the temperature back off feature set up the desired value in submenu 731 Cable Temp as per instructions on page 3 17 There are two ways to determine the temperature compensation needed 1 When the amplifier s ambient temperature is very different from the network temperature the user should enter the estimated network temperature manually by selecting from the available values in the submenu incl...

Page 44: ...tions about this product contact your distributor or sales agent for product information or refer to product data sheets on www cisco com you have technical questions about this product call the nearest Technical Service center you have customer service questions about this product call the nearest Customer Service center In This Chapter This chapter contains the following topics Topic See Page Su...

Page 45: ...e elc cisco com Japan Japan Telephone 81 3 5908 2153 or 81 3 5908 2154 Fax 81 3 5908 2155 Korea Korea Telephone 82 2 3429 8800 Fax 82 2 3452 9748 E mail songk cisco com China mainland China Telephone 86 21 2401 4433 Fax 86 21 2401 4455 E mail repaircentercn external cisco com All other Asia Pacific countries Australia Hong Kong Telephone 852 2588 4746 Fax 852 2588 3139 E mail support apr sciatl co...

Page 46: ... includes various trademarks of Cisco Systems Inc Please see the Notices section of this document for a list of the Cisco Systems Inc trademarks used in this document Product and service availability are subject to change without notice 2011 Cisco and or its affiliates All rights reserved February 2011 Part Number 4038501 Rev C ...

Reviews: