2-11
Cisco Aironet 1400 Series Wireless Bridges Software Configuration Guide
OL-4059-01
Chapter 2 Configuring the Bridge for the First Time
Assigning an IP Address Using the CLI
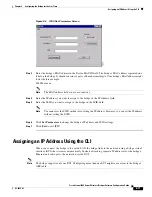
Figure 2-4
IPSU Set Parameters Screen
Step 3
Enter the bridge’s MAC address in the Device MAC ID field. The bridge’s MAC address is printed on a
label on the bridge. It should contain six pairs of hexadecimal digits. Your bridge’s MAC address might
look like this example:
004096xxxxxx
Note
The MAC address field is not case-sensitive.
Step 4
Enter the IP address you want to assign to the bridge in the IP Address field.
Step 5
Enter the SSID you want to assign to the bridge in the SSID field.
Note
You cannot set the SSID without also setting the IP address. However, you can set the IP address
without setting the SSID.
Step 6
Click
Set Parameters
to change the bridge’s IP address and SSID settings.
Step 7
Click
Exit
to exit IPSU.
Assigning an IP Address Using the CLI
When you connect the bridge to the wired LAN, the bridge links to the network using a bridge virtual
interface (BVI) that it creates automatically. Instead of tracking separate IP addresses for the bridge’s
Ethernet and radio ports, the network uses the BVI.
Note
The bridge supports only one BVI. Configuring more than one BVI might cause errors in the bridge’s
ARP table.


