Basic Configuration 3-9
Verify
Verify
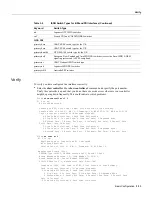
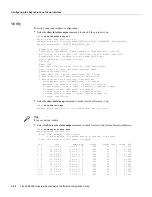
To verify you have configured the interfaces correctly:
•
Specify one of the new serial interfaces with the show interfaces serial port command and verify
that the first line of the display specifies the interface with the correct slot number. Also verify
that the interface and line protocol are in the correct state: up or down.
5300# show interfaces serial 0
Serial0 is up, line protocol is up
Hardware is 4T
Internet address is 120.0.0.1/8
MTU 1500 bytes, BW 1544 Kbit, DLY 20000 usec,
reliablility 255/255, txload 1/255, rxload 1/255
Encapsulation HDLC, crc 16, loopback not set, keepalive set (10 sec)
Last input 00:00:08, output 00:00:04, output hang never
Last clearing of "show interface" counters never
Queueing strategy:fifo
Output queue 0/40, 0 drops; input queue 0/75, 0 drops
5 minute input rate 0 bits/sec, 0 packets/sec
5 minute output rate 0 bits/sec, 0 packets/sec
392 packets input, 33312 bytes, 0 no buffer
Received 392 broadcasts, 0 runts, 0 giants, 0 throttles
0 input errors, 0 CRC, 0 frame, 0 overrun, 0 ignored, 0 abort
358 packets output, 25157 bytes, 0 underruns
0 output errors, 0 collisions, 1 interface resets
0 output buffer failures, 0 output buffers swapped out
0 carrier transitions DCD=up DSR=up DTR=up RTS=up CTS=up
•
Display the entire system configuration file with the show configuration command. Verify that
the configuration is accurate for the system and each interface.
•
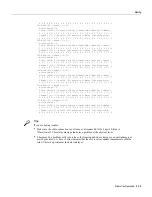
Enter the show controller t1 [0-7] clock or show controller e1 [0-7] clock command to display
the history of primary clock changes, the events that caused the change, and the controller
currently selected as the primary clock source:
5300# show controllers e1 0 clock
Clock selected: Controller E1 0
CLOCK CHANGE HISTORY
----- ------ -------
CLOCK Event Time
----- ----- ----
Freerun Firmware Initialization 02:09:10 PDT8 Sat Apr 5 2003
E1 0 Clock Select Algorithm Initialization 02:09:13 PDT8 Sat Apr 5 2003
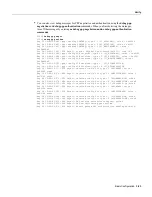
Tips
If you are having trouble:
•
Make sure the network interface is properly connected and terminated.
Summary of Contents for AS5300 - Universal Access Server
Page 4: ......
Page 10: ...x Book Title ...
Page 34: ...Where to Go Next Cisco AS5300 Universal Access Server Software Configuration Guide 2 6 ...
Page 160: ...Cisco AS5300 Universal Access Server Software Configuration Guide ROM Monitor Commands B 8 ...
Page 184: ...Cisco AS5300 Universal Access Server Software Configuration Guide Where to Go Next C 24 ...
Page 192: ...Cisco AS5300 Universal Access Server Software Configuration Guide New Hardware Features D 8 ...


