background image

Chapter 7      Scenario: Remote-Access VPN Configuration

  Implementing the IPsec Remote-Access VPN Scenario

7-2

Cisco ASA 5550 Getting Started Guide

78-17644-01

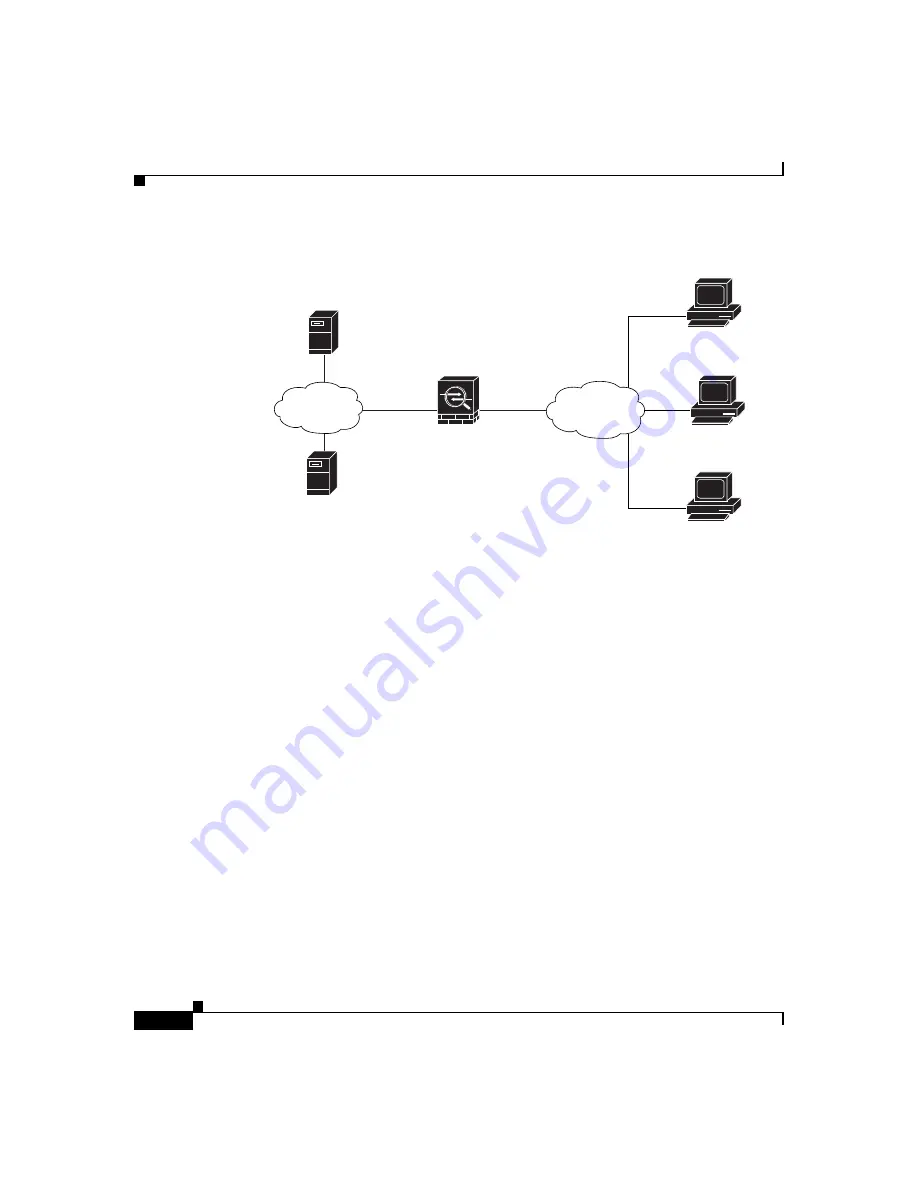
Figure 7-1

Network Layout for Remote Access VPN Scenario

Implementing the IPsec Remote-Access VPN 
Scenario 

This section describes how to configure the adaptive security appliance to accept 
IPsec VPN connections from remote clients and devices. If you are implementing 
an Easy VPN solution, this section describes how to configure an Easy VPN 
server (also known as a headend device). 

Values for example configuration settings are taken from the remote-access 
scenario illustrated in 

Figure 7-1

This section includes the following topics: 

Information to Have Available, page 7-3

Starting ASDM, page 7-4

Configuring the ASA 5550 for an IPsec Remote-Access VPN, page 7-5

Selecting VPN Client Types, page 7-6

132209

Inside

10.10.10.0

VPN client

(user 1)

VPN client

(user 3)

Outside

Security

Appliance

DNS Server

10.10.10.163

WINS Server
10.10.10.133

VPN client

(user 2)

Internet

Internal

network

Summary of Contents for ASA 5550 Series

Page 1: ...Systems Inc 170 West Tasman Drive San Jose CA 95134 1706 USA http www cisco com Tel 408 526 4000 800 553 NETS 6387 Fax 408 526 4100 Cisco ASA 5550 Getting Started Guide Customer Order Number DOC 7817644 Text Part Number 78 17644 01 ...

Page 2: ... LIABLE FOR ANY INDIRECT SPECIAL CONSEQUENTIAL OR INCIDENTAL DAMAGES INCLUDING WITHOUT LIMITATION LOST PROFITS OR LOSS OR DAMAGE TO DATA ARISING OUT OF THE USE OR INABILITY TO USE THIS MANUAL EVEN IF CISCO OR ITS SUPPLIERS HAVE BEEN ADVISED OF THE POSSIBILITY OF SUCH DAMAGES CCSP CCVP the Cisco Square Bridge logo Follow Me Browsing and StackWise are trademarks of Cisco Systems Inc Changing the Way...

Page 3: ...ext 2 5 C H A P T E R 3 Installing the Cisco ASA 5550 Security Appliance 3 1 Verifying the Package Contents 3 2 Installing the Chassis 3 3 Rack Mounting the Chassis 3 4 Installing SFP Modules 3 5 SFP Module 3 6 Installing an SFP Module 3 7 Ports and LEDs 3 9 Front Panel LEDs 3 9 Rear Panel LEDs and Ports in Slot 0 3 10 Ports and LEDs in Slot 1 3 12 What to Do Next 3 13 C H A P T E R 4 Connecting C...

Page 4: ...a DMZ Deployment 6 4 Configuration Requirements 6 5 Starting ASDM 6 6 Creating IP Pools for Network Address Translation 6 7 Configuring NAT for Inside Clients to Communicate with the DMZ Web Server 6 12 Configuring NAT for Inside Clients to Communicate with Devices on the Internet 6 15 Configuring an External Identity for the DMZ Web Server 6 16 Providing Public HTTP Access to the DMZ Web Server 6...

Page 5: ...iguration 7 17 What to Do Next 7 18 C H A P T E R 8 Scenario Site to Site VPN Configuration 8 1 Example Site to Site VPN Network Topology 8 1 Implementing the Site to Site Scenario 8 2 Information to Have Available 8 2 Configuring the Site to Site VPN 8 3 Starting ASDM 8 3 Configuring the Security Appliance at the Local Site 8 4 Providing Information About the Remote VPN Peer 8 6 Configuring the I...

Page 6: ...Contents vi Cisco ASA 5550 Getting Started Guide 78 17644 01 ...

Page 7: ...cting Cables to Network Interfaces Perform initial setup of the adaptive security appliance Chapter 5 Configuring the Adaptive Security Appliance Configure the adaptive security appliance for your implementation Chapter 6 Scenario DMZ Configuration Chapter 7 Scenario Remote Access VPN Configuration Chapter 8 Scenario Site to Site VPN Configuration Refine configuration Configure optional and advanc...

Page 8: ...Chapter 1 Before You Begin 1 2 Cisco ASA 5550 Getting Started Guide 78 17644 01 ...

Page 9: ...e following sections Embedded Network Interfaces page 2 1 Balancing Traffic to Maximize Throughput page 2 2 What to Do Next page 2 5 Embedded Network Interfaces The adaptive security appliance has two internal buses providing copper Gigabit Ethernet and fiber Gigabit Ethernet connectivity Slot 0 corresponding to Bus 0 has four embedded copper Gigabit Ethernet ports Slot 1 corresponding to Bus 1 ha...

Page 10: ... fiber Ethernet ports you can use only four Slot 1 ports at a time For example you could use two Slot 1 copper ports and two fiber ports but you cannot use fiber ports if you are already using all four Slot 1 copper ports Balancing Traffic to Maximize Throughput To maximize traffic throughput configure the adaptive security appliance so that traffic is distributed equally between the two buses in ...

Page 11: ...oughput Copper to Copper Figure 2 3 Traffic Evenly Distributed for Maximum Throughput Copper to Fiber 153104 LINK SPD 2 LINK SPD 1 LINK SPD 0 LINK SPD 3 MGMT USB2 USB1 FLASH CONSOLE AUX P O W E R S T A T U S F L A S H V P N A C T I V E PW R ST AT US LNK SPD 0 1 2 3 Slot 1 Slot 0 Incoming and outgoing traffic Incoming and outgoing traffic Maximum throughput 153305 LINK SPD 2 LINK SPD 1 LINK SPD 0 L...

Page 12: ... T U S F L A S H V P N A C T IV E PW R ST AT US LNK SPD 0 1 2 3 LINK SPD 2 LINK SPD 1 LINK SPD 0 LINK SPD 3 MGMT USB2 USB1 FLASH CONSOLE AUX P O W E R S T A T U S F L A S H V P N A C T IV E PW R ST AT US LNK SPD 0 1 2 3 LINK SPD 2 LINK SPD 1 LINK SPD 0 LINK SPD 3 MGMT USB2 USB1 FLASH CONSOLE AUX P O W E R S T A T U S F L A S H V P N A C T IV E PW R ST AT US LNK SPD 0 1 2 3 LINK SPD 2 LINK SPD 1 LI...

Page 13: ...ve Security Appliance What to Do Next Note You can use the show traffic command to see the traffic throughput over each bus For more information about using the command see the Cisco Security Appliance Command Reference What to Do Next Continue with Chapter 3 Installing the Cisco ASA 5550 Security Appliance ...

Page 14: ...Chapter 2 Maximizing Throughput on the ASA 5550 Adaptive Security Appliance What to Do Next 2 6 Cisco ASA 5550 Getting Started Guide 78 17644 01 ...

Page 15: ...tory Compliance and Safety Information for the Cisco ASA 5500 Series and follow proper safety procedures when performing these steps This chapter describes the ASA 5550 adaptive security appliance and rack mount and installation procedures for the adaptive security appliance This chapter includes the following sections Verifying the Package Contents page 3 2 Installing the Chassis page 3 3 Install...

Page 16: ...ackage Yellow Ethernet cable 72 1482 01 Mounting brackets 700 18797 01 AO right 700 18798 01 AO left 4 flathead screws 48 0451 01 AO 2 long cap screws 48 0654 01 AO 4 cap screws 48 0523 01 AO Safety and Compliance Guide Cisco ASA 5550 adaptive security appliance Documentation Cisco ASA 5550 Adaptive Security Appliance Product CD 4 rubber feet Cable holder 153215 Blue console cable PC terminal adap...

Page 17: ...re adequate ventilation An enclosed rack should never be overcrowded Make sure that the rack is not congested because each unit generates heat When mounting a device in an open rack make sure that the rack frame does not block the intake or exhaust ports If the rack contains only one unit mount the unit at the bottom of the rack If the rack is partially filled load the rack from the bottom to the ...

Page 18: ...s perform the following steps Step 1 Attach the rack mount brackets to the chassis using the supplied screws Attach the brackets to the holes as shown in Figure 3 2 After the brackets are secured to the chassis you can rack mount it Figure 3 2 Installing the Right and Left Brackets Step 2 Attach the chassis to the rack using the supplied screws as shown in Figure 3 3 153216 LNK 1 2 3 ...

Page 19: ...he rack and then remove the chassis Installing SFP Modules The adaptive security appliance uses a field replaceable SFP module to establish fiber Gigabit Ethernet connections This section describes how to install and remove SFP modules in the adaptive security appliance This section includes the following topics SFP Module page 3 6 Installing an SFP Module page 3 7 119633 POWER STATUS FLASH ACTIVE...

Page 20: ...r connections Use fiber cables with LC connectors to connect to an SFP module The SFP modules support 850 to 1550 nm nominal wavelengths The cables must not exceed the required cable length for reliable communications Table 3 2 lists the cable length requirements Table 3 2 Cabling Requirements for Fiber Optic SFP Modules Table 3 1 Supported SFP Modules SFP Module Type of Connection Cisco Part Numb...

Page 21: ...n port plugs into the SFPs after the cables are extracted from them Be sure to clean the optic surfaces of the fiber cables before you plug them back into the optical bores of another SFP module Avoid getting dust and other contaminants into the optical bores of your SFP modules The optics do not work correctly when obstructed with dust Warning Because invisible laser radiation may be emitted from...

Page 22: ...e cables Step 2 Remove the port plug then connect the network cable to the SFP module Step 3 Connect the other end of the cable to your network For more information on connecting the cables see Chapter 4 Connecting Cables to Network Interfaces Caution The latching mechanism used on many SFP modules locks them into place when cables are connected Do not pull on the cabling in an attempt to remove t...

Page 23: ...ure 3 5 shows the LEDs on the front panel of the adaptive security appliance Figure 3 5 Front Panel LEDs LED Color State Description 1 Power Green On The system has power 2 Status Green Flashing The power up diagnostics are running or the system is booting Solid The system has passed power up diagnostics Amber Solid The power up diagnostics have failed 3 Active Green Flashing There is network acti...

Page 24: ...ce is a Fast Ethernet interface designed for management traffic only 6 USB 2 0 interfaces2 2 Reserved for future use 11 VPN LED 2 External CompactFlash slot 7 Network interfaces3 3 GigabiteEthernet interfaces from right to left GigabitEthernet 0 0 GigabitEthernet 0 1 GigabitEthernet 0 2 and GigabitEthernet 0 3 12 Flash LED 3 Serial Console port 8 Power indicator LED 13 AUX port 4 Power switch 9 St...

Page 25: ...e 3 7 Rear Panel Link and Speed Indicator LEDs Table 3 3 lists the rear MGMT and Network interface LEDs 1 MGMT indicator LEDs 2 Network interface LEDs 126917 USB2 USB1 LNK SPD 3 LNK SPD 2 LNK SPD 1 LNK SPD 0 MGMT 2 1 Table 3 3 Link and Speed LEDs Indicator Color Description Left side Solid green Green flashing Physical link Network activity Right side Not lit Green Amber 10 Mbps 100 Mbps 1000 Mbps...

Page 26: ...P modules if you want to establish fiber Ethernet connectivity For more information on fiber ports and SFP modules see the Installing SFP Modules section on page 3 5 Table 3 4 describes the LEDs in Slot 1 1 Copper Ethernet ports 5 Status LED 2 RJ 45 Link LED 6 Fiber Ethernet ports 3 RJ 45 Speed LED 7 SFP Link LED 4 Power LED 8 SFP Speed LED 153212 P W R S TA T U S LNK SPD 0 1 2 3 Cisco SSM 4GE 4 1...

Page 27: ... Interfaces 3 8 SPEED Off Green Amber 10 MB There is no network activity 100 MB There is network activity at 100 Mbps 1000 MB GigE There is network activity at 1000 Mbps 4 POWER Green On The system has power 5 STATUS Green Green Amber Flashing The system is booting Solid The system booted correctly Solid The system diagnostics failed Table 3 4 LEDs on Bus G1 continued LED Color State Description ...

Page 28: ...Chapter 3 Installing the Cisco ASA 5550 Security Appliance What to Do Next 3 14 Cisco ASA 5550 Getting Started Guide 78 17644 01 ...

Page 29: ... to Do Next page 4 7 Warning Only trained and qualified personnel should install replace or service this equipment Statement 49 Caution Read the safety warnings in the Regulatory Compliance and Safety Information for the Cisco ASA 5500 Series and follow proper safety procedures when performing these steps Connecting Interface Cables To connect cables to the network interfaces perform the following...

Page 30: ...to be a management only interface using the management only command You can also disable management only mode on the management interface For more information about this command see the management only command in the Cisco Security Appliance Command Reference a Locate an Ethernet cable which has an RJ 45 connector on each end b Connect one RJ 45 connector to the Management0 0 port as shown in Figu...

Page 31: ...on one end and a DB 9 connector on the other end for the serial port on your computer c Connect the RJ 45 connector to the Console port of the adaptive security appliance as shown in Figure 4 2 d Connect the DB 9 connector to the console port on your computer Figure 4 2 Connecting the Console Cable Step 4 Connect to the Auxiliary port labeled AUX a Locate the serial console cable which has an RJ 4...

Page 32: ... 5 Connect to copper Ethernet ports to be used for network connections Copper Ethernet ports are available both in Slot 0 and Slot 1 Note You must use a port in Slot 0 for the inside interface and a port in Slot 1 for the outside interface a Connect one end of an Ethernet cable to a copper Ethernet port as shown in Figure 4 4 and Figure 4 5 1 RJ 45 AUX port 2 RJ 45 to DB 9 console cable 92686 FLAS...

Page 33: ...nnecting to a Copper Ethernet Interface in Slot 0 Figure 4 5 Connecting to a Copper Ethernet Interfaces in Slot 1 1 Copper Ethernet ports 2 RJ 45 connector USB2 USB1 LNK SPD 3 LNK SPD 2 LNK SPD 1 LNK SPD 0 MGMT 92685 2 1 1 Copper Ethernet ports 2 RJ 45 connector 153213 MGMT USB2 Cisco SSM 4GE LNK SPD 0 1 2 3 PO W ER ST AT US 2 MGMT USB2 USB1 1 ...

Page 34: ...of ports but you can only have a total of four Slot 1 ports in use at a time For example you could use two copper Ethernet ports and two fiber Ethernet ports For each fiber port you want to use perform the following steps a Install the SFP module Insert and slide the SFP module into the fiber port until you hear a click The click indicates that the SFP module is locked into the port Remove the por...

Page 35: ...e cable to a network device such as a router switch or hub Step 7 Connect the power cord to the adaptive security appliance and plug the other end to the power source Step 8 Power on the chassis What to Do Next Continue with Chapter 5 Configuring the Adaptive Security Appliance 1 LC connector 2 SFP module MGMT USB2 Cisco SSM 4GE LNK SPD 0 1 2 3 MGMT USB2 USB1 PO W ER ST AT US 1 153214 2 ...

Page 36: ...Chapter 4 Connecting Cables to Network Interfaces What to Do Next 4 8 Cisco ASA 5550 Getting Started Guide 78 17644 01 ...

Page 37: ...M or the command line interface CLI However the procedures in this chapter refer to the method using ASDM Note To use ASDM you must have a DES license or a 3DES AES license For more information see Appendix A Obtaining a DES License or a 3DES AES License This chapter includes the following sections About the Factory Default Configuration page 5 2 About the Adaptive Security Device Manager page 5 2...

Page 38: ...on automatically configures an interface for management so you can quickly connect to the device and use ASDM to complete your configuration By default the adaptive security appliance Management interface is configured with a default DHCP address pool This configuration enables a client on the inside network to obtain a DHCP address from the adaptive security appliance to connect to the appliance ...

Page 39: ...l you can configure the adaptive security appliance by using the command line interface For more information see the Cisco Security Appliance Command Line Configuration Guide and the Cisco Security Appliance Command Reference Using the Startup Wizard ASDM includes a Startup Wizard to simplify the initial configuration of your adaptive security appliance With a few steps the Startup Wizard enables ...

Page 40: ...name to identify the adaptive security appliance on your network The IP addresses of your outside interface inside interface and any other interfaces to be configured The IP addresses to use for NAT or PAT configuration The IP address range for the DHCP server Running the Startup Wizard To use the Startup Wizard to set up a basic configuration for the adaptive security appliance perform the follow...

Page 41: ...ASDM launcher or to run the ASDM software as a Java applet Step 3 In the dialog box that requires a username and password leave both fields empty Press Enter Step 4 Click Yes to accept the certificates Click Yes for all subsequent authentication and certificate dialog boxes ASDM starts Step 5 From the Wizards menu choose Startup Wizard Step 6 Follow the instructions in the Startup Wizard to set up...

Page 42: ...llowing steps starting from the main ASDM window Step 1 In the ASDM window click Configuration Step 2 In the Features pane click Interfaces Step 3 Click the 4GE SSM interface and click Edit The Edit Interface dialog box appears Step 4 Click Configure Hardware Properties The Hardware Properties dialog box appears Step 5 From the Media Type drop down list choose Fiber Connector Step 6 Click OK to re...

Page 43: ...oyment using one or more of the following chapters To Do This See Configure the adaptive security appliance to protect a DMZ web server Chapter 6 Scenario DMZ Configuration Configure the adaptive security appliance for remote access VPN Chapter 7 Scenario Remote Access VPN Configuration Configure the adaptive security appliance for Site to Site VPN Chapter 8 Scenario Site to Site VPN Configuration...

Page 44: ...Chapter 5 Configuring the Adaptive Security Appliance What to Do Next 5 8 Cisco ASA 5550 Getting Started Guide 78 17644 01 ...

Page 45: ...one DMZ A DMZ is a separate network located in the neutral zone between a private inside network and a public outside network This chapter includes the following sections Example DMZ Network Topology page 6 1 Configuring the Security Appliance for a DMZ Deployment page 6 4 What to Do Next page 6 24 Example DMZ Network Topology The example network topology shown in Figure 6 1 is typical of most DMZ...

Page 46: ...erver all other traffic is denied The network has two routable IP addresses that are publicly available one for the outside interface of the adaptive security appliance 209 165 200 225 and one for the public IP address of the DMZ web server 209 165 200 226 Figure 6 2 shows the outgoing traffic flow of HTTP requests from the private network to both the DMZ web server and to the Internet 132064 Inte...

Page 47: ...esses are not visible to the Internet For traffic destined for the DMZ web server private IP addresses are translated to an address from an IP pool For traffic destined for the Internet private IP addresses are translated to the public IP address of the adaptive security appliance Outgoing traffic appears to come from this address Figure 6 3 shows HTTP requests originating from the Internet and de...

Page 48: ...eb server The procedures for creating this configuration are detailed in the remainder of this chapter Configuring the Security Appliance for a DMZ Deployment This section describes how to use ASDM to configure the adaptive security appliance for the configuration scenario shown in Figure 6 1 The procedure uses sample parameters based on the scenario 153779 Internet HTTP client HTTP client Securit...

Page 49: ...r Inside Clients to Communicate with the DMZ Web Server page 6 12 Configuring NAT for Inside Clients to Communicate with Devices on the Internet page 6 15 Configuring an External Identity for the DMZ Web Server page 6 16 Providing Public HTTP Access to the DMZ Web Server page 6 18 The following sections provide detailed instructions for how to perform each step Configuration Requirements Configuri...

Page 50: ...c address of the adaptive security appliance 209 165 200 225 For external clients to have HTTP access to the DMZ web server you must configure an external identity for the DMZ web server and an access rule that permits HTTP requests coming from clients on the Internet To accomplish this task you should configure the following Create a static NAT rule This rule translates the real IP address of the...

Page 51: ...ptive security appliance uses Network Address Translation NAT and Port Address Translation PAT to prevent internal IP addresses from being exposed externally This procedure describes how to create a pool of IP addresses that the DMZ interface and outside interface can use for address translation A single IP pool can contain both NAT and PAT entries and it can contain entries for more than one inte...

Page 52: ...dress translation perform the following steps Step 1 In the ASDM window click the Configuration tool a In the Features pane click NAT The NAT Configuration screen appears b In the right pane click the Global Pools tab c Click Add to create a new global pool for the DMZ interface The Add Global Address Pool dialog box appears Note For most configurations IP pools are added to the less secure or pub...

Page 53: ...create a new IP pool enter a unique Pool ID In this scenario the Pool ID is 200 f In the IP Addresses to Add area specify the range of IP addresses to be used by the DMZ interface Click the Range radio button Enter the Starting IP address and Ending IP address of the range In this scenario the range of IP addresses is 10 30 30 50 10 30 30 60 Optional Enter the Netmask for the range of IP addresses...

Page 54: ...addresses so that inside clients can communicate securely with clients on the Internet In this scenario there are limited public IP addresses available Use Port Address Translation PAT so that many internal IP addresses can map to the same public IP address as follows a In the right pane of the NAT Configuration screen click the Global Pools tab b Under the Global Pools tab click Add The Add Globa...

Page 55: ... the interface radio button If you select the option Port Address Translation using the IP address of the interface all traffic initiated from the inside network exits the adaptive security appliance using the IP address of the outside interface To the devices on the Internet it appears that all traffic is coming from this one IP address f Click the Add button to add this new address to the IP poo...

Page 56: ... should be similar to the following Step 3 Confirm that the configuration values are correct Step 4 Click Apply in the main ASDM window Configuring NAT for Inside Clients to Communicate with the DMZ Web Server In the previous procedure you created a pool of IP addresses that could be used by the adaptive security appliance to mask the private IP addresses of inside clients ...

Page 57: ...log box appears Step 4 In the Real Address area specify the IP address to be translated For this scenario address translation for inside clients is done according to the IP address of the subnet a From the Interface drop down list choose the Inside interface b Enter the IP address of the client or network In this scenario the IP address of the network is 10 10 10 0 c From the Netmask drop down lis...

Page 58: ...n rule appears as you expected Note When you click OK to create this rule notice that there are actually two translation rules created A translation rule between the inside and DMZ interfaces to be used when inside clients communicate with the DMZ web server A translation rule between the inside and outside interfaces to be used when inside clients communicate with the Internet ASDM is able to cre...

Page 59: ...lar to the following Step 6 Click Apply to complete the adaptive security appliance configuration changes Configuring NAT for Inside Clients to Communicate with Devices on the Internet In the previous procedure you configured a Network Address Translation NAT rule that associates IP addresses from the IP pool with the inside clients so they can communicate securely with the DMZ web server ...

Page 60: ...the DMZ Web Server The DMZ web server needs to be accessible by all hosts on the Internet This configuration requires translating the private IP address of the DMZ web server to a public IP address enabling access to outside HTTP clients that are unaware of the adaptive security appliance To map the real web server IP address 10 30 30 30 statically to a public IP address 209 165 200 226 perform th...

Page 61: ... server a From the Interface drop down list choose Outside b From the IP Address drop down list choose the public IP address of the DMZ web server In this scenario the public IP address of the DMZ web server is 209 165 200 226 Step 6 Click OK to add the rule and return to the list of Address Translation Rules This rule maps the real web server IP address 10 30 30 30 statically to the public IP add...

Page 62: ...mplete the adaptive security appliance configuration changes Providing Public HTTP Access to the DMZ Web Server By default the adaptive security appliance denies all traffic coming in from the public network You must create an access control rule on the adaptive security appliance to permit specific traffic types from the public network to resources in the DMZ This access control rule specifies th...

Page 63: ...ion you create an access rule that permits incoming HTTP traffic originating from any host or network on the Internet if the destination of the traffic is the web server on the DMZ network All other traffic coming in from the public network is denied To configure the access control rule perform the following steps Step 1 In the ASDM window a Click the Configuration tool b In the Features pane clic...

Page 64: ...ce and Action area a From the Interface drop down list choose Outside b From the Direction drop down list choose Incoming c From the Action drop down list choose Permit Step 3 In the Source area a From the Type drop down list choose IP Address b Enter the IP address of the source host or source network Use 0 0 0 0 to allow traffic originating from any host or network ...

Page 65: ...ublic IP address of the destination host or network such as a web server In this scenario the public IP address of the DMZ web server is 209 165 200 226 Step 5 In the Protocol and Service area specify the type of traffic that you want to permit through the adaptive security appliance a From the Protocol drop down list choose tcp b In the Source Port area click the Service radio button choose equal...

Page 66: ...oyment 6 22 Cisco ASA 5550 Getting Started Guide 78 17644 01 At this point the entries in the Add Access Rule dialog box should be similar to the following d Click OK Step 6 The displayed configuration should be similar to the following Verify that the information you entered is accurate ...

Page 67: ...ntent from the DMZ web server while keeping the private network secure Note Although the destination address specified is the private address of the DMZ web server 10 30 30 30 HTTP traffic from any host on the Internet destined for the public address 209 165 200 226 is permitted through the adaptive security appliance The address translation 209 165 200 226 to 10 30 30 30 allows the traffic to be ...

Page 68: ...r in a DMZ you have completed the initial configuration You may want to consider performing some of the following additional steps You can configure the adaptive security appliance for more than one application The following sections provide configuration procedures for other common applications of the adaptive security appliance To Do This See Refine configuration and configure optional and advan...

Page 69: ... you are implementing an Easy VPN solution this chapter describes how to configure the Easy VPN server sometimes called a headend device This chapter includes the following sections Example IPsec Remote Access VPN Network Topology page 7 1 Implementing the IPsec Remote Access VPN Scenario page 7 2 What to Do Next page 7 18 Example IPsec Remote Access VPN Network Topology Figure 7 1 shows an adapti...

Page 70: ...menting an Easy VPN solution this section describes how to configure an Easy VPN server also known as a headend device Values for example configuration settings are taken from the remote access scenario illustrated in Figure 7 1 This section includes the following topics Information to Have Available page 7 3 Starting ASDM page 7 4 Configuring the ASA 5550 for an IPsec Remote Access VPN page 7 5 S...

Page 71: ...iguration page 7 17 Information to Have Available Before you begin configuring the adaptive security appliance to accept remote access IPsec VPN connections make sure that you have the following information available Range of IP addresses to be used in an IP pool These addresses are assigned to remote VPN clients as they are successfully connected List of users to be used in creating a local authe...

Page 72: ...Guide 78 17644 01 Starting ASDM To run ASDM in a web browser enter the factory default IP address in the address field https 192 168 1 1 admin Note Remember to add the s in https or the connection fails HTTPS HTTP over SSL provides a secure connection between your browser and the adaptive security appliance The Main ASDM window appears ...

Page 73: ... the process for configuring a remote access VPN perform the following steps Step 1 In the main ASDM window choose VPN Wizard from the Wizards drop down menu The VPN Wizard Step 1 screen appears Step 2 In Step 1 of the VPN Wizard perform the following steps a Click the Remote Access VPN radio button b From the drop down list choose Outside as the enabled interface for the incoming VPN tunnels c Cl...

Page 74: ...644 01 Selecting VPN Client Types In Step 2 of the VPN Wizard perform the following steps Step 1 Specify the type of VPN client that will enable remote users to connect to this adaptive security appliance For this scenario click the Cisco VPN Client radio button You can also use any other Cisco Easy VPN remote product Step 2 Click Next to continue ...

Page 75: ...d key for example Cisco This key is used for IPsec negotiations between the adaptive security appliances To use digital certificates for authentication click the Certificate radio button choose the Certificate Signing Algorithm from the drop down list and then choose a preconfigured trustpoint name from the drop down list If you want to use digital certificates for authentication but have not yet ...

Page 76: ... as Cisco for the set of users that use common connection parameters and client attributes to connect to this adaptive security appliance Step 3 Click Next to continue Specifying a User Authentication Method Users can be authenticated either by a local authentication database or by using external authentication authorization and accounting AAA servers RADIUS TACACS SDI NT Kerberos and LDAP ...

Page 77: ...want to authenticate users by creating a user database on the adaptive security appliance click the Authenticate Using the Local User Database radio button Step 2 If you want to authenticate users with an external AAA server group a Click the Authenticate Using an AAA Server Group radio button b Choose a preconfigured server group from the drop down list or click New to add a new server group Step...

Page 78: ...ccounts If you have chosen to authenticate users with the local user database you can create new user accounts here You can also add users later using the ASDM configuration interface In Step 5 of the VPN Wizard perform the following steps Step 1 To add a new user enter a username and password and then click Add Step 2 When you have finished adding new users click Next to continue ...

Page 79: ...nnected In this scenario the pool is configured to use the range of IP addresses 209 165 201 1 209 166 201 20 In Step 6 of the VPN Wizard perform the following steps Step 1 Enter a pool name or choose a preconfigured pool from the drop down list Alternatively click New to create a new address pool The Add IP Pool dialog box appears Step 2 In the Add IP Pool dialog box a Enter the Starting IP addre...

Page 80: ...etwork configuration information such as which DNS and WINS servers to use and the default domain name Rather than configuring each remote client individually you can provide the client information to ASDM The adaptive security appliance pushes this information to the remote client or Easy VPN hardware client when a connection is established Ensure that you specify the correct values or remote cli...

Page 81: ...ng steps Step 1 Enter the network configuration information to be pushed to remote clients Step 2 Click Next to continue Configuring the IKE Policy IKE is a negotiation protocol that includes an encryption method to protect data and ensure privacy it is also an authentication method to ensure the identity of the peers In most cases the ASDM default values are sufficient to establish secure VPN tun...

Page 82: ...ng Started Guide 78 17644 01 To specify the IKE policy in Step 8 of the VPN Wizard perform the following steps Step 1 Click the Encryption DES 3DES AES authentication algorithms MD5 SHA and the Diffie Hellman group 1 2 5 7 used by the adaptive security appliance during an IKE security association Step 2 Click Next to continue ...

Page 83: ...nfiguration Implementing the IPsec Remote Access VPN Scenario Configuring IPsec Encryption and Authentication Parameters In Step 9 of the VPN Wizard perform the following steps Step 1 Click the Encryption algorithm DES 3DES AES and authentication algorithm MD5 SHA Step 2 Click Next to continue ...

Page 84: ...ranslation NAT to prevent internal IP addresses from being exposed externally You can make exceptions to this network protection by identifying local hosts and networks that should be made accessible to authenticated remote users In this scenario the entire inside network 10 10 10 0 is exposed to all remote clients In Step 10 of the VPN Wizard perform the following steps Step 1 Specify hosts group...

Page 85: ... check box at the bottom of the screen Split tunneling allows traffic outside the configured networks to be sent out directly to the Internet instead of over the encrypted VPN tunnel Step 2 Click Next to continue Verifying the Remote Access VPN Configuration In Step 11 of the VPN Wizard review the configuration attributes for the VPN tunnel you just created The displayed configuration should be si...

Page 86: ...on takes effect the next time the device starts What to Do Next If you are deploying the adaptive security appliance solely in a remote access VPN environment you have completed the initial configuration In addition you may want to consider performing some of the following steps You can configure the adaptive security appliance for more than one application The following sections provide configura...

Page 87: ...7 Scenario Remote Access VPN Configuration What to Do Next To Do This See Configure the adaptive security appliance to protect a Web server in a DMZ Chapter 6 Scenario DMZ Configuration Configure a site to site VPN Chapter 8 Scenario Site to Site VPN Configuration ...

Page 88: ...Chapter 7 Scenario Remote Access VPN Configuration What to Do Next 7 20 Cisco ASA 5550 Getting Started Guide 78 17644 01 ...

Page 89: ... maintaining their network security A VPN connection enables you to send data from one location to another over a secure connection or tunnel first by authenticating both ends of the connection and then by automatically encrypting all data sent between the two sites This chapter includes the following sections Example Site to Site VPN Network Topology page 8 1 Implementing the Site to Site Scenari...

Page 90: ...parameters from the remote access scenario shown in Figure 8 1 This section includes the following sections Information to Have Available page 8 2 Configuring the Site to Site VPN page 8 3 Information to Have Available Before you begin the configuration procedure gather the following information IP address of the remote adaptive security appliance peer IP addresses of local hosts and networks perm...

Page 91: ...out the Remote VPN Peer page 8 6 Configuring the IKE Policy page 8 7 Configuring IPsec Encryption and Authentication Parameters page 8 9 Specifying Hosts and Networks page 8 10 Viewing VPN Attributes and Completing the Wizard page 8 11 The following sections provide detailed instructions for how to perform each configuration step Starting ASDM To run ASDM in a web browser enter the factory default...

Page 92: ...the Security Appliance at the Local Site Note The adaptive security appliance at the first site is referred to as Security Appliance 1 from this point forward To configure the Security Appliance 1 perform the following steps Step 1 In the main ASDM window choose the VPN Wizard option from the Wizards drop down menu ASDM opens the first VPN Wizard screen ...

Page 93: ...m the following steps a Click the Site to Site VPN radio button Note The Site to Site VPN option connects two IPsec security gateways which can include adaptive security appliances VPN concentrators or other devices that support site to site IPsec connectivity b From the drop down list choose Outside as the enabled interface for the current VPN tunnel c Click Next to continue ...

Page 94: ...eshared key for authentication click the Pre Shared Key radio button and enter a preshared key for example Cisco This key is used for IPsec negotiations between the adaptive security appliances Note When you configure Security Appliance 2 at the remote site the VPN peer is Security Appliance 1 Be sure to enter the same preshared key Cisco that you use here Click the Challenge Response Authenticati...

Page 95: ... method to protect data and ensure privacy it is also an authentication method to ensure the identity of the peers In most cases the ASDM default values are sufficient to establish secure VPN tunnels between two peers In Step 3 of the VPN Wizard perform the following steps Step 1 Click the Encryption DES 3DES AES authentication algorithms MD5 SHA and the Diffie Hellman group 1 2 5 used by the adap...

Page 96: ...o ASA 5550 Getting Started Guide 78 17644 01 Note When configuring Security Appliance 2 enter the exact values for each of the options that you chose for Security Appliance 1 Encryption mismatches are a common cause of VPN tunnel failures and can slow down the process Step 2 Click Next to continue ...

Page 97: ...ion Implementing the Site to Site Scenario Configuring IPsec Encryption and Authentication Parameters In Step 4 of the VPN Wizard perform the following steps Step 1 Choose the Encryption algorithm DES 3DES AES and authentication algorithm MD5 SHA from the drop down lists Step 2 Click Next to continue ...

Page 98: ...dition identify hosts and networks at the remote site to be allowed to use this IPsec tunnel to access local hosts and networks Add or remove hosts and networks dynamically by clicking Add or Delete respectively In this scenario for Security Appliance 1 the remote network is Network B 10 20 20 0 so traffic encrypted from this network is permitted through the tunnel In Step 5 of the VPN Wizard perf...

Page 99: ...ing the Site to Site Scenario Step 5 Click Next to continue Viewing VPN Attributes and Completing the Wizard In Step 6 of the VPN Wizard review the configuration list for the VPN tunnel you just created If you are satisfied with the configuration click Finish to apply the changes to the adaptive security appliance ...

Page 100: ...ed to the startup configuration so that they are applied the next time the device starts from the File menu click Save Alternatively ASDM prompts you to save the configuration changes permanently when you exit ASDM If you do not save the configuration changes the old configuration takes effect the next time the device starts This concludes the configuration process for Security Appliance 1 ...

Page 101: ...and finishing with the Viewing VPN Attributes and Completing the Wizard section on page 8 11 Note When configuring Security Appliance 2 enter the exact same values for each of the options that you selected for Security Appliance 1 Mismatches are a common cause of VPN configuration failures What to Do Next If you are deploying the adaptive security appliance solely in a site to site VPN environment...

Page 102: ...liance for more than one application The following sections provide configuration procedures for other common applications of the adaptive security appliance To Do This See Configure the adaptive security appliance to protect a web server in a DMZ Chapter 6 Scenario DMZ Configuration Configure a remote access VPN Chapter 7 Scenario Remote Access VPN Configuration ...

Page 103: ...es with the adaptive security appliance If you are a registered user of Cisco com and would like to obtain a 3DES AES encryption license go to the following website http www cisco com go license If you are not a registered user of Cisco com go to the following website https tools cisco com SWIFT Licensing RegistrationServlet Provide your name e mail address and the serial number for the adaptive s...

Page 104: ...n 5 tuple key Updates the encryption activation key by replacing the activation 4 tuple key variable with the activation key obtained with your new license The activation 5 tuple key variable is a five element hexadecimal string with one space between each element An example is 0xe02888da 0x4ba7bed6 0xf1c123ae 0xffd8624e The 0x is optional all values are assumed to be hexadecimal Step 4 hostname c...

Reviews: