Adding Application Cards
The installation procedure is identical for all application cards. This section provides the instructions for
adding application cards to the chassis.
You can add single packet processing cards to a production system. However, you must reboot the system
to ensure optimal operation and capacity. For this reason Cisco Systems suggests that you perform the
installation during a maintenance window when a reboot will have minimal impact.
Important
During installation, maintenance, and/or removal, wear a grounding wrist strap to avoid ESD damage to
the components. Failure to do so could result in damage to sensitive electronic components and potentially
void your warranty.
Caution
Step 1
Determine the type of application card you are installing. Each application card is identified by the label near the bottom
of its front panel.
Step 2
Determine which chassis slot to install the card in based on the information in
Chassis Slot Numbering and Assignments,
on page 176
..
To achieve optimal airflow performance in minimal system deployments, populate packet processing cards
from the middle of the chassis outward, leaving an empty slot between them. For example, with four packet
processing cards use slots 3, 5, 12, and 14. For two packet processing cards, place them in slots 5 and 12.
Important
Step 3
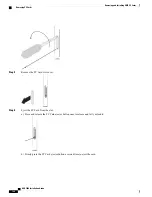
Remove the blanking panel, if one is installed, covering the slot.
a) Use a Phillips #2 screwdriver to loosen the screws at the top and bottom of the blanking panel.
b) Holding the screws on the blanking panel, pull the blanking panel away from the chassis to expose the chassis slot.
Do not leave chassis slots uncovered for extended periods of time. This reduces airflow through the chassis
and could cause it to overheat. Make sure there is a circuit card or blanking panel in every chassis slot at
all times.
Caution
Step 4
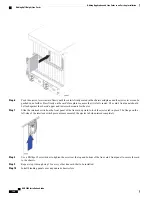
Slide the interlock switch on the card fully downward. Flip the ejector levers outward and away from the card's front
panel.
Step 5
Properly support the weight of the card and align it with the upper and lower card guides of the chassis slot. Gently slide
the card into the slot until the levers touch the chassis frame.
Take extra care when you install packet processing cards. These cards contain heat sinks that could become
loose or damaged if they come into contact with an adjacent card while the packet processing card is being
inserted in the chassis slot.
Caution
If you are installing PSCAs in a chassis that contains PSCs, refer to the
Chassis Hybrid Mode Operation
appendix for additional configuration information.
Important
ASR 5000 Installation Guide
177
Adding Application and Line Cards to an Existing Installation
Adding Application Cards
Summary of Contents for ASR 5000
Page 16: ...ASR 5000 Installation Guide xvi About this Guide Contacting Customer Support ...
Page 64: ...ASR 5000 Installation Guide 48 Installation Procedure Overview Laser Notice ...
Page 100: ...ASR 5000 Installation Guide 84 Line Card Installation Installing the XGLC ...
Page 122: ...ASR 5000 Installation Guide 106 Cabling the Fast Ethernet 10 100 Line Card FLC2 Interfaces ...
Page 206: ...ASR 5000 Installation Guide 190 Removing and Installing SMC PC Cards Removing PC Cards ...
Page 212: ...ASR 5000 Installation Guide 196 Replacing the Chassis Air Filter Installing the Air Filter ...
Page 220: ...ASR 5000 Installation Guide 204 Replacing a Power Filter Unit What to do with the Failed PFU ...
Page 266: ...ASR 5000 Installation Guide 250 Safety Electrical and EMC Certifications Korean EMC ...
Page 270: ...ASR 5000 Installation Guide 254 Environmental Specifications Chassis Air Flow ...


