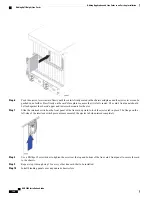
Step 6
Push the ejector levers inward firmly until the card is seated in the chassis midplane and you cannot push the ejector
levers in any further. Press firmly on the card's faceplate to ensure that it is fully seated. The card's front panel should
be flush against the chassis' upper and lower card mounts for the slot.
Step 7
Slide the interlock switch on the front panel of the application card upward to lock the ejector tab in place. The flange
on the left-side of the interlock switch prevents movement of the ejector tab when raised completely.
You must slide the interlock switch upward before securing the card's top screw to the mounting
rail.
Important
ASR 5000 Installation Guide
178
Adding Application and Line Cards to an Existing Installation
Adding Application Cards
Summary of Contents for ASR 5000
Page 16: ...ASR 5000 Installation Guide xvi About this Guide Contacting Customer Support ...
Page 64: ...ASR 5000 Installation Guide 48 Installation Procedure Overview Laser Notice ...
Page 100: ...ASR 5000 Installation Guide 84 Line Card Installation Installing the XGLC ...
Page 122: ...ASR 5000 Installation Guide 106 Cabling the Fast Ethernet 10 100 Line Card FLC2 Interfaces ...
Page 206: ...ASR 5000 Installation Guide 190 Removing and Installing SMC PC Cards Removing PC Cards ...
Page 212: ...ASR 5000 Installation Guide 196 Replacing the Chassis Air Filter Installing the Air Filter ...
Page 220: ...ASR 5000 Installation Guide 204 Replacing a Power Filter Unit What to do with the Failed PFU ...
Page 266: ...ASR 5000 Installation Guide 250 Safety Electrical and EMC Certifications Korean EMC ...
Page 270: ...ASR 5000 Installation Guide 254 Environmental Specifications Chassis Air Flow ...

