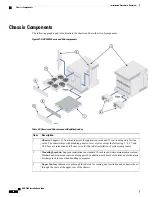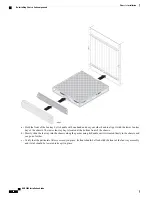
a) Remove the plastic bezel from the upper-front of the chassis by placing your fingers in the notches on the sides of
the bezel and pulling it toward you. Place it to the side for re-installation later.
b) Loosen the four screws that secure the fan tray in place using a Phillips #1 screwdriver.
c) Grasp the two bezel mounts on the front of the fan tray and pull. The fan tray should easily slide out of the chassis.
Place it to the side for re-installation later.
To avoid personal injury and/or damage to the fan tray, be sure to support the weight of the fan tray from its front
and back as you slide it completely out of the chassis.
Vorsicht beim Herausziehen der Luefter-Schublade: um eine Beschaedigung des Moduls und eventuelle Verletzungen
zu vermeiden, sollte diese hinten und vorne unterstuetzt werden.
Step 2
Remove the lower fan tray assembly.
ASR 5000 Installation Guide
55
Chassis Installation
Reducing the Weight of the Chassis Prior to Installation
Summary of Contents for ASR 5000
Page 16: ...ASR 5000 Installation Guide xvi About this Guide Contacting Customer Support ...
Page 64: ...ASR 5000 Installation Guide 48 Installation Procedure Overview Laser Notice ...
Page 100: ...ASR 5000 Installation Guide 84 Line Card Installation Installing the XGLC ...
Page 122: ...ASR 5000 Installation Guide 106 Cabling the Fast Ethernet 10 100 Line Card FLC2 Interfaces ...
Page 206: ...ASR 5000 Installation Guide 190 Removing and Installing SMC PC Cards Removing PC Cards ...
Page 212: ...ASR 5000 Installation Guide 196 Replacing the Chassis Air Filter Installing the Air Filter ...
Page 220: ...ASR 5000 Installation Guide 204 Replacing a Power Filter Unit What to do with the Failed PFU ...
Page 266: ...ASR 5000 Installation Guide 250 Safety Electrical and EMC Certifications Korean EMC ...
Page 270: ...ASR 5000 Installation Guide 254 Environmental Specifications Chassis Air Flow ...


