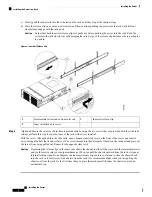
c) Slowly push the inner rails into the slide rails on the rack until they stop at the internal stops.
d) Press the release clip on each inner rail inward, and then continue pushing the server into the rack until its front
slam-latches engage with the rack posts.
Ensure that both inner rail release clips are pushed in before pushing the server into the rack. Push the
server into the rails slowly to avoid damaging the rails. Let go of the release clip buttons as the server begins
to push in.
Caution
Figure 4: Inner-Rail Release Clip
Inner rail release clip
3
Intermediate rail extended from outer rail
1
-
Inner rail attached to server
2
Step 6
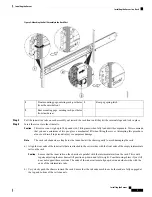
(Optional) Secure the server in the rack more permanently by using the two screws that are provided with the slide rails.
Always perform this step if you plan to move the rack with servers installed.
With the server fully pushed into the slide rails, open a hinged slam latch lever on the front of the server and insert a
screw through the hole that is under the lever. The screw threads into the static part of the rail on the rack post and prevents
the server from being pulled out. Repeat for the opposite slam latch.
Depressing the release clips on the inner rails allows the chassis to slide all the way out of the intermediate rails
and could result in injury or equipment damage. When you pull the chassis outward from the rack, it stops at
internal locking stops. Do not depress the inner-rail release clips unless you intend to slide the chassis back
into the rack or to fully remove the chassis from the rack. It is recommended that when you test pulling the
chassis out from the rack for the first time that you place the mechanical lift under the chassis to avoid an
accidental drop.
Caution
Installing the Server
8
Installing the Server
Installing the Server in a Rack


