background image

12

Catalyst 4500-X AC-Input Power Supply Installation Note

OL-26535-01

  Removing the Power Supply

Step 3

Grasp the power supply handle with your forefinger and place your thumb on the power supply release 
handle.

Step 4

Squeeze your forefinger and thumb together and pull on the power supply handle to release the power 
supply from the chassis bay. (See 

Figure 4

.)

Figure 4

Removing the AC-Input Power Supply

Step 5

Slide the power supply out of the chassis bay. 

Note

The power supply is approximately 14 inches (35.56 cm) long. Place your other hand underneath 
of the power supply to support the power supply as you extract it from the chassis.

Step 6

Set the removed power supply aside.

Step 7

If you are not going to replace the power supply, place a power supply blank cover (part no. 
C4KX-PWR-BLANK=) over the empty power supply bay opening and snap it into place. If you are 
going to install a new power supply in the chassis, see the 

“Installing the Power Supply” section on 

page 9

 for instructions.

332209

Summary of Contents for C4KX-PWR-750AC-F

Page 1: ...as part of the basic chassis configuration product numbers The AC input power supplies are ordered separately Contents This installation note contains the following sections AC Input Power Supply Features page 2 Safety page 3 Tools Required page 9 Installing the Power Supply page 9 Removing the Power Supply page 11 Power Supply Specifications page 13 Power Cords page 14 Related Documentation page ...

Page 2: ...the release lever is color coded burgundy indicating warm side Both power supplies provide 750 W of power Figure 1 shows the AC input power supply and identifies the major features Figure 1 750 W AC Input Power Supply Features 1 FAIL LED amber 5 AC power cord receptacle IEC 60320 C15 2 OK LED green 6 Fan directional arrow on top indicates airflow direction 3 Power supply handle 7 Release lever col...

Page 3: ...oltage out of tolerance or fan failure in the power supply Safety Warning statements in the document use the following conventions Table 1 AC Input Power Supply Status LEDs Meanings OK LED Green FAIL LED Amber Description Off Off No source AC power is detected by the power supply Off On Power supply failure can include overvoltage overcurrent overtemperature or fan failure Off Blinking Power suppl...

Page 4: ...uwing als u een vertaling van de waarschuwing die bij het apparaat wordt geleverd wilt raadplegen BEWAAR DEZE INSTRUCTIES Varoitus TÄRKEITÄ TURVALLISUUSOHJEITA Tämä varoitusmerkki merkitsee vaaraa Tilanne voi aiheuttaa ruumiillisia vammoja Ennen kuin käsittelet laitteistoa huomioi sähköpiirien käsittelemiseen liittyvät riskit ja tutustu onnettomuuksien yleisiin ehkäisytapoihin Turvallisuusvaroitus...

Page 5: ...Du er i en situasjon som kan føre til skade på person Før du begynner å arbeide med noe av utstyret må du være oppmerksom på farene forbundet med elektriske kretser og kjenne til standardprosedyrer for å forhindre ulykker Bruk nummeret i slutten av hver advarsel for å finne oversettelsen i de oversatte sikkerhetsadvarslene som fulgte med denne enheten TA VARE PÅ DISSE INSTRUKSJONENE Aviso INSTRUÇÕ...

Page 6: ...i en situation som kan leda till personskada Innan du utför arbete på någon utrustning måste du vara medveten om farorna med elkretsar och känna till vanliga förfaranden för att förebygga olyckor Använd det nummer som finns i slutet av varje varning för att hitta dess översättning i de översatta säkerhetsvarningar som medföljer denna anordning SPARA DESSA ANVISNINGAR ...

Page 7: ...ação fornecido ao final de cada aviso para localizar sua tradução nos avisos de segurança traduzidos que acompanham o dispositivo GUARDE ESTAS INSTRUÇÕES Advarsel VIGTIGE SIKKERHEDSANVISNINGER Dette advarselssymbol betyder fare Du befinder dig i en situation med risiko for legemesbeskadigelse Før du begynder arbejde på udstyr skal du være opmærksom på de involverede risici der er ved elektriske kr...

Page 8: ...8 Catalyst 4500 X AC Input Power Supply Installation Note OL 26535 01 Safety ...

Page 9: ... Supply To install the AC input power supply follow these steps Step 1 Remove the power supply from the shipping packaging and discard the packaging Step 2 Verify that the new power supply has the correct airflow direction front to back or back to front for your situation The power supply release lever see Figure 1 is color coded blue for back to front airflow or burgundy for front to back airflow...

Page 10: ...empty but has a power supply blank cover installed you must remove the blank cover see Figure 2 a Grasp the two retaining clips with your thumb and forefinger and squeeze to release the blank cover from the power supply bay b While still squeezing the two clips pull on them to remove the blank cover from the power supply bay Figure 2 Power Supply Blank Cover Note If the redundant power supply bay ...

Page 11: ...er supply Connect the power cord s AC plug to the source AC outlet Note If the source AC outlet is live the power supply will immediately power up There is no power switch on the AC input power supply Step 8 Verify that the power supply powers up correctly by visually monitoring the two LEDs on the power supply See Figure 1 See Table 1 for a list of LED conditions and meanings Removing the Power S...

Page 12: ... Supply Step 5 Slide the power supply out of the chassis bay Note The power supply is approximately 14 inches 35 56 cm long Place your other hand underneath of the power supply to support the power supply as you extract it from the chassis Step 6 Set the removed power supply aside Step 7 If you are not going to replace the power supply place a power supply blank cover part no C4KX PWR BLANK over t...

Page 13: ...00 VAC max AC input frequency 47 to 63 Hz 50 60 Hz nominal Branch circuit requirement Each chassis power supply should have its own dedicated fused branch circuit For North America 15 A For International Circuits should be sized to local and national codes All AC power supply inputs are fully isolated Source AC can be out of phase between multiple power supplies in the same chassis which means tha...

Page 14: ...eight 3 7 lb 1 68 kg Table 4 AC Power Cords Supported on the 750 W Power Supply Locale Part Number AC Source Plug Type Cordset Rating Power Cord Reference Illustration Switzerland CAB 9K10A SW CAB C15 ACS MP232 A 10 A 250 VAC Figure 5 Australia CAB AS3112 C15 AU AS3112 10 A 250 VAC Figure 6 United Kingdom CAB BS1363 C15 UK BS 1363 10 A 250 VAC Figure 7 South Africa India CAB BS546 C15 SA BS 546 10...

Page 15: ...AC Power Cord Australia Figure 7 CAB BS1363 C15 UK AC Power Cord United Kingdom Plug MP232 R Cordset rating 10 A 250 V Length 8 ft 2 in 2 5 m 186578 Connector IEC 60320 C15 Connector IEC 60320 C15 Cordset rating 10 A 250 V Length 8 ft 2 in 2 5 m Plug SAA AS 3112 113347 Cordset rating 10 A 250 V Length 8 ft 2 in 2 5 m 113351 Connector IEC 60320 C15 Plug BS 1363 13A fuse ...

Page 16: ...6 C15 IT AC Power Cord Italy Figure 10 CAB CEE77 C15 EU AC Power Cord Europe Cordset rating 10A 250V 6 ft 0 in 1 83 m Plug BS 546 SABS 164 1 196271 Connector IEC60320 C15 Plug CEI 23 16 7 Cordset rating 10 A 250 V Length 8 ft 2 in 2 5 m 113349 Connector IEC 60320 C15 Connector IEC 60320 C15 Cordset rating 16 A 250 V Length 8 ft 2 in 2 5 m Plug CEE 7 7 113348 ...

Page 17: ...S515 C15 US AC Power Cord North America Figure 13 CAB C15 ISR AC Power Cord Israel Plug IRAM 2073 Cordset rating 10 A 250 V Length 8 ft 2 in 2 5 m 113346 Connector IEC 60320 C15 Connector IEC60320 C15 Cordset rating 13A 125V 8 2 feet 2 5m Plug NEMA 5 15P 192260 Connector IEC 60320 C15 Cordset rating 10 A 250 V Length 8 ft 2 in 2 5 m Plug EL212 334126 ...

Page 18: ...ords Figure 14 CAB C15 JPN AC Power Cord Japan Figure 15 CAB EL223 C15 BR AC Power Cord Brazil Connector IEC 60320 C15 Cordset rating 12 A 125 V Length 8 ft 2 in 2 5 m Plug JIS C8303 334127 Connector IEC 60320 C15 Cordset rating 10 A 250 V Length 8 ft 2 in 2 5 m Plug EL223 334128 ...

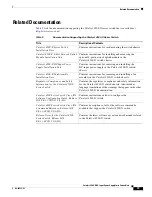
Page 19: ...witch chassis Catalyst 4500 X Fan Assembly Installation Note Contains instructions for removing and installing a fan assembly in the Catalyst 4500 X switch chassis Regulatory Compliance and Safety Information for the Catalyst 4500 X Series Switch Contains the regulatory compliance and safety information for the Catalyst 4500 X switch chassis Also includes language translations of the warnings that...

Page 20: ...document is to be used in conjunction with the documents listed in the Related Documentation section Cisco and the Cisco logo are trademarks or registered trademarks of Cisco and or its affiliates in the U S and other countries To view a list of Cisco trademarks go to this URL www cisco com go trademarks Third party trademarks mentioned are the property of their respective owners The use of the wo...

Reviews: