background image


xiii

Cisco 1900 Series Hardware Installation

OL-19084-02

Preface

Summary of Contents for Catalyst 1900 Series

Page 1: ... Systems Inc 170 West Tasman Drive San Jose CA 95134 1706 USA http www cisco com Tel 408 526 4000 800 553 NETS 6387 Fax 408 527 0883 Cisco 1900 Series Integrated Services Router Hardware Installation Text Part Number OL 19084 02 ...

Page 2: ...y of California Berkeley UCB as part of UCB s public domain version of the UNIX operating system All rights reserved Copyright 1981 Regents of the University of California NOTWITHSTANDING ANY OTHER WARRANTY HEREIN ALL DOCUMENT FILES AND SOFTWARE OF THESE SUPPLIERS ARE PROVIDED AS IS WITH ALL FAULTS CISCO AND THE ABOVE NAMED SUPPLIERS DISCLAIM ALL WARRANTIES EXPRESSED OR IMPLIED INCLUDING WITHOUT L...

Page 3: ...ures 1 6 Product Serial Number Location 1 6 Cisco Product Identification Tool 1 8 Built In Interfaces 1 8 Removable Interchangeable and Optional Modules 1 8 Memory 1 9 LED Indicators 1 10 Chassis Ventilation 1 12 Real Time Clock 1 12 Chassis Security 1 13 Wireless LAN Connectivity 1 13 Baud Reset Button 1 14 Interface Numbering 1 14 Specifications 1 14 Regulatory Compliance 1 18 C H A P T E R 2 Pr...

Page 4: ...e Baud Rates 2 9 ISDN BRI Connections 2 9 CSU DSU Connections 2 10 Inspecting the Router 2 10 Installation Checklist 2 11 Site Log 2 13 Required Tools and Equipment for Installation and Maintenance 2 13 C H A P T E R 3 Cable Information and Specifications for Cisco 1900 Series Routers 3 1 Console and Auxiliary Port Considerations 3 1 Console Port Connections 3 1 EIA TIA 232 Port 3 1 USB Serial Con...

Page 5: ...Connecting to the Console Port with Linux 4 18 Installing the Cisco Microsoft Windows USB Device Driver 4 18 Installing the Cisco Microsoft Windows XP USB Driver 4 19 Installing the Cisco Microsoft Windows 2000 USB Driver 4 19 Installing the Cisco Microsoft Windows Vista USB Driver 4 19 Uninstalling the Cisco USB Driver 4 20 Uninstalling the Cisco Microsoft Windows XP and 2000 USB Driver 4 20 Unin...

Page 6: ...he Configuration 6 7 Using Cisco Configuration Professional Express 6 8 Using the Cisco CLI Manual Configuration 6 9 Configuring the Router Hostname 6 10 Configuring the Enable and Enable Secret Passwords 6 11 Configuring the Console Idle Privileged EXEC Timeout 6 12 Configuring Gigabit Ethernet Interfaces 6 14 Specifying a Default Route or Gateway of Last Resort 6 16 Configuring IP Routing and IP...

Page 7: ...lains how to install connect and perform initial configuration for the Cisco 1900 series Integrated Services Routers ISRs Some information may not apply to your particular router model For warranty service and support information see the Cisco Warranty Terms section in the Readme First for the Cisco 1900 Series Integrated Services Routers document that was shipped with your router Audience This do...

Page 8: ...for the Router Describes how to activate a software package or feature and perform a license transfer Convention Indication bold font Commands and keywords and user entered text appear in bold font italic font Document titles new or emphasized terms and arguments for which you supply values are in italic font Elements in square brackets are optional x y z Required alternative keywords are grouped ...

Page 9: ...71 SAVE THESE INSTRUCTIONS Waarschuwing BELANGRIJKE VEILIGHEIDSINSTRUCTIES Dit waarschuwingssymbool betekent gevaar U verkeert in een situatie die lichamelijk letsel kan veroorzaken Voordat u aan enige apparatuur gaat werken dient u zich bewust te zijn van de bij elektrische schakelingen betrokken risico s en dient u op de hoogte te zijn van de standaard praktijken om ongelukken te voorkomen Gebru...

Page 10: ...bolo di avvertenza indica un pericolo La situazione potrebbe causare infortuni alle persone Prima di intervenire su qualsiasi apparecchiatura occorre essere al corrente dei pericoli relativi ai circuiti elettrici e conoscere le procedure standard per la prevenzione di incidenti Utilizzare il numero di istruzione presente alla fine di ciascuna avvertenza per individuare le traduzioni delle avverten...

Page 11: ...ero que le ayudará a encontrar el texto traducido en el apartado de traducciones que acompaña a este dispositivo GUARDE ESTAS INSTRUCCIONES Varning VIKTIGA SÄKERHETSANVISNINGAR Denna varningssignal signalerar fara Du befinner dig i en situation som kan leda till personskada Innan du utför arbete på någon utrustning måste du vara medveten om farorna med elkretsar och känna till vanliga förfaranden ...

Page 12: ...rnecido ao final de cada aviso para localizar sua tradução nos avisos de segurança traduzidos que acompanham o dispositivo GUARDE ESTAS INSTRUÇÕES Advarsel VIGTIGE SIKKERHEDSANVISNINGER Dette advarselssymbol betyder fare Du befinder dig i en situation med risiko for legemesbeskadigelse Før du begynder arbejde på udstyr skal du være opmærksom på de involverede risici der er ved elektriske kredsløb ...

Page 13: ...xiii Cisco 1900 Series Hardware Installation OL 19084 02 Preface ...

Page 14: ...s not limited to CISCO designated products Statement 371 Warning There is the danger of explosion if the battery is replaced incorrectly Replace the battery only with the same or equivalent type recommended by the manufacturer Dispose of used batteries according to the manufacturer s instructions Statement 1015 Warning Do not use this product near water for example near a bath tub wash bowl kitche...

Page 15: ... Overview of Cisco Network Modules and Service Modules for Cisco Access Routers Installing Cisco Network Modules and Service Modules in Cisco Access Routers Cisco Interface Cards for Cisco Access Routers Installing Cisco Interface Cards in Cisco Access Routers Installing Replacing and Upgrading Components in Cisco Modular Access Routers and Integrated Services Routers Declarations of Conformity an...

Page 16: ...ple PDF files simultaneously and to change case sensitivity and other options Adobe Reader s online help has more information about how to search PDF documents Obtaining Documentation and Submitting a Service Request For information on obtaining documentation submitting a service request and gathering additional information see the monthly What s New in Cisco Product Documentation which also lists...

Page 17: ... USB devices and a USB mini Type B serial console port is available in addition to the RJ 45 console connector This chapter provides an overview of the Cisco 1900 series routers and includes the following sections Safety Warnings page 1 1 Chassis Views page 1 2 Hardware Features page 1 6 Interface Numbering page 1 14 Specifications page 1 14 Regulatory Compliance page 1 18 Safety Warnings Warning ...

Page 18: ...e of a special tool lock and key or other means of security Statement 1017 Chassis Views This section contains views of the front and rear panels of Cisco 1900 series routers showing the locations of the power and signal interfaces the interface card slots and the status indicators Figure 1 1 shows the front panel of the Cisco 1905 and Cisco 1921 router Figure 1 2 shows the back panel connectors o...

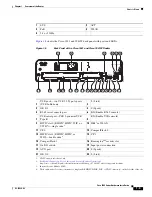
Page 19: ...EHWIC in the Cisco 1905 and Cisco 1921 ISRs Cisco 1900 Series SYS ACT POE 253707 1 2 3 1 EHWIC HWIC WIC or VWIC1 slots 0 and 1 slot 0 Right slot 1 Left or double wide2345 1 VWIC support is for data only 2 Double wide slot on the 1921 only 3 The 1905 slot 0 Right comes with a permanently installed interface card Only slot 1 Left is available 2 EN Enable RJ 45 console 3 RJ 45 serial console port 4 A...

Page 20: ...941 and Cisco 1941W Router LEDs 4 Only 1 EHWIC Gigabit Ethernet Switch can be installed in a 1905 or 1921 5 See Module Support on Cisco s Integrated Services Routers Generation 2 http cisco com en US prod collateral routers ps10538 aag_c07_563807 pdf for supported modules 6 Power off the PoE before installing an EHWIC in the Cisco 1905 and Cisco 1921 ISRs 1 Antenna mounts1 1 The antenna mounts are...

Page 21: ...1 VWIC support is for data only 2 See Module Support on Cisco s Integrated Services Routers Generation 2 http cisco com en US prod collateral routers ps10538 aag_c07_563807 pdf for supported modules 10 ISM3 or WLAN 3 Internal Service Module ISM 11 CF 0 12 CompactFlash 0 13 HWIC slot 1 EHWIC HWIC or WIC double wide4 4 The double wide slot can accommodate a single wide EHWIC HWIC WIC or VWIC data on...

Page 22: ...ct Serial Number Location The serial number and common language equipment identifier CLEI label for the Cisco 1905 and Cisco 1921 router is located on the rear of the chassis See Figure 1 6 The product ID PID label for the Cisco 1905 and Cisco 1921 series routers is located on the bottom of the chassis See Figure 1 8 The serial number label for the Cisco 1940 series routers is located on the rear ...

Page 23: ...te The serial number for Cisco 1900 series routers is 11 characters long EN EN S L CONSOLE AUX GE 0 0 GE 0 1 POE FLASH Cisco 1905 RESET EHWIC 1 EHWIC 0 S L BAUD 48VDC 1 67A 100 240 V 50 60 Hz 1A 253911 1 2 1 Product ID PID 2 Compliance label DO NOT REMOVE DURING NETWORK OPERATION DO NOT REMOVE DURING NETWORK OPERATION 251370 1 4 3 2 OVE DURING K OPERATIO N 1 Product ID PID 2 Serial Number SN 3 Pro...

Page 24: ...ptional Modules Some modules can be installed either by inserting them into slots on the chassis or by opening the chassis and plugging them into connectors inside The WLAN is factory installed CompactFlash memory and enhanced high speed WAN interface cards EHWICs fit into slots on the Cisco 1940 series chassis and can be installed or removed without opening the chassis A connector inside the Cisc...

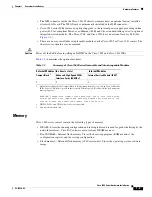
Page 25: ...pes of memory DRAM Stores the running configuration and routing tables and is used for packet buffering by the network interfaces Cisco IOS software executes from DRAM memory Boot NVRAM Internal flash memory Stores the bootstrap program ROM monitor the configuration register and the startup configuration Flash memory External flash memory 1940 series only Stores the operating system software image...

Page 26: ...Boot or NVRAM Internal 16 MB flash memory Type DDR2 DIMM expansion slots 0 Default onboard memory 2561 MB non ECC Maximum memory 512 MB2 Boot or NVRAM Internal 16 MB flash memory 1 256 MB cannot support net boot or warm upgrade functions Net boot and warm upgrade require 512 MB of memory 2 512 MB activation requires memory licensing feature See the Cisco IOS Software Activation Configuration Guide...

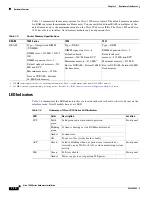
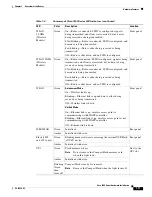
Page 27: ...d Off Radio is shut down and no SSID is configured Front panel WLAN Green Autonomous Mode On Wireless link is up Blinking Ethernet link is up and data is either being received or being transmitted Off Wireless link is down Unified Mode On Ethernet link is up wireless access point is communicating with LWAPP controller Blinking Ethernet link is up wireless access point is not communicating with LWA...

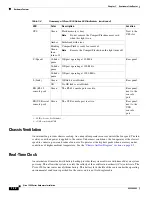
Page 28: ...attery This battery lasts the life of the router under the operating environmental conditions specified for the router and is not field replaceable CF 0 Green Flash memory is busy Note Do not remove the CompactFlash memory card when this light is on Next to the CF0 slot Amber Initialized with error Blinking Green then turns off CompactFlash is ready for removal Note Remove the CompactFlash when th...

Page 29: ... device you must use a console cable to connect a PC to the host router s console port as described in Chapter 5 Connecting to a Console Terminal or Modem and then use the Cisco IOS command line interface CLI to access the interface Table 1 5 describes the radios and antennas for the Cisco 1900 series wireless routers The 5 GHz radio incorporates an Unlicensed National Information Infrastructure U...

Page 30: ...mat for the slots is interface type 0 slot number interface number Table 1 6 summarizes the interface numbering See Figure 1 5 to identify the slot numbers Note On the Cisco 1900 series router the numbering format for configuring an async interface is 0 slot port To configure the line associated with an async interface simply use the interface number to specify the async line For example line 0 0 ...

Page 31: ... Type B USB 2 0 compliant Baud rates 1200 2400 4800 9600 19200 38400 57600 and 115200 Auxiliary ports RJ 45 connector Baud rates 1200 2400 4800 9600 19200 38400 57600 and 115200 USB port One USB Type A USB 2 0 compliant 2 5 W 500 mA max 3 10 100 1000 Gigabit Ethernet Two RJ 45 connectors GE0 GE1 Auto MDIX4 Environmental Operating humidity 10 to 85 RH Operating temperature up to 5906 ft 1800 m elev...

Page 32: ...ompliance information see the Regulatory Compliance and Safety Information for Cisco 1900 Series Routers document Telecom TIA EIA IS 968 CS 03 ANSI T1 101 IEEE 802 3 RTTE Directive For detailed compliance information see the Regulatory Compliance and Safety Information for Cisco 1900 Series Routers document 1 Refer to the Cisco 1900 Series Integrated Services Routers Data Sheet for additional info...

Page 33: ...e RJ 45 connector and one USB mini Type B USB 2 0 compliant Baud rates 1200 2400 4800 9600 19200 38400 57600 and 115200 Auxiliary ports RJ 45 connector Baud rates 1200 2400 4800 9600 19200 38400 57600 and 115200 USB ports Two USB Type A USB 2 0 compliant 2 5 W 500 mA max 3 10 100 1000 Gigabit Ethernet Two RJ 45 connectors GE0 GE1 Auto MDIX4 Environmental Operating humidity 10 to 85 RH Operating te...

Page 34: ...d Safety Information for Cisco 1900 Series Routers document Safety compliance UL 60950 1 CAN CSA C22 2 No 60950 1 EN 60950 1 AS NZS 60950 1 IEC 60950 1 For detailed compliance information see the Regulatory Compliance and Safety Information for Cisco 1900 Series Routers document Telecom TIA EIA IS 968 CS 03 ANSI T1 101 ITU T G 823 G 824 IEEE 802 3 RTTE Directive For detailed compliance information...

Page 35: ...2 13 Note To see translations of the warnings that appear in this publication refer to the Regulatory Compliance and Safety Information for Cisco 1900 Series Routers document that accompanies your router Safety Recommendations Follow these guidelines to ensure general safety Keep the chassis area clear and dust free during and after installation If you remove the chassis cover put it in a safe pla...

Page 36: ...hen working on equipment powered by electricity Warning Do not work on the system or connect or disconnect cables during periods of lightning activity Statement 1001 Warning Read the installation instructions before connecting the system to the power source Statement 1004 Warning When installing or replacing the unit the ground connection must always be made first and disconnected last Statement 1...

Page 37: ...rcuitry ESD can occur if electronic printed circuit cards are improperly handled and can cause complete or intermittent failures Always follow ESD prevention procedures when removing and replacing modules Ensure that the router chassis is electrically connected to earth ground Wear an ESD preventive wrist strap ensuring that it makes good skin contact Connect the clip to an unpainted surface of th...

Page 38: ...guration section on page 2 4 to help avoid equipment failures and reduce the possibility of environmentally caused shutdowns If you are currently experiencing shutdowns or an unusually high number of errors with your existing equipment these precautions may help you isolate the cause of the failures and prevent future problems Site Configuration The following precautions will help you plan an acce...

Page 39: ...ng to Connect to a Network page 2 7 For cable connection procedures see the Cable Connection Procedures for Cisco 1900 Series Routers document Console and Auxiliary Port Considerations The router includes USB asynchronous serial and auxiliary ports The console and auxiliary ports provide access to the router either locally using a console terminal connected to the console port or remotely using a ...

Page 40: ...l The default parameters for the console port are 9600 baud 8 data bits no parity and 1 stop bit The console port does not support mode control For detailed information about installing a console terminal see the Connecting to the Console Port with Microsoft Windows section on page 5 4 of the Cable Connection Procedures for Cisco 1900 Series Routers document For operation with Microsoft Windows th...

Page 41: ...net Connections page 2 7 Serial Connections page 2 7 ISDN BRI Connections page 2 9 CSU DSU Connections page 2 10 Refer to the following online documents for more information about network connections and interfaces Cisco Modular Access Router Cable Specifications Ethernet Connections The IEEE has established Ethernet as standard IEEE 802 3 The Cisco 1941 Ethernet implementations are as follows 100...

Page 42: ... DTE and DCE devices Signaling Standards Supported The synchronous serial ports available for the router support the following signaling standards EIA TIA 232 EIA TIA 449 V 35 X 21 and EIA 530 You can order a Cisco DB 60 shielded serial transition cable that has the appropriate connector for the standard you specify The documentation for the device that you want to connect should indicate the stan...

Page 43: ...anced drivers allow EIA TIA 449 signals to travel greater distances than EIA TIA 232 signals Typically EIA TIA 449 and EIA 530 can support a 2 Mbps rate and V 35 can support a 4 Mbps rate Asynchronous Synchronous Serial Module Baud Rates The following baud rate limitations apply to the slow speed serial interfaces in the asynchronous synchronous serial modules Asynchronous interface Maximum baud r...

Page 44: ...ore information on BRI WICs refer to Cisco com CSU DSU Connections CSU DSU WICs are available that provide switched 56 kbps connections or full or fractionalized T1 connections For more information on CSU DSU WICs refer to Cisco com Inspecting the Router Do not unpack the router until you are ready to install it If the final installation site will not be ready for some time keep the chassis in its...

Page 45: ...ation Checklist Installation Checklist The sample installation checklist lists items and procedures for installing a new router Make a copy of this checklist and mark each item when you complete it Include a copy of the checklist for each router in your Site Log described in the Site Log section on page 2 13 ...

Page 46: ...Log Site power voltages verified Installation site power check completed Required tools available Additional equipment available Router received Router quick start guide received Cisco Regulatory Compliance and Safety Information Roadmap document received Product registration card received Chassis components verified Initial electrical connections established ASCII terminal for local configuration...

Page 47: ...pment for installing and upgrading the router and its components ESD preventive cord and wrist strap Number 2 Phillips screwdriver for installing or removing modules and a flat blade screwdriver for removing CompactFlash cover upgrading memory or other components small 3 16 inch 0 48 centimeter and medium 1 4 inch 0 63 centimeter A 1 4 inch 0 63 centimeter nut driver Wire crimper AWG 14 wire for c...

Page 48: ...es Hardware Installation OL 19084 02 Chapter 2 Preparing for Router Installation Required Tools and Equipment for Installation and Maintenance NT1 device for ISDN BRI S T interfaces if not supplied by your service provider ...

Page 49: ...outer to a console terminal or modem The main difference between the console and auxiliary ports is that the auxiliary port supports flow control whereas the console port does not Flow control paces the transmission of data between a sending device and a receiving device Flow control ensures that the receiving device can absorb the data sent to it before the sending device sends more When the buff...

Page 50: ...parity and 1 stop bit The console port does not support mode control For detailed information about installing a console terminal see the Connecting to the Console Port with Microsoft Windows section on page 5 4 of the Cable Connection Procedures for Cisco 1900 Series Routers document For operation with Microsoft Windows the Cisco Windows USB Console Driver must be installed on any PC connected to...

Page 51: ... interfaces Ethernet Connections page 3 3 Serial Connections page 3 3 ISDN BRI Connections page 3 5 CSU DSU Connections page 3 6 Refer to the following online documents for more information about network connections and interfaces Cisco Modular Access Router Cable Specifications Ethernet Connections The IEEE has established Ethernet as standard IEEE 802 3 The Cisco 1941 Ethernet implementations ar...

Page 52: ... 1 lists typical DTE and DCE devices Signaling Standards Supported The synchronous serial ports available for the router support the following signaling standards EIA TIA 232 EIA TIA 449 V 35 X 21 and EIA 530 You can order a Cisco DB 60 shielded serial transition cable that has the appropriate connector for the standard you specify The documentation for the device that you want to connect should i...

Page 53: ...commonly used Balanced drivers allow EIA TIA 449 signals to travel greater distances than EIA TIA 232 signals Typically EIA TIA 449 and EIA 530 can support a 2 Mbps rate and V 35 can support a 4 Mbps rate Asynchronous Synchronous Serial Module Baud Rates The following baud rate limitations apply to the slow speed serial interfaces in the asynchronous synchronous serial modules Asynchronous interfa...

Page 54: ... ports When detaching cables detach the end away from the unit first Statement 1026 Use a BRI cable not included to connect the BRI WIC directly to an ISDN Table 3 3 lists the specifications for ISDN BRI cables For information about pinouts refer to the Cisco Modular Access Router Cable Specifications online document which is located on Cisco com For more information on BRI WICs refer to Cisco com...

Page 55: ...ponents that can be upgraded or replaced to expand and enhance the router s functionality These components either are inserted internally into the router or are plugged into slots in the router chassis Note To see translations of the warnings that appear in this publication refer to the Regulatory Compliance and Safety Information for Cisco 1900 Series Routers document that accompanies your router...

Page 56: ... be aware of the hazards involved with electrical circuitry and be familiar with standard practices for preventing accidents Use the statement number provided at the end of each warning to locate its translation in the translated safety warnings that accompanied this device Statement 1071 SAVE THESE INSTRUCTIONS Warning No user serviceable parts inside Do not open Statement 1073 Warning Read the i...

Page 57: ...Mounting the Chassis Caution The front panel bezel must not be removed from the Cisco 1900 series router It is part of the product s enclosure and must be left in place to prevent damage from foreign parts entering the router to provide a shield from internal electromagnetic interference EMI and to direct the flow of cooling air properly through the chassis Chassis Airflow Diagram Figure 4 2 shows...

Page 58: ...ld damage the chassis Chassis Grounding After the router has been installed you must connect the chassis to a reliable earth ground For the chassis ground connection procedure see the Installing the Chassis Ground Connection section on page 4 10 Wall Mounting the Chassis Warning Read the wall mounting instructions carefully before beginning installation Failure to use the correct hardware or to fo...

Page 59: ...ll Mounting the Chassis Figure 4 3 shows the wall mounting features on the Cisco 1905 and Cisco 1921 routers Figure 4 3 Wall Mounting Features on the Cisco 1905 and Cisco 1921 Routers 1 Wall screws 2 8 inches 20 3 cm 3 Chassis mounting holes on bottom 4 Router chassis 5 Mounting surface 253711 5 4 3 2 1 1 ...

Page 60: ...e surface of the wall Step 2 Remove the rubber feet from the router Step 3 Hang the router on the screws This is the appropriate orientation for safe use See Figure 4 3 and Figure 4 4 Caution If you install the screws in drywall use hollow wall anchors 1 8 inch by 5 16 inch to secure the screws If the screws are not properly anchored the strain of the cables connected to the router back panel coul...

Page 61: ...ting brackets allow installing in either a front and rear facing position You can mount the router in the following ways Front mounting Brackets attached at the front of the chassis with the front panel facing forward Back mounting Brackets attached at the back of the chassis with the back panel facing forward Note The rubber feet need to be removed for rack mounting Attaching Rack Mount Brackets ...

Page 62: ...rdware Installation OL 19084 02 Chapter 4 Installing and Connecting the Router Rack Mounting the Chassis Figure 4 6 Bracket Installation for Back Mounting the Cisco 1905 and Cisco 1921 ISRs 253713 Cisco 1900 Series SYS ACT POE ...

Page 63: ...ward Figure 4 7 Bracket Installation for Front Mounting the Cisco 1940 Series ISR Figure 4 8 shows how to attach the brackets to the sides of the router with the back panel forward Figure 4 8 Bracket Installation for Back Mounting the Cisco 1940 Series ISR DO NOT REMOVE DURING NETWORK OPERATION DO NOT REMOVE DURING NETWORK OPERATION 250998 DO NOT REMOVE DURING NETWORK OPERATION DO NOT REMOVE DURIN...

Page 64: ...ning This equipment needs to be grounded Use a green and yellow 12 to 14 AWG ground wire to connect the host to earth ground during normal use Statement 242 You must connect the chassis to a reliable earth ground using a ground lug and size 14 AWG 2 mm2 wire To install the ground connection for a Cisco 1900 series router follow these steps Step 1 Strip one end of the ground wire to expose approxim...

Page 65: ... Cisco 1921 Routers Figure 4 11 Chassis Ground Connection on the Cisco 1941 Router Step 4 Connect the other end of the ground wire to a known good electrical ground point Please consult with a licensed electrician if you have any questions about the suitability of the ground connection After the router is installed and properly grounded you can connect the WAN and LAN cables as required for your i...

Page 66: ...ation for short circuit over current protection Ensure that the protective device is rated not greater than 15A 120VAC 10A 240VAC Statement 1005 Warning Take care when connecting units to the supply circuit so that wiring is not overloaded Statement 1018 This section explains how to connect AC or DC power to Cisco 1900 series routers and a console terminal It covers the following topics Power Conn...

Page 67: ...y number is 911 You need to be aware of the emergency number in your country Statement 361 Warning Do not use this product near water for example near a bath tub wash bowl kitchen sink or laundry tub in a wet basement or near a swimming pool Statement 1035 Warning Never install telephone jacks in wet locations unless the jack is specifically designed for wet locations Statement 1036 Warning Avoid ...

Page 68: ...with such circuits because they may cause serious injury or death For proper installation and grounding of the antenna please refer to national and local codes for example U S NFPA 70 National Electrical Code Article 810 Canada Canadian Electrical Code Section 54 Statement 1052 Warning Class I CDRH and Class 1M IEC laser products Statement 1055 Warning Invisible laser radiation may be emitted from...

Page 69: ...ment Cisco serial 1T 60 pin D sub blue CSU DSU and serial network or equipment Cisco serial transition cable that matches the signaling protocol EIA TIA 232 EIA TIA 449 V 35 X 21 or EIA TIA 530 and the serial port operating mode DTE or DCE Refer to the Cisco Modular Access Router Cable Specifications document for information about selecting these cables Cisco Smart serial 2T Cisco Smart compact co...

Page 70: ...B 9 Modem adapter DB 9 to DB 25 Note The first time a Windows based PC is connected to the router a USB device driver must be installed See Installing the Cisco Microsoft Windows USB Device Driver page 4 18 This section describes how to connect a console terminal or PC to the console port and how to connect a modem to the auxiliary port Connecting to the Console Port with Microsoft Windows To conf...

Page 71: ...le to the Router Step 2 Connect the end of the cable with the DB 9 connector or USB Type A to the terminal or PC If your terminal or PC has a console port that does not accommodate a DB 9 connector you must provide an appropriate adapter for that port Step 3 To communicate with the router start a terminal emulator application 1 USB 5 pin mini Type B console port 2 USB 5 pin mini Type B to USB Type...

Page 72: ...dev tty usbmodem1a21 9600 To disconnect the OS X USB console from the Terminal window Enter Ctrl a followed by Ctrl Connecting to the Console Port with Linux This procedure shows how to connect a Linux system USB port to the console using the built in Linux Terminal utility Step 1 Open the Linux Terminal window Step 2 Connect the Linux USB port to the router Step 3 Enter the following commands to ...

Page 73: ... Found New Hardware Wizard appears Step 7 The USB console is ready for use Installing the Cisco Microsoft Windows 2000 USB Driver This procedure shows how to install the Microsoft Windows 2000 USB driver Step 1 Obtain the file cisco_usbconsole zip from the Cisco com web site and unzip it Step 2 Double click the file setup exe Step 3 The Cisco Virtual Com InstallShield Wizard begins Click Next Step...

Page 74: ... be removed using the Windows Add Remove Programs utility or the setup exe program Using the Add Remove Programs utility Note Disconnect the router console terminal before uninstalling the driver Step 1 Click Start Control Panel Add or Remove Programs Step 2 Scroll to Cisco Virtual Com and click Remove Step 3 When the Program Maintenance window appears select the Remove radio button Click Next Usi...

Page 75: ... Step 4 When the Remove the Program window appears click Remove Note If a User Account Control warning appears click Allow I trust this program to proceed Step 5 When the InstallShield Wizard Completed window appears click Finish Connecting to the Auxiliary Port When a modem is connected to the auxiliary port a remote user can dial in to the router and configure it Use the light blue console cable...

Page 76: ... end of the modem adapter to the modem Step 4 Make sure that your modem and the router auxiliary port are configured for the same transmission speed up to 115200 bps is supported and for mode control with data carrier detect DCD and data terminal ready DTR operations 1 Aux port RJ 45 3 DB 9 to DB 25 modem adapter 2 Light blue console cable 4 Modem DO NOT REMOVE DURING NETWORK OPERATION DO NOT REMO...

Page 77: ...o see translations of the warnings that appear in this publication refer to the Regulatory Compliance and Safety Information for Cisco 1900 Series Routers document Power Connections Warning Read the installation instructions before connecting the system to the power source Statement 1004 Note The installation must comply with all required electrical codes applicable at the installation site Connec...

Page 78: ... connections for Cisco 1941 routers The connections summarized in Table 5 1 are also described in detail in the following documents Cisco Modular Access Router Cable Specifications Table 5 1 WAN and LAN Connections Port or Connection Port Type Color1 Connected to Cable Gigabit Ethernet GE RJ 45 yellow Ethernet switch or hub Crossover to connect to a router Straight through to connect to a switch T...

Page 79: ...The following cables and adapters may be used for connecting your router to a console terminal PC or modem USB Console cable USB 5 pin mini Type B to USB Type A See USB Serial Console section on page 3 2 for port details and Specifications section on page 1 14 Console cable EIA RJ 45 to DB 9 Modem adapter DB 9 to DB 25 Note The first time a Windows based PC is connected to the router a USB device ...

Page 80: ...h the following parameters 9600 baud 8 data bits no parity 1 stop bit and no flow control Refer to the Cisco 3900 Series 2900 Series and 1900 Series Software Configuration Guide for detailed information about using Cisco IOS software for configuring the router To connect the router to a terminal or PC follow these steps Step 1 Connect the end of the console cable with the RJ 45 connector to the li...

Page 81: ...ou must provide an appropriate adapter for that port Step 3 To communicate with the router start a terminal emulator application Connecting to the Console Port with Mac OS X This procedure shows how to connect a Mac OS X system USB port to the console using the built in OS X Terminal utility Step 1 Use the Finder to go to Applications Utilities Terminal 1 USB 5 pin mini Type B console port 2 USB 5...

Page 82: ...tep 2 Connect the Linux USB port to the router Step 3 Enter the following commands to find the Linux USB port number root usb suse cd dev root usb suse dev ls ltr ACM crw r r 1 root root 188 0 Jan 14 18 02 ttyACM0 root usb suse dev Step 4 Connect to the USB port with the following command followed by the router USB port speed root usb suse dev screen dev ttyACM0 9600 To disconnect the Linux USB co...

Page 83: ...ep 4 The Ready to Install the Program window appears Click Install Step 5 The InstallShield Wizard Completed window appears Click Finish Step 6 Connect the USB cable to the PC and router USB console ports See Table 5 1 on page 5 5 The EN LED for the USB console port turns green and within a few moments a series of Found New Hardware Wizard windows appear Step 7 The USB console is ready for use Ins...

Page 84: ... the Remove radio button Click Next Using the Setup exe program Note Disconnect the router console terminal before uninstalling the driver Step 1 Run the setup exe program Click Next Step 2 The InstallShield Wizard for Cisco Virtual Com appears Click Next Step 3 When the Program Maintenance window appears select the Remove radio button Click Next Step 4 When the Remove the Program window appears c...

Page 85: ...modem to the router follow these steps Step 1 Connect the RJ 45 end of the adapter cable to the black AUX port on the router See Figure 5 2 Figure 5 2 Connecting a Modem to the Router Step 2 Connect the DB 9 end of the console cable to the DB 9 end of the modem adapter Step 3 Connect the DB 25 end of the modem adapter to the modem Step 4 Make sure that your modem and the router auxiliary port are ...

Page 86: ...5 10 Cisco 1900 Series Hardware Installation OL 19084 01 Chapter 5 Cable Connection Procedures for Cisco 1900 Series Routers Connecting to a Console Terminal or Modem ...

Page 87: ... and cover panels serve three important functions they prevent exposure to hazardous voltages and currents inside the chassis they contain electromagnetic interference EMI that might disrupt other equipment and they direct the flow of cooling air through the chassis Do not operate the system unless all cards faceplates front covers and rear covers are in place Statement 1029 This section covers th...

Page 88: ...on guide For information about the configuration register see the Changing the Configuration Register Settings in the router s software configuration guide Note To view the boot sequence you must establish console connection to the Cisco router before it powers up Step 1 Make sure that your PC is powered up and connected as described in the Checklist for Power Up section on page 6 1 Step 2 Move th...

Page 89: ...ar a default configuration file was installed on the router prior to shipping See the Using Cisco Configuration Professional Express section on page 6 8 to configure the router Cisco Configuration Professional Express Use Cisco Configuration Professional Express web based application to configure the initial router settings See the Cisco Configuration Professional Express User Guide document on Ci...

Page 90: ...s ios fundamentals configuration guide 12_4 cf_12_4_book html This section explains how to configure a hostname for the router set passwords and configure an interface for communication with the management network Note The messages that are displayed will vary based on your router model the installed interface modules and the software image The following example and the user entries in bold are sh...

Page 91: ... Enter an enable secret password This password is encrypted for more security and cannot be seen when viewing the configuration The enable secret is a password used to protect access to privileged EXEC and configuration modes This password after entered becomes encrypted in the configuration Enter enable secret cisco Step 6 Enter an enable password that is different from the enable secret password...

Page 92: ...er Interface IP Address OK Method Status Protocol GigabitEthernet0 0 unassigned YES NVRAM administratively down down GigabitEthernet0 1 10 10 10 12 YES DHCP up up GigabitEthernet0 2 unassigned YES NVRAM administratively down down SSLVPN VIF0 unassigned NO unset up Any interface listed with OK value NO does not have a valid configuration ...

Page 93: ...g interface GigabitEthernet0 0 shutdown no ip address interface GigabitEthernet0 1 no shutdown ip address 10 10 10 12 255 255 255 0 interface GigabitEthernet0 2 shutdown no ip address end Step 11 Respond to the following prompts Select 2 to save the initial configuration 0 Go to the IOS command prompt without saving this config 1 Return back to the setup without saving this config 2 Save this conf...

Page 94: ...ompt Note If you see the next message it means that no other routers were found on the network attached to the port AT 6 ONLYROUTER Ethernet0 0 AppleTalk port enabled no neighbors found Step 3 The Router prompt indicates that you are now at the command line interface CLI and you have just completed a initial router configuration Nevertheless this is not a complete configuration At this point you h...

Page 95: ...es no no Step 2 Press Return to terminate autoinstall and continue with manual configuration Would you like to terminate autoinstall yes Return Several messages are displayed ending with a line similar to the following Copyright c 1986 2004 by cisco Systems Inc Compiled date time by person Step 3 Press Return to bring up the Router prompt flashfs 4 Initialization complete Router Step 4 Type enable...

Page 96: ... also follow the rules for Advanced Research Projects Agency Network ARPANET hostnames They must start with a letter end with a letter or digit and have as interior characters only letters digits and hyphens Names must be 63 characters or fewer For more information see the RFC 1035 Domain Names Implementation and Specification SUMMARY STEPS 1 enable 2 configure terminal 3 hostname name 4 Verify th...

Page 97: ...nfiguring Passwords and Privileges chapter in the Cisco IOS Security Configuration Guide Also see the Cisco IOS Password Encryption Facts tech note and the Improving Security on Cisco Routers tech note Restrictions If you configure the enable secret command it takes precedence over the enable password command the two commands cannot be in effect simultaneously SUMMARY STEPS 1 enable 2 configure te...

Page 98: ... the Cisco IOS Configuration Fundamentals and Network Management Configuration Guide In particular see the Configuring Operating Characteristics for Terminals and Troubleshooting and Fault Management chapters SUMMARY STEPS 1 enable 2 configure terminal 3 line console 0 4 exec timeout minutes seconds 5 end 6 show running config Step 4 enable secret password Example Router config enable secret green...

Page 99: ...e console 0 Example Router config line console 0 Configures the console line and starts the line configuration command collection mode Step 4 exec timeout minutes seconds Example Router config line exec timeout 0 0 Sets the idle privileged EXEC timeout which is the interval that the privileged EXEC command interpreter waits until user input is detected The example shows how to specify no timeout S...

Page 100: ...le 2 show ip interface brief 3 configure terminal 4 interface fastethernet gigabitethernet 0 port 5 description string 6 ip address ip address mask 7 no shutdown 8 end 9 show ip interface brief DETAILED STEPS Command or Action Purpose Step 1 enable Example Router enable Enables privileged EXEC mode Enter your password if prompted Step 2 show ip interface brief Example Router show ip interface brie...

Page 101: ...ep 5 description string Example Router config if description GE int to 2nd floor south wing Optional Adds a description to an interface configuration The description helps you remember what is attached to this interface The description can be useful for troubleshooting Step 6 ip address ip address mask Example Router config if ip address 172 16 74 3 255 255 255 0 Sets a primary IP address for an i...

Page 102: ...hnology_support_sub protocol_home html IP routing is automatically enabled in the Cisco IOS software When IP routing is configured the system will use a configured or learned route to forward packets including a configured default route Note This task section does not apply when IP routing is disabled To specify a default route when IP routing is disabled refer to the Configuring a Gateway of Last...

Page 103: ...obal configuration command In this usage the ip default network command takes an unconnected network as an argument If this network appears in the routing table from any source dynamic or static it is flagged as a candidate default route and is a possible choice as the default route If the router has no interface on the default network but does have a route to it it considers this network as a can...

Page 104: ...0 1 0 via 172 28 99 0 S 192 168 24 0 1 0 via 172 28 99 2 172 16 0 0 255 255 255 0 is subnetted 1 subnets C 172 16 99 0 is directly connected FastEthernet1 Router Step 4 ip route dest prefix mask next hop ip address admin distance permanent Example Router config ip route 192 168 24 0 255 255 255 0 172 28 99 2 Establishes a static route Step 5 ip default network network number or ip route dest prefi...

Page 105: ...s Privilege Levels and Login Usernames for CLI Sessions on Networking Devices section If you want to secure the vty lines with an access list see the Access Control Lists Overview and Guidelines Also see the Cisco IOS Password Encryption Facts tech note SUMMARY STEPS 1 enable 2 configure terminal 3 line vty line number ending line number 4 password password 5 login 6 end 7 show running config 8 Fr...

Page 106: ...ribes how to enter line configuration mode for the auxiliary line How you configure the auxiliary line depends on your particular implementation of the auxiliary AUX port See the following documents for information on configuring the auxiliary line Step 4 password password Example Router config line password guessagain Specifies a password on a line Step 5 login Example Router config line login En...

Page 107: ...n_example09186a0080093d2b shtml Modem Router Connection Guide tech note http www cisco com en US tech tk801 tk36 technologies_tech_note09186a008009428b shtml SUMMARY STEPS 1 enable 2 configure terminal 3 line aux 0 4 See the tech notes and sample configurations to configure the line for your particular implementation of the AUX port DETAILED STEPS Command or Action Purpose Step 1 enable Example Ro...

Page 108: ... 168 7 27 Repeat count 5 Datagram size 100 Timeout in seconds 2 Extended commands n Sweep range of sizes n Type escape sequence to abort Sending 5 100 byte ICMP Echos to 192 168 7 27 timeout is 2 seconds Success rate is 100 percent round trip min avg max 1 2 4 ms Command or Action Purpose Step 1 enable Example Router enable Enables privileged EXEC mode Enter your password if prompted Step 2 ping i...

Page 109: ...e by saving the running configuration to the startup configuration in NVRAM The NVRAM provides 256KB of storage on the router SUMMARY STEPS 1 enable 2 copy running config startup config DETAILED STEPS Saving Backup Copies of Configuration and System Image To aid file recovery and minimize downtime in case of file corruption we recommend that you save backup copies of the startup configuration file...

Page 110: ...ystem image file and the use of the copy flash0 flash1 tftp privileged EXEC command to copy the system image c3900 2is mz to a TFTP server The router uses the default username and password Command or Action Purpose Step 1 enable Example Router enable Enables privileged EXEC mode Enter your password if prompted Step 2 copy nvram startup config ftp rcp tftp Example Router copy nvram startup config f...

Page 111: ... the initial configuration on the router show version Displays the system hardware version the installed software version the names and sources of configuration files the boot images and the amount of installed DRAM NVRAM and flash memory show diag Lists and displays diagnostic information about the installed controllers interface processors and port adapters show interfaces Shows interfaces are o...

Page 112: ...6 26 Cisco 1900 Series Hardware Installation OL 19084 02 Chapter 6 Configuring the Router Verifying the Initial Configuration ...

Page 113: ...d on the router To try a new software package or feature activate the evaluation license for that package or feature Activating a New Software Package or Feature Complete the following steps to permanently activate a software package or feature on the your router Step 1 Purchase the software package or feature you want to install You will receive a product activation key PAK with your purchase Ste...

Page 114: ... and manage licenses Simple Network Management Protocol SNMP Use SNMP to install and manage software licenses Figure 1 shows the steps for software activation Figure 1 Steps for Software Activation RMA License Transfer To transfer a software license from a failed device to a new device go to the Cisco licensing portal at http www cisco com go license Note You will need the SN and PID of the defect...

Page 115: ...icenses for the Router Additional Information Additional Information See the Software Activation on Cisco Integrated Services Routers and Cisco Integrated Service Routers Generation 2 document on Cisco com for detailed information on about software activation on Cisco ISR G2 platforms ...

Page 116: ...7 4 Cisco 1900 Series Hardware Installation OL 19084 02 Chapter 7 Getting Software Licenses for the Router Additional Information ...

Reviews: