background image


2-8

Cisco Catalyst Blade Switch 3120 for HP Hardware Installation Guide

OL-12246-01

Chapter 2      Switch Installation

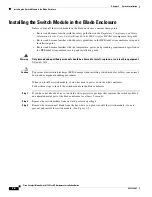
  Installing the Switch Module in the Blade Enclosure

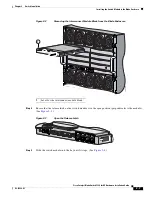
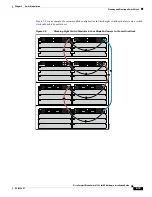
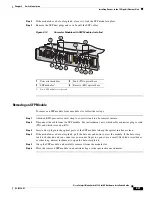
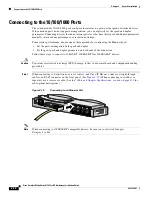
Figure 2-4

Installing the Switch Module into the Blade Enclosure Interconnect Module Bay

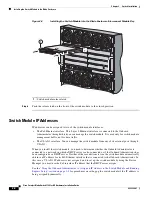
Step 6

Push the release latch on the front of the switch module to the closed position. 

Switch Module IP Addresses

IP addresses can be assigned to two of the switch module interfaces:

  •

The Fa0 Ethernet interface. This Layer 3 Ethernet interface is connected to the Onboard 
Administrator through which you can manage the switch module. It is used only for switch module 
management traffic, not for data traffic.

  •

The VLAN 1 interface. You can manage the switch module from any of its external ports through 
VLAN 1.

When you install the switch module, you need to determine whether the Onboard Administrator is 
connected to a network in which a DHCP server is also connected or if the Onboard Administrator has 
been configured as a DHCP server. If either of these conditions is true, the switch module automatically 
obtains an IP address for its Fa0 Ethernet interface that is connected to the Onboard Administrator. In 
this case, a VLAN 1 IP address is not assigned, and to set up the switch module by using the Device 
Manager you must use the Fa0 interface IP address that the DHCP server assigns. 

See the 

“Using the Onboard Administrator to Assign an IP Address to the Switch Module and Running 

Express Setup” section on page 2-9

 for procedures on setting up the switch module if the IP address is 

being assigned dynamically.

1

Switch module release latch

250306

24x

SFP19-20

19-20

21-22

SYST

S-MODE
S-MSTR
S-MMBR

CONSOLE

WS-CBS3120G-

S

MODE

UID

SFP 21-22

23x

26x

STK A

STK B

24x

1

Summary of Contents for Catalyst 3120

Page 1: ...dware Installation Guide March 2008 THE SPECIFICATIONS AND INFORMATION REGARDING THE PRODUCTS IN THIS MANUAL ARE SUBJECT TO CHANGE WITHOUT NOTICE ALL STATEMENTS INFORMATION AND RECOMMENDATIONS IN THIS MANUAL ARE BELIEVED TO BE ACCURATE BUT ARE PRESENTED WITHOUT WARRANTY OF ANY KIND EXPRESS OR IMPLIED USERS MUST TAKE FULL RESPONSIBILITY FOR THEIR APPLICATION OF ANY PRODUCTS Text Part Number OL 1224...

Page 2: ...television or radio are on circuits controlled by different circuit breakers or fuses Modifications to this product not authorized by Cisco Systems Inc could void the FCC approval and negate your authority to operate the product The Cisco implementation of TCP header compression is an adaptation of a program developed by the University of California Berkeley UCB as part of UCB s public domain vers...

Page 3: ...witch Module Console Port 3 10 100 1000 Ports 4 10 Gigabit Ethernet Module Slots 4 Cisco TwinGig Converter Module 4 LEDs 5 StackWise Plus Ports 8 Power Connectors 8 Management Options 8 Using the Device Manager 9 Using the Command Line Interface 10 Using the Onboard Administrator CLI and GUI 10 Other Management Options 10 Network Configurations 10 C H A P T E R 2 Switch Installation 1 Preparing fo...

Page 4: ... X2 Transceiver Modules and Cisco Converter Modules 18 Installing SFP Modules 20 Connecting to the 10 100 1000 Ports 22 Planning 10 100 1000 Ethernet Port Connections 23 Where to Go Next 24 C H A P T E R 3 Troubleshooting 1 Diagnosing Problems 1 Verify the Switch Module POST Results 1 Look at the Switch Module LEDs 2 Confirm the Switch Module Connections 2 Verify the Switch Module Performance 4 Cl...

Page 5: ... 4 SFP Module Cable Specifications 6 Two Twisted Pair Cable Pinouts 6 Four Twisted Pair Cable Pinouts for 1000BASE T Ports 7 Identifying a Crossover Cable 8 Console Port Adapter Pinouts 8 A P P E N D I X C Configuring the Switch with the CLI Based Setup Program 1 Accessing the CLI Through the Console Port 1 Connecting to the Console Port 1 Completing the Initial Configuration 4 I N D E X ...

Page 6: ...Contents 6 Cisco Catalyst Blade Switch 3120 for HP Hardware Installation Guide OL 12246 01 ...

Page 7: ...ns how to install it in the server enclosure and provides troubleshooting information This guide does not describe system messages that you might receive or how to configure your switch module For more information see the switch software configuration guide the switch command reference and the switch system message guide on the Cisco com Product Documentation home page at http www cisco com en US ...

Page 8: ...mber provided at the end of each warning to locate its translation in the translated safety warnings that accompanied this device SAVE THESE INSTRUCTIONS Statement 1071 The safety warnings for this product are translated into several languages in the Regulatory Compliance and Safety Information for the Cisco Catalyst Blade Switch 3000 Series for HP that ships with the product The EMC regulatory st...

Page 9: ...ceiver Modules Compatibility Matrix Cisco Small Form Factor Pluggable Modules Compatibility Matrix Compatibility Matrix for 1000BASE T Small Form Factor Pluggable Modules Obtaining Documentation Obtaining Support and Security Guidelines For information on obtaining documentation obtaining support providing documentation feedback security guidelines and also recommended aliases and general Cisco do...

Page 10: ...10 Cisco Catalyst Blade Switch 3120 for HP Hardware Installation Guide OL 12246 01 Preface Obtaining Documentation Obtaining Support and Security Guidelines ...

Page 11: ...rview The Cisco Catalyst Blade Switch 3120 for HP is a stackable Layer 3 switch module The number of ports depends on which modules are installed See the release notes and the software configuration guide for information about which Layer 3 features are supported See the Planning and Creating a Switch Stack section on page 2 13 for information about stacking the switch The Cisco Catalyst Blade Swi...

Page 12: ...ports Each external port has an associated LED 1 Switch module 8 LEDs for ports 19 and 20 or for the Gigabit Ethernet slot 1 2 UID1 LED 1 UID unit identifier 9 Gigabit Ethernet uplink ports 23 to 26 and port LEDs 3 Health LEDs 10 Gigabit Ethernet ports 19 and 20 or 10 Gigabit Ethernet slot 1 4 System LEDs2 2 SYST STCK MSTR MMBR 11 LEDs for ports 21 and 22 and for the 10 Gigabit Ethernet slot 2 5 M...

Page 13: ... from Cisco If you want to attach the switch module to any other device such as a terminal server you might need a different cable For console port and adapter pinout information see the Connector and Cable Specifications section on page B 1 Ports 19 to 22 10 Gigabit Ethernet module slots for use with the Cisco TwinGig Converter Modules and Cisco X2 transceiver modules Ports 23 to 26 External 10 1...

Page 14: ...iver modules see the switch release notes on Cisco com at this location http www cisco com en US products ps6748 tsd_products_support_series_home html For more information about the 10 Gigabit Ethernet module slots see the Installing Devices in the 10 Gigabit Ethernet Slots section on page 2 17 For cable specifications see Appendix B Connector and Cable Specifications Cisco TwinGig Converter Modul...

Page 15: ...roperly Table 1 2 lists the LED colors and their meanings Stack LED To see the status of the StackWise Plus ports press the Mode button The Stack LED STCK is green when the StackWise Plus ports are up and amber when the ports are down The bottom two 10 Gigabit Ethernet module slot LEDs show the status for StackWise Plus ports 1 and 2 respectively see item 11 in Figure 1 1 on page 1 2 When in stack...

Page 16: ...on it is amber when a failure is detected RJ 45 Uplink Port LEDs The external 10 100 1000BASE T copper Gigabit Ethernet uplink port LEDs display link and activity information about each individual port These LEDs are on the top left and right respectively of each RJ 45 port see item 9 in Figure 1 1 on page 1 2 Table 1 5 describes the port link LED colors and their meanings Table 1 3 Stack Master L...

Page 17: ...odule Installed When a converter module is in one of the 10 Gigabit Ethernet module slots the LEDs show the status of the SFP modules that are in the converter module If one converter module is installed in slots 19 and 20 and one converter module is installed in slots 20 and 21 this is how the LEDs correspond to the installed SFP modules 1 The top LED 19 corresponds to the SFP module in slot 19 2...

Page 18: ...o cables or equipment You can order these StackWise Plus cables from your Cisco sales representative CAB STK E 0 5M 0 5 meter cable CAB STK E 1M 1 meter cable CAB STK E 3M 3 meter cable Power Connectors The blade enclosure controls power to the switch module After the blade enclosure detects the presence of the switch module it moves the switch module to the full power state The switch module soft...

Page 19: ... the device manager from anywhere in your network through a web browser Follow these steps 1 Launch a web browser on your PC or workstation 2 Enter the switch module IP address in the web browser and press Enter The device manager page appears See Figure 1 2 Figure 1 2 Device Manager Page 3 Use the device manager to perform basic switch module configuration and monitoring Refer to the device manag...

Page 20: ...sed Setup Program Using the Onboard Administrator CLI and GUI See the HP BladeSystem enclosure setup and installation guide at http www hp com go bladesystem documentation for information on how to use the Onboard Administrator CLI and GUI Other Management Options You can use SNMP management applications such as CiscoWorks Small Network Management Solution SNMS to configure and manage the switch m...

Page 21: ...how to interpret the power on self test POST that ensures proper operation and how to make connections to the switch module Read the topics and perform the procedures in this order Preparing for Installation page 2 1 HP c Class BladeSystem Enclosure Architecture page 2 5 Installing the Switch Module in the Blade Enclosure page 2 6 Using the Onboard Administrator to Assign an IP Address to the Swit...

Page 22: ...o power and ground and can cause serious burns or weld the metal object to the terminals Statement 43 Warning Ethernet cables must be shielded when used in a central office environment Statement 171 Warning Do not work on the system or connect or disconnect cables during periods of lightning activity Statement 1001 Warning Read the installation instructions before connecting the system to the powe...

Page 23: ... the switch modules to logically enable the interconnect ports Gigabit Ethernet ports 23 and 24 See the switch module software configuration guide for information on configuring these ports See the HP c Class documentation for information on the port mapping between blade enclosures and the switch modules Caution To prevent electrostatic discharge ESD damage when installing switch modules follow y...

Page 24: ...ith your switch module The Cisco TwinGig Converter Modules with installed protective dust covers are shipped already installed on your switch module Console cable 1 meter Stackwise Plus cable Documentation CD that contains Cisco Catalyst Blade Switch 3000 Series for HP Getting Started Guide Regulatory Compliance and Safety Information for the Cisco Catalyst Blade Switch 3000 Series for HP Cisco an...

Page 25: ...al airflow Fill any unoccupied server slot bays or power module bays with blanks Bays 1 through 8 are available for Ethernet switch modules See the server enclosure documentation for information on the port mapping between blade enclosures and the switch modules 1 Blade enclosure rear view 7 Interconnect module bay 5 2 Blade enclosure fans 8 Interconnect module bay 6 3 Interconnect bay 1 with swit...

Page 26: ...ified in the HP BladeSystem enclosure setup and installation guide Warning Only trained and qualified personnel should be allowed to install replace or service this equipment Statement 1030 Caution To prevent electrostatic discharge ESD damage when installing switch modules follow your normal board and component handling procedures When you install a switch module you do not need to power down the...

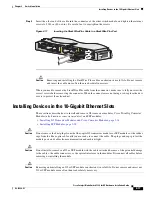
Page 27: ...nclosure Step 4 Ensure that the release latch on the switch module is in the open position perpendicular to the module See Figure 2 3 Figure 2 3 Open the Release Latch Step 5 Slide the switch module into the bay until it stops See Figure 2 4 1 Lever for the interconnect module blank 153142 1 153141 23x 24x 21x 24x 17x 18x 17x 20x 17 20 SYST STAT DLX SPD CONSOLE UID WS CBS 3020 HPQ MODE MEDIA DETEC...

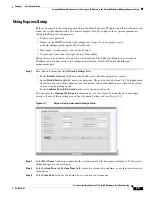
Page 28: ...When you install the switch module you need to determine whether the Onboard Administrator is connected to a network in which a DHCP server is also connected or if the Onboard Administrator has been configured as a DHCP server If either of these conditions is true the switch module automatically obtains an IP address for its Fa0 Ethernet interface that is connected to the Onboard Administrator In ...

Page 29: ...imately 2 minutes the switch module automatically obtains an IP address for its Fa0 interface through the Onboard Administrator This method of obtaining an IP address occurs if a DCHP server is configured on the same network or if the Onboard Administrator is configured as a DHCP server After you have installed the switch module see the Installing the Switch Module in the Blade Enclosure section o...

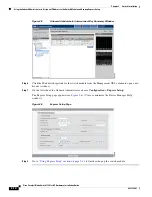
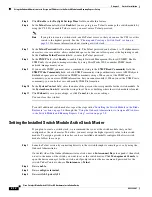
Page 30: ...terconnect Bay Summary Window Step 6 Click the IP address hyperlink for the switch module from the Management URL column to open a new browser window Step 7 On the left side of the Onboard Administrator choose Configuration Express Setup The Express Setup page appears see Figure 2 6 Close or minimize the Device Manager Help window Figure 2 6 Express Setup Page Step 8 Go to Using Express Setup sect...

Page 31: ...ement interface VLAN ID and to the Ethernet management port Step 1 Enter this information in the Network Settings fields In the Default Gateway field enter the IP address for the default gateway router In the Switch Password field enter your password The password can be from 1 to 25 alphanumeric characters can start with a number is case sensitive allows embedded spaces but does not allow spaces a...

Page 32: ... read community you can access SNMP information but you cannot modify it When you set the SNMP write community you can both access and modify SNMP information Step 10 In the System Contact field enter the name of the person who is responsible for the switch module In the System Location field enter the wiring closet floor or building where the switch module is located Step 11 Click Submit to save ...

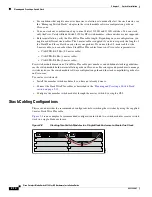
Page 33: ...ch modules are not stacked each acts as a standalone switch For general concepts and procedures to manage switch stacks see the switch module software configuration guide and command reference on Cisco com Caution The Cisco Catalyst Blade Switch 3120 for HP does not support switch stacks with other types of blade switches as members Combining the Cisco Catalyst Blade Switch 3120 for HP with other ...

Page 34: ...sco sales representative CAB STK E 0 5M 0 5 meter cable CAB STK E 1M 1 meter cable CAB STK E 3M 3 meter cable For switch module dimensions StackWise Plus cable part numbers and additional stacking guidelines see the switch module hardware installation guide on Cisco com For concepts and procedures to manage switch stacks see the switch module software configuration guide and the stack compatibilit...

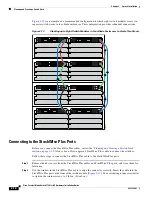
Page 35: ...pter 2 Switch Installation Planning and Creating a Switch Stack Figure 2 9 is an example of a recommended configuration in which eight switch modules create a switch stack in four blade enclosures Figure 2 9 Stacking Eight Switch Modules in Four Blade Enclosures to Create One Stack 250304 ...

Page 36: ...e Plus Ports Before you connect the StackWise Plus cables review the Planning and Creating a Switch Stack section on page 2 13 Always use a Cisco approved StackWise Plus cable to connect the switches Follow these steps to connect the StackWise Plus cable to the StackWise Plus ports Step 1 Remove the dust covers from the StackWise Plus cables and StackWise Plus ports and store them for future use S...

Page 37: ... These sections describe how to install and remove X2 transceiver modules Cisco TwinGig Converter Modules also known as converter modules and SFP modules Installing X2 Transceiver Modules and Cisco Converter Modules page 2 18 Installing SFP Modules page 2 20 Caution Do not remove the dust plugs from the fiber optic X2 transceiver modules or SFP modules or the rubber caps from the fiber optic cable...

Page 38: ...tch For more information about installing removing cabling and troubleshooting X2 transceiver modules see the module documentation that shipped with your device For module cable specifications see Appendix B Connector and Cable Specifications Installing a Transceiver or Converter Module When you install or remove the converter module the mode on the switch changes from 10 Gigabit Ethernet to Gigab...

Page 39: ...eiver modules disconnect the cables from the module For fiber optic modules install the optical bore dust plugs Step 3 For converter modules disconnect the cables from the SFP module Remove the SFP modules from the converter module Caution Do not remove the converter module with SFP modules or cables installed Always remove any cables and modules before removing the converter module from the slot ...

Page 40: ...and troubleshooting SFP modules see the module documentation that shipped with your device For module cable specifications see Appendix B Connector and Cable Specifications Installing an SFP Module To insert an SFP module into a converter module slot follow these steps Step 1 Attach an ESD preventive wrist strap to your wrist and to a bare metal surface Step 2 Remove the Cisco TwinGig Converter Mo...

Page 41: ...able connector plug is send TX and which is receive RX Step 3 Insert a dust plug into the optical ports of the SFP module to keep the optical interfaces clean Step 4 If the module has a bale clasp latch pull the bale out and down to eject the module If the bale clasp latch is obstructed and you cannot use your index finger to open it use a small flat blade screwdriver or other long narrow instrume...

Page 42: ...d duplex Set the port speed and duplex parameters on both ends of the connection Follow these steps to connect to 10BASE T 100BASE TX or 1000BASE T devices Caution To prevent electrostatic discharge ESD damage follow your normal board and component handling procedures Step 1 When connecting to workstations servers routers and Cisco IP Phones connect a straight through cable to an RJ 45 connector o...

Page 43: ...lanning 10 100 1000 Ethernet Port Connections The 10 100 1000 Ethernet ports use standard RJ 45 connectors with Ethernet pinouts The maximum cable length is 328 feet 100 meters The 100BASE TX and 1000BASE T traffic requires Category 5 Category 5e or Category 6 UTP cable The 10BASE T traffic can use Category 3 or Category 4 cable The autonegotiation feature is enabled by default on the switch At th...

Page 44: ...d to support desktop switching features You can fully configure and monitor the switch module from the CLI You can access the CLI either by connecting your management station directly to the switch module console port or by using Telnet from a remote management station Refer to the switch module command reference on Cisco com for more information Using SNMP You can use SNMP management applications...

Page 45: ...2 25 Cisco Catalyst Blade Switch 3120 for HP Hardware Installation Guide OL 12246 01 Chapter 2 Switch Installation Where to Go Next ...

Page 46: ...ence on Cisco com or the documentation that came with your SNMP application for more information This section includes these troubleshooting topics Verify the Switch Module POST Results page 3 1 Look at the Switch Module LEDs page 3 2 Confirm the Switch Module Connections page 3 2 Verify the Switch Module Performance page 3 4 Verify the Switch Module POST Results As the switch module powers on it ...

Page 47: ...rtors Try using the cable in another port or interface to see if the problem also exists there Ethernet and Fiber Cables Make sure that you have the correct cable type for the connection For Ethernet use Category 3 copper cable for 10 Mb s unshielded twisted pair UTP connections Use either Category 5 Category 5e or Category 6 UTP for 10 100 or 10 100 1000 Mb s connections For fiber optic connector...

Page 48: ... error disabled disabled or shutdown status on both sides of the connection If necessary re enable the port or the interface Ping the End Device Test the end device by pinging it from the directly connected switch module first and then work your way back port by port interface by interface trunk by trunk until you find the source of the connectivity issue Make sure that each switch module can iden...

Page 49: ...idelines when you set or change the settings for duplex and speed Let both ports autonegotiate both speed and duplex Manually set the speed and duplex parameters for the ports on both ends of the connection If a remote device does not autonegotiate configure the duplex settings on the two ports to match The speed parameter can adjust itself even if the connected port does not autonegotiate Autoneg...

Page 50: ...module by using the CLI setup procedure described in Appendix C Configuring the Switch with the CLI Based Setup Program Replacing a Failed Stack Member If you need to replace a failed stack member you can hot swap or replace the switch module by following this procedure 1 Get a replacement switch module that has the same model number as the failed switch module 2 Power down the failed switch modul...

Page 51: ... you contact Cisco Technical Assistance you need to know the serial number of your switch module Figure 3 1 shows the serial number location on your switch module You can also use the show version command to get the serial number Figure 3 1 Serial Number Location 250310 Cisco Systems Inc IOS VERSION HP Part No 410916 B21 CISCO PID VID CISCO SERI AL NUM BER MAC ADDRESS CLEI CODE SN XXXNNNNXXXX ...

Page 52: ...3 7 Cisco Catalyst Blade Switch 3120 for HP Hardware Installation Guide OL 12246 01 Chapter 3 Troubleshooting Locating the Switch Module Serial Number ...

Page 53: ... safety compliance and electromagnetic compatibility Table A 1 Technical Specifications for the Cisco Catalyst Blade Switch 3120 for HP Environmental Ranges Operating temperature 32 to 109 F 0 to 43 C Storage temperature 4 to 158 F 20 to 70 C Relative humidity 10 to 85 noncondensing Storage relative humidity 5 to 95 noncondensing Operating altitude Up to 10 000 feet 3048 meters Storage altitude Up...

Page 54: ...A 2 Cisco Catalyst Blade Switch 3120 for HP Hardware Installation Guide OL 12246 01 Appendix A Technical Specifications ...

Page 55: ...0 100 1000 Ports The 10 100 1000 Ethernet ports on the switch module use standard RJ 45 connectors Figure B 1 shows the pinout Note You can use the mdix auto interface configuration command in the CLI to enable the automatic medium dependent interface crossover auto MDIX feature When the auto MDIX feature is enabled the switch module detects the required cable type for copper Ethernet connections ...

Page 56: ...e Category 3 4 or 5 cabling when connecting to 10BASE T compatible devices You must use Category 5 cabling when connecting to 100BASE TX compatible devices Connecting to 1000BASE T Devices When connecting the ports to 1000BASE T devices such as servers workstations and routers you must use a four twisted pair Category 5 straight through cable wired for 10BASE T 100BASE TX and 1000BASE T Figure B 8...

Page 57: ... 2 and Figure B 3 Figure B 2 10 Gigabit Ethernet Optical Module SC Connector Figure B 3 10 Gigabit Ethernet Infiniband 4x Connector Cisco TwinGig Converter Module Ports The Cisco TwinGig Converter Module uses SFP modules for fiber optic and copper uplink ports Figure B 4 and Figure B 5 show the SFP module connectors Figure B 4 Duplex LC Cable Connector Figure B 5 Copper SFP Module RJ 45 Connector ...

Page 58: ...cations page B 4 SFP Module Cable Specifications page B 6 Two Twisted Pair Cable Pinouts page B 6 Four Twisted Pair Cable Pinouts for 1000BASE T Ports page B 7 Identifying a Crossover Cable page B 8 Console Port Adapter Pinouts page B 8 10 Gigabit Ethernet X2 Transceiver Module Cable Specifications Table B 1 lists the port cabling specifications for the 10 Gigabit Ethernet X2 transceiver modules E...

Page 59: ...ver Type Transmit Power dBm Receive Power dBm Transmit and Receive Wavelength nm X2 10GB SR 10GBASE SR 850 nm MMF 11 max 7 3 min 1 The launch power shall be the lesser of the Class 1 safety limit or the maximum receive power Class 1 laser requirements are defined by IEC 60825 1 2001 1 0 max 9 9 min 840 to 860 X2 10GB LX4 10GBASE LX4 WWWDM 1300 nm MMF 0 5 per lane max 0 5 max 14 4 per lane Four lan...

Page 60: ...sted Pair Cable Pinouts Figure B 6 and Figure B 7 show the schematics of two twisted pair cables for connecting to 10BASE T and 100BASE TX compatible devices Figure B 6 Two Twisted Pair Straight Through Cable Schematic Figure B 7 Two Twisted Pair Crossover Cable Schematic Table B 3 Fiber Optic SFP Module Port Cabling Specifications SFP Module Wavelength nanometers Fiber Type Core Size Cladding Siz...

Page 61: ...four twisted pair cables for 10 100 1000 ports on the switch module Figure B 8 Four Twisted Pair Straight Through Cable Schematic for 10 100 1000 Ports Figure B 9 Four Twisted Pair Crossover Cable Schematics for 10 100 1000 Ports 1 TPO 2 TPO 3 TP1 6 TP1 1 TP1 Switch Router or PC 2 TP1 3 TPO 6 TPO 4 TP2 5 TP2 7 TP3 8 TP3 4 TP3 5 TP3 7 TP2 8 TP2 65272 1 TPO 2 TPO 3 TP1 6 TP1 1 TP0 Switch Switch 2 TP...

Page 62: ...able Console Port Adapter Pinouts Table B 4 lists the pinouts for the console port the RJ 45 to DB 9 adapter cable and the console device Table B 5 lists the pinouts for the console port RJ 45 to DB 25 female DTE adapter and the console device Note The RJ 45 to DB 25 female DTE adapter is not supplied with the switch module You can order a kit part number ACS DSBUASYN containing this adapter from ...

Page 63: ...onnector and Cable Specifications Cable and Adapter Specifications Table B 5 Console Port Signaling Using a DB 25 Adapter Switch Console Port DTE RJ 45 to DB 25 Terminal Adapter Console Device Signal DB 25 Pin Signal RTS 5 CTS DTR 6 DSR TxD 3 RxD GND 7 GND GND 7 GND RxD 2 TxD DSR 20 DTR CTS 4 RTS ...

Page 64: ...B 10 Cisco Catalyst Blade Switch 3120 for HP Hardware Installation Guide OL 12246 01 Appendix B Connector and Cable Specifications Cable and Adapter Specifications ...

Page 65: ...Through the Console Port page C 1 2 Connecting to the Console Port page C 1 3 Completing the Initial Configuration page C 4 Accessing the CLI Through the Console Port You can access the CLI on a configured or unconfigured switch module by connecting the console port of the switch module to the serial port on your PC or workstation and accessing the switch module through a Telnet session Connecting...

Page 66: ...face configuration command in the CLI to enable the automatic medium dependent interface crossover auto MDIX feature When the auto MDIX feature is enabled the switch module detects the required cable type for copper Ethernet connections and configures the interfaces accordingly Therefore you can use either a crossover or a straight through cable for connections to a copper 10 100 1000 or 1000BASE ...

Page 67: ...ule Console Port Step 2 Start the terminal emulation session so that you can see the output display from the power on self test POST The terminal emulation software a PC application such as Hyperterminal or ProcommPlus makes communication between the switch module and your PC or terminal possible 23x 24x 21x 24x 17x 18x 17x 20x 17 20 SYST STAT DLX SPD CONSOLE UID WS CBS 3020 HPQ MODE MEDIA DETECT ...

Page 68: ...tch module is operating properly Step 7 See the Completing the Initial Configuration section on page C 4 for instructions on setting up and initially configuring the switch module Completing the Initial Configuration Follow these steps to complete the setup program and to create an initial configuration for the switch module Note For information about automatically configuring the switch module se...

Page 69: ...To configure SNMP now enter yes Configure SNMP Network Management no yes Community string public public Step 7 Enter the interface name physical interface or VLAN name of the interface that connects to the management network and press Return Enter vlan1 for the interface name at this prompt Step 8 To configure the interface enter Yes after the prompt and then enter the switch module IP address and...

Page 70: ... end Step 10 These choices appear 0 Go to the IOS command prompt without saving this config 1 Return back to the setup without saving this config 2 Save this configuration to nvram and exit If you want to save the configuration and use it the next time the switch reboots save it in NVRAM by selecting option 2 Enter your selection 2 2 Make your selection and press Return Step 11 Disconnect the blad...

Page 71: ...es connecting the stacking cables 16 cables continued crossover connecting to 2 four twisted pair pinout 1000BASE T ports 7 identifying 8 two twisted pair pinout 10 100 ports 6 recommended 24 SFP module 6 straight through connecting to 2 four twisted pair pinout 1000BASE T ports 7 two twisted pair pinout 6 X2 transceiver module 4 cabling 10 100 1000 ports 22 auto MDIX 23 1 2 pinouts 6 See also con...

Page 72: ...duplex default setting 23 troubleshooting 4 E electrical codes warning 2 electrical noise avoiding 3 Ethernet and fiber optic cable troubleshooting 2 Ethernet cable shielding warning 2 Ethernet port connections warning 2 examples network configuration 3 Express Setup 11 to 12 F features 1 to 8 features overview 1 to 3 front panel 10 100 1000 Ethernet ports 4 10 100 1000 ports 4 10 Gigabit Ethernet...

Page 73: ... switch module 10 using to assign IP address 9 overheating prevention warning 2 P packing list 4 pinouts adapters 8 console port 9 9 crossover cable 8 crossover cables for four twisted pair 1000BASE T ports 7 crossover cables for two twisted pair 10 100 ports 6 RJ 45 to DB 25 terminal adapter 9 RJ 45 to DB 9 terminal adapter 8 SFP module ports 3 straight through cables four twisted pair 1000BASE T...

Page 74: ...ackWise Plus cables configuration examples 14 ordering 14 StackWise ports 8 straight through cable pinout four twisted pair 1000BASE T ports 7 two twisted pair 10 100 ports 6 switch stack configuration examples 14 to 16 creating 13 to 17 description 13 system LED 5 T technical specifications 1 Telnet and accessing the CLI 10 24 temperature operating 1 trained and qualified personnel warning 2 trou...

Page 75: ...electrical codes 2 Ethernet cable shielding 2 Ethernet port connections 2 installation 2 installation instructions 2 jewelry removal 2 lightning activity 2 overheating prevention 2 trained and qualified personnel 2 X X2 transceiver modules described 4 installing 18 installing and removing 18 to 20 removing 19 See also 10 Gigabit Ethernet module slot ...

Page 76: ...Index IN 6 Cisco Catalyst Blade Switch 3120 for HP Hardware Installation Guide OL 12246 01 ...

Reviews: