background image


3-10

Cisco CGS 2520 Hardware Installation Guide

OL-31444-01

Chapter 3      Power Supply Installation

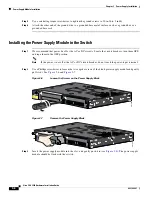
Power Supply Module Installation

Figure 3-12

Crimping the Spade Terminal Lug

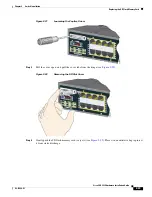
Step 6

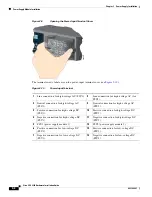
Loosen the terminal screw, and slide the terminal under the screw and washer (see 

Figure 3-14

).

Note

Use the appropriate terminal screws, depending on whether you are installing a high-voltage (AC or DC) 
or a low-voltage (DC) power supply.

Step 7

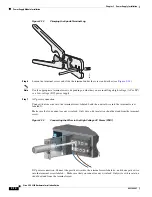
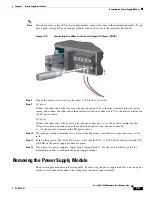
AC power connection

Connect the line wire into the terminal screw labeled 

L

 and the neutral wire into the terminal screw 

labeled 

N

Make sure that you cannot see any wire lead. Only wire 

with


insulation

 should extend from the terminal 

screw.

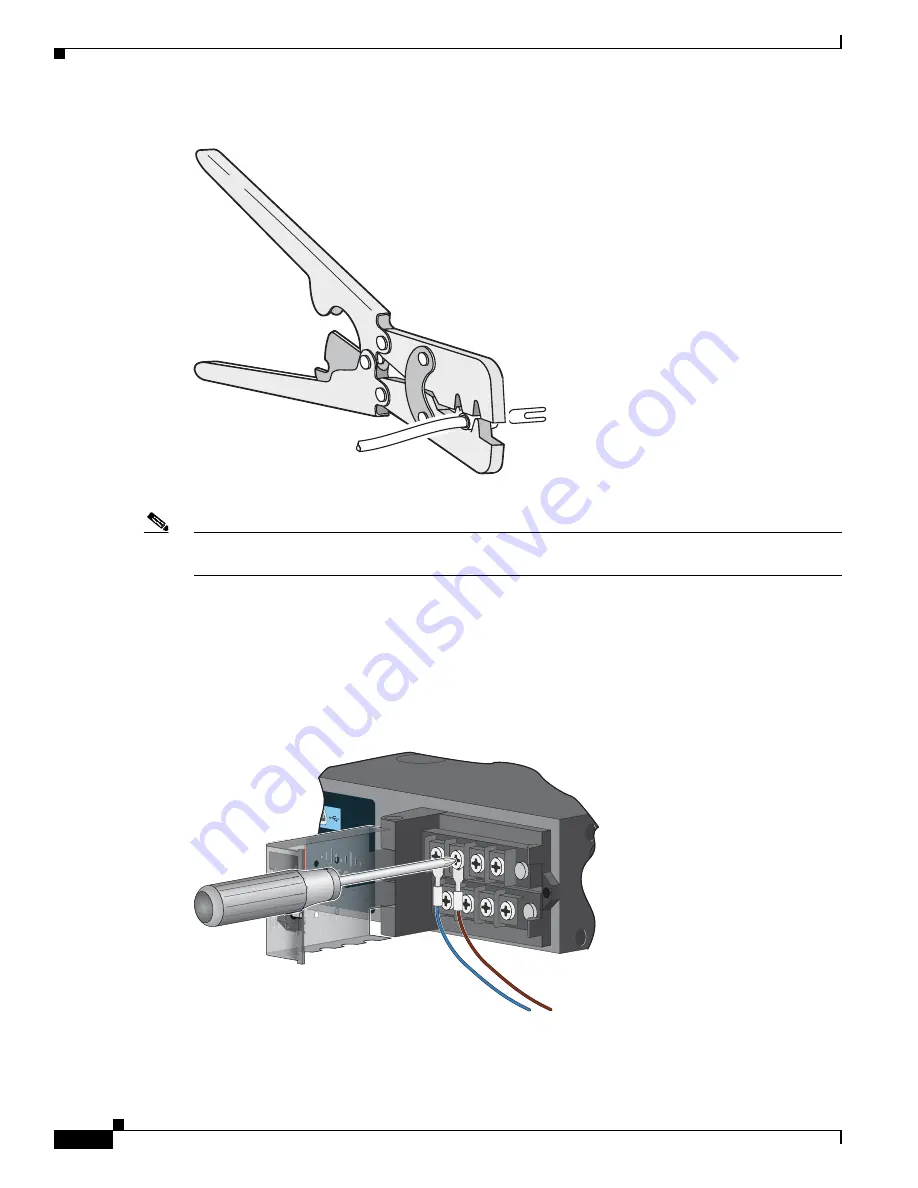
Figure 3-13

Connecting the Wires to the High-Voltage AC Power (PSU1)

DC power connection. Connect the positive wire into the terminal screw labeled 

+

, and the negative wire 

into the terminal screw labeled 

. Make sure that you cannot see any wire lead. Only wire 

with


insulation


should extend from the terminal screw. 

207427

100-240V~, 50-60Hz, 2.2A

100-240V~, 50-60Hz, 2.2A

207429

Cis

co 

CGS

S

 25

5

2

20

0

Summary of Contents for CGS 2520

Page 1: ...es worldwide Addresses phone numbers and fax numbers are listed on the Cisco website at www cisco com go offices Cisco CGS 2520 Hardware Installation Guide First Published August 2011 Last Updated January 2014 Part Number OL 31444 01 Text Part Number OL 31444 01 ...

Page 2: ...cur in a particular installation If the equipment causes interference to radio or television reception which can be determined by turning the equipment off and on users are encouraged to try to correct the interference by using one or more of the following measures Reorient or relocate the receiving antenna Increase the separation between the equipment and receiver Connect the equipment into an ou...

Page 3: ... Gigabit Ethernet Ports 1 5 SFP Modules 1 5 SFP Module Patch Cable 1 6 Power Input Terminal 1 7 Alarm Ports 1 7 Alarm Input 1 7 Alarm Output 1 7 Management Ports 1 8 LEDs 1 8 Switch Panel LEDs 1 9 System LED 1 9 Power Supply Module LEDs 1 10 Alarm LEDs 1 10 Console LEDs 1 10 Port LEDs 1 11 PoE LED 1 11 Dual Purpose Port LEDs 1 12 SD Flash Memory Card LED 1 12 SD Flash Memory Card 1 12 Power Supply...

Page 4: ...0 Compliance 2 17 Installing and Removing SFP Modules 2 19 Installing SFP Modules 2 19 Removing SFP Modules 2 20 Inserting and Removing the SFP Module Patch Cable 2 21 Removing the SFP Module Patch Cable 2 22 Replacing the SD Flash Memory Card 2 22 Connecting Devices to the Ethernet Ports 2 24 Connecting to the 10 100 and 10 100 1000 Ports 2 25 Connecting to the 10 100 PoE Ports 2 25 Where to Go N...

Page 5: ...witch Performance 4 4 Speed Duplex and Auto Negotiation 4 4 Auto Negotiation and Network Interface Cards 4 5 Cabling Distance 4 5 Resetting the Switch to the Factory Default Settings 4 6 Finding the Switch Serial Number 4 6 A P P E N D I X A Technical Specifications A 1 Switch Specifications A 1 Power Supply Module Specifications A 4 A P P E N D I X B Connector and Cable Specifications B 1 Connect...

Page 6: ...ice Drivers C 4 Installing the Cisco Microsoft Windows XP USB Driver C 4 Installing the Cisco Microsoft Windows 2000 USB Driver C 4 Installing the Cisco Microsoft Windows Vista USB Driver C 5 Uninstalling the Cisco Microsoft Windows USB Drivers C 5 Uninstalling the Cisco Microsoft Windows XP and 2000 USB Driver C 5 Uninstalling the Cisco Microsoft Windows Vista USB Driver C 6 Entering the Initial ...

Page 7: ...nual Caution Means reader be careful In this situation you might do something that could result in equipment damage or loss of data The safety warnings for this product are translated into several languages in the Regulatory Compliance and Safety Information for the Cisco CGS 2520 that ships with the product on the documentation CD The EMC regulatory statements are also included in that guide Warn...

Page 8: ... cisco com en US products hw modules ps5455 prod_installation_guides_list html SFP compatibility matrix documents http www cisco com en US products hw modules ps5455 products_device_support_tables_list html Obtaining Documentation and Submitting a Service Request For information on obtaining documentation submitting a service request and gathering additional information see the monthly What s New ...

Page 9: ...es such as Intelligent Electronic Devices IEDs distributed controllers substation routers Cisco IP Phones Cisco Wireless Access Points and other network devices such as redundant substation switches This chapter contains the following topics Switch Models page 1 2 Cable Side page 1 2 Ports page 1 3 LEDs page 1 8 SD Flash Memory Card page 1 12 Power Supply Side page 1 12 Management Options page 1 1...

Page 10: ...rpose Gigabit Ethernet ports 2 10 100 1000BASE T ports and 2 SFP1 module slots and 2 AC and DC power supply module slots 1 SFP small form factor pluggable Cisco CGS 2520 24TC C For China 24 10 100BASE T ports 2 dual purpose Gigabit Ethernet ports 2 10 100 1000BASE T ports and 2 SFP module slots and 2 AC and DC power supply module slots Cisco CGS 2520 16S 8PC 16 100 Mb s SFP module slots 8 10 100BA...

Page 11: ...1 4 Dual Purpose Gigabit Ethernet Ports page 1 5 Power Input Terminal page 1 7 Alarm Ports page 1 7 Management Ports page 1 8 1 SD1 flash memory card slot 1 SD Secure Digital 6 RJ 45 console port 2 LEDs 7 USB mini Type B console port 3 Express Setup button 8 Power input terminal 4 10 100BASE T ports 9 Alarm port 5 Dual purpose ports 1 SD flash memory card slot 6 Dual purpose ports 2 LEDs 7 RJ 45 c...

Page 12: ...d users and service people who are authorized within the restricted access location are made aware of the hazard A restricted access area can be accessed only through the use of a special tool lock and key or other means of security Statement 1072 The 10 100BASE T PoE ports on the Cisco CGS 2520 16S 8PC and Cisco CGS 2520 16S 8PC C models provide Support for IEEE 802 3af compliant powered devices ...

Page 13: ...e active link goes down If links are active on both media the SFP module port has priority but you can use the media type interface configuration command to manually designate the port as an RJ 45 port or an SFP port You can configure the speed and duplex settings consistent with the selected media type For information on configuring interfaces see the CGS 2520 Switch Software Configuration Guide ...

Page 14: ... Module Patch Cable For information about using the SFP module patch cable see the Inserting and Removing the SFP Module Patch Cable section on page 2 21 Table 1 2 Maximum Operating Temperature Type of SFP Module Model Rugged and Industrial SFPs 40 to 140 F 40 to 60 C GLC SX MM RGD GLC LX SM RGD GLC FE 100LX RGD GLC FE 100FX RGD GLC ZX SM RGD Commercial SFPs 32 to 113 F 0 to 45 C GLC BX D with dig...

Page 15: ...that no current flows through the contact referred to as a normally open contact The alarm is generated when the current flows This section contains the following alarm port information Alarm Input page 1 7 Alarm Output page 1 7 Alarm Input The alarm input is a dry contact alarm port You can connect up to four alarm inputs from devices such as a door a temperature gauge or a fire alarm to the alar...

Page 16: ...device driver connecting and disconnecting the USB cable from the console port does not affect Windows HyperTerminal operations Mac OS X or Linux require no special drivers Note The 5 pin mini Type B connectors resemble the 4 pin mini Type B connectors They are not compatible Use only the 5 pin mini Type B See Figure 1 5 Figure 1 5 USB Mini Type B Port The configurable inactivity timeout reactivat...

Page 17: ... power supply 2 4 SD SD flash memory card 12 PoE1 1 Only on the Cisco CGS 2520 16S 8PC switch 5 IN1 alarm input 1 13 Express Setup button 6 IN2 alarm input 2 14 Ethernet ports 7 IN3 alarm input 3 15 SFP module port 8 IN4 alarm input 4 16 10 100 1000 port Table 1 3 System LED Color System Status Off System is not powered on Blinking green POST1 is in progress Green System is operating normally Ambe...

Page 18: ...le port the switch automatically uses that port for console communication If you connect two console cables the USB console port has priority 1 POST power on self test Table 1 4 Power Supply Module LEDs Color System Status Off Power supply module 1 or 2 is not installed Green Valid input is present and the output is within the operating range Red Valid input is present and the output is outside th...

Page 19: ...nistratively shut down Green Link present but not sending or receiving data Blinking green Activity Port is sending or receiving data Alternating green amber Link fault Error frames can affect connectivity and errors such as excessive collisions CRC errors and alignment and jabber errors are monitored for link faults Amber Port is blocked by Spanning Tree Protocol STP and is not forwarding data Af...

Page 20: ...ash Memory Card section on page 2 22 for information Warning Be aware that the SD card contains sensitive and security relevant information including but not limited to full device configuration information public and private keys used for SSH and SSL if those protocols are enabled device passwords and others Access to SD cards for any Cisco CGS switch should be limited to authorized personnel Pow...

Page 21: ...igure 1 8 Switch with Both Power Supply Modules For a description of the PSU OK LED see Table 1 4 on page 1 10 1 LED panel Power supply slot 1 3 Power supply slot 2 2 1 3 207200 Ci sco Connected Gri d Sw i tch 2500 Seri es P W R R G D LO W D C 1 PSU OK LED 207230 1 1 Ci sco Connected Gri d Sw i tch 2500 Seri es P W R R G D LO W D C P W R R G D LO W D C ...

Page 22: ...r China The switch supports these power supply module combinations Single low voltage DC Single high voltage AC or DC Two high voltage AC or DC 1 SYS system 9 OUT alarm output 2 CON console 10 PSU1 power supply 1 3 USB LED 11 PSU2 power supply 2 4 SD SD flash memory card 12 PoE1 1 Only on the Cisco CGS 2520 16S 8PC switch For a description of the LEDs see LEDs page 1 8 5 IN1 alarm input 1 13 Expre...

Page 23: ...net from a remote management station See the switch command reference on Cisco com for information CiscoWorks application The CiscoWorks LAN Management Solution LMS is a suite of management tools that simplify the configuration administration monitoring and troubleshooting of Cisco networks See the LMS documentation for information http www cisco com en US products ps7198 tsd_products_support_seri...

Page 24: ...al is available at no cost http www cisco com en US products ps9422 index html See the Configuration Professional getting started guide and online help for more information Cisco Security Manager Cisco Security Manager Security Manager manages security policies on Cisco security devices It supports integrated provisioning of firewall IPS and VPN site to site remote access and SSL services across d...

Page 25: ...o Go Next page 2 26 Warnings These warnings are translated into several languages in the Regulatory Compliance and Safety Information for the Cisco CGS 2520 document that ships on the documentation CD These warning statements apply to all the switches Warning Before working on equipment that is connected to power lines remove jewelry including rings necklaces and watches Metal objects will heat up...

Page 26: ...uct should be handled according to all national laws and regulations Statement 1040 Warning For connections outside the building where the equipment is installed the following ports must be connected through an approved network termination unit with integral circuit protection 10 100 1000 Ethernet Statement 1044 Warning To prevent the system from overheating do not operate it in an area that excee...

Page 27: ...e Cables section on page B 4 and the module documentation Airflow around the switch and through the vents is unrestricted To prevent overheating the switch must meet the minimum clearance of 1 75 inches 4 4 cm at the top and bottom For clearances needed for wall mounting see specifications in Wall Mounting section on page 2 16 Note If the switch is installed in a closed or multirack assembly take ...

Page 28: ...Attaching Brackets for 23 Inch Racks page 2 12 Attaching Brackets for ETSI Racks page 2 13 Mounting the Switch into a Rack page 2 15 Warning To prevent bodily injury when mounting or servicing this unit in a rack you must take special precautions to ensure that the system remains stable The following guidelines are provided to ensure your safety This unit should be mounted at the bottom of the rac...

Page 29: ...h rack mounting brackets Figure 2 2 23 inch Mounting Brackets Figure 2 3 shows the ETSI rack mounting brackets Figure 2 3 ETSI Mounting Brackets Attaching Brackets for 19 Inch Racks Figure 2 4 and Figure 2 5 shows the 19 inch rack mounting bracket locations on the switch for cable side mounting and power side mounting onto an 19 inch rack ...

Page 30: ...ion Guide OL 31444 01 Chapter 2 Switch Installation Installing the Switch Figure 2 4 Attaching Brackets for 19 Inch Racks 1 Mid mount position 3 Cable side mounting position 2 Phillips flat head screws 4 Power supply side mounting position ...

Page 31: ... rubber plugs by ordering kit CGS 2520 IP30KIT Follow the procedure below to install the rubber plugs Step 1 Determine whether you will install using the mid mount cable side or power supply side positioning by identifying your bracket mounting positions shown in Figure 2 9 and Figure 2 10 Step 2 Insert the rubber plugs into the appropriate holes according to your mount position as shown in Figure...

Page 32: ...re Installation Guide OL 31444 01 Chapter 2 Switch Installation Installing the Switch Figure 2 6 Inserting the Rubber Plugs 1 Rubber plug 3 Cable side mounting position 2 Mid mount position 4 Power supply side mounting position ...

Page 33: ... the Switch Figure 2 7 Inserting the Rubber Plugs Step 3 Use a screwdriver or pen to completely push in the rubber plugs Figure 2 8 shows a close up of the rubber plug and how they are inserted into the mounting holes 1 Rubber plug 3 Power supply side mounting position 2 Cable side mounting position ...

Page 34: ...uide OL 31444 01 Chapter 2 Switch Installation Installing the Switch Figure 2 8 Inserting the Rubber Plugs detail Step 4 Install the brackets on both sides of the switch as shown in Figure 2 9 and Figure 2 10 1 Rubber plug 3 Screwdriver 2 Switch ...

Page 35: ...ion Guide OL 31444 01 Chapter 2 Switch Installation Installing the Switch Figure 2 9 Attaching Brackets for 19 Inch Racks 1 Mid mount position 3 Cable side mounting position 2 Phillips flat head screws 4 Power supply side mounting position ...

Page 36: ...s or ETSI brackets you can insert the rubber plugs in the same holes as shown in Figure 2 6 and Figure 2 7 before installing the brackets Attaching Brackets for 23 Inch Racks Figure 2 11 shows the 23 inch rack mounting bracket locations on the switch for cable side mounting and power side mounting onto a 23 inch rack 1 Phillips flat head screws 3 Power supply side mounting position 2 Cable side mo...

Page 37: ...se 23 inch brackets you can insert the rubber plugs in the same holes as shown in Figure 2 7 or Figure 2 8 before installing the brackets Attaching Brackets for ETSI Racks Figure 2 12 shows the mounting bracket locations on the switch for cable side mounting and power side mounting onto an ETSI rack 1 Phillips flat head screws 3 Power supply side mounting position 2 Cable side mounting position ...

Page 38: ... Figure 2 12 Attaching Brackets for ETSI Racks Note For IP 30 compliance If you use ETSI brackets you can insert the rubber plugs in the same holes as shown in Figure 2 7 or Figure 2 8 before installing the brackets 1 Phillips flat head screws 3 Power supply side mounting position 2 Cable side mounting position ...

Page 39: ...ack as shown in Figure 2 13 Brackets for the 19 inch rack shown in this example Note We recommend attaching the cable guide to prevent the cables from obscuring the LED panels on the devices in the rack Use the supplied black screw shown in Figure 2 13 6 to attach the cable guide to the left or right bracket Figure 2 13 Rack Mounting 1 Mid mount position 4 Phillips machine screws 2 Cable screw 5 P...

Page 40: ...0 in 7 62 cm Power supply side 5 25 in 13 33 cm Cover side side not facing wall 1 75 in 4 44 cm Base side facing wall 0 in 0 cm Attaching Brackets for Wall Mounting Follow these steps to mount the switch onto a wall Step 1 Insert the rubber plugs into the appropriate holes Follow the same procedure for the other side of the switch Step 2 Use a screwdriver or pen to completely push in the rubber pl...

Page 41: ...all Mounting for IP 30 Compliance Follow these steps to mount the switch onto a wall and conform to IP 30 Compliance regulations Step 1 Insert the rubber plugs into the appropriate holes see Figure 2 15 Follow the same procedure for the other side of the switch Step 2 Use a screwdriver or pen to completely push in the rubber plugs see Figure 2 8 1 Phillips truss head screws ...

Page 42: ...er 2 Switch Installation Installing the Switch Figure 2 15 Inserting the Rubber Plugs into the Switch Holes Step 3 Install the brackets on both sides of the switch see Figure 2 16 Figure 2 16 Attaching 19 inch Rack Brackets 1 Rubber plug 1 Phillips truss head screws ...

Page 43: ... fiber optic cable is attached to it because of the potential damage to the cables to the cable connector or to the optical interfaces in the SFP module Disconnect the cable before you remove or install an SFP module Installing SFP Modules This section describes how to install Small Form Factor pluggable SFP modules SFP modules are inserted into the SFP modules connected to the switch Step 1 Attac...

Page 44: ... from the SFP module ports For reattachment note which cable connector plug is send TX and which is receive RX Note On some SFP modules the send and receive TX and RX markings might be replaced by arrows that show the direction send or receive of the connection Caution Do not remove cables from the fiber optic SFP module ports until you are ready to insert the dust plugs Step 3 Insert a dust plug ...

Page 45: ...in an anti static bag or other protective environment Inserting and Removing the SFP Module Patch Cable Step 1 Attach an ESD preventive wrist strap to your wrist and to a bare metal surface Step 2 Insert the SFP module patch cable into the slot until you feel the connector on the cable snap into place at the rear of the slot see Figure 2 19 Figure 2 19 Inserting an SFP Module Patch Cable Step 3 Re...

Page 46: ... the SD Flash Memory Card Warning Be aware that the SD card contains sensitive and security relevant information including but not limited to full device configuration information public and private keys used for SSH and SSL if those protocols are enabled device passwords and others Access to SD cards for any Cisco CGS switch should be limited to authorized personnel Step 1 Locate the Secure Digit...

Page 47: ...h Memory Card Figure 2 21 Loosening the Captive Screw Step 3 Pull the cover open and pull the cover tabs from the hinge see Figure 2 22 Figure 2 22 Removing the SD Slot Cover Step 4 Gently push the SD flash memory card to eject it see Figure 2 23 Place it in an antistatic bag to protect it from static discharge ...

Page 48: ...heting torque number 1 Phillips screwdriver to torque the screw to 4 5 in lb Connecting Devices to the Ethernet Ports This section covers the following procedures Connecting to the 10 100 and 10 100 1000 Ports page 2 25 Connecting to the 10 100 PoE Ports page 2 25 Table 2 1 Ethernet Cables Auto MDIX Disabled Device Crossover Cable1 1 100BASE TX and 1000BASE T traffic requires twisted four pair Cat...

Page 49: ...se either a crossover or a straight through cable for connections to a 10 100 1000 Ethernet port regardless of the type of connected device See the switch software configuration guide or the switch command reference on Cisco com for more information about auto negotiation and auto MDIX If auto MDIX is disabled use the guidelines in Table 2 1 to select the cable for connecting the 10 100 1000 Ether...

Page 50: ...access location are made aware of the hazard A restricted access area can be accessed only through the use of a special tool lock and key or other means of security Statement 1072 Caution Category 5e and Category 6 cables can store high levels of static electricity Always ground the cables to a suitable and safe earth ground before connecting them to the switch or other devices Where to Go Next Af...

Page 51: ...r information on the power supply modules see the Power Supply Features section on page 1 14 Note Each power supply module can support an equivalent PoE load of two PoE ports or four PoE ports When both power supply modules are installed the system has enough power to support four PoE ports or eight PoE ports If ports are designated as high priority and low priority PoE or PoE ports at the command...

Page 52: ...e For a description of the PSU OK LEDs see the Power Supply Module LEDs section on page 1 10 Power Supply Module Installation Installation Guidelines page 3 3 Installing a Power Supply Module page 3 3 Wiring the Power Source page 3 7 Removing the Power Supply Module page 3 11 1 Power supply module 3 Captive screw 2 PSU OK LED 207215 1 2 3 1 Power supply module 3 Captive screw 2 PSU OK LED 207232 1...

Page 53: ...ing Do not reach into a vacant slot while installing or removing a module Exposed circuitry is an energy hazard Statement 206 Warning Only trained and qualified personnel should be allowed to install replace or service this equipment Statement 1030 Warning Do not work on the system or connect or disconnect cables during periods of lightning activity Statement 1001 Installing a Power Supply Module ...

Page 54: ...For power source connections use wires rated for at least 194 F 90 C UL and CSA rated style 1007 or 1569 twisted pair copper wire such as Belden part number 9318 Wire stripping tools for stripping 6 10 12 14 and 16 gauge wires Number 2 Phillips screwdriver Flat blade screwdriver Grounding the Switch Follow the grounding procedures at your site and observe these warnings Warning This equipment must...

Page 55: ...p the 6 gauge ground wire to 0 5 inch 12 7 mm 0 02 inch 0 5 mm see Figure 3 3 Stripping more than the recommended amount of wire can leave exposed wire from the connector Figure 3 3 Stripping the Ground Wire Step 3 Insert the ground wire into the terminal lug and crimp the terminal to the wire see Figure 3 4 Figure 3 4 Crimping the Terminal Lug Step 4 Slide the ground screw from Step 1 through the...

Page 56: ...the circuit breakers turn them OFF and tape them in the OFF position Note If the power is not off at the AC or DC circuit breaker do not touch the power input terminal Step 2 Use a Phillips screwdriver to loosen the two captive screws of the blank power supply module and gently pull it out See Figure 3 6 and Figure 3 7 Figure 3 6 Loosen the Screws on the Power Supply Blank Figure 3 7 Remove the Po...

Page 57: ...005 Warning A readily accessible two poled disconnect device must be incorporated in the fixed wiring Statement 1022 Warning Only trained and qualified personnel should be allowed to install or replace this equipment Statement 1030 Warning Hazardous voltage or energy may be present on power terminals Always replace cover when terminals are not in service Be sure uninsulated conductors are not acce...

Page 58: ... high voltage AC PSU1 8 Line connection for high voltage AC for PSU2 2 Neutral connection for high voltage AC PSU1 9 Neutral connection for high voltage AC PSU2 3 Positive connection for high voltage DC PSU1 10 Positive connection for high voltage DC PSU2 4 Negative connection for high voltage DC PSU1 11 Negative connection for high voltage DC PSU2 5 PSU1 power supply module 1 12 PSU2 power supply...

Page 59: ...Use 16 AWG minimum for the high voltage AC or DC power supply module Step 4 Strip each of the two wires to 0 25 inch 6 3 mm 0 02 inch 0 5 mm Do not strip more than 0 27 inch 6 8 mm of insulation from the wire Stripping more than the recommended amount of wire can leave exposed wire from the connector after installation Figure 3 11 Stripping the Input Power Source Wire Step 5 Insert the wire into a...

Page 60: ...ction Connect the line wire into the terminal screw labeled L and the neutral wire into the terminal screw labeled N Make sure that you cannot see any wire lead Only wire with insulation should extend from the terminal screw Figure 3 13 Connecting the Wires to the High Voltage AC Power PSU1 DC power connection Connect the positive wire into the terminal screw labeled and the negative wire into the...

Page 61: ...ource DC power Connect the other end of the positive wire the one connected to to the positive terminal on the DC power source and connect the other end of the negative wire the one connected to to the negative terminal on the DC power source Step 10 Close the power input terminal cover Use a ratcheting torque screwdriver to torque the screw to 6 8 in lb Step 11 Turn on the power at the AC or DC c...

Page 62: ...that secure the power supply module to the switch see Figure 3 15 Warning Hot surface Statement 1079 Figure 3 15 Removing the Screws Step 4 Remove the power supply module from the power slot The power supply module might be hot see Figure 3 16 Step 5 Install a new power supply module or a blank cover Figure 3 16 Removing the Power Supply Module Caution To prevent exposure to hazardous voltages and...

Page 63: ...n See the software configuration guide the switch command reference guide on Cisco com or the documentation that came with your SNMP application for details The following topics can be used as approaches to diagnosing problems Switch POST Results page 4 1 Switch LEDs page 4 1 Switch Connections page 4 2 Switch Performance page 4 4 Switch POST Results See the Verifying Switch Operation section on p...

Page 64: ...le bypass the patch panel or eliminate media convertors fiber optic to copper Try the cable in another port to see if the problem follows the cable Ethernet and Fiber Optic Cables Make sure that you have the correct cable For Ethernet use Category 3 copper cable for 10 Mb s UTP connections Use either Category 5 Category 5e or Category 6 UTP for 10 100 or 10 100 1000 Mb s connections Verify that yo...

Page 65: ...ileged EXEC command to see if the port is error disabled disabled or shutdown Re enable the port if necessary Verify the cable type Many legacy powered devices including older Cisco IP phones and access points that do not fully support IEEE 802 3af or IEEE 802 PoE and PoE standards might not support PoE or PoE when connected to the switch by a crossover cable Replace the crossover cable with a str...

Page 66: ...s one way communication You can enable UniDirectional Link Detection UDLD on the switch to help identify unidirectional link problems For information about enabling UDLD on the switch see the Understanding UDLD section in the switch software configuration guide on Cisco com Switch Performance Speed Duplex and Auto Negotiation page 4 4 Auto Negotiation and Network Interface Cards page 4 5 Cabling D...

Page 67: ...negotiate yet sometimes issues occur To troubleshoot auto negotiation problems try manually setting both sides of the connection If this does not solve the problem there could be a problem with the firmware or software on the NIC You can resolve this by upgrading the NIC driver to the latest version Cabling Distance If the port statistics show excessive FCS late collision or alignment errors verif...

Page 68: ... press Return or Enter The switch displays the prompt to run the initial configuration dialog See the Configuring the Switch with the CLI Setup Program section on page C 1 Finding the Switch Serial Number If you contact Cisco Technical Assistance you need to know the switch serial number Figure 4 1 and Figure 4 2 show the serial number locations You can also use the show version privileged EXEC co...

Page 69: ... of SFP module that you use See Table 1 2 on page 1 6 for information on the supported temperature ranges for the SFPs Storage temperature 40 to 185 F 40 to 85 C Relative humidity 5 to 95 noncondensing Operating altitude Up to 10 000 ft 3049 m Storage altitude Up to 15 000 ft 4570 m Thermal spacing 1 75 in 4 4 cm Operating shock 30 g at 11 ms Physical Specifications Weight Cisco CGS 2520 24TC Cisc...

Page 70: ...5 V DC 375 BTUs per hour 109 8 W Power rating 0 109 KVA 125 VDC Power consumption with two PWR RGD AC DC power supply modules AC 166 BTUs per hour 48 8 W Power rating 0 051 KVA 115 V DC 167 BTUs per hour 48 9 W Power rating 0 0489 KVA 125 VDC Power consumption with two PWR RGD AC DC power supply modules with PoE on 8 ports AC 628 BTUs per hour 184 1 W Power rating 0 185 KVA 115 V DC 622 BTUs per h...

Page 71: ...th one PWR RGD AC DC power supply module AC 102 BTUs per hour 29 8 W Power rating 0 031 KVA 115 V DC 98 BTUs per hour 28 6 W Power rating 0 0286 KVA 125 VDC Power consumption with two PWR RGD AC DC power supply modules AC 121 BTUs per hour 35 5 W Power rating 0 0367 KVA 115 V DC 117 BTUs per hour 34 4 W Power rating 0 0344 KVA 125 VDC Table A 5 Specifications for the Cisco CGS 2520 24TC Switch PWR...

Page 72: ... RGD LOW DC 1 58 x 7 x 5 in 4 x 17 8 x 12 7 cm without mounting flanges 1 58 x 8 15 x 5 in 4 x 20 7 x 12 7 cm with mounting flanges Table A 7 Specifications for the PWR RGD AC DC Power Supply Module Power Specifications Maximum output power 150 W Nominal input voltage 100 to 240 VAC 50 to 60 Hz 100 to 250 VDC Absolute maximum short term input voltage 85 to 265 VAC 47 to 63 Hz 88 to 300 VDC Input c...

Page 73: ...rts page B 1 SFP Module Connectors page B 2 Dual Purpose Ports page B 3 Alarm Port page B 3 10 100 Ethernet Ports The 10 100 Ethernet ports use standard RJ 45 connectors and Ethernet pinouts with internal crossovers These ports have the send TD and receive RD signals internally crossed so that a twisted pair straight through cable and adapter can be attached Figure B 1 10 100 Port Pinouts H5318 2 ...

Page 74: ...nnect ports when both ports are labeled with an X or when both ports are not labeled with an X You can use Category 3 4 or 5 cabling when connecting to 10BASE T compatible devices You must use Category 5 or higher cabling when connecting to 100BASE TX compatible devices Note You can use the mdix auto interface configuration command in the CLI to enable the automatic medium dependent interface cros...

Page 75: ... more information Figure B 4 Alarm Port Pinouts Alarm Ratings The following lists the alarm rating information Alarm Input Electrical Specification 8V 1mA Alarm Output Electrical Specification 30V 1A Note Due the RJ 45 design connector pin spacing the alarm output does not support AC voltage 60915 2 3 1 4 5 6 7 8 Pin Label 1 2 3 4 5 6 7 8 TP0 TP0 TP1 TP2 TP2 TP1 TP3 TP3 207434 2 3 1 4 5 6 7 8 Pin ...

Page 76: ...dule that you use See Table 1 2 on page 1 6 for information on the supported temperature ranges Table B 1 Fiber Optic SFP Module Port Cabling Specifications Type of SFP Module Wavelength nanometers Fiber Type Core Size Cladding Size micron Modal Bandwidth MHz km 1 Cable Distance Industrial and Rugged SFPs 1000BASE SX GLC SX MM RGD 850 MMF 62 5 125 62 5 125 50 125 50 125 160 200 400 500 722 feet 22...

Page 77: ...100BASE FX GLC FE 100F X 1310 MMF 50 125 62 5 125 500 500 6 562 feet 2 km 6 562 feet 2 km 100BASE EX GLC FE 100E X 1310 SMF G 6522 131 240 feet 40 km 100BASE ZX GLC FE 100Z X 1550 SMF G 652 262 480 feet 80 km CWDM 1470 1490 1510 1530 1550 1570 1590 1610 SMF G 6522 62 miles 100 km Table B 1 Fiber Optic SFP Module Port Cabling Specifications continued Type of SFP Module Wavelength nanometers Fiber T...

Page 78: ...MMF 62 5 62 5 50 0 50 0 160 200 400 500 722 feet 220 m 902 feet 275 m 1640 feet 500 m 1804 feet 550 m 100BASE ZX SFP GE Z 1550 SMF SMF 9 10 8 43 5 miles 70 km 62 1 miles 100 km 100BASE EX GLC EX SMD 1310 SMF G 6522 24 9 miles 40 km 1 Modal bandwidth applies only to multimode fiber 2 1000BASE ZX SFP modules can send data up to 62 miles 100 km by using dispersion shifted SMF or low attenuation SMF t...

Page 79: ...old the cable ends side by side with the tab at the back The wire connected to pin 1 on the left end should be the same color as the wire connected to pin 3 on the right end The wire connected to pin 2 on the left end should be the same color as the wire connected to pin 6 on the right end Switch 3 TD 6 TD 1 RD 2 RD Switch 3 TD 6 TD 1 RD 2 RD H5579 1 TP0 2 TP0 3 TP1 6 TP1 1 TP0 2 TP0 3 TP1 6 TP1 S...

Page 80: ... a terminal You can order an adapter part number ACS DSBUASYN For console port and adapter pinout information see Table B 2 and Table B 3 Table B 2 lists the pinouts for the console port the RJ 45 to DB 9 adapter cable and the console device Table B 3 lists the pinouts for the switch console port RJ 45 to DB 25 female DTE adapter and the console device Note The RJ 45 to DB 25 female DTE adapter is...

Page 81: ... B Connector and Cable Specifications Cables and Adapters Table B 3 Console Port Signaling Using a DB 25 Adapter Switch Console Port DTE RJ 45 to DB 25 Adapter Console Device Signal DB 25 Pin Signal RTS 5 CTS DTR 6 DSR TxD 3 RxD GND 7 GND RxD 2 TxD DSR 20 DTR CTS 4 RTS ...

Page 82: ...B 10 Cisco CGS 2520 Hardware Installation Guide OL 31444 01 Appendix B Connector and Cable Specifications Cables and Adapters ...

Page 83: ...Power Supply Module Installation section on page 3 2 Accessing the CLI Through the Console Port You can enter Cisco IOS commands and parameters through the CLI Use one of these options to access the CLI RJ 45 Console Port page C 1 USB Console Port page C 3 RJ 45 Console Port Step 1 Connect the RJ 45 to DB 9 adapter cable to the 9 pin serial port on the PC Connect the other end of the cable to the ...

Page 84: ...terminal to match the console port characteristics 9600 baud 8 data bits 1 stop bit No parity None flow control Step 4 Connect power to the switch as described in the Power Supply Module Installation section on page 3 2 Step 5 The PC or terminal displays the bootloader sequence Press Enter to display the setup prompt Follow the steps in the Completing the Setup Program section on page C 7 1 RJ 45 ...

Page 85: ... Step 2 Connect an USB cable to the PC USB port Connect the other end of the cable to the switch mini B 5 pin connector USB console port see Figure C 2 Step 3 To identify the COM port assigned to the USB console port Choose Start Control Panel Systems Click the Hardware tab and choose Device Manager Expand the Ports section The assigned COM port appears in parenthesis at the end of the line with t...

Page 86: ...ou can download the driver file from the Cisco com software download site Step 2 If using 32 bit Windows XP double click the setup exe file in the Windows_32 folder If using 64 bit Windows XP double click the setup x64 exe file in the Windows_64 folder Step 3 The Cisco Virtual Com InstallShield Wizard begins Step 4 The Ready to Install the Program window appears Click Install Step 5 The InstallShi...

Page 87: ...older Step 3 The Cisco Virtual Com InstallShield Wizard begins Click Next Step 4 The Ready to Install the Program window appears Click Install Note If a User Account Control warning appears click Allow I trust this program Step 5 The InstallShield Wizard Completed window appears Click Finish Step 6 Connect the USB cable to the PC and to the switch console port The USB console port LED turns green ...

Page 88: ...le terminal before uninstalling the driver Step 1 Run setup exe for Windows 32 bit or setup x64 exe for Windows 64bit Click Next Step 2 The InstallShield Wizard for Cisco Virtual Com appears Click Next Step 3 When the Program Maintenance window appears select the Remove radio button Click Next Step 4 When the Remove the Program window appears click Remove Note If a User Account Control warning app...

Page 89: ...character in a host name for any switch Enter host name Switch host_name Step 3 Enter an enable secret password and press Return The password can be from 1 to 25 alphanumeric characters can start with a number is case sensitive allows spaces but ignores leading spaces The secret password is encrypted and the enable password is in plain text Enter enable secret secret_password Step 4 Enter an enabl...

Page 90: ...the switch and the switch displays its configuration This is an example of the configuration output The following configuration command script was created hostname switch1 enable secret 5 1 Ulq8 DlA OiaEbl90WcBPd9cOn1 enable password enable_password line vty 0 15 password terminal password no snmp server no ip routing interface Vlan1 no shutdown ip address 10 4 120 106 255 0 0 0 interface FastEthe...

Reviews: