Step 3
For AC, at the AC service circuit breaker box open all associated equipment circuit breakers for shelf(s) to be removed.
Use the lockout and tag procedures per your local practices. Unplug the power cords from the associated power shelves
and remove. See
Removing Fixed Configuration AC Power Cords
for more information.
For DC, at the BDFB or power plant, remove the associated fuses / circuit breakers for shelf(s) to be removed. Use the
lockout and tag procedures per your local practices. Remove DC distribution cables from the rear of the associated power
shelf and tape the bare lugs for protection. See
Removing Fixed Configuration DC Power Shelf Wiring
for more
information.
Step 4
Remove all power modules (three AC power rectifiers in an AC power shelf or three DC PEMs in a DC power shelf)
from the shelf you are removing.
Step 5
Remove the alarm module.
Step 6
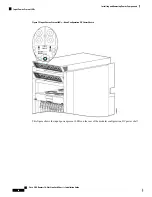
Use the screwdriver to loosen the four captive screws (two on each side) on the interior of the power shelf by turning
them counterclockwise.
Step 7
Use the screwdriver to loosen the two lever screws on the front panel of the power shelf by turning them counterclockwise.
Step 8
Pull the lever handles down with both hands and slide the power shelf slowly from the slot in the chassis. After partially
removing the power shelf from the chassis using the handles, grab both side of the power shelf and slide the shelf
completely from the chassis.
An empty power shelf weighs approximately 36 lb (16.3 kg). Because of the rack-mounted height of the chassis,
you should be especially careful while lifting and removing the power shelf. To prevent injury to your back,
keep your back straight while lifting the shelf and lift the equipment as you stand up. Avoid sudden twists or
lateral moves. It is safer to have two people use a ladder to install or remove the power shelf rather than do it
yourself.
Caution
Step 9
Set the power shelf carefully aside.
What to do next
After performing this task, you can install a replacement power shelf (
Installing a Fixed Configuration Power
Installing Fixed Configuration AC Power Cords
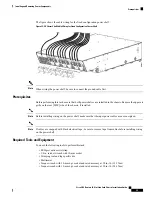
This section describes how to install the AC Wye and AC Delta power cord in the fixed configuration power
system.
Prerequisites
Before performing this task, ensure that both power shelves are installed in the chassis. Remove the upper air
grille on the rear [MSC] side of the chassis (if installed).
Before installing the AC power cord on the power shelf, make sure that the AC power cord is not plugged
into the facility power.
Note
Cisco CRS Routers 16-Slot Line Card Chassis Installation Guide
33
Installing and Removing Power Components
Installing Fixed Configuration AC Power Cords


