DETAILED STEPS
Step 1
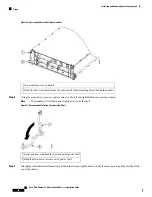
Insert the cord into the cord clamp.
If you have a Cisco CRS PDU installed, the AC power cords must be installed as labeled. For further information,
see
Cisco CRS 3-Phase AC Power Distribution Unit Installation Guide
.
Note
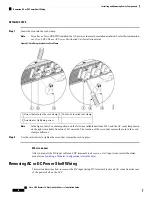
Figure 43: Cord Being Inserted into Cord Clamp
Cord to be inserted into clamp
3
Screw that secures the cord clamp
1
Screwdriver tightening screw
2
In the figure, the AC cord clamp shown on the left was available until June 2011, and the AC cord clamp shown
on the right is available from June 2011 onwards. The location of the screw that secures the cord in the cord
clamp is different.
Note
Step 2
Use the screwdriver to tighten the screw that clamps the cord in place.
What to do next
After you install the DC input cables and DC terminal block covers, or AC input cords, install the alarm
module (see
Installing a Modular Configuration Alarm Module
Removing AC or DC Power Shelf Wiring
This section describes how to remove the DC input wiring, DC terminal blocks and AC cords from the rear
of the power shelf on the LCC.
Cisco CRS Routers 16-Slot Line Card Chassis Installation Guide
78
Installing and Removing Power Components
Removing AC or DC Power Shelf Wiring


