5.
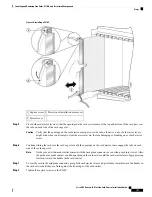
After the hard drive is in the slot, firmly press it all the way in so that it is properly seated. (When the hard
drive is firmly seated, the release button on the card pops out slightly.)
6.
Replace the hard drive door to keep dust out, and tighten the captive screws.
DETAILED STEPS
Step 1
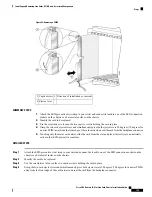
Attach the ESD-preventive wrist strap to your wrist and connect its leash to one of the ESD connection sockets on the
chassis or a bare metal surface on the chassis.
Step 2
Use the screwdriver to loosen the captive screws at the left and right of the hard drive door on the faceplate of the card.
If needed, use a screwdriver on the captive screws.
Step 3
Remove the hard drive door and set it carefully aside.
Step 4
Carefully align the hard drive sled (attached to the hard drive), and slowly insert it into the hard drive slot.
Step 5
After the hard drive is in the slot, firmly press it all the way in so that it is properly seated. (When the hard drive is firmly
seated, the release button on the card pops out slightly.)
Step 6
Replace the hard drive door to keep dust out, and tighten the captive screws.
What to do next
After performing this task, replace any cosmetic cover plates.
After installing the hard disk, use the
proc restart hd_drv
and
proc mandatory on hd_drv
commands to
reduce the chances of data corruption.
Removing a Hard Drive
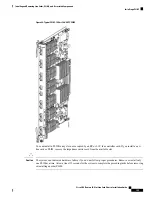
This section describes how to remove a hard drive from an RP or a DRP PLIM. Hard drives are available as
an option on both the RP and DRP PLIM and are removed in the same manner. For more detailed information
on the hard drives, see
About Hard Drives and PCMCIA Cards, on page 111
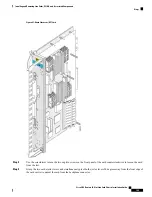
. The previous figure shows the
hard drive door location on the RP card. (The hard drive for the DRP PLIM is in a similar location.)
Prerequisites
The hard disk should be powered down prior to removal. This reduces the chances of data corruption. To
power down the hard disk prior to removal, use the
proc mandatory off hd_drv
and
proc shutdown hd_drv
commands.
Before performing this task, open the front (PLIM) side cosmetic doors (if installed).
Required Tools and Equipment
You need the following tools to perform this task:
• ESD-preventive strap
• Medium flat-head screwdriver
Steps
To remove the hard drive, follow these steps:
Cisco CRS Routers 16-Slot Line Card Chassis Installation Guide
162
Installing and Removing Line Cards, PLIMs, and Associated Components
Removing a Hard Drive


