SUMMARY STEPS
1.
Attach the ESD-preventive wrist strap to your wrist and connect its leash to one of the ESD connection
sockets on the front (PLIM) side of the chassis or a bare metal surface on the chassis.
2.
Make sure that the power shelf I/O switch, located on the front (PLIM) side of the chassis, is in the OFF
position.
3.
The lever handles are fastened down for shipment. Use the screwdriver to turn the two captive screws,
one on each lever handle, to unfasten them.
4.
Supporting the unit by the bottom and grasping one side for balance, lift the power shelf up and slide it
into one of the power shelf slots on the chassis.
5.
Slide the power shelf fully into the chassis and lift the lever handles up to lock the tray into position.
6.
Use the screwdriver to turn the two lever screws on the front panel of the power shelf clockwise to seat
the power shelf firmly in the slot.
7.
Use the screwdriver to turn the four captive screws on the interior of the power shelf clockwise to firmly
anchor the shelf to the sides of the chassis.
DETAILED STEPS
Step 1
Attach the ESD-preventive wrist strap to your wrist and connect its leash to one of the ESD connection sockets on the
front (PLIM) side of the chassis or a bare metal surface on the chassis.
Step 2
Make sure that the power shelf I/O switch, located on the front (PLIM) side of the chassis, is in the OFF position.
Step 3
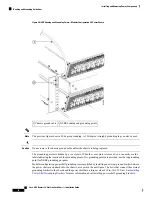
The lever handles are fastened down for shipment. Use the screwdriver to turn the two captive screws, one on each lever
handle, to unfasten them.
Step 4
Supporting the unit by the bottom and grasping one side for balance, lift the power shelf up and slide it into one of the
power shelf slots on the chassis.
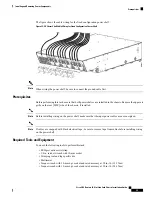
An empty power shelf weighs approximately 36 lb (16.3 kg). Because of the rack-mounted height of the chassis,
you should be especially careful while lifting and removing the power shelf. To prevent injury, keep your back
straight and lift with your legs, not your back. Avoid sudden twists or lateral moves. It is safer to use two people
and a ladder to install or remove the power shelf rather than a single person.
Caution
Step 5
Slide the power shelf fully into the chassis and lift the lever handles up to lock the tray into position.
Step 6
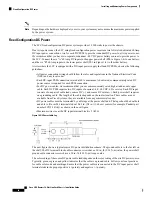
Use the screwdriver to turn the two lever screws on the front panel of the power shelf clockwise to seat the power shelf
firmly in the slot.
Step 7
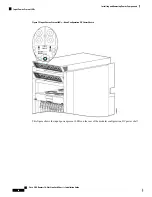
Use the screwdriver to turn the four captive screws on the interior of the power shelf clockwise to firmly anchor the shelf
to the sides of the chassis.
What to do next
After performing this task, wire the power shelf (
Installing Fixed Configuration AC Power Cords
and
Fixed Configuration DC Power Shelf Wiring
), install the power modules (
Installing an AC Rectifier or DC
) and install the alarm module (
Installing a Fixed Configuration Alarm Module
).
Removing a Fixed Configuration Power Shelf
This section describes how to remove a power shelf from the 16-slot LCC. For information on the differences
between the power types, see
and
.
Cisco CRS Routers 16-Slot Line Card Chassis Installation Guide
31
Installing and Removing Power Components
Removing a Fixed Configuration Power Shelf


