background image

Configuring

Before you can use the Cisco Expressway, you must configure its IPv4 and/or IPv6 address, subnet mask
and default gateway. Consult your network administrator for information on which addresses to use. Note
that the Cisco Expressway must use a static IP address.

This section describes how to connect to the Cisco Expressway and perform the initial configuration.

Connecting to the Cisco Expressway

Before you can use the Cisco Expressway, you must configure its IPv4 and/or IPv6 address, subnet mask
and default gateway. Consult your network administrator for information on which addresses to use. Note
that the Cisco Expressway must use a static IP address.

Note:

an additional IP address is required if the CIMC (Cisco Integrated Management Controller) tool is used.

It can be a static IP address or assigned via DHCP.

This initial configuration can be done:

n

by connecting from a PC to the Cisco Expressway using a serial cable (see

Connecting via the serial port

[p.8]

followed by

Configuring the Cisco Expressway [p.9]

).

n

by connecting a monitor and keyboard directly into the unit (see

Connecting via the KVM port [p.9]

followed

by

Configuring the Cisco Expressway [p.9]

).

n

if your network is set up to allow it, by connecting using a web browser to the default IP address of
192.168.0.100 (see

Using the web interface [p.10]

).

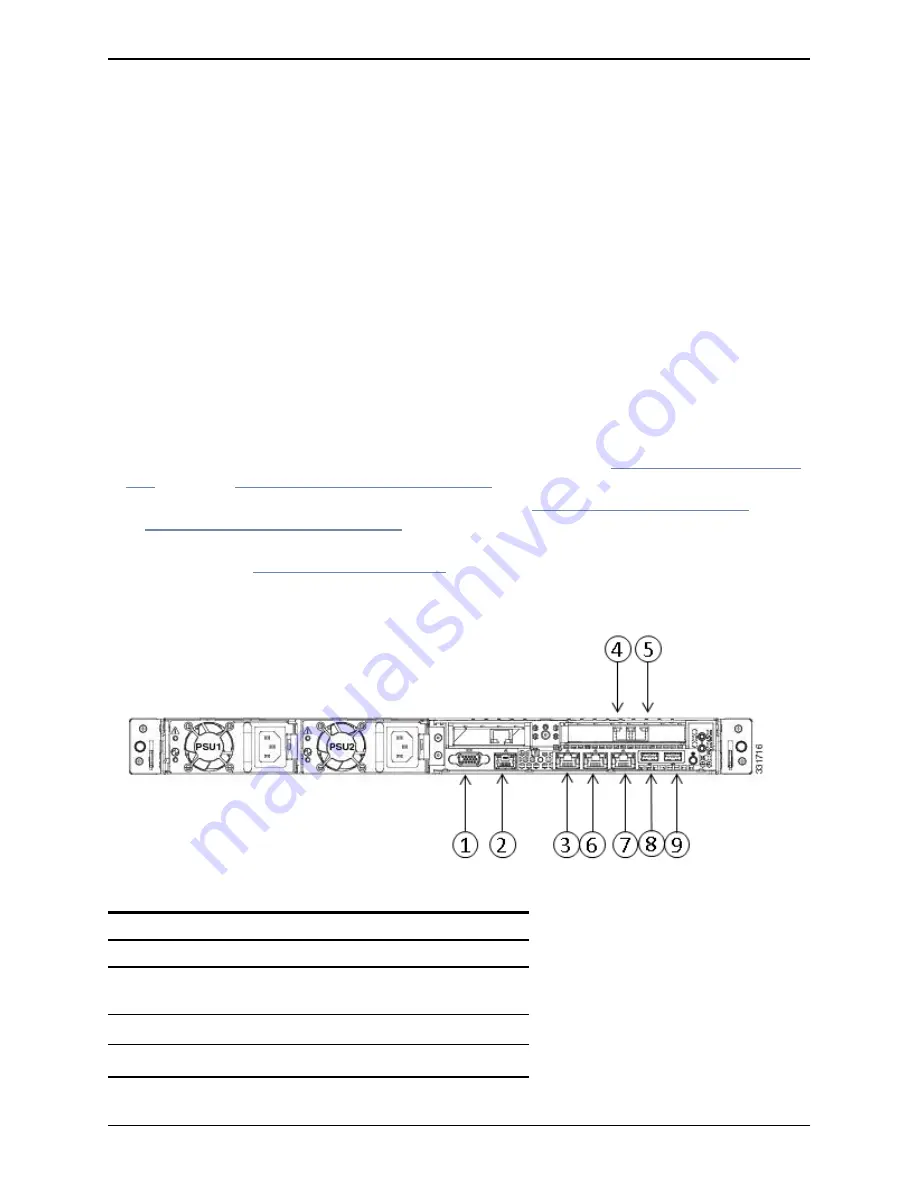
Figure 1: Rear panel showing ports.

The rear panel ports are:

1 VGA port

2 Serial port

3 Dedicated management port (can be used for CIMC in the

future)

4 LAN 1 (left-hand SFP port)

5 LAN 2 (right-hand SFP port)

Cisco Expressway CE1000 Appliance Installation Guide (8.5)

Page 7 of 16

Configuring

Summary of Contents for Expressway CE1000 Appliance

Page 1: ...Cisco Expressway CE1000 Appliance Installation Guide X8 2 or later December 2014 ...

Page 2: ...ring 7 Connecting to the Cisco Expressway 7 Connecting via the serial port 8 Connecting via the KVM port 9 Configuring the Cisco Expressway 9 Using the web interface 10 Using the Command Line Interface CLI 10 Changing the admin account password 10 Changing the root account password 11 Changing other system settings 11 Checking for updates and upgrading 11 Troubleshooting 12 Locating LEDs and compo...

Page 3: ...e of the unit s performance and scalability capabilities otherwise it will not support more than 150 traversal calls This is the case even if the option key for additional traversal calls has been installed The following table lists the components for the appliance Item Part Quantity Chassis UCSC C220 M3L 1 Processor UCS CPU E5 2643 3 30 GHz 4 Core Hyper threaded 2 RAM UCS MR 1X082RY A 8 GB 4 Hard...

Page 4: ...e Cisco Expressway software n Cisco Expressway Cluster Creation and Maintenance Deployment Guide describes how to create and maintain a cluster of Cisco Expressways Training Training is available online and at our training locations For more information on all the training we provide and where our training offices are located visit www cisco com go telepresencetraining Glossary A glossary of TeleP...

Page 5: ...iber SFPs and 2 x 1 Gb copper SFPs n Installation guidelines n Rack requirements n Equipment requirements n Slide rail adjustment range Locating serial numbers The Cisco Expressway appliance displays two serial numbers n UCS serial number l has the format FCHxxxxxxxx l is displayed on the physical hardware and in the CIMC web interface n Application Software serial number l has the format 52XNNNNN...

Page 6: ...stalled Connecting and powering on the unit Attach a power cord to each power supply in your server and then attach the power cord to a grounded AC power outlet See http www cisco com en US docs unified_ computing ucs c hw C220 install spec html wp1070378 for power specifications The power button of the unit is located in the top left hand corner of the front panel If this is the first time that t...

Page 7: ...uired if the CIMC Cisco Integrated Management Controller tool is used It can be a static IP address or assigned via DHCP This initial configuration can be done n by connecting from a PC to the Cisco Expressway using a serial cable see Connecting via the serial port p 8 followed by Configuring the Cisco Expressway p 9 n by connecting a monitor and keyboard directly into the unit see Connecting via ...

Page 8: ... in Figure 1 Rear panel showing ports p 7 2 Connect a serial cable from the serial port on the rear of the unit to the serial port on a PC see Figure 1 Rear panel showing ports p 7 The serial cable used must be a cross over cable The pin assignment for the serial cable is Male RJ45 pin Female DB9 pin 1 8 2 6 3 TXD 2 4 GND 5 5 GND 5 6 RXD 3 7 4 8 7 Note if there is no DB9 port on your PC a DB9 to U...

Page 9: ...rtup information After approximately four minutes you will get the login prompt If the Cisco Expressway was already on when you connected the serial cable press Enter to get the login prompt The login prompt is cisco login 2 Enter the username admin and press Enter You will get the password prompt Password 3 Enter the default password of TANDBERG and press Enter You will get the install wizard pro...

Page 10: ...d with the Overview page See the online help or Cisco Expressway Administrator Guide for information on the configuration options available for each page of the Cisco Expressway web interface Using the Command Line Interface CLI The command line interface is available over SSH and through the serial port by default To use the command line interface 1 Start an SSH session 2 Enter the IP address or ...

Page 11: ...tration page System Administration on the web interface n Automatic discovery If you have multiple Cisco Expressways in the same network you may want to disable automatic discovery on some of them This can be set from the H 323 page on the web interface Configuration Protocols H 323 n The DNS server address es if URI dialing or Fully Qualified Domain Names FQDNs are to be used This can be set from...

Page 12: ...tatus LED 4 Fan status LED 5 Temperature status LED 6 Power supply status LED 7 Network link activity LED 8 Asset tag serial number 9 KVM connector for USB VGA connection 10 HD drive activity fault LED Rear view Below is an illustration of the unit s rear view and a list of the LEDs and components available Figure 4 Rear view of the Cisco Expressway unit 1 Power supplies two for CE1000 Cisco Expre...

Page 13: ... button LED Definitions of LED states For the definitions of LED states see http www cisco com en US docs unified_ computing ucs c hw C220 install replace html wp1167104 Specific issues Active Options only indicates 150 traversal calls for Large deployments To utilize the Large scale capabilities 500 traversal calls of the Cisco Expressway the CE1000 unit must have an active 10Gb network connectio...

Page 14: ...zes the changes that have been applied to this document Date Description December 2014 Updated for X8 5 June 2014 Updated for X8 2 April 2014 Initial release Cisco Expressway CE1000 Appliance Installation Guide 8 5 Page 14 of 16 Document revision history ...

Page 15: ...n A full description of the problem To view a list of Cisco TelePresence products that are no longer being sold and might not be supported visit http www cisco com en US products prod_end_of_life html and scroll down to the TelePresence section Accessibility notice Cisco is committed to designing and delivering accessible products and technologies The Voluntary Product Accessibility Template VPAT ...

Page 16: ...T LIMITATION THOSE OF MERCHANTABILITY FITNESS FOR A PARTICULAR PURPOSE AND NONINFRINGEMENT OR ARISING FROM A COURSE OF DEALING USAGE OR TRADE PRACTICE IN NO EVENT SHALL CISCO OR ITS SUPPLIERS BE LIABLE FOR ANY INDIRECT SPECIAL CONSEQUENTIAL OR INCIDENTAL DAMAGES INCLUDING WITHOUT LIMITATION LOST PROFITS OR LOSS OR DAMAGE TO DATA ARISING OUT OF THE USE OR INABILITY TO USE THIS MANUAL EVEN IF CISCO ...

Reviews: