Cisco ASA for Firepower 4100 Quick Start Guide
•
•
Cisco Firepower Threat Defense for Firepower 4100 Quick Start Guide
Connect Cables, Turn on Power, and Verify Connectivity
Take note of the following warnings:
Statement 1021
—
SELV Circuit
To avoid electric shock, do not connect safety extra-low voltage (SELV) circuits to telephone-network
voltage (TNV) circuits. LAN ports contain SELV circuits, and WAN ports contain TNV circuits. Some
LAN and WAN ports both use RJ-45 connectors. Use caution when connecting cables.
Warning
Statement 1051
—
Laser Radiation
Invisible laser radiation may be emitted from disconnected fibers or connectors. Do not stare into beams
or view directly with optical instruments.
Warning
Statement 1053
—
Class 1M Laser Radiation
Class 1M laser radiation when open. Do not view directly with optical instruments.
Warning
Statement 1055
—
Class I and Class 1M Laser
Class I (CDRH) and Class 1M (IEC) laser products.
Warning
After rack mounting the Firepower 4100 series security appliance, follow these steps to connect cables, turn
on power, and verify connectivity.
Step 1
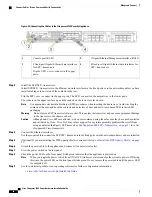
Connect the console port.
Using a serial console cable, connect a computer or terminal server to the RJ-45 serial console port (baud rate is 9600)
so that you can use the CLI to initially set up the Firepower 4100.
Step 2
Connect the management interface.
Install the 1 Gigabit Ethernet transceiver that was provided in the Firepower 4100 accessory kit in the Management port,
and then using an Ethernet cable, connect a management computer directly to the transceiver.
Cisco Firepower 4100 Series Hardware Installation Guide
55
Mount and Connect
Connect Cables, Turn on Power, and Verify Connectivity


