Software Configuration of ATM ISE Line Cards for Cisco 12000 Series Routers
How to Configure AToM VCs on the 4-Port ATM ISE Line Card
61
Cisco IOS Release 12.0(27)S
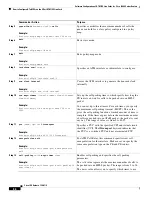
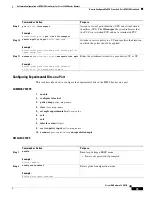
Step 3
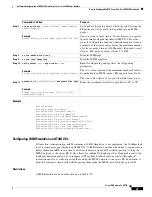
policy-map
policy-map-name
Example:
Router(config)# policy-map out_vbr-rt
Specifies the name of the service policy to configure with
the shaping queue size.
Step 4
class class-default
Example:
Router(config-pmap)# class class-default
Specifies to configure the default class.
Step 5
queue-limit
number-of-cells
cells
Example:
Router(config-pmap-c)# queue-limit 500 cells
Specifies or modifies the maximum number of cells the
queue can hold for a class policy configured in a policy
map.
Step 6
exit
Example:
Router(config-pmap-c)# exit
Exits class mode.
Step 7
exit
Example:
Router(config-pmap)# exit
Exits policy-map mode.
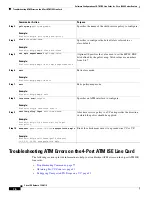
Step 8
interface atm
slot/port
Example:
Router(config)# interface atm1/0
Specifies an ATM interface or subinterface to configure.
Step 9
atm clock internal
Example:
Router(config)# atm clock internal
Causes the ATM interface to generate the transmit clock
internally.
Step 10
pvc
[
name
]
vpi/vci
l2transport
Example:
Router(config-if)# pvc 21/21 l2transport
Specifies a PVC with the specified VPI and virtual circuit
identifier (VCI). The
l2transport
keyword indicates that
the PVC is a switched PVC and not a terminated PVC.
Step 11
encapsulation aal5
Example:
Router(config-atm-l2trans-pvc)# encapsulation
aal5
Specifies ATM AAL5 encapsulation for the PVC. Make
sure you specify the same encapsulation type on the PE and
CE routers.
Command or Action
Purpose

