Step 1
Look at the fan trays and power supplies installed in the chassis to determine how you must position the bottom-support
rails on the rack.
• If the modules have burgundy coloring (port-side-intake airflow), you must position the bottom-support rails so that
their chassis stops are positioned in the hot aisle.
• If the modules have blue coloring (port-side-exhaust airflow), you must position the bottom-support rails so that
their chassis stops are positioned in the cold aisle.
Step 2
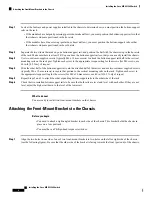
Separate the two sliders that make up one bottom-support rail, and position the half with the chassis stop in the hot aisle
of the rack. Make sure there is at least 2 RU open above the bottom-support rails so that you can easily install the chassis.
Step 3
Use two customer-supplied screws (typically M6 x 10 mm screws) to attach the bottom-support rail half to the vertical
mounting rails on the rack post. Tighten each screw to the appropriate torque setting for the screws (for M6 screws, use
40 in-lb [4.5 N·m] of torque).
Step 4
Slide the other half of the bottom-support rail onto the attached half of the rail set and use two customer supplied screws
(typically M6 x 10 mm screws) to secure that portion to the vertical mounting rails on the rack. Tighten each screw to
the appropriate torque setting for the screws (for M6 x 10 mm screws, use 40 in-lb [4.5 N·m] of torque).
Step 5
Repeat Steps 2 and 3 to attach the other expanding bottom-support rails to the other side of the rack.
Step 6
Check the two installed bottom support rails to be sure that both rails are level and level with each other. If they are not
level, adjust the higher rail down to the level of the lower rail.
What to do next
You are ready to install two front-mount brackets on the chassis.
Attaching the Front-Mount Brackets to the Chassis
Before you begin
• You need to attach a right-angled bracket to each side of the chassis. This bracket holds the chassis in
place on a four post rack.
• You must have a Phillips-head torque screwdriver.
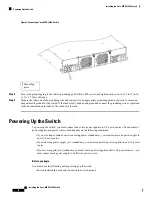
Step 1
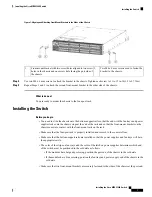
Align the two holes in one side of one of two front-mount brackets to two holes on the left or right side of the chassis
(see the following figure). Be sure that the other side of the bracket is facing towards the front (port end) of the chassis.
Installing the Cisco MDS 9396S Switch
6
Installing the Cisco MDS 9396S Switch
Attaching the Front-Mount Brackets to the Chassis


