10-32
Cisco Nexus 7000 Series Hardware Installation and Reference Guide
OL-23069-07
Chapter 10 Installing or Replacing Components
Replacing a Supervisor Module
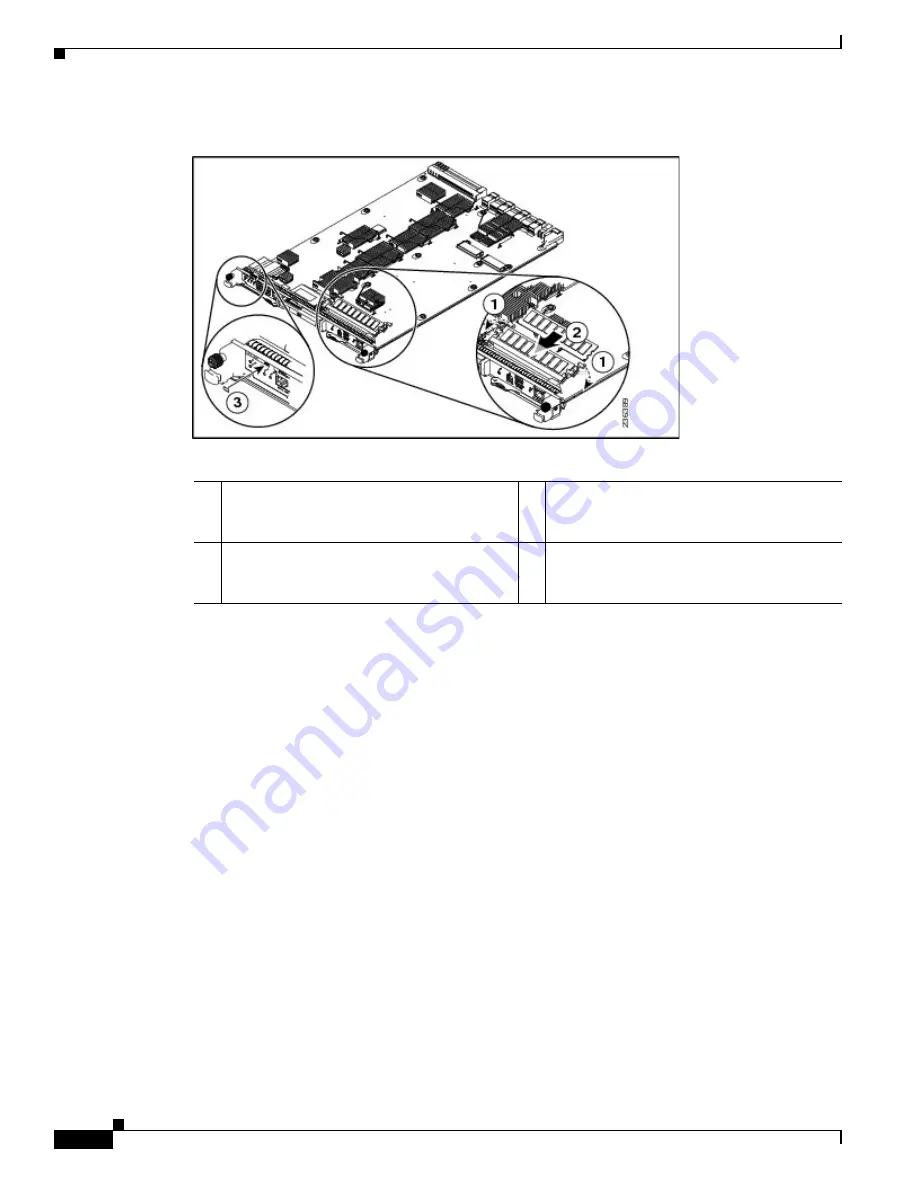
Figure 10-9
Adding a 4-GB DIMM
Step 10
Holding the edges of the 4-GB memory board with one hand, slide it into the second memory slot from
the front of the module until the two spring clips click into the DIMM (see Callout 2 in
Figure 10-9
).
Step 11
Place an 8-GB label on the front of the module and to the right of the N7K-SUP-1 identifier.
Step 12
Rotate both ejector levers away from the front of the supervisor module.
Step 13
Grasp the front of the supervisor module with one hand and place your other hand under the module to
support its weight.
Step 14
Align the module to the open supervisor slot in the chassis and push the module into the slot until it
makes contact with the midplane.
Step 15
Simultaneously push both ejector levers inward until they come in contact with the face of the module.
The module should be fully seated in the slot and the captive screws should be aligned with their holes
in the chassis. The EMI gasket should close the gap between this module and the next module.
Step 16
Screw in the two captive screws to the chassis and tighten them to 8 in-lb (0.9 N·m).
Step 17
Reconnect the console cable to the CONSOLE SERIAL PORT as explained in the
“Connecting to the
Console” section on page 7-2
.
Step 18
If the previous supervisor module was connected to an asynchronous device through a modem, connect
the modem cable to the COM1/AUX SERIAL PORT as explained in the
“Connecting to the Console”
section on page 7-2
.
Step 19
Reconnect the network management cable to the MGMT ETH port as explained in the
“Setting Up the
Management Interface” section on page 7-4
.
1
On the second memory slot from the front of
the supervisor module, rotate both spring
clips out.
3
Add an 8 GB label to the right of the
N7K-SUP-1 identifier on the front of the
module.
2
Holding the DIMM by its edges, align it to the
second memory slot and push it into place
until the spring clips click into the DIMM.
Summary of Contents for Nexus 7004
Page 12: ...Contents xii Cisco Nexus 7000 Series Hardware Installation and Reference Guide OL 23069 07 ...
Page 19: ... xix Cisco Nexus 7000 Series Hardware Installation and Reference Guide OL 23069 07 ...
Page 22: ... xxii Cisco Nexus 7000 Series Hardware Installation and Reference Guide OL 23069 07 ...