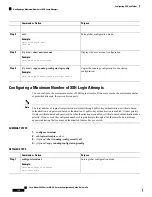
Purpose
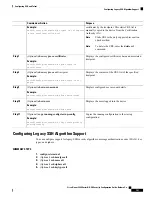
Command or Action
Exits global configuration mode.
exit
Example:
Step 3
switch(config)# exit
switch#
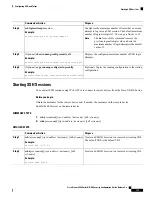
Displays the Telnet server configuration.
(Optional)
show telnet server
Example:
Step 4
switch# show telnet server
Copies the running configuration to the startup
configuration.
(Optional)
copy running-config startup-config
Example:
Step 5
switch# copy running-config startup-config
Starting Telnet Sessions to Remote Devices
You can start Telnet sessions to connect to remote devices from the Cisco NX-OS device. You can start Telnet
sessions using either IPv4 or IPv6.
Before you begin
Obtain the hostname or IP address for the remote device and, if needed, the username on the remote device.
Enable the Telnet server on the Cisco NX-OS device.
Enable the Telnet server on the remote device.
SUMMARY STEPS
1.
telnet
{
ipv4-address
|
host-name
} [
port-number
] [
vrf vrf-name
]
2.
telnet6
{
ipv6-address
|
host-name
} [
port-number
] [
vrf vrf-name
]
DETAILED STEPS
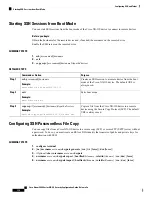
Purpose
Command or Action
Starts a Telnet session to a remote device using IPv4. The
default port number is 23. The range is from 1 to 65535.
The default VRF is the default VRF.
telnet
{
ipv4-address
|
host-name
} [
port-number
] [
vrf
vrf-name
]
Example:
Step 1
switch# telnet 10.10.1.1
Starts a Telnet session to a remote device using IPv6. The
default port number is 23. The range is from 1 to 65535.
The default VRF is the default VRF.
telnet6
{
ipv6-address
|
host-name
} [
port-number
] [
vrf
vrf-name
]
Example:
Step 2
switch# telnet6 2001:0DB8::ABCD:1 vrf management
Related Topics
, on page 147
Cisco Nexus 9000 Series NX-OS Security Configuration Guide, Release 9.x
148
Configuring SSH and Telnet
Starting Telnet Sessions to Remote Devices

