background image


18-23

Cisco ONS 15454 DWDM Installation and Operations Guide, R6.0

August 2005

Chapter 18      Network Reference

18.6 Span Loss Verification

18.6 Span Loss Verification

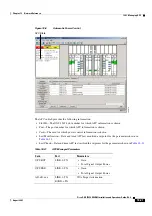
Span loss measurements can be performed from the Maintenance > DWDM > WDM Span Check subtab 
(

Figure 18-10

). The CTC span check compares the far-end OSC power with the near-end OSC power. A 

“Span Loss Out of Range” condition is raised when the measured span loss is higher than the maximum 
expected span loss. It is also raised when the measured span loss is lower than the minimum expected 
span loss and the difference between the minimum and maximum span loss values is greater than 1 dB. 
The minimum and maximum expected span loss values are calculated by Cisco MetroPlanner for the 
network and imported into CTC. However, you can manually change the minimum and expected span 
loss values.

CTC span loss measurements provide a quick span loss check and are useful whenever changes to the 
network occur, for example after you install equipment or repair a broken fiber. CTC span loss 
measurement resolutions are:

+/– 1.5 dB for measured span losses between 0 and 25 dB

+/– 2.5 dB for measured span losses between 25 and 38 dB

For ONS 15454 span loss measurements with higher resolutions, an optical time domain reflectometer 
(OTDR) must be used. 

Figure 18-10

Span Loss Verification

Summary of Contents for ONS 15454 DWDM

Page 1: ...man Drive San Jose CA 95134 1706 USA http www cisco com Tel 408 526 4000 800 553 NETS 6387 Fax 408 526 4100 Cisco ONS 15454 DWDM Installation and Operations Guide Product and Software Release 6 0 Last Updated September 05 2007 Text Part Number OL 8432 01 ...

Page 2: ...rect the interference by using one or more of the following measures Turn the television or radio antenna until the interference stops Move the equipment to one side or the other of the television or radio Move the equipment farther away from the television or radio Plug the equipment into an outlet that is on a different circuit from the television or radio That is make certain the equipment and ...

Page 3: ...back lxxv Cisco Product Security Overview lxxv Reporting Security Problems in Cisco Products lxxvi Obtaining Technical Assistance lxxvi Cisco Technical Support Documentation Website lxxvii Submitting a Service Request lxxvii Definitions of Service Request Severity lxxvii Obtaining Additional Publications and Information lxxviii C H A P T E R 1 Install the Shelf and Common Control Cards 1 1 Before ...

Page 4: ...26 DLP G13 Remove the Lower Backplane Cover 1 26 DLP G14 Remove the Backplane Sheet Metal Cover 1 27 NTP G6 Install the MIC A P and MIC T C P FMECs ETSI Only 1 28 NTP G7 Install the Power and Ground 1 30 DLP G15 Connect the Office Ground to the ONS 15454 ETSI 1 32 DLP G16 Connect the Office Ground to the ONS 15454 ANSI 1 34 DLP G17 Connect Office Power to the ONS 15454 ETSI 1 35 DLP G18 Connect Of...

Page 5: ... for Windows 2 3 DLP G38 Run the CTC Installation Wizard for UNIX 2 6 NTP G18 Set Up CTC Computer for Local Craft Connection to the ONS 15454 2 9 DLP G39 Set Up a Windows PC for Craft Connection to an ONS 15454 on the Same Subnet Using Static IP Addresses 2 11 DLP G40 Set Up a Windows PC for Craft Connection to an ONS 15454 Using Dynamic Host Configuration Protocol 2 13 DLP G41 Set Up a Windows PC...

Page 6: ...de 3 17 DLP G58 Create a Static Route 3 18 DLP G59 Set Up or Change Open Shortest Path First Protocol 3 19 DLP G60 Set Up or Change Routing Information Protocol 3 22 NTP G27 Set Up the ONS 15454 for Firewall Access 3 23 DLP G61 Provision the IIOP Listener Port on the ONS 15454 3 24 DLP G62 Provision the IIOP Listener Port on the CTC Computer 3 25 NTP G132 Provision OSI 3 25 DLP G283 Provision OSI ...

Page 7: ...r Optic Cables from a TXP MXP Node to the Patch Panel 3 78 NTP G141 Install Fiber Optic Cables for Y Cable Protection Modules 3 79 NTP G36 Calculate Cable Connections 3 80 DLP G72 Create a DWDM Connection 3 81 DLP G73 Delete a DWDM Connection 3 82 NTP G138 Import a Cisco MetroPlanner Configuration File 3 82 NTP G37 Run Automatic Node Setup 3 83 NTP G38 Provision OSC Terminations 3 84 NTP G39 Verif...

Page 8: ...LP G86 Verify Express Channel Connections on an OADM Node with OSC CSM Cards 4 46 DLP G87 Verify the AD xB xx x Output Express Power 4 47 DLP G88 Verify the AD xC xx x Output Express Power 4 47 DLP G271 Verify the AD xC xx x Output Common Power 4 48 DLP G272 Verify the AD xB xx x Output Common Power 4 48 DLP G89 Verify OADM Node Pass Through Channel Connections 4 49 DLP G90 Verify an AD xB xx x Pa...

Page 9: ...s Settings for MXP_2 5G_10G and MXP_2 5G_10E Cards 5 39 DLP G303 Provision the MXP_2 5G_10G and MXP_2 5G_10E Trunk Port Alarm and TCA Thresholds 5 41 DLP G304 Provision the MXP_2 5G_10G and MXP_2 5G_10E Client Port Alarm and TCA Thresholds 5 43 DLP G228 Change Line OTN Settings for MXP_2 5G_10G and MXP_2 5G_10E Cards 5 44 NTP G98 Modify Line Settings and PM Parameter Thresholds for TXP_MR_2 5G and...

Page 10: ...rify Node to Node Connections 6 3 NTP G53 Set Up Timing 6 4 DLP G95 Set Up External or Line Timing 6 4 DLP G96 Set Up Internal Timing 6 7 NTP G54 Provision and Verify a DWDM Network 6 8 DLP G99 Create a Provisionable Patchcord 6 11 NTP G56 Verify the OSNR 6 12 NTP G142 Perform a Protection Switch Test 6 13 NTP G57 Create a Logical Network Map 6 15 C H A P T E R 7 Create Channels and Circuits 7 1 B...

Page 11: ... DLP G117 Change the Maximum Number of Session Entries for Alarm History 8 9 DLP G118 Display Alarms and Conditions Using Time Zone 8 11 DLP G119 Synchronize Alarms 8 11 DLP G120 View Conditions 8 12 NTP G65 Delete Cleared Alarms from Display 8 13 NTP G66 View Alarm Affected Circuits 8 14 NTP G67 View Alarm Counts on the LCD for a Node Slot or Port 8 15 NTP G68 Create Download and Assign Alarm Sev...

Page 12: ...Statistics 9 12 DLP G141 View Optical Power Statistics for 32MUX O 32 WSS 32 DMX O and 32DMX Cards 9 13 DLP G276 View 4 Channel Multiplexer Demultiplexer Optical Power Statistics 9 15 DLP G142 View Channel Optical Add Drop Multiplexer Power Statistics 9 16 DLP G143 View Band Optical Add Drop Multiplexer Power Statistics 9 18 NTP G75 Monitor Transponder and Muxponder Performance 9 19 DLP G144 Enabl...

Page 13: ...achment 10 16 DLP G296 Edit an IP Over CLNS Tunnel 10 17 DLP G297 Delete an IP Over CLNS Tunnel 10 18 NTP G81 Change CTC Network Access 10 18 DLP G162 Change IP Settings 10 19 DLP G265 Lock Node Security 10 20 DLP G266 Modify Backplane Port IP Settings 10 21 DLP G267 Disable Node Security Mode 10 22 DLP G163 Modify a Static Route 10 23 DLP G164 Delete a Static Route 10 24 DLP G165 Disable OSPF 10 ...

Page 14: ... Nodes 10 47 DLP G317 Change Node Access and PM Clearing Privilege 10 49 DLP G191 Change User Password and Security Level on a Single Node 10 50 DLP G192 Change User Password and Security Level for Multiple Nodes 10 51 DLP G193 Delete a User From a Single Node 10 52 DLP G194 Delete a User From Multiple Nodes 10 52 DLP G195 Log Out a User on a Single Node 10 53 DLP G196 Log Out a User on Multiple N...

Page 15: ... for Multiplexer and Demultiplexer Cards 11 30 NTP G93 Modify the 32WSS Thresholds and Settings 11 33 DLP G212 Change Optical Channel Parameters for the 32WSS Card 11 33 DLP G213 Change the 32WSS Optical Channel Thresholds 11 36 DLP G214 Change Optical Line Parameters for the 32WSS Card 11 39 DLP G215 Change the 32WSS Card Optical Line Thresholds 11 40 NTP G101 Modify Alarm Interface Controller In...

Page 16: ...ce Switch the Node Timing Reference 13 18 DLP G260 Clear a Manual or Force Switch on a Node Timing Reference 13 19 NTP G113 View the ONS 15454 Timing Report 13 19 NTP G114 Inspect Clean and Replace the Air Filter 13 22 NTP G115 Clean Fiber Connectors 13 25 DLP G261 Scope and Clean Fiber Connectors and Adapters with Alcohol and Dry Wipes 13 26 DLP G262 Clean Fiber Connectors with CLETOP 13 27 DLP G...

Page 17: ... Alarm Interface Panel Replacement 15 29 15 8 ONS 15454 ETSI Front Mount Electrical Connection 15 30 15 9 ONS 15454 ANSI Alarm Expansion Panel 15 30 15 10 Filler Card 15 35 15 11 Cable Routing and Management 15 36 15 11 1 Fiber Management 15 37 15 11 2 Fiber Management Using the Patch Panel Tray 15 39 15 11 3 Fiber Management Using the Fiber Storage Tray 15 39 15 11 4 Fiber Management Using the Op...

Page 18: ...Cards 16 9 16 2 1 TCC2 Card 16 10 16 2 1 1 TCC2 Functionality 16 11 16 2 1 2 Redundant TCC2 Card Installation 16 12 16 2 1 3 TCC2 Card Level Indicators 16 12 16 2 1 4 Network Level Indicators 16 12 16 2 2 TCC2P Card 16 13 16 2 3 TCC2P Functionality 16 15 16 2 3 1 Redundant TCC2P Card Installation 16 15 16 2 3 2 TCC2P Card Level Indicators 16 16 16 2 3 3 Network Level Indicators 16 16 16 2 4 AIC I ...

Page 19: ...5 3 OPT BST E Amplifier Card 16 41 16 5 3 1 Power Monitoring 16 44 16 5 3 2 OPT BST E Amplifier Card Level Indicators 16 45 16 5 3 3 OPT BST E Port Level Indicators 16 45 16 6 Multiplexer and Demultiplexer Cards 16 45 16 6 1 32MUX O Card 16 45 16 6 1 1 Channel Plan 16 47 16 6 1 2 Power Monitoring 16 49 16 6 1 3 32MUX O Card Level Indicators 16 49 16 6 1 4 32MUX O Port Level Indicators 16 49 16 6 2...

Page 20: ... Power Monitoring 16 72 16 7 4 2 AD 1B xx x Card Level Indicators 16 73 16 7 4 3 AD 1B xx x Port Level Indicators 16 73 16 7 5 AD 4B xx x Card 16 73 16 7 5 1 Power Monitoring 16 75 16 7 5 2 AD 4B xx x Card Level Indicators 16 76 16 7 5 3 AD 4B xx x Port Level Indicators 16 76 16 7 6 32WSS Card 16 76 16 7 6 1 Power Monitoring 16 81 16 7 6 2 32WSS Card Level Indicators 16 81 16 7 6 3 32WSS Port Leve...

Page 21: ...16 98 16 8 4 2 Automatic Laser Shutdown 16 98 16 8 4 3 Timing Synchronization 16 98 16 8 4 4 MXP_2 5G_10G Card Level Indicators 16 99 16 8 4 5 MXP_2 5G_10G Port Level Indicators 16 99 16 8 5 MXP_2 5G_10E Card 16 99 16 8 5 1 Key Features 16 100 16 8 5 2 Faceplate 16 101 16 8 5 3 Client Interfaces 16 102 16 8 5 4 DWDM Interface 16 102 16 8 5 5 Multiplexing Function 16 102 16 8 5 6 Timing Synchroniza...

Page 22: ...bility by Card 16 118 16 13 2 SFP and XFP Description 16 119 C H A P T E R 17 Node Reference 17 1 17 1 DWDM Node Configurations 17 1 17 1 1 Hub Node 17 1 17 1 2 Terminal Node 17 3 17 1 3 OADM Node 17 4 17 1 4 ROADM Node 17 8 17 1 5 Anti ASE Node 17 10 17 1 6 Line Amplifier Node 17 11 17 1 7 OSC Regeneration Node 17 12 17 2 DWDM and TDM Hybrid Node Types 17 14 17 2 1 1 1 Protected Flexible Terminal...

Page 23: ...an Loss Verification 18 23 18 7 Network Optical Safety Automatic Laser Shutdown 18 24 18 7 1 Scenario 1 Fiber Cut in Nodes Using OPT BST OPT BST E Cards 18 24 18 7 2 Scenario 2 Fiber Cut in Nodes Using OSC CSM Cards 18 26 18 8 Network Level Gain Tilt Management of Optical Amplifiers 18 28 18 8 1 Gain Tilt Control at the Card Level 18 29 18 8 2 System Level Gain Tilt Control 18 31 18 8 2 1 System G...

Page 24: ...tion 20 9 20 4 2 Shared Secrets 20 9 C H A P T E R 21 Timing Reference 21 1 21 1 Node Timing Parameters 21 1 21 2 Network Timing 21 2 21 3 Synchronization Status Messaging 21 3 C H A P T E R 22 Management Connectivity Reference 22 1 22 1 IP Networking Overview 22 1 22 2 IP Addressing Scenarios 22 2 22 2 1 Scenario 1 CTC and ONS 15454s on Same Subnet 22 2 22 2 2 Scenario 2 CTC and ONS 15454s Connec...

Page 25: ...Column Descriptions 23 4 23 3 5 3 Filtering Conditions 23 5 23 3 6 Viewing History 23 5 23 3 6 1 History Column Descriptions 23 6 23 3 6 2 Retrieving and Displaying Alarm and Condition History 23 7 23 4 Alarm Severities 23 7 23 5 Alarm Profiles 23 7 23 5 1 Creating and Modifying Alarm Profiles 23 8 23 5 2 Alarm Profile Buttons 23 9 23 5 3 Alarm Profile Editing 23 10 23 5 4 Alarm Severity Options 2...

Page 26: ...rface ANSI only B 3 B 1 10 System Timing B 3 B 1 11 System Power B 3 B 1 12 System Environmental Specifications B 4 B 1 13 Dimensions B 4 B 2 General Card Specifications B 4 B 2 1 Power B 5 B 2 2 Temperature B 6 B 3 Common Control Card Specifications B 7 B 3 1 TCC2 Card Specifications B 7 B 3 2 TCC2P Card Specifications B 8 B 3 3 AIC I Card Specifications B 9 B 3 4 AEP Specifications ANSI only B 1...

Page 27: ...ons B 44 B 5 6 TXP_MR_10E Card Specifications B 46 B 6 SFP Specifications B 48 SFP Port Cabling Specifications B 49 B 7 XFP Specifications B 50 B 7 1 XFP Port Cabling Specifications B 50 A P P E N D I X C DWDM Administrative and Service States C 1 C 1 Service States C 1 C 2 Administrative States C 2 C 3 Service State Transitions C 3 C 3 1 DWDM Card Service State Transitions C 3 C 3 2 Optical Paylo...

Page 28: ...C Default Settings D 56 D 3 ETSI Platform Defaults D 57 D 3 1 ETSI Card Default Settings D 57 D 3 1 1 MXP_2 5G_10G Card Default Settings D 58 D 3 1 2 MXP_2 5G_10E Card Default Settings D 64 D 3 1 3 MXP_MR_2 5G Card Default Settings D 69 D 3 1 4 MXPP_MR_2 5G Card Default Settings D 72 D 3 1 5 TXP_MR_10E Card Default Settings D 76 D 3 1 6 TXP_MR_10G Card Default Settings D 81 D 3 1 7 TXP_MR_2 5G Car...

Page 29: ...9 Figure 1 13 Grounding the ONS 15454 ETSI 1 33 Figure 1 14 Ground Location on the Backplane 1 34 Figure 1 15 Cisco ONS 15454 Power Terminals 1 38 Figure 1 16 Installing the Fan Tray Assembly on the ONS 15454 ETSI 1 42 Figure 1 17 Installing the Fan Tray Assembly on the ONS 15454 ANSI 1 43 Figure 1 18 Replace Backplane Screws with Standoffs 1 45 Figure 1 19 Installing Standoffs and the AEP 1 46 Fi...

Page 30: ...fied OADM Node 3 65 Figure 3 15 Fibering a Passive OADM Node 3 67 Figure 3 16 Fibering an ROADM Node 3 70 Figure 3 17 Using the Patch Panel Latches to Slide the Patch Panel Away from the Tray 3 75 Figure 3 18 MPO Cable 3 76 Figure 3 19 Rear View of the Patch Panel 3 77 Figure 3 20 Top View of the Patch Panel Bar 3 77 Figure 3 21 Front View of the Patch Panel 3 78 Figure 3 22 OSC Terminations Area ...

Page 31: ...rmance Window 9 29 Figure 9 12 History Tab on the Card View Performance Window 9 30 Figure 9 13 SONET PM Tab on the Card View Performance Window 9 32 Figure 10 1 Equalized ROADM Power Example 10 6 Figure 10 2 RADIUS Server Tab 10 56 Figure 10 3 Create RADIUS Server Entry Window 10 56 Figure 13 1 Restoring the Database In Process Notification 13 3 Figure 13 2 Reinitialization Tool 13 6 Figure 13 3 ...

Page 32: ...igure 15 15 Typical DWDM Equipment Layout in an ONS 15454 ANSI Rack 15 18 Figure 15 16 The ONS 15454 Front Door 15 19 Figure 15 17 Cisco ONS 15454 ANSI Deep Door 15 20 Figure 15 18 ONS 15454 ANSI Front Door Ground Strap 15 21 Figure 15 19 Removing the ONS 15454 ANSI Front Door 15 22 Figure 15 20 Removing the ONS 15454 ETSI Front Door 15 23 Figure 15 21 ONS 15454 ANSI Front Door Erasable Label 15 2...

Page 33: ...am 16 22 Figure 16 7 MIC C T P Faceplate 16 25 Figure 16 8 MIC C T P Block Diagram 16 25 Figure 16 9 OSCM Card Faceplate 16 27 Figure 16 10 OSCM Block Diagram 16 28 Figure 16 11 OSCM VOA Optical Module Functional Block Diagram 16 28 Figure 16 12 OSC CSM Faceplate 16 31 Figure 16 13 OSC CSM Block Diagram 16 32 Figure 16 14 OSC CSM Optical Module Functional Block Diagram 16 33 Figure 16 15 OPT PRE F...

Page 34: ... AD 4C xx x Block Diagram 16 68 Figure 16 44 AD 4C xx x Optical Module Functional Block Diagram 16 68 Figure 16 45 AD 1B xx x Faceplate 16 71 Figure 16 46 AD 1B xx x Block Diagram 16 72 Figure 16 47 AD 1B xx x Optical Module Functional Block Diagram 16 72 Figure 16 48 AD 4B xx x Faceplate 16 74 Figure 16 49 AD 4B xx x Block Diagram 16 75 Figure 16 50 AD 4B xx x Optical Module Functional Block Diag...

Page 35: ...e 17 2 Figure 17 2 Hub Node Channel Flow Example 17 3 Figure 17 3 Terminal Node Configuration Example 17 4 Figure 17 4 Amplified OADM Node Configuration Example 17 5 Figure 17 5 Amplified OADM Node Channel Flow Example 17 6 Figure 17 6 Passive OADM Node Configuration Example 17 7 Figure 17 7 Passive OADM Node Channel Flow Example 17 7 Figure 17 8 ROADM Node with BST PRE OPT BST and 32DMX Cards Ins...

Page 36: ...re 18 2 Multihubbed Ring 18 3 Figure 18 3 Any to Any Ring 18 4 Figure 18 4 Meshed Ring 18 5 Figure 18 5 Linear Configuration with an OADM Node 18 5 Figure 18 6 Linear Configuration without an OADM Node 18 6 Figure 18 7 Single Span Link 18 6 Figure 18 8 Automatic Power Control 18 21 Figure 18 9 Power Monitoring Subtab 18 22 Figure 18 10 Span Loss Verification 18 23 Figure 18 11 Nodes Using OPT BST ...

Page 37: ...rio 7 ONS 15454 Proxy Server with GNE and ENEs on the Same Subnet ANSI and ETSI 22 14 Figure 22 11 Scenario 7 ONS 15454 Proxy Server with GNE and ENEs on Different Subnets ANSI and ETSI 22 15 Figure 22 12 Scenario 7 ONS 15454 Proxy Server With ENEs on Multiple Rings ANSI and ETSI 22 16 Figure 22 13 Scenario 8 Dual GNEs on the Same Subnet ANSI and ETSI 22 18 Figure 22 14 Scenario 8 Dual GNEs on Dif...

Page 38: ...Figures xxxviii Cisco ONS 15454 DWDM Installation and Operations Guide R6 0 August 2005 ...

Page 39: ...Planner Node Setup Information and Files 3 3 Table 3 2 LED Behavior During TCC2 TCC2P Reboot 3 14 Table 3 3 CTC Add Card Menu for DWDM Cards 3 37 Table 3 4 Cable Connections for Y Cable Protection of First Client Signal 3 79 Table 3 5 Cable Connections for Y Cable Protection of a Second Client Signal 3 80 Table 4 1 TXP_MR_2 5G Card Wavelengths and Part Numbers 4 4 Table 4 2 32WSS Ports and Wavelen...

Page 40: ...rd ITU T G 709 Threshold Settings 5 45 Table 5 27 MXP_2 5G_10G and MXP_2 5G_10E Muxponder Card FEC Threshold Settings 5 46 Table 5 28 MXP_2 5G_10G and MXP_2 5G_10E Muxponder Card Trail Trace Identifier Settings 5 46 Table 5 29 TXP_MR_2 5G and TXPP_MR_2 5G Transponder Card Settings 5 49 Table 5 30 TXP_MR_2 5G and TXPP_MR_2 5G Transponder Card Line Settings 5 51 Table 5 31 TXP_MR_2 5G and TXPP_MR_2 ...

Page 41: ...C 3 Settings 11 3 Table 11 2 OSCM and OSC CSM Cards SONET Threshold Settings 11 5 Table 11 3 OSCM and OSC CSM Card Optical Line Parameter Settings 11 6 Table 11 4 OSCM and OSC CSM Cards Optical Channel Warning Thresholds Settings 11 8 Table 11 5 OSCM and OSC CSM Cards Optical Channel Alarm Thresholds Settings 11 9 Table 11 6 OSC CSM and OSCM Maintenance Settings 11 11 Table 11 7 OPT PRE and OPT BS...

Page 42: ...6 Table 15 4 Protection B TXP Cards 3 and 4 Port Mapping Combiner from DWDM 15 16 Table 15 5 Protection B TXP Cards 3 and 4 Port Mapping Splitter to DWDM 15 16 Table 15 6 Pin Assignments for the AEP 15 32 Table 15 7 Alarm Input Pin Association 15 33 Table 15 8 Pin Association for Alarm Output Pins 15 34 Table 15 9 ANSI Fiber Channel Capacity One Side of the Shelf 15 38 Table 15 10 ETSI Fiber Chann...

Page 43: ... 23 OPT BST Card Level Indicators 16 41 Table 16 24 OPT BST E Port Calibration 16 44 Table 16 25 OPT BST E Card Level Indicators 16 45 Table 16 26 32MUX O Channel Plan 16 48 Table 16 27 32MUX O Port Calibration 16 49 Table 16 28 32MUX O Card Level Indicators 16 49 Table 16 29 32DMX O Port Calibration 16 51 Table 16 30 32DMX O Card Level Indicators 16 52 Table 16 31 32DMX Port Calibration 16 55 Tab...

Page 44: ...0G Port Level Indicators 16 99 Table 16 60 MXP_2 5G_10E Trunk Wavelengths 16 104 Table 16 61 MXP_2 5G_10E Card Level Indicators 16 106 Table 16 62 MXP_2 5G_10E Port Level Indicators 16 106 Table 16 63 Card Versions 16 107 Table 16 64 MXP_MR_2 5G and MXPP_MR_2 5G Client Interface Data Rates and Encapsulation 16 108 Table 16 65 Client Data Rates and Ports 16 108 Table 16 66 MXP_MR_2 5G and MXPP_MR_2...

Page 45: ...iber 18 15 Table 18 16 Span Loss for Single Span Link with Eight Channels 18 16 Table 18 17 Span Loss for Single Span Link with 16 Channels 18 16 Table 18 18 Span Loss for Single Span Link with AD 1C xx x Cards OPT PRE Amplifiers and OPT BST OPT BST E Amplifiers 18 17 Table 18 19 Span Loss for Single Span Link with One Channel and OPT BST Amplifiers 18 17 Table 18 20 Span Loss for Single Span Link...

Page 46: ...TCC2P 22 25 Table 23 1 Alarm Display 23 3 Table 23 2 Conditions Display 23 4 Table 23 3 Conditions Column Description 23 4 Table 23 4 History Column Description 23 6 Table 23 5 Alarm Profile Buttons 23 9 Table 23 6 Alarm Profile Editing Options 23 10 Table A 1 Change CTC Views A 2 Table A 2 Description of Node Icons on Network View Map A 3 Table A 3 CTC Menu and Toolbar Options A 5 Table A 4 CTC W...

Page 47: ...ifications B 50 Table B 26 XFP Specifications B 50 Table B 27 Single Mode Fiber XFP Port Cabling Specifications B 50 Table C 1 ONS 15454 Service State Primary States and Primary State Qualifiers C 1 Table C 2 ONS 15454 Secondary States C 2 Table C 3 ONS 15454 Administrative States C 2 Table C 4 ONS 15454 Optical Unit Service State Transitions C 3 Table C 5 ONS 15454 Optical Payload Port Service St...

Page 48: ...XP_MR_2 5G Card Default Settings ETSI D 69 Table D 16 MXPP_MR_2 5G Card Default Settings ETSI D 72 Table D 17 TXP_MR_10E Card Default Settings ETSI D 76 Table D 18 TXP_MR_10G Card Default Settings ETSI D 81 Table D 19 TXP_MR_2 5G Card Default Settings ETSI D 87 Table D 20 TXPP MR 2 5G Card Default Settings ETSI D 96 Table D 21 OSCM Card Default Settings ETSI D 104 Table D 22 OSC CSM Card Default S...

Page 49: ...nstall and Close the FMEC Cover ETSI Only 1 63 NTP G13 Install the Rear Cover ANSI Only 1 64 NTP G14 Install DWDM Equipment 1 66 NTP G15 Install the Common Control Cards 1 71 NTP G16 Perform the Shelf Installation Acceptance Test 1 76 Connect the PC and Log into the GUI 2 1 NTP G17 Set Up Computer for CTC 2 2 NTP G18 Set Up CTC Computer for Local Craft Connection to the ONS 15454 2 9 NTP G19 Set U...

Page 50: ... 2 NTP G42 Perform the Terminal Node with 32WSS and 32DMX Cards Acceptance Test 4 5 NTP G43 Perform the ROADM Node Acceptance Test 4 8 NTP G44 Perform the Anti ASE Hub Node Acceptance Test 4 20 NTP G45 Perform the Line Amplifier Node with OSCM Cards Acceptance Test 4 23 NTP G46 Perform the Line Amplifier Node with OSC CSM Cards Acceptance Test 4 26 NTP G47 Perform the Line Amplifier Node with OSCM...

Page 51: ... 21 NTP G62 Create a J0 Section Trace 7 23 Manage Alarms 8 1 NTP G63 Document Existing Provisioning 8 2 NTP G64 View Alarms History Events and Conditions 8 6 NTP G65 Delete Cleared Alarms from Display 8 13 NTP G66 View Alarm Affected Circuits 8 14 NTP G67 View Alarm Counts on the LCD for a Node Slot or Port 8 15 NTP G68 Create Download and Assign Alarm Severity Profiles 8 16 NTP G69 Enable Modify ...

Page 52: ...Line Settings and PM Parameters and Thresholds 11 2 NTP G91 Modify OPT PRE and OPT BST Line Settings and PM Parameters and Thresholds 11 12 NTP G92 Modify 32MUX O 32DMX O 32DMX and 4MD Line Settings and PM Thresholds 11 23 NTP G93 Modify the 32WSS Thresholds and Settings 11 33 NTP G101 Modify Alarm Interface Controller International Settings 11 42 NTP G102 Change Card Service State 11 45 Add and R...

Page 53: ...I Shelf Alarm Interface Panel 13 36 NTP G118 Replace the ANSI Shelf Plastic Lower Backplane Cover 13 40 NTP G135 Edit Network Element Defaults 13 42 NTP G136 Import Network Element Defaults 13 43 NTP G137 Export Network Element Defaults 13 44 Power Down a Node 14 1 NTP G119 Power Down the Node 14 1 Shelf Hardware Reference 15 1 Card Reference 16 1 Node Reference 17 1 Network Reference 18 1 CTC Ope...

Page 54: ...Procedures liv Cisco ONS 15454 DWDM Installation and Operations Guide R6 0 August 2005 ...

Page 55: ... Backplane Sheet Metal Cover 1 27 DLP G15 Connect the Office Ground to the ONS 15454 ETSI 1 32 DLP G16 Connect the Office Ground to the ONS 15454 ANSI 1 34 DLP G17 Connect Office Power to the ONS 15454 ETSI 1 35 DLP G18 Connect Office Power to the ONS 15454 ANSI 1 37 DLP G19 Turn On and Verify Office Power 1 39 DLP G20 Install Alarm Wires on the MIC A P ETSI Only 1 48 DLP G21 Install Timing Wires ...

Page 56: ...pe Windows and UNIX 2 22 DLP G46 Log into CTC 2 25 DLP G47 Install Public Key Security Certificate 2 28 DLP G48 Create Login Node Groups 2 28 DLP G49 Add a Node to the Current Session or Login Group 2 30 DLP G50 Delete a Node from the Current Session or Login Group 2 30 DLP G51 Delete a Node from a Specified Login Node Group 2 31 DLP G52 Change the JRE Version 2 31 DLP G53 Configure the CTC Alerts...

Page 57: ...M Node 3 68 DLP G315 Install Fiber Optic Cables From the 32WSS 32DMX and 32MUX O 32DMX O Cards to the Patch Panel 3 74 DLP G316 Install Fiber Optic Cables from a TXP MXP Node to the Patch Panel 3 78 DLP G72 Create a DWDM Connection 3 81 DLP G73 Delete a DWDM Connection 3 82 DLP G313 Verify OSC CSM Transmit Power 3 87 DLP G314 Verify OSCM Transmit Power 3 89 DLP G268 Provision TXP_MR_2 5G Cards for...

Page 58: ... Line Thresholds for SONET or SDH Payloads 5 19 DLP G319 Change the TXP_MR_10G or TXP_MR_10E Card Line Thresholds for 10G Ethernet LAN Phy 5 21 DLP G301 Provision the TXP_MR_10G and TXP_MR_10E Trunk Port Alarm and TCA Thresholds 5 24 DLP G302 Provision the TXP_MR_10G and TXP_MR_10E Client Port Alarm and TCA Thresholds 5 25 DLP G221 Change OTN Settings for TXP_MR_10G and TXP_MR_10E Cards 5 27 DLP G...

Page 59: ...r MXPP_MR_2 5G Card Line Thresholds for 1G Ethernet or 1G FC FICON Payloads 5 77 DLP G307 Provision the MXP_MR_2 5G and MXPP_MR_2 5G Trunk Port Alarm and TCA Thresholds 5 79 DLP G308 Provision the MXP_MR_2 5G and MXPP_MR_2 5G Client Port Alarm and TCA Thresholds 5 80 DLP G95 Set Up External or Line Timing 6 4 DLP G96 Set Up Internal Timing 6 7 DLP G99 Create a Provisionable Patchcord 6 11 DLP G100...

Page 60: ...nue Alarm Suppression 8 31 DLP G131 Refresh PM Counts at 15 Minute Intervals 9 2 DLP G132 Refresh PM Counts at One Day Intervals 9 3 DLP G133 View Near End PM Counts 9 4 DLP G134 View Far End PM Counts 9 5 DLP G135 Reset Current PM Counts 9 6 DLP G136 Clear Selected PM Counts 9 7 DLP G137 Set Auto Refresh Interval for Displayed PM Counts 9 8 DLP G138 Refresh PM Counts for a Different Port 9 9 DLP ...

Page 61: ... G287 Add a TARP Manual Adjacency Table Entry 10 13 DLP G292 Remove a TARP Manual Adjacency Table Entry 10 13 DLP G293 Change the OSI Routing Mode 10 14 DLP G294 Edit the OSI Router Configuration 10 15 DLP G295 Edit the OSI Subnetwork Point of Attachment 10 16 DLP G296 Edit an IP Over CLNS Tunnel 10 17 DLP G297 Delete an IP Over CLNS Tunnel 10 18 DLP G162 Change IP Settings 10 19 DLP G265 Lock Nod...

Page 62: ...191 Change User Password and Security Level on a Single Node 10 50 DLP G192 Change User Password and Security Level for Multiple Nodes 10 51 DLP G193 Delete a User From a Single Node 10 52 DLP G194 Delete a User From Multiple Nodes 10 52 DLP G195 Log Out a User on a Single Node 10 53 DLP G196 Log Out a User on Multiple Nodes 10 54 DLP G281 Configure the Node for RADIUS Authentication 10 55 DLP G28...

Page 63: ... Thresholds 11 40 DLP G245 Change External Alarms Using the AIC I Card 11 42 DLP G246 Change External Controls Using the AIC I Card 11 43 DLP G247 Change AIC I Card Orderwire Settings 11 44 DLP G254 Place OPT BST and OPT PRE Ports Out of Service 12 3 DLP G318 Place OPT BST and OPT PRE Ports In Service 12 4 DLP G248 Use the Reinitialization Tool to Clear the Database and Upload Software Windows 13 ...

Page 64: ... 64 Cisco ONS 15454 DWDM Installation and Operations Guide R6 0 August 2005 Chapter ...

Page 65: ...Network and PPMN refer generally to Cisco s path protection feature which may be used in any topological network configuration Cisco does not recommend using its path protection feature in any particular topological network configuration Revision History This section provides the following information Document Objectives Audience Document Organization Related Documentation Document Conventions Whe...

Page 66: ...Node Acceptance Tests provides acceptance tests for each DWDM node type Chapter 5 Provision Transponder and Muxponder Cards explains how to change transmission settings and provision pluggable port modules PPMs for transponder TXP and muxponder MXP cards Chapter 6 Turn Up Network explains how to turn up and test a DWDM network Chapter 7 Create Channels and Circuits explains how to create DWDM opti...

Page 67: ...nnection OSI protocol suites IP addressing scenarios and information about provisionable patchcords open GNE and external firewalls Chapter 23 Alarm Management Reference describes Cisco Transport Controller CTC alarm management Appendix A CTC Information and Shortcuts describes the CTC views menus options tool options shortcuts table display options and shelf inventory data Appendix B Hardware Spe...

Page 68: ...or loss of data Convention Application boldface Commands and keywords in body text italic Command input that is supplied by the user Keywords or arguments that appear within square brackets are optional x x x A choice of keywords represented by x appears in braces separated by vertical bars The user must select one Ctrl The control key For example where Ctrl D is written hold down the Control key ...

Page 69: ...n käsittelet laitteistoa huomioi sähköpiirien käsittelemiseen liittyvät riskit ja tutustu onnettomuuksien yleisiin ehkäisytapoihin Turvallisuusvaroitusten käännökset löytyvät laitteen mukana toimitettujen käännettyjen turvallisuusvaroitusten joukosta varoitusten lopussa näkyvien lausuntonumeroiden avulla SÄILYTÄ NÄMÄ OHJEET Attention IMPORTANTES INFORMATIONS DE SÉCURITÉ Ce symbole d avertissement ...

Page 70: ...ê está em uma situação que poderá ser causadora de lesões corporais Antes de iniciar a utilização de qualquer equipamento tenha conhecimento dos perigos envolvidos no manuseio de circuitos elétricos e familiarize se com as práticas habituais de prevenção de acidentes Utilize o número da instrução fornecido ao final de cada aviso para localizar sua tradução nos avisos de segurança traduzidos que ac...

Page 71: ...lxxi Cisco ONS 15454 DWDM Installation and Operations Guide R6 0 August 2005 About this Guide Document Conventions ...

Page 72: ... o número da declaração fornecido ao final de cada aviso para localizar sua tradução nos avisos de segurança traduzidos que acompanham o dispositivo GUARDE ESTAS INSTRUÇÕES Advarsel VIGTIGE SIKKERHEDSANVISNINGER Dette advarselssymbol betyder fare Du befinder dig i en situation med risiko for legemesbeskadigelse Før du begynder arbejde på udstyr skal du være opmærksom på de involverede risici der e...

Page 73: ...lxxiii Cisco ONS 15454 DWDM Installation and Operations Guide R6 0 August 2005 About this Guide Document Conventions ...

Page 74: ...ss international Cisco websites at this URL http www cisco com public countries_languages shtml Product Documentation DVD Cisco documentation and additional literature are available in the Product Documentation DVD package which may have shipped with your product The Product Documentation DVD is updated regularly and may be more current than printed documentation The Product Documentation DVD is a...

Page 75: ...ing Instructions for ordering documentation using the Ordering tool are at this URL http www cisco com univercd cc td doc es_inpck pdi htm Nonregistered Cisco com users can order documentation through a local account representative by calling Cisco Systems Corporate Headquarters California USA at 408 526 7208 or elsewhere in North America by calling 1 800 553 NETS 6387 Documentation Feedback You c...

Page 76: ...ich a system is under active attack or a condition for which a severe and urgent security vulnerability should be reported All other conditions are considered nonemergencies Nonemergencies psirt cisco com In an emergency you can also reach PSIRT by telephone 1 877 228 7302 1 408 525 6532 Tip We encourage you to use Pretty Good Privacy PGP or a compatible product to encrypt any sensitive informatio...

Page 77: ...esults show an illustration of your product with the serial number label location highlighted Locate the serial number label on your product and record the information before placing a service call Submitting a Service Request Using the online TAC Service Request Tool is the fastest way to open S3 and S4 service requests S3 and S4 service requests are those in which your network is minimally impai...

Page 78: ...oth new and experienced users will benefit from these publications For current Cisco Press titles and other information go to Cisco Press at this URL http www ciscopress com Packet magazine is the Cisco Systems technical user magazine for maximizing Internet and networking investments Each quarter Packet delivers coverage of the latest industry trends technology breakthroughs and Cisco products an...

Page 79: ...ive website for networking professionals to share questions suggestions and information about networking products and technologies with Cisco experts and other networking professionals Join a discussion at this URL http www cisco com discuss networking World class networking training is available from Cisco You can view current offerings at this URL http www cisco com en US learning index html ...

Page 80: ...lxxx Cisco ONS 15454 DWDM Installation and Operations Guide R6 0 August 2005 About this Guide Obtaining Additional Publications and Information ...

Page 81: ... Shelf Assembly procedure on page 1 8 2 NTP G2 Install the Shelf Assembly page 1 8 Complete this procedure to install the shelf assembly in a rack 3 NTP G3 Open and Remove the Front Door page 1 20 Complete this procedure to access the equipment before continuing with other procedures in this chapter 4 NTP G4 Open and Remove the FMEC Cover ETSI Only page 1 23 Complete this procedure to access the e...

Page 82: ... procedure to install the TCC2 TCC2P card and the AIC I card 16 NTP G16 Perform the Shelf Installation Acceptance Test page 1 76 Complete this procedure to determine if you have correctly completed all other procedures in the chapter Warning Installation of the equipment must comply with local and national electrical codes Statement 1074 Warning This equipment must be installed and maintained by s...

Page 83: ...l backplane cover installed 1 External bottom brackets for the fan tray air filter Standoff kit 53 0795 XX Plastic fiber management guides 2 Fan filter bracket screws 53 48 0003 6 User Supplied Materials ANSI The following materials and tools are required but are not supplied with the ONS 15454 ANSI One or more of the following equipment racks 19 inch ANSI Standard Telcordia GR 63 CORE 482 6 mm ra...

Page 84: ...mall slot head screwdriver Wire wrapper Wire cutters Wire strippers Crimp tool BNC insertion tool Test Equipment ANSI The following test equipment is needed to install an ONS 15454 Voltmeter Optical power meter for use with fiber optics only BER tester DS 1 and DS 3 Required Tools and Equipment ETSI You need the following tools and equipment to install and test the ONS 15454 ETSI shelf assembly Ci...

Page 85: ... 13 3 mm 6 AWG stranded specified for up to 90 degrees Celsius 194 degrees Fahrenheit Alarm cable pairs for all alarm connections 0 51 mm or 0 64 mm 22 or 24 AWG solid tinned Single mode SC fiber jumpers with UPC polish 55 dB or better for optical cards Coaxial cable terminated with 1 0 2 3 miniature coax connectors for FMEC cards DB 37 cable Shielded building integrated timing supply BITS clock c...

Page 86: ...pment at the installation site open the top of the box The Cisco Systems logo designates the top of the box Step 2 Remove the foam inserts from the box The box contains the ONS 15454 shelf wrapped in plastic and a smaller box of items needed for installation Step 3 To remove the shelf grasp both rings of the shelf removal strap and slowly lift the shelf out of the box Step 4 Open the smaller box o...

Page 87: ...Compartment Door task on page 1 20 Step 2 Verify the following The pins are not bent or broken The frame is not bent Step 3 If the pins are bent or broken or the frame is bent call your Cisco sales engineer for a replacement Step 4 Close the front door before installing Step 5 Return to your originating procedure NTP Purpose This task verifies that all parts of the shelf assembly are in good condi...

Page 88: ...5 Warning To prevent the system from overheating do not operate it in an area that exceeds the maximum recommended ambient temperature of 45 C 113 F Statement 1047 Warning Take care when connecting units to the supply circuit so that wiring is not overloaded Statement 1018 Purpose This procedure reverses the mounting bracket and mounts shelf assemblies in a rack Tools Equipment 2 Phillips screwdri...

Page 89: ...t from a 23 inch 584 2 mm to a 19 inch 482 6 mm rack Step 2 ANSI shelves only To install the air filter on the bottom of the shelf rather than below the fan tray assembly complete the DLP G4 Install the External Brackets and Air Filter ANSI Only task on page 1 11 Step 3 Complete the necessary rack mount task as applicable DLP G5 Mount the Shelf Assembly in a Rack One Person page 1 13 DLP G6 Mount ...

Page 90: ...e of the shelf assembly Step 2 Flip the detached mounting bracket upside down Text imprinted on the mounting bracket will now also be upside down Step 3 Place the widest side of the mounting bracket flush against the shelf assembly see Figure 1 1 The narrow side of the mounting bracket should be towards the front of the shelf assembly Text imprinted on the mounting bracket should be visible and up...

Page 91: ...th filter locations on any shelf assembly Purpose This task installs the external brackets and air filter on the bottom of the shelf rather than below the fan tray assembly Installing the external brackets and air filter on the bottom of the shelf enables access to the air filter without removing the fan tray assembly This task applies to the ONS 15454 ANSI shelf only Tools Equipment 2 Phillips sc...

Page 92: ...as a filter stopper and a flange on one end Make sure to attach the brackets with the stoppers and flanges facing the rear of the shelf assembly the top if the ONS 15454 is facedown during installation Figure 1 2 illustrates bottom bracket installation If you do not use the brackets in the future you must remove the fan tray assembly before removing the air filter The brackets enable you to clean ...

Page 93: ... alarm panel is not present you must install one according to manufacturer instructions ETSI only Verify that a 100 A fuse panel 30 A fuse per shelf minimum is installed ANSI only If you are installing the 15454 SA ANSI or 15454 SA HD shelf assembly a 100 A fuse panel 30 A fuse per shelf minimum is required ANSI only If you are installing the 15454 SA NEBS3 shelf assembly a standard 80 A fuse pane...

Page 94: ... protrude sufficiently to hold the mounting brackets Step 4 Lift the shelf assembly to the desired position in the rack and set it on the screws Step 5 Align the screw holes on the mounting brackets with the mounting holes in the rack Step 6 Using the Phillips screwdriver install one mounting screw in each side of the assembly Step 7 When the shelf assembly is secured to the rack install the remai...

Page 95: ...uipment must not vent heat upward into the ONS 15454 Step 1 Verify that the proper fuse and alarm panel has been installed in the top mounting space If a fuse and alarm panel is not present you must install one according to manufacturer s instructions ETSI only Verify that a 100 A fuse panel 30 A fuse per shelf minimum is installed ANSI only If you are installing the 15454 SA ANSI or 15454 SA HD s...

Page 96: ...om to the top with the heaviest component at the bottom of the rack If the rack is provided with stabilizing devices install the stabilizers before mounting or servicing the unit in the rack Note The ONS 15454 ETSI requires 616 5 mm 24 24 inch minimum of vertical rack space and 25 mm 1 inch below the installed shelf assembly to allow air flow to the fan intake If a second ONS 15454 ETSI is install...

Page 97: ...The third party equipment must not vent heat upward into the ONS 15454 Step 1 Verify that the proper fuse and alarm panel has been installed in the top mounting space If a fuse and alarm panel is not present you must install one according to manufacturer s instructions ETSI only Verify that a 100 A fuse panel 30 A fuse per shelf minimum is installed ANSI only If you are installing the 15454 SA ANS...

Page 98: ...S 15454 ETSI 15454 SDH Bay Assembly Step 3 ETSI only Mount the air ramp above the ONS 15454 ETSI The air ramp is needed if you install more than one ONS 15454 ETSI shelf in a rack To ensure that the air ramp is secure use one or two M6 mounting screws for each side of the shelf assembly Figure 1 5 shows how to mount an air ramp in the rack 61583 Fuse and Alarm Panel mountable in the rack if the ra...

Page 99: ...2 6 mm or 23 inch 584 2 mm rack Locate the RMU space specified in your site plan See the 15 5 Typical DWDM Rack Layouts section on page 15 17 for more information about air ramp placement Step 2 Verify that the mounting brackets attached to the unit are correct for your rack size Complete the DLP G3 Reverse the Mounting Bracket to Fit a 19 inch 482 6 mm Rack ANSI Only task on page 1 10 as required...

Page 100: ...15454 shelf assembly has an ESD plug input and is shipped with an ESD wrist strap The ESD plug input is located on the outside of the shelf assembly on the right side It is labeled ESD on the top and bottom Always wear an ESD wrist strap and connect the strap to the ESD plug when working on the ONS 15454 Step 1 Open the front door lock The ONS 15454 shelf assembly comes with a pinned hex key for l...

Page 101: ...ep 4 Return to your originating procedure NTP DLP G10 Remove the Front Door Step 1 For ONS 15454 ETSI shelves a Unscrew the nut holding the ground wire to the shelf Remove the nut and washer Purpose This task removes the front cabinet compartment door Tools Equipment Open end wrench Prerequisite Procedures DLP G9 Open the Front Cabinet Compartment Door page 1 20 Required As Needed As needed Onsite...

Page 102: ... the following To detach the ground strap from the front door loosen the 6 Kepnut 49 0600 01 using the open end wrench Detach the end of the ground strap terminal lug 72 3622 01 from the male stud on the inside of the door To detach the other end of the ground strap from the longer screw on the fiber guide loosen the 4 Kepnut 49 0337 01 on the terminal lug using the open end wrench Remove the term...

Page 103: ...e FMEC Cover task on page 1 24 Step 2 Complete the DLP G12 Remove the FMEC Cover task on page 1 25 Purpose This procedure opens and removes the FMEC cover on the ONS 15454 ETSI The ONS 15454 ETSI has a screw in panel over the EFCA The FMEC cover protects the FMEC cards Tools Equipment Medium slot head screwdriver Prerequisite Procedures NTP G2 Install the Shelf Assembly page 1 8 Required As Needed...

Page 104: ... screws on the FMEC cover Figure 1 9 Figure 1 9 Unscrewing the FMEC Cover Step 2 Use the handles to pull the cover forward Step 3 Return to your originating procedure NTP Purpose This task opens the FMEC cover The FMEC cover must be opened to install the MIC A P and the MIC C T P Tools Equipment Medium slot head screwdriver Prerequisite Procedures DLP G9 Open the Front Cabinet Compartment Door pag...

Page 105: ...ge locking spring Figure 1 10 Figure 1 10 Removing the ONS 15454 FMEC Cover Step 4 Detach the cover from the pin of the hinge Step 5 Remove the cover carefully from the left pin of the hinge Step 6 Return to your originating procedure NTP Purpose This task removes the FMEC cover in order to install the MIC A P and the MIC C T P Tools Equipment Medium slot head screwdriver Prerequisite Procedures D...

Page 106: ...ld the cover in place Figure 1 11 Purpose This procedure describes how to access the ONS 15454 ANSI backplane by removing the covers The backplane has two sheet metal covers one on either side and a lower backplane cover at the bottom Tools Equipment 2 Phillips screwdriver Medium slot head screwdriver Small slot head screwdriver Prerequisite Procedures NTP G2 Install the Shelf Assembly page 1 8 NT...

Page 107: ...that secure it to the ONS 15454 ANSI shelf and pull it away from the shelf assembly Figure 1 11 on page 1 27 Step 2 Loosen the nine perimeter screws that hold the backplane sheet metal cover s in place Step 3 Lift the panel by the bottom to remove it from the shelf assembly Purpose This task removes the backplane sheet metal cover that is installed on the rear of the 15454 ANSI shelf Tools Equipme...

Page 108: ... DWDM applications Step 1 Ensure you are installing the FMECs in the correct slot FMEC Slot 23 supports the MIC A P The MIC A P card provides connection for the BATTERY B input one of the two possible redundant power supply inputs It also provides connection for eight alarm outputs coming from the TCC2 TCC2P card sixteen alarm inputs and four configurable alarm inputs outputs FMEC Slot 24 supports...

Page 109: ...d FMEC slot or slots Step 4 Push the FMEC gently into the connector The ONS 15454 ETSI FMECs plug into electrical connectors on the back panel of the shelf assembly when the screws are tightened Figure 1 12 shows FMEC installation Figure 1 12 Installing FMECs on the ONS 15454 ETSI Step 5 Tighten the screws Step 6 Continue with the NTP G7 Install the Power and Ground procedure on page 1 30 Stop You...

Page 110: ...ounds the ONS 15454 Tools Equipment 2 Phillips screwdriver Medium slot head screwdriver Small slot head screwdriver Screws ETSI only Power cable from fuse panel to MIC A P and to MIC C T P shipped with the ONS 15454 ETSI ANSI only Power cable from fuse and alarm panel to assembly 10 AWG copper conductors 194 degrees F 90 degrees C Ground cable 13 3 mm 6 AWG stranded ETSI only Two hole grounding lu...

Page 111: ...I only Verify that a 100 A fuse panel 30 A fuse per shelf minimum is installed If not install one according to manufacturer s instructions ANSI only If you have the 15454 SA ANSI or 15454 SA HD shelf a 100 A fuse panel 30 A fuse per shelf minimum should be installed If not install one according to manufacturer s instructions ANSI only If you have the 15454 SA NEBS3 shelf a standard 80 A fuse panel...

Page 112: ...ce the grounding lug against the grounding receptacle on the side panel of the shelf Step 6 Insert one of the screws through the locking washer and through the hole in the grounding lug Insert the screw into the threaded holes on the right side of the shelf Ensure that the grounding lug does not interfere with other system hardware or rack equipment Step 7 Repeat Step 6 with the second screw Step ...

Page 113: ...Guide R6 0 August 2005 Chapter 1 Install the Shelf and Common Control Cards DLP G15 Connect the Office Ground to the ONS 15454 ETSI Figure 1 13 Grounding the ONS 15454 ETSI Step 9 Return to your originating procedure NTP 78101 FAN FAIL CR IT MAJ MIN Ground ...

Page 114: ...sed by rotation during installation and maintenance activity The type of prevention the kep nut provides for the frame ground connection is inherently provided by the terminal block for battery and battery return connections Figure 1 14 Ground Location on the Backplane Step 3 Attach the other end of the shelf ground cable to the bay Step 4 Return to your originating procedure NTP Purpose This task...

Page 115: ... battery battery return and ground conductors Connectors must be suitable for copper conductors Caution When terminating power return and frame ground do not use soldering lug connectors screwless push in connectors quick connect connectors or other friction fit connectors Purpose This task connects power to the ONS 15454 ETSI shelf Tools Equipment 2 Phillips screwdriver Medium slot head screwdriv...

Page 116: ... Step 1 Verify that the MIC A P FMEC is installed in Slot 23 and the MIC C T P FMEC is installed in Slot 24 of the EFCA Step 2 Attach the connector on the end of the power cable to the power FMEC Step 3 Tighten the screws of the connector on the power cable Step 4 Connect the power cable to the fuse panel or power source Use the pin connections in Table 1 1 The conductor green with yellow stripes ...

Page 117: ...n page 3 8 If you are using the TCC2 TCC2P cards the system clock will run for up to three hours In this case no action would be required Step 1 Connect the office power according to the fuse panel engineering specifications Step 2 Measure and cut the cables as needed to reach the ONS 15454 from the fuse panel Figure 1 15 shows the ONS 15454 power terminals Step 3 Dress the power according to loca...

Page 118: ...plated connectors braided strap and bus bars to a bright finish then coat with an antioxidant before you connect them You do not need to prepare tinned solder plated or silver plated connectors and other plated connection surfaces but always keep them clean and free of contaminants Caution When terminating power return and frame ground do not use soldering lug screwless push in connectors quick co...

Page 119: ...and alarm panel a To verify the power place the black test lead of the voltmeter to the frame ground Place the red test lead on the A side connection and verify that it is between 40 5 VDC and 57 VDC Place the red test lead on the B side connection and verify that it is between 40 5 VDC and 57 VDC Note The voltages 40 5 VDC and 57 VDC are respectively the minimum and maximum voltages required to p...

Page 120: ... battery connection red cable Verify that it reads between 40 5 VDC and 57 VDC Then place the red test lead of the voltmeter to the RET2 B side return ground black cable and verify that no voltage is present Step 4 Return to your originating procedure NTP NTP G8 Install the Fan Tray Assembly Caution Do not operate an ONS 15454 without a fan tray air filter A fan tray air filter is mandatory except...

Page 121: ...all the air filter The air filter can be installed internally between the fan tray and shelf assembly or externally by mounting the air filter bracket on the bottom of the shelf assembly Slide the air filter into the bracket Step 2 Install the fan tray assembly Figure 1 16 shows the fan tray assembly location on the ONS 15454 ETSI Figure 1 17 shows the fan tray assembly location on the ONS 15454 A...

Page 122: ...d Operations Guide R6 0 August 2005 Chapter 1 Install the Shelf and Common Control Cards NTP G8 Install the Fan Tray Assembly Figure 1 16 Installing the Fan Tray Assembly on the ONS 15454 ETSI 61236 FAN FAIL CR IT MAJ MIN Fan tray assembly LCD ...

Page 123: ...ed into the assembly look at the fan tray and listen to determine that the fans are running Step 4 If you want to install an alarm expansion panel on the ONS 15454 ANSI shelf continue with the NTP G9 Install the Alarm Expansion Panel ANSI Only procedure on page 1 44 Otherwise continue with the NTP G10 Attach Wires to Alarm Timing LAN and Craft Pin Connections procedure on page 1 47 Stop You have c...

Page 124: ...ace the two screws with standoffs Insert the longer standoff on the left and the shorter standoff on the right Figure 1 18 Purpose This procedure installs an AEP onto the 15454 SA ANSI or 15454 SA HD shelf backplane The AEP provides alarm contacts 32 inputs 16 outputs in addition to the 16 provided by the AIC I card Typically the AEP is preinstalled when ordered with the ONS 15454 however the AEP ...

Page 125: ...l the Shelf and Common Control Cards NTP G9 Install the Alarm Expansion Panel ANSI Only Figure 1 18 Replace Backplane Screws with Standoffs Step 2 Attach the remaining two standoffs on either side of the backplane Figure 1 19 Step 3 Position the AEP board over the standoffs 78402 Longer Shorter ...

Page 126: ...ne Figure 1 20 shows where the cable wires are connected Table 1 2 shows AEP and AIC I signals that each wire carries b Plug the other end of the AEP cable into AEP connector port The brown pin is on the top Figure 1 20 AEP Wire Wrap Connections to Backplane Pins 78403 AEP cable Connector Wires 1 2 3 4 A FG4 FG3 FG2 FG1 BITS LAN 1 2 3 4 A B 1 2 3 4 A B IN 1 2 3 4 A B IN OUT FG6 FG5 7 8 9 5 10 6 A ...

Page 127: ...al Black A1 GND AEP_GND White A2 AE_ 5 AEP_ 5 Slate A3 VBAT VBAT Violet A4 VB VB Blue A5 AE_CLK_P AE_CLK_P Green A6 AE_CLK_N AE_CLK_N Yellow A7 AE_DIN_P AE_DOUT_P Orange A8 AE_DIN_N AE_DOUT_N Red A9 AE_DOUT_P AE_DIN_P Brown A10 AE_DOUT_N AE_DIN_N Purpose This procedure installs alarm timing LAN and craft wires on the ONS 15454 shelf These wires are attached to the MIC FMECs on the ETSI shelf and a...

Page 128: ...all Timing Wires on the Backplane ANSI Only task on page 1 55 if you are provisioning external timing Complete the DLP G25 Install LAN Wires on the Backplane ANSI Only task on page 1 56 to create an external LAN connection LAN wires or the LAN port on the TCC2 TCC2P card are necessary to create an external LAN connection Complete the DLP G26 Install the TL1 Craft Interface ANSI Only task on page 1...

Page 129: ...nput pair number 3 9 ALMINP3 Alarm input pair number 4 10 ALMINP3 Alarm input pair number 4 11 EXALM0 Extra alarm 0 12 EXALM0 Extra alarm 0 13 FGND Ground 14 EXALM1 Extra alarm 1 15 EXALM1 Extra alarm 1 16 EXALM2 Extra alarm 2 17 EXALM2 Extra alarm 2 18 EXALM3 Extra alarm 3 19 EXALM3 Extra alarm 3 20 EXALM4 Extra alarm 4 21 EXALM4 Extra alarm 4 22 EXALM5 Extra alarm 5 23 EXALM5 Extra alarm 5 24 EX...

Page 130: ...open output pair number 3 44 ALMOUP3 Normally open output pair number 4 45 ALMOUP3 Normally open output pair number 4 46 AUDALM0 Normally open minor audible alarm 47 AUDALM0 Normally open minor audible alarm 48 AUDALM1 Normally open major audible alarm 49 AUDALM1 Normally open major audible alarm 50 AUDALM2 Normally open critical audible alarm 51 AUDALM2 Normally open critical audible alarm 52 FGN...

Page 131: ...ms to 100 120 ohms Table 1 4 shows MIC C T P pin assignments A high impedance option 3 kilo ohms or greater is possible through a jumper on the MIC C T P FMEC You can change the top timing input to high impedance by removing the jumper on P3 of the MIC C T P FMEC You can change the bottom timing input to high impedance by removing the jumper on P2 on the MIC C T P FMEC Note Refer to ITU T G 813 fo...

Page 132: ...s the computer connected directly to the TCC2 TCC2P card is not connected to a LAN Step 1 Using 0 51 mm or 0 64 mm 22 or 24 AWG wire or CAT 5 UTP Ethernet cable connect the wires to the RJ 45 connector according to Table 1 5 Purpose This task installs the LAN wires on the ONS 15454 ETSI MIC C T P Tools Equipment Standard CAT 5 UTP Ethernet cable straight through for data terminating equipment DTE ...

Page 133: ...IC I in the Release 3 4 or higher ONS 15454 backplane and Figure 1 22 calls out the external alarm pins on that backplane LAN 1 Connecting to DTE a PC workstation or router Straight through Ethernet cable 1 1 PNMSRX white green 2 2 PNMSRX green 3 3 PNMSTX white orange 4 4 5 5 6 6 PNMSTX orange 7 7 8 8 1 The Cisco ONS 15454 ETSI is DCE Purpose This task installs alarm wires on the backplane so that...

Page 134: ...t pair number 2 Critical audible alarm B2 A3 Alarm output pair number 3 Major audible alarm A1 B3 B1 A4 Alarm output pair number 4 Minor audible alarm A2 B4 B2 LOCAL ALARMS VIS Visual A1 Alarm output pair number 1 Remote visual alarm A3 B1 A2 Alarm output pair number 2 Critical visual alarm B2 A3 Alarm output pair number 3 Major visual alarm B3 A4 Alarm output pair number 4 Minor visual alarm B4 A...

Page 135: ...e pin assignments for the BITS timing pin fields 1 2 3 4 A FG4 FG3 FG2 FG1 BITS LAN 1 2 3 4 A B 1 2 3 4 A B IN 1 2 3 4 A B IN OUT FG6 FG5 7 8 9 5 10 6 A B A B ENVIRONMENTAL ALARMS IN ACO FG7 1 2 3 4 IN A B FG8 1 2 3 4 A B MODEM FG9 1 2 3 4 A CRAFT AUD VIS FG10 1 2 3 4 A B LOCAL ALARMS IN FG12 FG11 11 12 A B B 83020 Purpose This task installs the BITS timing wires on the ONS 15454 ANSI backplane To...

Page 136: ...at is connected directly to the TCC2 TCC2P is not connected to a LAN Step 1 Using 22 or 24 AWG 0 51 mm or 0 64 mm wire or CAT 5 UTP Ethernet cable wrap the wires on the appropriate wire wrap pins according to local site practice Caution Cross talk might result if both receive Rx and transmit Tx pins connect on the same twisted pair of wires from the CAT 5 cable The two Tx pins need to be on one tw...

Page 137: ... 0 51 mm or 0 64 mm wire wrap the craft interface wires on the appropriate wire wrap pins according to local site practice Step 2 Wrap the ground shield of the craft interface cable to the frame ground pin Table 1 7 LAN Pin Assignments for the ONS 15454 ANSI Shelf Pin Field Backplane Pins RJ 45 Pins Function Color LAN 1 Connecting to data circuit terminating equipment DCE a hub or switch the ONS 1...

Page 138: ...tivity Step 3 Return to your originating procedure NTP NTP G11 Install an External Wire Wrap Panel on the AEP ANSI Only Step 1 Position the lower cover over the AEP Make sure that the AEP AMP Champ connectors protrude through the cutouts in the lower cover Figure 1 23 Table 1 8 Craft Interface Pin Assignments Pin Field Contact Function Craft A1 Receive A2 Transmit A3 Ground A4 DTR Purpose This pro...

Page 139: ... 3 Connect the cables from the external wire wrap panel to the AMP Champ connectors on the AEP Table 1 9 lists the alarm input pin assignments Table 1 9 Alarm Input Pin Assignments AMP Champ Pin Signal Name AMP Champ Pin Signal Name 1 ALARM_IN_1 27 GND 2 GND 28 ALARM_IN_2 3 ALARM_IN_3 29 ALARM_IN_4 4 ALARM_IN_5 30 GND 5 GND 31 ALARM_IN_6 6 ALARM_IN_7 32 ALARM_IN_8 7 ALARM_IN_9 33 GND 8 GND 34 ALAR...

Page 140: ...ALARM_IN_24 19 ALARM_IN_25 45 GND 20 GND 46 ALARM_IN_26 21 ALARM_IN_27 47 ALARM_IN_28 22 ALARM_IN_29 48 GND 23 GND 49 ALARM_IN_30 24 ALARM_IN_31 50 25 ALARM_IN_ 51 GND1 26 ALARM_IN_0 52 GND2 Table 1 9 Alarm Input Pin Assignments continued AMP Champ Pin Signal Name AMP Champ Pin Signal Name Table 1 10 Alarm Output Pin Assignments AMP Champ Pin Signal Name AMP Champ Pin Signal Name 1 27 COM_0 2 COM_...

Page 141: ...IN_0 XREF 5 XREF 5 ALARM_IN_2 XREF 5 ALARM_IN_3 XREF 5 ALARM_IN_4 XREF 5 ALARM_IN_5 ALARM_IN_6 XREF 5 ALARM_IN_7 XREF 5 XREF 5 ALARM_IN_9 XREF 5 ALARM_IN_10 XREF 5 ALARM_IN_11 XREF 5 ALARM_IN_12 XREF 5 ALARM_IN_13 XREF 5 ALARM_IN_14 XREF 5 ALARM_IN_15 XREF 6 ALARM_IN_16 XREF 6 ALARM_IN_17 XREF 6 ALARM_IN_18 XREF 6 ALARM_IN_19 XREF 6 ALARM_IN_20 ALARM_IN_21 XREF 6 XREF 6 ALARM_IN_22 XREF 6 ALARM_IN...

Page 142: ... this procedure NO_5 XREF 7 COM_5 XREF 7 NO_3 XREF 7 COM_3 XREF 7 COM_14 XREF 7 NO_14 XREF 7 XREF 7 COM_12 NO_12 XREF 7 COM_10 XREF 7 NO_10 XREF 7 COM_8 XREF 7 NO_8 XREF 7 COM_6 XREF 7 NO_6 XREF 7 COM_4 XREF 7 NO_4 XREF 7 COM_2 XREF 7 NO_1 XREF 7 NO_2 XREF 7 COM_0 XREF 7 NO_0 XREF 7 NO_15 XREF 7 COM_15 XREF 7 NO_13 XREF 7 COM_13 XREF 7 COM_1 XREF 7 NO_11 XREF 7 COM_11 XREF 7 NO_9 XREF 7 COM_9 XREF...

Page 143: ... Push the cover onto the right pin until the spring snaps into place Figure 1 26 ONS 15454 ETSI FMEC Cover Step 4 Attach the ground wire to the shelf Step 5 Attach the washer and nut Step 6 Attach the cover to the shelf using the screws on the top of the cover Purpose This procedure installs and closes the ONS 15454 ETSI FMEC cover Tools Equipment 2 Phillips screwdriver Medium slot head screwdrive...

Page 144: ... of the backplane Figure 1 27 Figure 1 27 Backplane Attachment for the Rear Cover Tip Only six screws three on each side line up with the screw slots on the mounting brackets making the screws easy to locate Purpose The following procedure explains how to install the rear cover on an ONS 15454 ANSI shelf Tools Equipment 2 Phillips screwdriver Medium slot head screwdriver Small slot head screwdrive...

Page 145: ...h the cover by hanging it from the mounting screws on the back of the mounting brackets and pulling it down until it fits snugly into place Figure 1 28 shows rear cover installation using spacers Figure 1 28 Installing the Rear Cover with Spacers Step 6 Continue with the NTP G14 Install DWDM Equipment procedure on page 1 66 Stop You have completed this procedure 55374 R E T 1 C A U TI O N R em ov ...

Page 146: ...alculated for your DWDM network with Cisco MetroPlanner Release 2 5 MetroPlanner is a DWDM planning tool that is available your Cisco account representative MetroPlanner prepares a shelf plan for each network node and calculates the power and attenuation levels for the DWDM cards installed in the node For information about Cisco MetroPlanner refer to the Cisco MetroPlanner DWDM Operations Guide Re...

Page 147: ...side of the chassis Use minimum 14 AWG wire Step 5 Return to your originating procedure NTP DLP G28 Install the Fiber Patch Panel Tray Step 1 The fiber patch panel tray requires 1 RU in a standard 19 inch 482 6 mm or 23 inch 584 2 mm rack Locate the RMU space specified in your site plan See the 15 5 Typical DWDM Rack Layouts section on page 15 17 for common site configurations Step 2 Verify that t...

Page 148: ...hten Step 4 Return to your originating procedure NTP DLP G30 Install the FlexLayer Shelf Step 1 The FlexLayer shelf requires 1 RU in a standard 19 inch 482 6 mm or 23 inch 584 2 mm rack Locate the RMU space specified in your site plan Refer to Chapter 15 Shelf Hardware Reference for typical DWDM site layout plans Step 2 A set of mounting brackets are included with the FlexLayer mounting kit one se...

Page 149: ...uisite Procedures None Required As Needed As needed Onsite Remote Onsite Security Level None Table 1 11 ONS 15xxx FlexLayer Hardware Part Numbers Part Number Description 2 Channel Add Drop FlexLayer Modules 15216 FLB 2 31 1 ITU 100 GHz 2 Ch FlexMod 1530 33 and 1531 12 15216 FLB 2 32 6 ITU 100 GHz 2 Ch FlexMod 1531 90 and 1532 68 15216 FLB 2 35 0 ITU 100 GHz 2 Ch FlexMod 1534 25 and 1535 04 15216 F...

Page 150: ...p 4 Repeat this task as necessary for each FlexLayer module you want to install Step 5 Return to your originating procedure NTP DLP G32 Install the Y Cable Protection Modules Step 1 Determine the Y cable modules that you want to install in the FlexLayer shelf Purpose This task installs the Y cable protection modules in the FlexLayer shelf assembly Tools Equipment 2 Phillips screwdriver Y Cable mod...

Page 151: ...e wristband cable into the ESD jack located on the lower right outside to edge of the shelf assembly Note If protective clips are installed on the backplane connectors of the cards remove the clips before installing the cards Note If you install a card incorrectly the FAIL LED flashes continuously Step 1 Complete the DLP G33 Install the TCC2 or TCC2P Card task on page 1 72 Note If you install the ...

Page 152: ...ssible to close the latches ejectors when the card is not completely plugged into the back panel of the shelf assembly Ensure that you cannot insert the card any farther If you insert a card into a slot provisioned for a different card all LEDs turn off Step 4 As needed go to Step a to verify the LED activity on the TCC2 card For the TCC2P card go to Step b a For the TCC2 card All LEDs turn on for...

Page 153: ...d b For the TCC2P card All LEDs turn on briefly The red FAIL LED the yellow ACT STBY LED the red REM LED the green SYNC LED and the green ACO LED turn on for about 10 seconds The red FAIL LED and the green ACT STBY LED turn on for about 40 seconds The red FAIL LED blinks for about 10 seconds If both TCC2 cards are installed this LED blinks on the other TCC2 card as well The red FAIL LED turns on f...

Page 154: ...ease specific software upgrade document to replace the software To exchange the TCC2 TCC2P card refer to the Cisco ONS 15454 Troubleshooting Guide or the Cisco ONS 15454 SDH Troubleshooting Guide Step 8 Repeat Steps 1 through 7 for the redundant TCC2 TCC2P card If both TCC2 TCC2P cards are already installed proceed to Step 9 Tip If you install a standby TCC2 TCC2P card that has a different softwar...

Page 155: ...red FAIL LED turns on for 1 second then blinks for up to 5 seconds The PWR A and PWR B LEDs become red and the two INPUT OUTPUT LEDs become green for approximately 3 seconds The PWR A LED turns green the INPUT OUTPUT LEDs turn off and the ACT LED turns on Note It might take up to 3 minutes for the PWR A and PWR B LEDs to update Note If the red FAIL LED does not turn on check the power Note If you ...

Page 156: ...curity Level None Table 1 12 ONS 15454 ETSI Shelf Installation Task Summary Description Completed NTP G1 Unpack and Inspect the Shelf Assembly page 1 6 NTP G2 Install the Shelf Assembly page 1 8 NTP G3 Open and Remove the Front Door page 1 20 NTP G4 Open and Remove the FMEC Cover ETSI Only page 1 23 NTP G6 Install the MIC A P and MIC T C P FMECs ETSI Only page 1 28 NTP G7 Install the Power and Gro...

Page 157: ...I only To check that the FMEC cover is seated correctly verify that it can be easily closed without disturbing cables Step 3 Return to your originating procedure NTP NTP G8 Install the Fan Tray Assembly page 1 40 NTP G9 Install the Alarm Expansion Panel ANSI Only page 1 44 NTP G10 Attach Wires to Alarm Timing LAN and Craft Pin Connections page 1 47 NTP G11 Install an External Wire Wrap Panel on th...

Page 158: ...urn ground Step 2 Using a voltmeter verify the shelf ground and power wiring a Place the black lead positive on the RET1 and the red lead on the BAT1 point Verify a reading between 40 5 VDC and 57 VDC If there is no voltage check the following and correct if necessary Battery and ground are reversed to the shelf Battery is open or missing Return is open or missing Step 3 Repeat Step 1 and Step 2 f...

Page 159: ...elf assemblies Before You Begin This section lists the chapter procedures NTPs Turn to a procedure for applicable tasks DLPs 1 NTP G17 Set Up Computer for CTC page 2 2 Complete this procedure if your PC or workstation has never been connected to an ONS 15454 2 NTP G18 Set Up CTC Computer for Local Craft Connection to the ONS 15454 page 2 9 Complete this procedure to set up your computer for an ons...

Page 160: ...on is set up continue with the setup procedure appropriate to your network NTP G18 Set Up CTC Computer for Local Craft Connection to the ONS 15454 page 2 9 NTP G19 Set Up a CTC Computer for a Corporate LAN Connection to the ONS 15454 page 2 21 NTP G20 Set Up a Remote Access Connection to the ONS 15454 page 2 23 Note Cisco recommends that you configure your browser to disable the caching of user ID...

Page 161: ...n the Version tab of the Windows NT Diagnostics dialog box If Service Pack 6a or later is not installed do not continue Install Service Pack 6a following the computer upgrade procedures for your site Note Processor and RAM requirements are guidelines CTC performance is faster if your computer has a faster processor and more RAM Step 2 Insert the Cisco ONS 15454 Release 6 0 software CD into your co...

Page 162: ...s Cisco CTC Documentation If you want to change the CTC online user manuals directory type the new directory path in the Directory Name field or click Browse to navigate to the directory If you do not want to change the directory skip this step Step 8 Click Next Step 9 Review the components that will be installed If you want to change the components complete one of the following If not proceed to ...

Page 163: ...ent Default Installs JRE 1 4 2 with support for European languages Support for Additional Languages Adds support for non European languages Additional Font and Media Support Adds Lucida fonts Java Sound and color management capabilities The drop down list options for each program feature include This feature will be installed on the local hard drive Installs the selected feature This feature and a...

Page 164: ...lable Operating system Solaris 8 or 9 Note These requirements are guidelines CTC performance is faster if your computer has a faster processor and more RAM Step 2 Change the directory Type cd cdrom cdrom0 Step 3 From the techdoc454 CD directory type setup bat The Cisco Transport Controller Installation Wizard displays the components that will be installed on your computer Java Runtime Environment ...

Page 165: ... Review the components that will be installed If you selected Typical in Step 5 click Back twice to return to the installation setup type page Choose Custom and repeat Steps 6 through 9 If you selected Custom in Step 5 click Back once or twice depending on the components selected until you reach the component selection page and check the desired components Repeat Steps 7 through 9 Step 11 Click Ne...

Page 166: ...tions for each program feature include This feature will be installed on the local hard drive Installs the selected feature This feature and all subfeatures will be installed on the local hard drive Installs the selected feature and all subfeatures Don t install this feature now Does not install the feature not an option for Java 2 Runtime Environment To modify the directory where the JRE version ...

Page 167: ...54 CTC Connection Environment CTC Computer Setup Task You are connecting from a Windows PC All nodes that you will access run software earlier than Release 3 3 You will connect to one ONS 15454 You need to access non ONS 15454 applications such as ping and tracert trace route DLP G39 Set Up a Windows PC for Craft Connection to an ONS 15454 on the Same Subnet Using Static IP Addresses page 2 11 You...

Page 168: ...dure You are connecting from a Windows PC All nodes that you will access run software Release 3 3 or later You will connect to ONS 15454s at different locations and times and do not wish to reconfigure your PC s IP settings each time You will not access or use non ONS 15454 applications such as ping and tracert trace route If you are using an ANSI shelf you will connect to the TCC2 TCC2P Ethernet ...

Page 169: ...he Windows Start menu choose Settings Control Panel b In the Control Panel dialog box click the Network icon c In the Network dialog box choose TCP IP for your NIC card then click Properties d In the TCP IP Properties dialog box click the DNS Configuration tab and choose Disable DNS e Click the WINS Configuration tab and choose Disable WINS Resolution f Click the IP Address tab g In the IP Address...

Page 170: ... an IP address that is identical to the ONS 15454 IP address shown on the ONS 15454 LCD except for the last octet The last octet must be 1 or 3 through 254 g In the Subnet Mask field type 255 255 255 0 h Click Advanced i In the Gateways List click Add The TCP IP Gateway Address dialog box appears j Type the ONS 15454 IP address in the Gateway Address field k Click Add l Click OK m Click Apply n In...

Page 171: ... the last octet The last octet must be 1 or 3 through 254 e In the Subnet Mask field type 255 255 255 0 f In the Default Gateway field type the ONS 15454 IP address g Click OK h In the Local Area Connection Properties dialog box click OK i In the Local Area Connection Status dialog box click Close Step 7 Return to your originating procedure NTP DLP G40 Set Up a Windows PC for Craft Connection to a...

Page 172: ...e Network icon c In the Network dialog box select TCP IP for your NIC then click Properties d In the TCP IP Properties dialog box click the DNS Configuration tab and choose Disable DNS e Click the WINS Configuration tab and choose Disable WINS Resolution f Click the IP Address tab g In the IP Address window click Obtain an IP address automatically h Click OK i When the prompt to restart your PC ap...

Page 173: ...7 Step 6 If you have Windows XP installed on your PC complete the following steps to change its TCP IP configuration a From the Windows Start menu choose Control Panel Network Connections Note If the Network Connections menu is not available click Switch to Classic View b In the Network Connections dialog box click Local Area Connection c In the Local Area Connection Status dialog box click Proper...

Page 174: ... NT 4 0 complete Step 4 For Windows 2000 complete Step 5 For Windows XP complete Step 6 Step 3 If you have Windows 98 installed on your PC complete the following steps to change its TCP IP configuration a From the Windows Start menu choose Settings Control Panel b In the Control Panel dialog box click the Network icon c In the Network dialog box select TCP IP for your NIC then click Properties Pur...

Page 175: ... Add m Verify that the IP address appears in the Installed Gateways field then click OK n When the prompt to restart your PC appears click Yes o Proceed to Step 7 Step 4 If you have Windows NT 4 0 installed on your PC complete the following steps to change its TCP IP configuration a From the Windows Start menu choose Settings Control Panel b In the Control Panel dialog box click the Network icon c...

Page 176: ...ss entered in Step e in the Gateway Address field h Click OK i In the Local Area Connection Properties dialog box click OK j In the Local Area Connection Status dialog box click Close k Proceed to Step 7 Step 6 If you have Windows XP installed on your PC complete the following steps to change its TCP IP configuration a From the Windows Start menu choose Control Panel Network Connections Note If th...

Page 177: ...4 mtu 1500 index 2 inet 0 0 0 0 netmask 0 If a message similar to this one appears go to Step 4 If the interface is not plumbed a message similar to the following appears ifconfig status SIOCGLIFFLAGS hme1 no such interface If a message similar to this one appears go to Step 3 Step 3 Plumb the interface by typing ifconfig device plumb For example ifconfig hme1 plumb Step 4 Configure the IP address...

Page 178: ...ot appear complete Steps c and d c At the prompt type ping ONS 15454 IP address For example to connect to an ONS 15454 with a default IP address of 192 1 0 2 type ping 192 1 0 2 If your workstation is connected to the ONS 15454 the following message appears IP address is alive Note Skip this step if you checked the Craft Access Only check box on the Provisioning Network General Gateway Settings ta...

Page 179: ...m the PC or Solaris workstation NIC card to a corporate LAN port Step 3 If your computer is connected to a proxy server disable proxy service or add the ONS 15454 nodes as exceptions To disable proxy service complete one of the following tasks depending on the web browser that you use DLP G43 Disable Proxy Service Using Internet Explorer Windows page 2 22 DLP G44 Disable Proxy Service Using Netsca...

Page 180: ...Separate each address with a semicolon You can insert an asterisk for the host number to include all the ONS 15454s on your network Click OK to close each open dialog box Step 5 Return to your originating procedure NTP DLP G44 Disable Proxy Service Using Netscape Windows and UNIX Step 1 Open Netscape Step 2 From the Edit menu choose Preferences Step 3 In the Preferences dialog box under Category c...

Page 181: ...T P FMEC ETSI only Step 2 While referring to the modem documentation complete the following tasks to provision the modem for the ONS 15454 For CTC access set the modem for Ethernet access Assign an IP address to the modem that is on the same subnet as the ONS 15454 The IP address the modem assigns to the CTC computer must be on the same subnet as the modem and the ONS 15454 Note For assistance on ...

Page 182: ... on page 2 30 Step 5 As needed complete the DLP G51 Delete a Node from a Specified Login Node Group task on page 2 31 Step 6 As needed complete the DLP G52 Change the JRE Version task on page 2 31 Step 7 As needed complete the DLP G53 Configure the CTC Alerts Dialog Box for Automatic Popup task on page 2 32 Stop You have completed this procedure Purpose This procedure logs into CTC the graphical u...

Page 183: ... color intensive applications such as Netscape in UNIX it is possible that UNIX might run out of colors to use for CTC The install and ncols 32 command line options limit the number of colors that Netscape uses Step 2 In the Netscape or Internet Explorer web address URL field enter the ONS 15454 IP address For initial setup this is the default IP address 192 1 0 2 This IP address appears on the LC...

Page 184: ...oting Guide or the Cisco ONS 15454 SDH Troubleshooting Guide Step 4 If a Java Plug in Security Warning dialog box appears complete the DLP G47 Install Public Key Security Certificate task on page 2 28 to install the public key security certificate required by Software Release 4 1 and later After you complete the security certificate dialog box or if the certificate is already installed a Java Cons...

Page 185: ...y new node where you want to log in Additional Nodes Displays a list of current login node groups To create a login node group or add additional groups see the DLP G48 Create Login Node Groups task on page 2 28 Disable Network Discovery Check this box to view only the ONS 15454 and login node group members if any entered in the Node Name field Nodes linked to this node through DCCs are not discove...

Page 186: ...ificate If you choose this option you cannot log into the ONS 15454 Always Grant Always Installs the public key certificate and does not delete it after the session is over Cisco recommends this option More Details View Certificate Allows you to view the public key security certificate Step 2 Return to your originating procedure NTP DLP G48 Create Login Node Groups Step 1 From the Edit menu in nod...

Page 187: ...ox For example in Figure 2 2 a login node group is created that contains the IP addresses for Nodes 1 4 and 5 During login if you choose this group from the Additional Nodes list and Disable Network Discovery is not selected all nodes in the figure appear If the login group and Disable Network Discovery are both selected only Nodes 1 4 and 5 appear You can create as many login node groups as you n...

Page 188: ...he Current Session or Login Group Step 1 From the View menu choose Go to Network View Step 2 Click the node that you want to delete Step 3 From the CTC File menu click Delete Selected Node After a few seconds the node disappears from the network view map Step 4 Return to your originating procedure NTP Purpose This task adds a node to the current CTC session or login node group Tools None Prerequis...

Page 189: ...ersion and the recommended version Step 3 Click the Browse button and navigate to the JRE directory on your computer Step 4 Choose the JRE version Step 5 Click OK Purpose This task removes a node from a specified login node group To remove a node from the current login node group see the DLP G50 Delete a Node from the Current Session or Login Group task on page 2 30 Tools None Prerequisite Procedu...

Page 190: ...og box to open automatically for all notifications Error alerts only Sets the CTC Alerts dialog box to open automatically for circuit deletion errors only Never Sets the CTC Alerts dialog box to never open automatically Step 3 Click Close Step 4 Return to your originating procedure NTP Purpose This task sets up the CTC Alerts dialog box to open for all alerts for circuit deletion errors only or ne...

Page 191: ...r to the Cisco MetroPlanner DWDM Installation and Operations Guide Release 2 5 Note Unless otherwise specified ONS 15454 refers to both ANSI ONS 15454 and ETSI ONS 15454 SDH shelf assemblies Before You Begin This section lists the non trouble procedures NTPs that you need to complete to turn up a DWDM node Turn to a procedure for applicable detailed level procedures DLPs 1 NTP G139 Verify Cisco Me...

Page 192: ...der and Muxponder Cards page 3 43 Complete this procedure to install transponder TXP and muxponder MXP cards 13 NTP G123 Install the Filler Cards page 3 47 Complete this procedure to install ONS 15454 filler cards 14 NTP G34 Install Fiber Optic Cables on DWDM Cards and DCUs page 3 48 Complete this procedure as needed to install the fiber optic cables on the DWDM cards 15 NTP G140 Install Fiber Opt...

Page 193: ...ommon Control Cards Required As Needed Required Onsite Remote Onsite Security Level Retrieve or higher Table 3 1 Cisco MetroPlanner Node Setup Information and Files Source Format Description Shelf layout Table or JPG file Cisco MetroPlanner provides a shelf layout Figure 3 1 showing the cards that should be installed in each ONS 15454 slot Cisco MetroPlanner can export this as a table Layout Table...

Page 194: ...orts during node turn up Stop You have completed this procedure NTP G22 Verify Common Card Installation Step 1 Verify that two TCC2 TCC2P cards are installed in Slots 7 and 11 Step 2 Verify that the green ACT active LED is illuminated on one TCC2 TCC2P and the amber STBY standby LED is illuminated on the second TCC2 TCC2P Purpose This procedure verifies that the ONS 15454 node has two TCC2 TCC2P c...

Page 195: ...ds containing the correct release Stop You have completed this procedure NTP G23 Create Users and Assign Security Step 1 Complete the DLP G46 Log into CTC task on page 2 25 at the node where you need to create users If you are already logged in continue with Step 2 Note You must log in as a Superuser to create additional users The CISCO15 user provided with each ONS 15454 can be used to set up oth...

Page 196: ...t be 6 to 10 characters Note The password must not contain the user name Confirm Password Type the password again to confirm it Security Level Choose a security level for the user RETRIEVE MAINTENANCE PROVISIONING or SUPERUSER See the 20 1 User IDs and Security Levels section on page 20 1 for information about the capabilities provided with each level Note Each security level has a different idle ...

Page 197: ... a security level for the user RETRIEVE MAINTENANCE PROVISIONING or SUPERUSER Refer to the 20 1 User IDs and Security Levels section on page 20 1 for information about the capabilities provided with each level Note Each security level has a different idle time The idle time is the length of time that CTC can remain idle before it locks up and the password must be reentered The defaults are Retriev...

Page 198: ...n the network view map To convert a coordinate in degrees to degrees and minutes multiply the number after the decimal by 60 For example the latitude 38 250739 converts to 38 degrees 15 minutes 0 250739 x 60 15 0443 rounded to the nearest whole number Description Type a description of the node The description can be a maximum of 255 characters Use NTP SNTP Server When checked CTC uses a Network Ti...

Page 199: ...ce each other Date If Use NTP SNTP Server is not checked type the current date in the format m d yyyy for example September 24 2002 is 9 24 2002 Time If Use NTP SNTP Server is not checked type the current time in the format hh mm ss for example 11 24 58 The ONS 15454 uses a 24 hour clock so 10 00 PM is entered as 22 00 00 Time Zone Click the field and choose a city within your time zone from the d...

Page 200: ...the low battery voltage threshold in 0 5 VDC increments choose a voltage from the LWBATVGVdc drop down list Step 5 To change the high battery voltage threshold in 0 5 VDC increments choose a voltage from the HIBATVGVdc drop down list Step 6 To change the extreme high battery voltage threshold in 0 5 VDC increments choose a voltage from the EHIBATVGVdc drop down list Step 7 Click Apply Stop You hav...

Page 201: ... DLP G264 Enable Node Security Mode task on page 3 17 Note Secure mode is not available if TCC2 cards are installed Step 4 If static routes are needed complete the DLP G58 Create a Static Route task on page 3 18 For more information about static routes see Chapter 22 Management Connectivity Reference Step 5 If the ONS 15454 is connected to a LAN or WAN that uses OSPF and you want to share routing ...

Page 202: ...y on the LCD Default Router If the ONS 15454 is connected to a LAN enter the IP address of the default router The default router forwards packets to network devices that the ONS 15454 cannot directly access This field is ignored if any of the following are true The ONS 15454 is not connected to a LAN SOCKS proxy server is enabled and the ONS 15454 is provisioned as an end network element ENE OSPF ...

Page 203: ...nected nodes only to the proxy ONS 15454 If the Enable SOCKS proxy server on port check box is unchecked the node does not proxy for any CTC clients When this box is checked you can provision one of the following options External Network Element ENE Choose this option when the ONS 15454 is not connected to a LAN but has DCC connections to other ONS nodes A CTC computer connected to the ENE through...

Page 204: ...C is updated The standby TCC2 TCC2P becomes the active TCC2 TCC2P ACT STBY Flashing green 1 ACT STBY Flashing yellow 2 FAIL LED Solid red 3 All LEDs on except ACT STBY 4 CRIT turns off 5 MAJ and MIN turn off 6 REM SYNC and ACO turn off 7 All LEDs except A B PWR turn off 1 to 2 minutes 8 ACT STBY Solid yellow 9 Alarm LEDs Flash once 10 ACT STBY Solid green Memory test 1 to 2 minutes TCC2 TCC2P upda...

Page 205: ...de IP address Status IpAddress Figure 3 2 To change the node network mask Status Net Mask To change the default router IP address Status Default Rtr Figure 3 2 Selecting the IP Address Option Step 3 Press the Status button to display the node IP address Figure 3 3 the node subnet mask length or the default router IP address Figure 3 3 Changing the IP Address Step 4 Push the Slot button to move to ...

Page 206: ...rs Figure 3 4 Figure 3 4 Selecting the Save Configuration Option Step 8 Press the Status button to choose the Save Configuration option A Save and REBOOT message appears Figure 3 5 Figure 3 5 Saving and Rebooting the TCC2 TCC2P Step 9 Press the Slot button to apply the new IP address configuration or press Port to cancel the configuration Saving the new configuration causes the TCC2 TCC2P cards to...

Page 207: ...router Step 5 Click Next Step 6 On the Backplane Ethernet Port page modify the backplane IP address subnet mask and default router if needed You normally do not modify these fields if no ONS 15454 network changes have occurred Step 7 Click Next Step 8 On the SOCKS Proxy Server Settings page choose one of the following options External Network Element ENE If selected the CTC computer is only visibl...

Page 208: ...moves the IP address from display on the ONS 15454 LCD d Check the Suppress CTC IP Address check box This removes the IP address from display in the CTC information area and from the Provisioning Security Data Comm tab e Click Apply Note After you turn on secure mode the TCC2P IP address becomes the node IP address Step 12 Return to your originating procedure NTP DLP G58 Create a Static Route Purp...

Page 209: ...outer port or the node IP address if the CTC computer is connected to the node directly Cost Enter the number of hops between the ONS 15454 and the computer Step 4 Click OK Verify that the static route appears in the Static Route window Note Static route networking examples are provided in Chapter 22 Management Connectivity Reference Step 5 Return to your originating procedure NTP DLP G59 Set Up o...

Page 210: ...word Confirm Authentication Key Enter the same password to confirm it c Click OK The authentication button label changes to Simple Password Step 5 Provision the OSPF priority and interval settings The OSPF priority and interval defaults are the defaults most commonly used by OSPF routers Verify that these defaults match the ones used by the OSPF router where the ONS 15454 is connected Router Prior...

Page 211: ...ogical path to Area 0 a Under OSPF Virtual Link Table click Create b In the Create Virtual Link dialog box complete the following fields OSPF settings must match OSPF settings for the ONS 15454 OSPF area Neighbor The router ID of the Area 0 router Transit Delay sec The service speed One second is the default Hello Int sec The number of seconds between OSPF hello packet advertisements sent by OSPF ...

Page 212: ... password to confirm it c Click OK The authentication button label changes to Simple Password Step 6 If you want to complete an address summary complete the following steps If not continue with Step 7 Complete the address summary only if the ONS 15454 is a gateway NE with multiple external ONS 15454 NEs attached with IP addresses in different subnets a In the RIP Address Summary area click Create ...

Page 213: ...ator on the ONS 15454 Figure 3 6 Nodes Behind a Firewall Step 3 If the CTC computer resides behind a firewall complete the DLP G62 Provision the IIOP Listener Port on the CTC Computer task on page 3 25 Figure 3 7 shows a CTC computer and ONS 15454 behind firewalls For the computer to access the ONS 15454 you must provision the IIOP port on the CTC computer and on the ONS 15454 Purpose This procedu...

Page 214: ... used for access through a firewall if Port 57790 is open Standard Constant Uses Port 683 the CORBA default port number Other Constant If Port 683 is not used type the IIOP port specified by your firewall administrator Step 3 Click Apply Step 4 When the Change Network Configuration message appears click Yes Both ONS 15454 TCC2 TCC2P cards reboot one at a time The reboot takes approximately 15 minu...

Page 215: ...IOP port log out of CTC then log back in To log out choose Exit from the File menu Step 8 Return to your originating procedure NTP NTP G132 Provision OSI Purpose This task selects the IIOP listener port on CTC and must be completed if the computer running CTC resides behind a firewall Tools Equipment IIOP listener port number from LAN or firewall administrator Prerequisite Procedures NTP G22 Verif...

Page 216: ... node where you want to provision the OSI routing mode If you are already logged in continue with Step 2 Step 2 As needed complete the following tasks DLP G283 Provision OSI Routing Mode page 3 27 Complete this task first DLP G284 Provision the TARP Operating Parameters page 3 28 Complete this task second DLP G285 Add a Static TID to NSAP Entry to the TARP Data Cache page 3 30 Complete this task a...

Page 217: ...y manual area address To edit the primary NSAP you must edit the Router 1 primary manual area address After you enable Router 1 on the Routers subtab the Change Primary Area Address button is available to edit the address Step 1 In node view click the Provisioning OSI tabs Step 2 Choose a routing mode End System The ONS 15454 performs OSI end system ES functions and relies upon an intermediate sys...

Page 218: ...ived by the node and are not excluded by the LDB are propagated to other NEs within the Level 1 OSI area Type 1 PDUs request a protocol address that matches a target identifier TID within a Level 1 routing area The propagation does not occur if the NE is the target of the Type 1 PDU and PDUs are not propagated to the NE from which the PDU was received Note The TARP PDUs L1 Propagation parameter is...

Page 219: ...el 2 nodes that are connected to other Intermediate System Level 1 Level 2 nodes Enabling the parameter for Intermediate System Level 1 nodes is not recommended LDB If checked default enables the TARP loop detection buffer The LDB prevents TARP PDUs from being sent more than once on the same subnet Note The LDP parameter is not used if the Node Routing Mode is provisioned to End System or if the T...

Page 220: ...conds Note The T1 T2 and T4 timers are not used if TARP PDUs Origination is not enabled Step 3 Click Apply Step 4 Return to your originating procedure NTP DLP G285 Add a Static TID to NSAP Entry to the TARP Data Cache Step 1 In node view click the Provisioning OSI TARP Static TDC tabs Step 2 Click Add Static Entry Step 3 In the Add Static Entry dialog box enter the following TID Enter the TID of t...

Page 221: ...tep 4 Click OK to close the Masked NSAP Entry dialog box if used and then click OK to close the Add Static Entry dialog box Step 5 Return to your originating procedure NTP DLP G288 Provision OSI Routers Note Router 1 must be enabled before you can enable and edit the primary manual area addresses for Routers 2 and 3 Purpose This task adds an entry to the TARP manual adjacency table MAT Entries are...

Page 222: ... Use Mask and enter the edits in the Masked NSAP Entry dialog box The address hexadecimal format can be 8 to 24 alphanumeric characters 0 9 a f in length d Click OK successively to close the following dialog boxes Masked NSAP Entry if used Edit Manual Area Address and OSI Router Editor Step 4 Return to your originating procedure NTP DLP G289 Provision Additional Manual Area Addresses Step 1 Click ...

Page 223: ...If Secure Mode is on the OSI Subnet is enabled on the backplane LAN port not the front TCC2P port Step 1 Click the Provisioning OSI Routers Subnet tabs Step 2 Click Enable LAN Subnet Step 3 In the Enable LAN Subnet dialog box complete the following fields ESH Sets the End System Hello ESH propagation frequency End system NEs transmit ESHs to inform other ESs and ISs about the NSAPs it serves The d...

Page 224: ...uipment location Step 1 Click the Provisioning OSI Tunnels tabs Step 2 Click Create Step 3 In the Create IP Over OSI Tunnel dialog box complete the following fields Tunnel Type Choose a tunnel type Cisco Creates the proprietary Cisco IP tunnel Cisco IP tunnels add the CLNS header to the IP packets GRE Creates a Generic Routing Encapsulation tunnel GRE tunnels add the CLNS header and a GRE header t...

Page 225: ...Complete the DLP G46 Log into CTC task on page 2 25 at the node where you want to set up SNMP If you are already logged in continue with Step 2 Step 2 In node view click the Provisioning SNMP tabs Step 3 In the Trap Destinations area click Create Step 4 Complete the following in the Create SNMP Trap Destination dialog box Figure 3 8 Destination IP Address Type the IP address of your network manage...

Page 226: ...eporting and performance statistic retrieval across ONS firewalls click the Enable SNMP Proxy check box located on the SNMP tab Note The ONS firewall proxy feature only operates on nodes running Software Release 4 6 and later Using this feature effectively breaches the ONS firewall to exchange management information For more information about the SNMP proxy feature refer to the Cisco ONS 15454 Tro...

Page 227: ...ows the Add Card shortcut menu items submenu items and the card groups and menu options cards that they reference Purpose This procedure preprovisions the ONS 15454 slots in CTC based upon the Cisco MetroPlanner shelf layout prepared for your site Preprovisioning the slots ensures that the physical cards are installed in the slots anticipated by the parameters contained in the Cisco MetroPlanner A...

Page 228: ...alled Step 4 Repeat Step 3 until all the cards shown in the Cisco MetroPlanner shelf layout are provisioned in CTC Stop You have completed this procedure MD 32 DMX 32DMX 32 DMXO 32DMX O 32 MUXO 32MUX O 32 WSS 32WSS 4MD 4MD xx x OADM OADM 1 band AD 1B xx x OADM 1 Channel AD 1C xx x OADM 2 Channels AD 2C xx x OADM 4 Bands AD 4B xx x OADM 4 Channels AD 4C xx x Ampli Optical booster OPT BST Optical bo...

Page 229: ... outside edge of the shelf assembly Note Complies with the US Federal Drug Administration Code of Federal Regulations Title 21 Sections 1040 10 and 1040 11 except for deviations pursuant to Laser Notice No 50 dated July 26 2001 Note If protective clips are installed on the backplane connectors of the cards remove the clips before installing the cards Purpose This procedure describes how to install...

Page 230: ...er The following LED activity will occur The FAIL LED turns on for approximately 35 seconds During this time the ACT LED will cycle through various states and then extinguish The FAIL LED blinks for approximately 40 seconds All LEDs turn on and then turn off within 5 seconds If new software is being downloaded to the card the ACT and SF LEDs blink for 20 seconds to 5 minutes depending on the card ...

Page 231: ...t includes DCUs complete the NTP G31 Install the DWDM Dispersion Compensating Units procedure on page 3 41 for each side of the shelf that requires a DCU Stop You have completed this procedure NTP G31 Install the DWDM Dispersion Compensating Units Warning Class I CDRH and Class 1M IEC laser products Statement 1055 Warning Invisible laser radiation may be emitted from the end of the unterminated fi...

Page 232: ...gs into the receptacle at the back of the horizontal dispersion compensating card slot at the top of the shelf Note The west DCU is commonly installed on the left side and the east DCU is commonly installed on the right side Note Double check the placement of the DCU s with your Cisco MetroPlanner shelf layout If you install the wrong DCU in a slot remove the DCU and install the correct one Step 3...

Page 233: ...stband cable into the ESD jack located on the lower right outside edge of the shelf assembly Note Complies with the US Federal Drug Administration Code of Federal Regulations Title 21 Sections 1040 10 and 1040 11 except for deviations pursuant to Laser Notice No 50 dated July 26 2001 Note If protective clips are installed on the backplane connectors of the cards remove the clips before installing ...

Page 234: ...es The ACT or ACT STBY LED turns on The SF LED might persist until all card ports connect to their far end counterparts and a signal is present Note Until a TXP or MXP is provisioned the card is in the standby condition and the ACT STBY LED remains amber in color Step 6 If the card does not boot up properly or the LED activity does not mirror Step 5 check the following When a physical card type do...

Page 235: ...PMs in CTC After installing the SFP XFP multirate PPMs PPMs that provide OC 3 or OC 12 line rates must be provisioned in CTC See the DLP G277 Provision a Multirate PPM task on page 5 3 Step 1 Verify that the SFP XFP is correct for your network and TXP or MXP card see Table 16 69 on page 16 118 Check that you are installing compatible SFP XFPs for example SX to SX or LX LH to LX LH Step 2 Install t...

Page 236: ...wn list The drop down list displays the number of PPMs that are available for provisioning If only one port is supported PPM 1 port is the only option Step 5 Click OK The newly created port appears in the Pluggable Port Modules pane The row in the Pluggable Port Modules pane turns light blue The Actual Equipment Type column remains blank until the actual SFP XFP is installed After the SFP XFP is i...

Page 237: ...e the SFP XFP out of the slot Step 4 Return to your originating procedure NTP NTP G123 Install the Filler Cards Purpose This task removes SFP XFPs from TXP and MXP cards Tools Equipment None Prerequisite Procedures NTP G32 Install the Transponder and Muxponder Cards page 3 43 Required As Needed As needed Onsite Remote Onsite Security Level Provisioning or higher Purpose This procedure explains how...

Page 238: ...3 Close the ejectors Step 4 Repeat for any remaining unused card slots Stop You have completed this procedure NTP G34 Install Fiber Optic Cables on DWDM Cards and DCUs Warning Class I CDRH and Class 1M IEC laser products Statement 1055 Note Complies with the US Federal Drug Administration Code of Federal Regulations Title 21 Sections 1040 10 and 1040 11 except for deviations pursuant to Laser Noti...

Page 239: ...ition 1 The first position rack shelf and slot For example Rack 1 Main Shelf 02 refers to Slot 2 in the main shelf of Rack 1 Refer to the Cisco MetroPlanner Site Dialog window for rack and shelf names and locations Unit 1 The ONS 15454 DWDM card unit that is installed in the first position slot Port 1 The port identifier shown in the CTC for the first Position 1 connection Port ID 1 The port ident...

Page 240: ...te complete the DLP G65 Install Fiber Optic Cables for OSC Link Terminations Between Two Adjacent Nodes task on page 3 51 Otherwise continue with Step 6 Step 6 On the front of the fiber storage tray usually installed below the node you are fibering push the tabs on the left and right sides inward to release the lock on the tray Step 7 Pull the fiber storage tray away from the shelf until it is ful...

Page 241: ...e DWDM channels and the OSC CSM acts as an OSCM it does not carry DWDM traffic If an OPT BST and OSCM card are installed on the east side the east OPT BST OSC RX port is connected to the east OSCM TX port and the east OPT BST OSC TX port is connected to the east OSCM RX port If you have an OPT BST and OSC CSM card are installed on the east side the east OPT BST OSC RX port is connected to the east...

Page 242: ...TX RX COM TX RX OSC TX RX LINE TX OPT PRE FAIL ACT SF MON RX COM TX RX DC TX OPT BST FAIL ACT SF RX MON TX RX COM TX RX OSC TX RX LINE TX OPT PRE FAIL ACT SF MON RX COM TX RX DC TX OSCM FAIL ACT SF UC RX TX OSCM FAIL ACT SF UC RX TX 32DMX 0 FAIL ACT SF 30 3 34 2 38 1 42 1 46 1 50 1 TX 54 1 58 1 RX COM 32DMX 0 FAIL ACT SF 30 3 34 2 38 1 42 1 46 1 50 1 TX 54 1 58 1 RX COM 32MUX 0 FAIL ACT SF 30 3 34...

Page 243: ...ibers are not connected correctly For example an RX port is connected to another RX port or a TX port is connected to another TX port Step 6 If OSCM cards are not installed continue with Step 7 If OSCM cards are installed on both sides of the shelf complete Steps a through d If an OSCM is installed on the west side of the shelf but not the east side complete Steps a and b only If the OSCM is insta...

Page 244: ...nected to the west OPT BST or west OSC CSM COM RX port The east 32MUX O COM TX port is connected to the east OPT BST or east OSC CSM COM RX port The east OPT BST or east OSC CSM COM TX port is connected to the east OPT PRE COM RX port or the east 32DMX O COM RX port The east OPT PRE COM TX port is connected to the east 32DMX O COM RX port Figure 3 11 shows an example of a hub node with cabling In ...

Page 245: ...TPUT 1 OUTPUT 2 OUTPUT 3 OUTPUT 4 RING CALL LOCAL OW RING CALL EXPRESS OW CONTACT STATUS AIC OPT BST FAIL ACT SF RX MON TX RX COM TX RX OSC TX RX LINE TX OPT PRE FAIL ACT SF MON RX COM TX RX DC TX OPT BST FAIL ACT SF RX MON TX RX COM TX RX OSC TX RX LINE TX OPT PRE FAIL ACT SF MON RX COM TX RX DC TX OSCM FAIL ACT SF UC RX TX OSCM FAIL ACT SF UC RX TX 32DMX 0 FAIL ACT SF 30 3 34 2 38 1 42 1 46 1 50...

Page 246: ...er storage tray as necessary Step 7 Plug the other end of the cable into the desired TX port Note Cards display an SF LED after the OSC terminations are created see the NTP G38 Provision OSC Terminations procedure on page 3 84 if transmit and receive fibers are not connected correctly For example an RX port is connected to another RX port or a TX port is connected to another TX port Step 8 Repeat ...

Page 247: ...routing channel and cutout on the appropriate side of the shelf assembly as necessary Figure 15 35 on page 15 37 Step 5 As needed route slack fiber optic cable around the round cable retainers in the fiber storage tray Figure 15 38 on page 15 40 Caution When you close the fiber storage tray the cables must not be pinched and the cable bend radius must be equal to or greater than the minimum radius...

Page 248: ...lification If a west OPT PRE card is installed The west OSC CSM or OPT BST COM TX is connected to the west OPT PRE COM RX port The west OPT PRE COM TX port is connected to the east OSC CSM or OPT BST COM RX port If a west OPT PRE card is not installed the west OSC CSM or the OPT BST COM TX port is connected to the east OSC CSM or OPT BST COM RX port If an east OPT PRE card is installed The east OS...

Page 249: ...1 4 West OPT PRE COM TX to east OPT BST COM RX 8 East DCU RX to east OPT PRE DC TX1 115423 DCU xxx West DCU xxx East FAIL ACT SF INPUT 1 INPUT 2 INPUT 3 INPUT 4 OUTPUT 1 OUTPUT 2 OUTPUT 3 OUTPUT 4 RING CALL LOCAL OW RING CALL EXPRESS OW CONTACT STATUS AIC OPT BST FAIL ACT SF RX MON TX RX COM TX RX OSC TX RX LINE TX OPT PRE FAIL ACT SF MON RX COM TX RX DC TX OPT BST FAIL ACT SF RX MON TX RX COM TX ...

Page 250: ...lug the other end of the cable into the desired TX port Note Cards display an SF LED after the OSC terminations are created see the NTP G38 Provision OSC Terminations procedure on page 3 84 if transmit and receive fibers are not connected correctly For example an RX port is connected to another RX port or a TX port is connected to another TX port Step 8 Repeat 2 through 7 until you have connected ...

Page 251: ...e Cisco MetroPlanner Internal Connections table for your site Figure 3 13 Fibering an OSC Regeneration Node 115484 FAIL ACT SF INPUT 1 INPUT 2 INPUT 3 INPUT 4 OUTPUT 1 OUTPUT 2 OUTPUT 3 OUTPUT 4 RING CALL LOCAL OW RING CALL EXPRESS OW CONTACT STATUS AIC TCC2 FAIL SF PWR A B CRIT MAJ MIN REM SYNC ACO ACO LAMP TEST RS 232 TCP IP LINK ACT TCC2 FAIL SF PWR A B CRIT MAJ MIN REM SYNC ACO ACO LAMP TEST R...

Page 252: ...n your site specifications As you route each cable through the fiber storage tray make sure that adequate cable slack remains Step 6 Route the fiber cable out either side of the fiber storage tray as necessary Step 7 Plug the other end of the cable into the desired TX port Note Cards display an SF LED after the OSC terminations are created see the NTP G38 Provision OSC Terminations procedure on pa...

Page 253: ...ld only be connected to RX ports EXP ports are connected only to COM ports in between AD xC xx x or AD xB xx x cards that all belong to the east side that is they are daisy chained EXP ports are connected only to COM ports in between AD xC xx x or AD xB xx x cards that all belong to the west side that is they are daisy chained The EXP port of the last AD xC xx x or AD xB xx x card on the west side...

Page 254: ...4MD xx x card belonging to the same band For each specific AD xB the add and drop ports for that band card are connected to the COM TX and COM RX ports of the same 4MD xx x card The AD xB xx x and 4MD xx x cards are located in the same side the connected ports will all have the same line direction Step 4 Consult the following rules for OADM node pass through path cabled connections Pass through co...

Page 255: ...TX RX OSC TX RX LINE TX OPT PRE FAIL ACT SF MON RX COM TX RX DCC TX OPT BST FAIL ACT SF RX MON TX RX COM TX RX OSC TX RX LINE TX OPT PRE FAIL ACT SF MON RX COM TX RX DC TX OSCM FAIL ACT SF UC RX TX TCC2 FAIL SF PWR A B CRIT MAJ MIN REM SYNC ACO ACO LAMP TEST RS 232 TCP IP LINK ACT TCC2 FAIL SF PWR A B CRIT MAJ MIN REM SYNC ACO ACO LAMP TEST RS 232 TCP IP LINK ACT OSCM FAIL ACT SF UC RX TX TXP MR 2...

Page 256: ...e for your site 4 West OPT BST COM RX to west AD 1C xx x COM TX 12 East AD 1C xx x COM RX to OPT PRE COM TX 5 West OPT PRE COM TX to west AD 1C xx x COM RX 13 East AD 1C xx x COM TX to OPT BST COM RX 6 West AD 1C xx x 15xx xx RX to west TXP_MR_2 5G DWDM TX 14 East OPT PRE COM RX to east OPT BST COM TX 7 West AD 1C xx x 15xx xx TX to west TXP_MR_2 5G DWDM RX 15 East DCU TX to east OPT PRE DC RX1 8 ...

Page 257: ...st OSC CSM COM RX to west AD 1C xx x COM TX 5 East AD 1C xx x COM TX to east OSC CSM COM RX 3 West OSC CSM EXP TX to east AD 1C xx x EXP RX 6 East AD 1C xx x COM RX to east OSC CSM COM TX 115425 FAIL ACT SF INPUT 1 INPUT 2 INPUT 3 INPUT 4 OUTPUT 1 OUTPUT 2 OUTPUT 3 OUTPUT 4 RING CALL LOCAL OW RING CALL EXPRESS OW CONTACT STATUS AIC OSC CSM FAIL ACT SF UC RX MON TX RX COM TX RX LINE TX OSC CSM FAIL...

Page 258: ...to another RX port or a TX port is connected to another TX port Step 11 Repeat 5 through 10 until you have connected the nodes according to the site plan Step 12 Return to your originating procedure NTP DLP G71 Install Fiber Optic Cables for an ROADM Node Note Throughout this task west refers to Slots 1 through 8 and east refers to Slots 10 through 17 Note To avoid errors connect fiber optic cable...

Page 259: ... port The west 32WSS EXP RX port is connected to the east 32WSS EXP TX port The west 32WSS DROP TX port is connected to the west 32DMX COM RX port The east OPT BST or OSC CSM COM TX port is connected to the east OPT PRE COM RX port The east OPT PRE COM TX port is connected to the east 32WSS COM RX port The east OPT BST or OSC CSM COM RX port is connected to the east 32WSS COM TX port The east OPT ...

Page 260: ...W CONTACT STATUS AIC OPT BST FAIL ACT SF RX MON TX RX COM TX RX OSC TX RX LINE TX OPT PRE FAIL ACT SF MON RX COM TX RX DC TX OPT BST FAIL ACT SF RX MON TX RX COM TX RX OSC TX RX LINE TX OPT PRE FAIL ACT SF MON RX COM TX RX DC TX OSCM FAIL ACT SF UC RX TX OSCM FAIL ACT SF UC RX TX TCC2 FAIL SF PWR A B CRIT MAJ MIN REM SYNC ACO ACO LAMP TEST RS 232 TCP IP LINK ACT TCC2 FAIL SF PWR A B CRIT MAJ MIN R...

Page 261: ... is recommended in your site specifications As you route each cable through the fiber storage tray make sure that adequate cable slack remains Step 6 Route the fiber cable out either side of the fiber storage tray as necessary Step 7 Plug the other end of the cable into the correct TX port Note Cards display an SF LED after the OSC terminations are created see the NTP G38 Provision OSC Termination...

Page 262: ...n this procedure Terminal node One 32DMX O card One 32MUX O card One patch panel Eight MPO cables fiber optic cables terminated on one end with one multifiber push on MPO connector and on the other end with eight LC type connectors Hub node Two 32DMX O cards Two 2MUX O cards Two patch panels Sixteen MPO cables fiber optic cables terminated on one end with one MPO connector and on the other end wit...

Page 263: ...is fully opened To install fiber optic cables between a hub terminal or ROADM node and the TXP MXP cards perform the following tasks DLP G315 Install Fiber Optic Cables From the 32WSS 32DMX and 32MUX O 32DMX O Cards to the Patch Panel page 3 74 DLP G316 Install Fiber Optic Cables from a TXP MXP Node to the Patch Panel page 3 78 Step 3 To close the fiber storage tray push the tray back toward the r...

Page 264: ...al hub or ROADM node to the patch panel Tools Equipment The following node types require the following equipment The cards and patch panels should already be installed before you begin this procedure Terminal node One 32DMX O card One 32MUX O card One Patch panel Eight MPO cables fiber optic cables terminated on one end with one multifiber push on MPO connector and on the other end with eight LC t...

Page 265: ... until it snaps in place above the tray Figure 3 17 Figure 3 17 Using the Patch Panel Latches to Slide the Patch Panel Away from the Tray Step 6 At the 32WSS or 32MUX O card in the node plug the MPO connector of an MPO cable Figure 3 18 into the top Add RX 30 3 36 6 port of the card If you are connecting to the next MPO cable plug it into the MPO connector below the previous MPO cable 134825 Patch...

Page 266: ... cable slack remains Step 8 While facing the front of the patch panel at the rear of the patch panel plug the eight LC connector fan out cables on the MPO cable into their corresponding connectors on the bottom row of the patch panel You should plug the fan out cables from left to right as you face the patch panel following the numbers tagged 1 through 8 on the cables Figure 3 19 shows the patch p...

Page 267: ...is recommended in your site specifications As you route each cable through the patch panel tray make sure that adequate cable slack remains Step 12 While facing the front of the patch panel at the rear of the patch panel plug the eight LC connector fan out cables on the MPO cable into their corresponding connectors on the top row of the patch panel You should plug the fan out cables from left to r...

Page 268: ... to which the TXP MXP port is tuned See Figure 3 20 on page 3 77 for a view of the wavelengths assigned to the patch panel connectors Figure 3 21 shows the patch panel connectors from the front of the patch panel tray Figure 3 21 Front View of the Patch Panel Step 4 Plug a fiber optic cable into the RX port of the DWDM connector on that TXP MXP card Step 5 On the DWDM front side of the patch panel...

Page 269: ...ach cable through the fiber storage tray make sure that adequate cable slack remains To protect one client signal connect the fiber optic cables according to either Table 3 4 or Table 3 5 To protect two client signals using a single Y cable module connect the cables according to both Table 3 4 and Table 3 5 Purpose This procedure installs and routes fiber optic cables from the client signal to the...

Page 270: ...s not installed the calculate connections function generates an error Note The connections calculation is not based on the Cisco MetroPlanner shelf layout Calculations are based on the cards that are physically installed If the Cisco MetroPlanner shelf layout calls for a hub node but OADM cards are installed CTC calculates connections based on the cards expected for an OADM node Table 3 5 Cable Co...

Page 271: ...82 Note Although CTC calculates most DWDM connections automatically some connections cannot be calculated because of the DWDM card type and position You must create these connections manually For example connections related to optical bypass circuits must be manually provisioned Stop You have completed this procedure DLP G72 Create a DWDM Connection Step 1 In node view click the Provisioning WDM A...

Page 272: ...node view click the Provisioning WDM ANS Provisioning tabs Step 3 Click Import The Import NE Update From File dialog box appears Step 4 Enter the path to the Assisted Configuration Setup file see Table 3 1 on page 3 3 or click Browse and navigate to the configuration file using the Open dialog box Step 5 Click OK Step 6 Click OK on the import confirmation dialog box Purpose This task deletes a DWD...

Page 273: ...eat Steps 2 through 4 for all parameters in the Cisco MetroPlanner Installation Parameters table that display Yes in the Manually Set field Step 6 Change to node view Step 7 Click the Provisioning WDM ANS Port Status tabs Step 8 Click Launch ANS Step 9 In the Apply Launch ANS dialog box click Yes Step 10 In the Launch ANS confirmation dialog box click OK Step 11 Verify that one of the following st...

Page 274: ...e This status should normally not appear at this point in node turn up If it does display the card in card view change the port administrative state to OOS DSLB ANSI or Locked disabled ETSI and repeat Steps 6 through 11 Stop You have completed this procedure NTP G38 Provision OSC Terminations Step 1 Complete the DLP G46 Log into CTC task on page 2 25 at the node where you want to provision the OSC...

Page 275: ...following Check only the IP box if the LDCC is between the ONS 15454 and another ONS node and only ONS nodes reside on the network The LDCC will use Point to Point Protocol PPP Check both the IP and OSI boxes if the LDCC is between the ONS 15454 and another ONS node and third party NEs that use the OSI protocol stack are on the same network The LDCC will use PPP Step 6 If you checked OSI complete ...

Page 276: ...arm on the OPT BST or OSC CSM card Note After the OSC termination is created the line ports are placed in service and span power levels are checked Stop You have completed this procedure NTP G39 Verify OSCM and OSC CSM Transmit Power Step 1 Complete the DLP G46 Log into CTC task on page 2 25 at the node where you want to verify the OSCM or OSC CSM transmit power If you are already logged in contin...

Page 277: ...SC CSM continue with Step 4 If not continue with Step 7 Step 4 Change to node view then click the Provisioning WDM ANS tabs Step 5 Record the amplifier working mode value from one of the following For OSC CSM cards installed on the east side a In the Selector window on the left expand the East Side parameters tree view b Expand the RX category c Expand the Amplifier category then highlight Working...

Page 278: ...rs tree view b Expand the TX category c Expand the Power category then highlight Add Drop Output Power d Record the EastSide Tx Power Add Drop Output Power parameter displayed in the right pane e If an OSC CSM card is not installed on the west side continue with Step 8 If an OSC CSM card is installed on the west side in the Selector window on the left expand the West Side parameters tree view f Ex...

Page 279: ...t side a In the Selector window on the left expand the West Side parameters tree view b Expand the RX category c Expand the Amplifier category then highlight Working Mode d Record the WestSide Rx Amplifier Working Mode parameter displayed in the right pane Step 6 If the working mode recorded in Step 5 is Control Gain verify that the value recorded in Step 3 is equal to 5 dBm 0 5 dBm If the value r...

Page 280: ...Node DLP G314 Verify OSCM Transmit Power Create the OSC channels using the NTP G38 Provision OSC Terminations procedure on page 3 84 d Repeat Steps 3 through 6 If the power level is still not within the specified range contact your next level of support Step 7 Return to your originating procedure NTP ...

Page 281: ...alled 3 NTP G43 Perform the ROADM Node Acceptance Test page 4 8 Complete this procedure to test reconfigurable optical add drop multiplexing ROADM nodes 4 NTP G44 Perform the Anti ASE Hub Node Acceptance Test page 4 20 Complete this procedure to test anti amplified spontaneous emission anti ASE hub nodes 5 NTP G45 Perform the Line Amplifier Node with OSCM Cards Acceptance Test page 4 23 Complete t...

Page 282: ...e with Step 2 Step 2 From the View menu choose Go to Network View Step 3 Click the Alarms tab a Verify that the alarm filter is not on See the DLP G128 Disable Alarm Filtering task on page 8 28 as necessary b Verify that no equipment EQPT alarms appear indicating equipment failure or other hardware problems If equipment failure alarms appear investigate and resolve them before continuing Refer to ...

Page 283: ...t optical power Pout must be 6 dBm If the output power is lower than the specified value the 32MUX O card might not reach the provisioned setpoint Step 13 If an OPT BST card is installed complete the DLP G79 Verify the OPT BST Amplifier Laser and Power task on page 4 40 on the west or terminal OPT BST to ensure that the amplifier is working properly Step 14 Complete the DLP G80 Verify the OPT PRE ...

Page 284: ... Line Service Type tabs Step 5 Click the Admin State column for the trunk port and choose OOS Disable ANSI or Unlocked disable ETSI from the drop down list Step 6 Click Apply then click Yes Step 7 Click the Provisioning Card tabs Step 8 In the Wavelength field choose the first wavelength required by the acceptance test Step 9 Click Apply Step 10 Click the Provisioning Line Service Type tabs Purpos...

Page 285: ...mon TX and into the OPT PRE common RX The OPT PRE sends the signal to the 32DMX The optical signal from the tunable laser or TXP_MR_2 5G must pass successfully through the 32WSS and out the 32DMX Step 1 Complete the DLP G46 Log into CTC task on page 2 25 at the hub or terminal node that you want to test If you are already logged in continue with Step 2 Step 2 Display the terminal node in node view...

Page 286: ...elength you will test then continue with Step 9 Step 8 If you are using a TXP_MR_2 5G card complete the DLP G268 Provision TXP_MR_2 5G Cards for Acceptance Testing task on page 4 4 for the TXP containing the wavelength you will test Refer to Table 4 1 if needed Step 9 Connect the tunable laser transmitter or the TXP_MR_2 5G card DWDM TX port to the CHAN RX 01 port on the 32WSS card using the avail...

Page 287: ... page 4 42 to verify that the 32DMX O or 32DMX card is powered correctly Step 26 Display the 32WSS in card view Step 27 Click the Maintenance tab Step 28 For the circuit channel under test click the Operating Mode table cell and choose Not Assigned from the drop down list Step 29 Click Apply then Yes Step 30 Click the Provisioning Optical Chn Optical Connector tabs Step 31 Click the Admin State ta...

Page 288: ...them The 32 wavelengths are divided among four physical MPO connectors on the 32WSS card Each MPO connector is assigned eight wavelengths In CTC the MPO connector appears in the card view Provisioning Optical Connector tab Each Optical Connector subtab represents an MPO connector Ports 1 through 32 are the receive RX ports Ports 33 through 64 are the PT ports Purpose The ROADM node acceptance test...

Page 289: ... 33 RX 2 PT 34 1531 12 RX 3 PT 35 1531 90 RX 4 PT 36 1532 68 RX 5 PT 37 1534 25 RX 6 PT 38 1535 04 RX 7 PT 39 1535 82 RX 8 PT 40 1536 61 Optical Chn Optical Connector 2 RX 9 PT 41 1538 19 RX 10 PT 42 1538 98 RX 11 PT 43 1539 77 RX 12 PT 44 1540 56 RX 13 PT 45 1542 14 RX 14 PT 46 1542 94 RX 15 PT 47 1543 73 RX 16 PT 48 1544 53 Optical Chn Optical Connector 3 RX 17 PT 49 1546 12 RX 18 PT 50 1546 92 ...

Page 290: ...inations procedure on page 3 84 Step 6 Display the east 32WSS in card view Step 7 Click the Provisioning Optical Chn Optical Connector n Parameters tabs where n the optical connector number that carries the wavelengths you will test Refer to Table 4 2 on page 4 9 if needed Step 8 Click the Admin State table cell for the Add port carrying the tested wavelength then choose OOS MT for ANSI or Locked ...

Page 291: ...OS MT or Locked Maintenance Step 21 Click Apply Step 22 Repeat Steps 19 and 21 for all the ports that are OOS MT or Locked maintenance on the east 32WSS card Step 23 Display the west 32WSS in card view Step 24 Repeat Steps 19 through 21 for all ports on the west 32WSS card Step 25 Display the east 32DMX in card view Step 26 Choose the Provisioning Optical Line Parameters tabs Step 27 For Port 33 c...

Page 292: ...CTC window e If an OPT PRE is installed on the east side complete Steps a through d for the east OPT PRE If an OPT PRE is not installed on the east side continue with Step 3 Step 3 Wait 2 to 3 minutes then in node view click the Alarms tab Verify that the LOS alarms on the west OSCM or OSC CSM card and the OPT BST card have cleared The clearing of the LOS alarms indicates that the OSC link is acti...

Page 293: ...amage equipment Step 13 If an east OPT PRE card is installed complete the following steps If not continue with Step 14 a Display the east OPT PRE in card view b Click the Provisioning Optical Line Parameters tabs c Locate the Power parameter for Port 1 Record the value d Display the east OPT BST or OSC CSM card in card view e Click the Provisioning Optical Line Parameters tabs f Locate the Power v...

Page 294: ...60 seconds then locate the Power and VOA Power Ref parameters for the tested PT port Verify that the Power value is equal to the VOA Power Ref value 1 5 dBm Step 19 If an OPT BST card is installed on the east side complete the following steps If not continue with Step 20 a Display the east OPT BST in card view b Click the Provisioning Optical Line Parameters tabs c Locate the Port 1 Power paramete...

Page 295: ...WSS in card view b Click the Provisioning Optical Line Parameters tabs c Locate the Port 65 Power parameter Record the value a Display the east 32WSS in card view b Click the Provisioning Optical Line Parameters tabs c Locate the Power value for Port 66 Verify that the value matches the power recorded in Step c 1 dB If not use the NTP G115 Clean Fiber Connectors procedure on page 13 25 to clean th...

Page 296: ...rd Step 34 Remove the TXP or tunable laser from the east OPT BST or OSC CSM line side TX and RX ports Step 35 Remove the loopback fiber from the line RX and TX in the west OPT BST or OSC CSM card Step 36 Return to your originating procedure NTP DLP G311 Verify the East ROADM Add Drop Channels Note Throughout this task west refers to Slots 1 through 8 and east refers to Slots 10 through 17 Step 1 I...

Page 297: ... patch panel DMX port that corresponds to the east 32DMX card port carrying the tested wavelength Step 9 Display the east 32WSS in card view Step 10 Click the Maintenance tab Step 11 For each wavelength that you will test click the table cell under Operating Mode and choose Add Drop from the drop down list Step 12 Click Apply then click Yes to confirm Step 13 Click the Provisioning Optical Chn Opt...

Page 298: ...ep 26 Remove the TXP or tunable laser from the east side patch panel Step 27 Unplug the physical loopback fiber from the line TX and RX in the OPT BST or OSC CSM card Step 28 Return to your originating procedure NTP DLP G312 Verify the West ROADM Add Drop Channels Note Throughout this task west refers to Slots 1 through 8 and east refers to Slots 10 through 17 Step 1 In node view display the Alarm...

Page 299: ...DMX port that corresponds to the west 32DMX card port carrying the tested wavelength Step 9 Display the west 32WSS in card view Step 10 Click the Maintenance tab Step 11 For each wavelength that you will test click the table cell under Operating Mode and choose Add Drop from the drop down list Step 12 Click Apply then click Yes to confirm Step 13 Click the Provisioning Optical Chn Optical Connecto...

Page 300: ...from the west side patch panel Step 27 Unplug the physical loopback fiber from the line TX and RX in the OPT BST or OSC CSM card Step 28 Return to your originating procedure NTP NTP G44 Perform the Anti ASE Hub Node Acceptance Test Step 1 Complete the DLP G46 Log into CTC task on page 2 25 at the node where you want to perform the acceptance test If you are already logged in continue with Step 2 S...

Page 301: ...rd from the LINE TX port to the LINE RX port with a 10 dB bulk attenuator Step 7 Verify that the OSC link becomes active on the west OSCM or OSC CSM card The OSC Termination must already be provisioned If not complete the NTP G38 Provision OSC Terminations procedure on page 3 84 Step 8 For pass through channels continue with Step 9 For add and drop channels continue with Step 18 Step 9 Verify the ...

Page 302: ... the west 32DMX O in card view Step 25 Click the Provisioning Optical Chn Parameters tabs Step 26 Change the Admin State of Port nn to OOS MT ANSI or Locked maintenance ETSI Step 27 Check that the power value on Port nn reaches the provisioned setpoint VOA Power Ref Step 28 Optional Connect a power meter to the CHAN TX nn port through the patch panel and verify that the physical optical power comi...

Page 303: ...es Note The OSC terminations created during node turn up will generate two alarms for each side of the shelf one for LOS on the OPT BST card and the other an LOS alarm on the OSC_CSM or OSCM card Step 5 In node view click the Provisioning WDM ANS Port Status tabs Verify that all statuses under Link Status are listed as Success Changed Success Unchanged or Not Applicable If any are not complete the...

Page 304: ... OCSM card If the alarms clear continue with Step 11 If not perform the following steps a Display the west OPT BST card in card view b Click the Provisioning Optical Line Optics Thresholds tabs c Under Types click Alarms then click Refresh d Locate the Port 2 Power Failure Low parameter Double click the table cell and change the value to 30 dBm e Locate the Port 4 Power Failure Low parameter Doubl...

Page 305: ...proper attenuation might damage equipment Step 21 Wait 90 seconds then in node view click the Alarms tab Verify that the LOS alarms on the east OPT BST and OSCM cards have cleared The clearing of the LOS alarms indicates that the OSC link is active on the east side Note An SDCC Termination Failure alarm will continue to appear due to the OSC signal loopback An LOS O alarm appears on the west OPT B...

Page 306: ... G37 Run Automatic Node Setup procedure on page 3 83 to restore the original configuration Step 30 Create the two OSC channels using the NTP G38 Provision OSC Terminations procedure on page 3 84 Stop You have completed this procedure NTP G46 Perform the Line Amplifier Node with OSC CSM Cards Acceptance Test Step 1 Complete the DLP G46 Log into CTC task on page 2 25 at the node where you want to pe...

Page 307: ...to the LINE RX port with a fiber and 10 dB bulk attenuator Caution Failure to use proper attenuation might damage equipment Step 7 Wait 90 seconds then in node view click the Alarms tab Verify that the LOS alarm on the west OSC CSM card has cleared The clearing of the LOS alarm indicates that the OSC link is active on the west side Note An SDCC Termination Failure alarm will continue to appear due...

Page 308: ...ctors procedure on page 13 25 If this does not change the power value consult your next level of support Step 14 If an OPT PRE is installed on the west side of the shelf complete the DLP G80 Verify the OPT PRE Amplifier Laser and Power task on page 4 41 If not continue with Step 15 Step 15 Display the east OSC CSM card in card view Step 16 Click the Provisioning Optical Line Parameters tabs Locate...

Page 309: ...ser transmitter or the TXP_MR_2 5G card DWDM TX port to the west OSC CSM LINE RX port using a 10 dB bulk attenuator Caution Failure to use proper attenuation might damage equipment Step 24 If an OPT PRE card is installed on the west side complete the DLP G80 Verify the OPT PRE Amplifier Laser and Power task on page 4 41 If not continue with Step 25 Step 25 Display the east OSC CSM card in card vie...

Page 310: ...ask on page 8 28 as necessary b Verify that no equipment EQPT alarms appear indicating equipment failure or other hardware problems If alarms appear investigate and resolve them before continuing Refer to the Cisco ONS 15454 Troubleshooting Guide or the Cisco ONS 15454 SDH Troubleshooting Guide for procedures Note The OSC terminations created during node turn up will generate two alarms for each s...

Page 311: ...e with Step c c Display the OSC CSM card in card view d Click the Provisioning Optical Line Optics Thresholds tabs e Under Types click Alarm then click Refresh f Locate the Port 3 Power Failure Low parameter Double click the table cell and change the value to 30 dBm g Locate the Port 6 Power Failure Low parameter Double click the table cell and change the value to 40 dBm h Click Apply and then Yes...

Page 312: ...tep 20 Remove the loopback fiber on the OSC CSM card Step 21 Delete both OSC channels See the DLP G186 Delete an OSC Termination task on page 10 41 Step 22 Complete the NTP G37 Run Automatic Node Setup procedure on page 3 83 to restore the original configuration Step 23 Create the OSC channels using the NTP G38 Provision OSC Terminations procedure on page 3 84 Step 24 Create a loopback on the OPT ...

Page 313: ...9 Verify the OPT BST Amplifier Laser and Power task on page 4 40 for the OPT BST card Step 29 Display the OSC CSM card in card view Step 30 Click the Provisioning Optical Line Parameters tabs Verify that the power value on Port 3 Out Com is equal to the optical power from the tunable laser or TXP_MR_2 5G card measured in Step 10 1 dBm Step 31 If an OPT PRE card is installed on the side opposite th...

Page 314: ...nner site configuration file to verify the presence of added and dropped bands including four channels at 100 GHz configured in pass through mode in either direction Note Configuring a band in pass through mode means that the band is dropped in one direction by an AD xB xx x card on one side east or west of the node then added by another AD xB x xx card on the opposite side in the same direction T...

Page 315: ...oes not turn up complete the following steps a Modify the OSC Fail Low thresholds Click the Provisioning Optical Line Optics Thresholds tabs and change the Port 4 opwrMin minimum power to 40 dBm b Modify the COM TX Fail Low Threshold Change the Port 2 opwrMin minimum power to 30 dBm c If the OSC link turns up continue with Step 11 If the OSC link is still down disconnect the OSCM card from the OPT...

Page 316: ...roPlanner site configuration file to verify the presence of added and dropped bands including 4 channels at 100 GHz configured in pass through mode in either direction Note Configuring a band in pass through mode means that the band is dropped in one direction by an AD xB xx x card on one side east or west of the node then added by another AD xB x xx card on the opposite side in the same direction...

Page 317: ...ignal loopback an SDCC Termination Failure alarm might be raised Step 11 If the OSC link becomes active continue with Step 12 If the OSC link does not turn up perform the following troubleshooting steps a Remove the 10 dB bulk attenuator between the LINE TX and LINE RX connection If the OSC link becomes active continue with Step 11 If not continue with Step b b Modify the OSC Fail Low thresholds C...

Page 318: ...Planner site configuration file to verify the presence of a dropped or added bands including 4 channels at 100 GHz configured in pass through mode in either direction Note Configuring a band in pass through mode means that the band is dropped in one direction by an AD xB xx x card on one side east or west of the node then added by another AD xB x xx card on the opposite side in the same direction ...

Page 319: ...ignal loopback an SDCC Termination Failure alarm might be raised Step 11 If the OSC link becomes active continue with Step 12 If the OSC link does not turn up perform the following troubleshooting steps a Remove the 10 dB bulk attenuator between the LINE TX and LINE RX connection If the OSC link becomes active continue with Step 12 If not continue with Step b b Modify the OSC Fail Low thresholds C...

Page 320: ...If it is set to On change it to Off and click Apply b Check the Currently Shutdown field If it changes to NO continue with Step 3 If not contact your next level of support The amplifier might need to be replaced Step 3 Click the Provisioning Opt Ampli Line Parameters tabs Step 4 Click Reset Step 5 Scroll to the right and locate the Signal Output Power parameter for Port 6 Verify that the Signal Ou...

Page 321: ...e Signal Output Power value is greater than or equal to 1 5 dBm If the optical power is greater than or equal to 1 5 dBm continue with Step 6 If the optical power is less than 1 5 dBm check your connections and clean the fibers using the NTP G115 Clean Fiber Connectors procedure on page 13 25 If this does not change the power value consult your next level of support Step 6 Scroll to the right to l...

Page 322: ...ioning Optical Chn Parameters tabs Step 3 Change the Admin State for Port 33 to OOS MT ANSI or Locked maintenance ETSI Step 4 Verify that the VOA Power Ref reaches the provisioned setpoint Step 5 Optional Connect a power meter to the CHAN TX 01 port through the patch panel Verify that the physical optical power value coming from drop Port 1 on the west 32DMX card is consistent with the value read ...

Page 323: ... Line Parameters tabs Step 3 Verify that the Power value for Port 3 is higher than the default no power value of 30 dBm The calculated expected power value for Port 3 is Pout COM TX of last AD xy xx x IL02 OSC CSM COM RX LINE TX 10 dB bulk attenuator Step 4 Double check the value Note Actual output power is affected by many factors Always consider the calculated expected power to be a general guid...

Page 324: ...ocedure NTP DLP G85 Verify Express Channel Connections on an OADM Node with OSCM Cards Step 1 If you are using a tunable laser set the output power to a nominal value such as 3 dBm If not continue with Step 2 Step 2 Connect the tunable laser transmitter or the TXP_MR_2 5G card DWDM TX port to the east OPT BST LINE RX port Purpose This task verifies the OSC CSM card incoming power Tools Equipment N...

Page 325: ...d in one direction the received express channels will run into the AD xB xx x cards first then into the AD xC xx x cards Step 6 If AD xC xx x cards are installed on the east side complete the DLP G88 Verify the AD xC xx x Output Express Power task on page 4 47 for each east side card If not continue with Step 7 Step 7 If AD xC xx x cards are installed on the west side complete the DLP G271 Verify ...

Page 326: ... 4 47 for each east side card If not continue with Step 7 Note If Ad xB xx xand AD xC cards are both installed in one direction the received express channels will run into the AD xB xx x cards first then into the AD xC xx x cards Step 7 If AD xC xx x cards are installed on the east side complete the DLP G88 Verify the AD xC xx x Output Express Power task on page 4 47 for each east side card If not...

Page 327: ...5 Return to your originating procedure NTP DLP G88 Verify the AD xC xx x Output Express Power Step 1 Display the AD xC xx x card in card view Step 2 Click the Provisioning Optical Line Parameters tabs Step 3 Change the Output Express port Admin State to OOS MT ANSI or Locked maintenance ETSI Click Apply Step 4 Verify that the Output Express port Power value is greater than the default no power val...

Page 328: ...r Step 1 Display the AD xB xx x card in card view Step 2 Click the Provisioning Optical Line Parameters tabs Step 3 Verify that the Output Com port Power value is greater than the default no power value of 28 dBm Step 4 Return to your originating procedure NTP Purpose This task verifies the output common power of the AD xC xx x cards Tools Equipment None Prerequisite Procedures DLP G46 Log into CT...

Page 329: ...s If the pass through channel connections use an AD xC xx x card continue with Step 7 If the pass through channel connections use a 4MD xx x card continue with Step 11 Step 7 Tune the tunable laser on a wavelength 1 of 4 belonging to the channel to be tested Step 8 Complete the DLP G91 Verify an AD xC xx x Pass Through Connection task on page 4 51 for the first pass through connection Step 9 Optio...

Page 330: ...that the BAND TX port Power value is higher than the default no power value of 30 dBm Step 2 Verify the west AD xB xx x card RX and TX power a Display the west AD xB xx x card in card view b Click the Provisioning Optical Band Parameters tabs c Verify that the Power value of the BAND RX east to west port is higher than the default no power value of 30 dBm d Change the Admin State of the BAND TX we...

Page 331: ...t the power value of the CHAN TX port is higher than the default no power value of 35 dBm d Verify that the Power value of the CHAN RX port reaches the provisioned setpoint VOA Power Ref e Change the Admin State of the CHAN TX port related to the wavelength selected on the tunable laser to OOS MT ANSI or Locked maintenance ETSI Click Apply f If the AD xC xx x is an AD 4C W card a VOA applying to a...

Page 332: ...abs c Verify that the Power value on the CHAN TX port is higher than the default no power value of 35 dBm Step 3 Verify the RX band power on the west AD xB xx x card east to west a Display the west Ad xB xx x card in card view b Click the Provisioning Optical Band Parameters tabs c Verify that the BAND RX Power value is higher than the default no power values of 30 dBm Step 4 Verify the west 4MD x...

Page 333: ...Verify Add and Drop Connections on an OADM Node with OSCM Cards Note In this task you will verify add and drop connections in the following order east to west add and west to east drop Steps 1 through 15 west to east add and east to west drop Steps 16 through 17 Step 1 Based on the Cisco MetroPlanner site configuration file tune the tunable laser or TXP_MR_2 5G card to a wavelength belonging to th...

Page 334: ...the Provisioning Optical Band Parameters tabs c Change the Admin State of the BAND TX port to OOS MT ANSI or Locked maintenance ETSI for the channel related to the wavelength selected on the tunable laser d Verify that the Power value of the BAND TX port is higher than the default no power value of 30 dBm Step 9 Verify the west 4MD xx x card west to east a Display the west 4MD xx x card in card vi...

Page 335: ...h Step 15 If the OSC link remains down disconnect the OSCM card from the OPT BST c Create a loopback on the OSCM card by connecting patch cable from the OSC TX port to the OSC RX port using a 10 dB bulk attenuator d If the OSC link turns up replace the OPT BST card If the OSC link does not turn up replace the OSCM card See the NTP G30 Install the DWDM Cards procedure on page 3 39 Note Due to the O...

Page 336: ...hn Parameters tabs c Change the Admin State of the CHAN RX port to OOS MT ANSI or Locked maintenance ETSI for the channel related to the wavelength selected on the tunable laser d Verify that the Power value of the CHAN RX port reaches the provisioned setpoint VOA Power Ref Step 4 Complete the DLP G80 Verify the OPT PRE Amplifier Laser and Power task on page 4 41 on the west OPT PRE amplifier to v...

Page 337: ...aser to OOS MT ANSI or Locked maintenance ETSI Click Apply i Perform the output power check Step 11 Optional Connect a power meter to the proper 15xx xx TX port on the front panel the dual port compared with the port where the tunable laser is connected Verify that the physical optical power value from that port is consistent with the value on Provisioning Optical Chn Parameters tab for the proper...

Page 338: ... wavelength belonging to the 100 Ghz ITU T grid of the channel running on the first add path of the first AD xC xx x E or 4MD xx x E card on the west to east direction Step 20 Connect the tunable laser to the correspondent 15xx x RX port on the card front panel of the east AD xC xx x E or east 4MD xx x E card Step 21 Repeat Steps 3 through 20 applying the steps to the west to east direction Step 2...

Page 339: ...e Pluggable Port Modules page 5 2 Complete this procedure to provision a multirate pluggable port module PPM provision or change the optical line rate of a PPM or delete a PPM PPMs provide the fiber interface to the TXP and MXP cards With the exception of the TXP_MR_10G card all TXPs and MXP accept PPMs 2 NTP G33 Create a Y Cable Protection Group page 5 10 Complete this procedure as needed for TXP...

Page 340: ...rt CTC Data task on page 8 4 to export alarm and condition information Step 3 Complete the DLP G277 Provision a Multirate PPM task on page 5 3 If you preprovisioned a multirate PPM DLP G273 Preprovision an SFP or XFP Slot page 3 46 skip this step and continue with Step 4 Single rate PPMs do not require provisioning Step 4 If you are provisioning an IBM External Time Reference Control Link Oscillat...

Page 341: ...MA DSBLD service state ANSI or the Locked enabled disabled service state ETSI Step 5 Click OK The newly created port appears on the Pluggable Port Modules area The row on the Pluggable Port Modules area turns white and the Actual Equipment Type column lists the equipment name Step 6 Verify that the PPM appears in the list on the Pluggable Port Modules area If it does not repeat Steps 3 through 5 S...

Page 342: ...as displayed in Cisco MetroPlanner Figure 5 1 Single Span Topology Point to Point Two terminal sites with the following cards installed 32MUX O and 32DMX O cards 32WSS and 32DMX cards 32WSS and 32 DMX O cards Line amplifiers can be installed between the terminal sites but intermediate traffic terminating sites cannot be installed Figure 5 2 shows a point to point topology as shown in Cisco MetroPl...

Page 343: ...2MUX O and 32DMX O cards 32WSS and 32DMX cards 32WSS and 32 DMX O cards Line amplifiers can be installed between the hubs Figure 5 3 shows two hub nodes with no line amplifier nodes installed Figure 5 4 shows two hub nodes line amplifier nodes installed Figure 5 3 Hubs with No Line Amplifiers Figure 5 4 Hubs with Line Amplifiers Step 3 Return to your originating procedure NTP Site 1 Site 2 W E E W...

Page 344: ...dicates the PPM and the second number indicates the port number on the PPM For example the first PPM with one port displays as 1 1 and the second PPM with one port displays as 2 1 The PPM number can be 1 to 4 but the port number is always 1 Port Type Choose the type of port from the drop down list The port type list displays the supported port rates on your PPM See Table 5 1 for definitions of the...

Page 345: ...VIDEO Serial Digital Interface and Digital Video signal type 1 HDTV High Definition Television PASS THRU Not specified FC1G Fibre Channel 1 06 Gbps FC2G Fibre Channel 2 125 Gbps FICON1G Fiber CON 1 06 Gbps IBM signal FICON2G Fiber CON 2 125 Gbps IBM signal ETR_CLO External Time Reference Control Link Oscillator ISC compat InterSystem Coupling Link 1 ISC1 ISC peer InterSystem Coupling Link 3 ISC3 M...

Page 346: ... procedure NTP DLP G280 Delete a PPM Note This task does not apply to the TXP_MR_10G card Step 1 In node view double click the TXP or MXP card where you want to delete PPM settings Step 2 Click the Provisioning Pluggable Port Modules tabs Purpose This task edits PPM port rates for the TXP and MXP cards Perform this task if you want to change the port rate on a multirate PPM that is already provisi...

Page 347: ...SBLD ANSI Locked enabled disabled ETSI service state a Click the PPM line that you want to delete that appears in the Pluggable Port Modules area The highlight changes to dark blue b Click Delete The Delete PPM dialog box appears c Click Yes The PPM provisioning is removed from the Pluggable Port Modules area and the Pluggable Ports area Step 4 Verify that the PPM provisioning is deleted CTC shows...

Page 348: ...wo transponder TXP_MR_10G TXP_MR_10E or TXP_MR_2 5G or two muxponder MXP_2 5G_10G MXP_2 5G_10E MXP_MR_2 5G MXPP_MR_2 5G cards For additional information about Y cable protection see the 16 9 1 Y Cable Protection section on page 16 114 Tools Equipment Installed TXP or MXP cards Cisco MetroPlanner Traffic Matrix Prerequisite Procedures NTP G15 Install the Common Control Cards page 1 71 NTP G14 Insta...

Page 349: ... compatibility do not use question mark backslash or double quote characters Type Choose Y Cable from the drop down list Protect Port From the drop down list choose the port that will be the standby or protection port to the active port The list displays the available transponder or muxponder ports If transponder or muxponder cards are not installed no ports appear in the drop down list After you ...

Page 350: ...ue with Step 2 Step 2 As needed complete the NTP G103 Back Up the Database procedure on page 13 2 to preserve the existing transmission settings Step 3 Perform any of the following tasks as needed DLP G216 Change Card Settings for TXP_MR_10G and TXP_MR_10E Cards page 5 13 DLP G217 Change Line Settings for TXP_MR_10G and TXP_MR_10E Cards page 5 14 DLP G218 Change Section Trace Settings for the TXP_...

Page 351: ...u want to change the card settings Step 2 Click the Provisioning Card tabs Step 3 Modify any of the settings described in Table 5 3 Purpose This task changes the card settings for TXP_MR_10G and TXP_MR_10E multirate 10 Gbps transponder cards Tools Equipment None Prerequisite Procedures DLP G46 Log into CTC page 2 25 Required As Needed As needed Onsite Remote Onsite or remote Security Level Provisi...

Page 352: ... AIS Squelch AIS Wavelength Sets the wavelength of the DWDM side optical transmitter First Tunable Wavelength Further wavelengths in 100 GHz ITU spacing Supported wavelengths are in white and marked by asterisks unsupported wavelengths are gray Note The four available wavelengths are listed in the Card Parameters section of the window and also on the Maintenance Info tab First Tunable Wavelength F...

Page 353: ...ly generated state that gives the overall condition of the port Service states appear in the format Primary State Primary State Qualifier Secondary State For more information about service states see Appendix C DWDM Administrative and Service States IS NR OOS AU AINS OOS MA DSBLD OOS MA MT Unlocked enabled Unlocked disabled automaticInService Locked enabled disabled Locked enabled maintenance SF B...

Page 354: ...onditions that caused the outage are resolved Manual Restart ALS is on the laser automatically shuts down when traffic outages LOS occur However the laser must be manually restarted when conditions that caused the outage are resolved Manual Restart for Test Manually restarts the laser for testing ProvidesSync TXP_MR_10E OC192 only Sets the ProvidesSync card parameter If checked the card is provisi...

Page 355: ... 5 Wavelength Displays the wavelength of the client port First Tunable Wavelength Further wavelengths 1310 nm to 1550 nm 100 GHz ITU spacing Coarse wavelength division multiplexing CWDM spacing Supported wavelengths are marked by asterisks First Tunable Wavelength Further wavelengths 1310 nm to 1550 nm 100 GHz ITU spacing CWDM spacing Supported wavelengths are marked by asterisks Reach Displays th...

Page 356: ... the button on the right to change the display Its title changes based on the current display mode Click Hex to change the display to hexadecimal button changes to ASCII click ASCII to change the display to ASCII button changes to Hex String of trace string size String of trace string size Expected Displays the current transmit string sets a new transmit string You can click the button on the righ...

Page 357: ...into CTC page 2 25 Required As Needed As needed Onsite Remote Onsite or remote Security Level Provisioning or higher Table 5 6 TXP_MR_10G and TXP_MR_10E Transponder Card Line Threshold Settings Parameter Description Options ONS 15454 Options ONS 15454 SDH Port Display only Port number 1 1 OC192 2 Trunk 1 1 STM64 2 Trunk CV Coding violations Numeric Threshold display options include Direction Near ...

Page 358: ...r Far End for 15 minute or one day intervals for Regeneration Section only Choose an interval option and click Refresh FC Failure count Numeric Threshold display options include Direction Near End or Far End Interval 15 Min minutes or 1 day Types Line or Section near end only Choose an option in each category and click Refresh Numeric Threshold display options include Direction Near End or Far End...

Page 359: ...Onsite Remote Onsite or remote Security Level Provisioning or higher Table 5 7 TXP_MR_10G and TXP_MR 10GE LAN Phy Variables Variable Description ifInOctets Total number of octets received on the interface including framing characters rxTotalPkts Total number of received packets ifInMulticastPkts Number of multicast frames received error free ifInBroadcastPkts Number of packets delivered by a subla...

Page 360: ...therStatsPkts128to255Octets The total number of packets including bad packets received that were between 128 and 255 octets in length inclusive excluding framing bits but including FCS octets etherStatsPkts256to511Octets Total number of packets including bad packets received that were between 256 and 511 octets in length inclusive excluding framing bits but including FCS octets etherStatsPkts512to...

Page 361: ... occurrences is above the rising threshold and then drops below a falling threshold it resets the rising threshold For example when the network problem that caused 1001 collisions in 15 seconds subsides and creates only 799 collisions in 15 seconds occurrences fall below a falling threshold of 800 collisions This resets the rising threshold so that if network collisions again spike over a 1000 per...

Page 362: ...nd click Refresh Note Do not modify the Laser Bias parameters Step 4 Click Apply Step 5 Under Types click the Alarm radio button and click Refresh Step 6 Referring to Table 5 9 provision the trunk port Port 2 Alarm thresholds for RX Power High RX Power Low TX Power High and TX Power Low Note You must modify 15 Min and 1 Day independently To do so choose the appropriate radio button and click Refre...

Page 363: ... Low based on the client interface at the other end For additional information about client SFP and XFP interfaces also known as PPMs refer to Appendix B Hardware Specifications Note You must modify 15 Min and 1 Day independently To do so choose the appropriate radio button and click Refresh Note Do not modify the Laser Bias parameters Step 4 Click Apply Table 5 9 TXP_MR_10G and TXP_MR_10E Trunk P...

Page 364: ...Client Interface TCA Thresholds Port Type by CTC Pluggable Port Module XFP TCA RX Power Low TCA RX Power High TCA TX Power Low TCA TX Power High SONET or SDH TXP_MR_10E uses ONS XC 10G S1 TXP_MR_10G XFP not present 11 1 12 5 10G Ethernet LAN Phy TXP_MR_10E uses ONS XC 10G S1 TXP_MR_10G XFP not present 14 1 12 5 10G Ethernet WAN PHY TXP_MR_10E uses ONS XC 10G S1 TXP_MR_10G XFP not present 14 1 12 5...

Page 365: ... so choose the appropriate radio button and click Refresh Table 5 12 describes the values on the Provisioning OTN OTN Lines tab Purpose This task changes the line optical transport network OTN settings for TXP_MR_10G and TXP_MR_10E transponder cards Tools Equipment None Prerequisite Procedures DLP G46 Log into CTC page 2 25 Required As Needed As needed Onsite Remote Onsite or remote Security Level...

Page 366: ...Card ITU T G 709 Threshold Settings Parameter Description Options Port Display only Port number 2 ES Severely errored seconds Two types of thresholds can be asserted Selecting the SM OTUk radio button selects FEC overhead management and PM using OTUk Selecting the PM radio button selects path PM using ODUk Numeric Threshold display options include Direction Near End or Far End Interval 15 Min minu...

Page 367: ...s or 1 day Types SM OTUk or PM ODUk Choose an option in each category and click Refresh FC Failure counter Numeric Threshold display options include Direction Near End or Far End Interval 15 Min minutes or 1 day Types SM OTUk or PM ODUk Choose an option in each category and click Refresh Table 5 13 TXP_MR_10G and TXP_MR_10E Transponder Card ITU T G 709 Threshold Settings Parameter Description Opti...

Page 368: ...y Its title changes based on the current display mode Click Hex to change the display to hexadecimal button changes to ASCII click ASCII to change the display to ASCII button changes to Hex String of trace string size trail trace identifier is 64 bytes in length Expected Displays the current expected string sets a new expected string You can click the button on the right to change the display Its ...

Page 369: ...G and MXP_2 5G_10E Cards page 5 36 DLP G225 Change Trunk Settings for MXP_2 5G_10G and MXP_2 5G_10E Cards page 5 38 DLP G226 Change Line Thresholds Settings for MXP_2 5G_10G and MXP_2 5G_10E Cards page 5 39 DLP G303 Provision the MXP_2 5G_10G and MXP_2 5G_10E Trunk Port Alarm and TCA Thresholds page 5 41 DLP G304 Provision the MXP_2 5G_10G and MXP_2 5G_10E Client Port Alarm and TCA Thresholds page...

Page 370: ... the MXP_2 5G_10G or and MXP_2 5G_10E card where you want to change the card settings Step 2 Click the Provisioning Card tabs Step 3 Modify any of the settings described in Table 5 16 Purpose This task changes the card settings for MXP_2 5G_10G or MXP_2 5G_10E muxponder cards including payload type termination mode and wavelength Tools Equipment None Prerequisite Procedures DLP G46 Log into CTC pa...

Page 371: ...byte or other bytes It encapsulates OC 48 STM 16 bytes into ODU1 first then multiplexes them into an OTU2 See the 16 12 Termination Modes section on page 16 117 for more information For ANSI platforms Transparent Section MXP_2 5G_10E only Line MXP_2 5G_10E only For ETSI platforms Transparent Multiplex Section MXP_2 5G_10E only Regeneration Section MXP_2 5G_10E only Wavelength Sets the wavelength o...

Page 372: ...muxponder cards Tools Equipment None Prerequisite Procedures DLP G46 Log into CTC page 2 25 Required As Needed As needed Onsite Remote Onsite or remote Security Level Provisioning or higher Table 5 17 MXP_2 5G_10G or MXP_2 5G_10E Muxponder Card Line Settings Parameter Description Options Port Display only Port number Ports 1 to 4 are client ports OC 48 STM 16 Port 5 TXP_2 5G_10G is the DWDM trunk ...

Page 373: ...Restart ALS is on the laser automatically shuts down when traffic outages LOS occur It automatically restarts when the conditions that caused the outage are resolved Manual Restart ALS is on the laser automatically shuts down when traffic outages LOS occur However the laser must be manually restarted when conditions that caused the outage are resolved Manual Restart for Test Manually restarts the ...

Page 374: ...not appear for the MXP_2 5G_10E trunk port Checked or unchecked Send DoNotUse When checked sends a DUS message on the S1 byte This parameter does not appear for the MXP_2 5G_10E trunk port Checked or unchecked Reach Displays the optical reach distance of the client port Autoprovision default I1 S1 S2 L1 L2 L3 Wavelength Displays the wavelength of the client port First Tunable Wavelength Further wa...

Page 375: ...rent transmit string sets a new transmit string You can click the button on the right to change the display Its title changes based on the current display mode Click Hex to change the display to hexadecimal button changes to ASCII click ASCII to change the display to ASCII button changes to Hex String of trace string size Expected Displays the current expected string sets a new expected string You...

Page 376: ...Port 5 is the DWDM trunk OC 192 STM 64 that provides wavelength services 5 Port Name Provides the ability to assign the specified port a logical name User defined Name can be up to 32 alphanumeric special characters Blank by default See the DLP G104 Assign a Name to a Port task on page 7 10 Admin State Sets the port service state unless network conditions prevent the change For more information ab...

Page 377: ...ges LOS occur Auto Restart ALS is on the laser automatically shuts down when traffic outages LOS occur It automatically restarts when the conditions that caused the outage are resolved Manual Restart ALS is on the laser automatically shuts down when traffic outages LOS occur However the laser must be manually restarted when conditions that caused the outage are resolved Manual Restart for Test Man...

Page 378: ...15 Min minutes or 1 day Types Multiplex Section or Regeneration Section near end only Choose an option in each category and click Refresh ES Errored seconds Numeric Threshold display options include Direction Near End or Far End Interval 15 Min minutes or 1 day Types Line or Section near end only Choose an option in each category and click Refresh Numeric Threshold display options include Directio...

Page 379: ...Choose an option in each category and click Refresh Numeric Threshold display options include Direction Near End or Far End Interval 15 Min minutes or 1 day Types Multiplex Section or Regeneration Section near end only Choose an option in each category and click Refresh UAS Unavailable seconds Numeric Threshold display options include Direction Near End or Far End Interval 15 Min minutes or 1 day ...

Page 380: ...on the trunk port Port 5 Alarm thresholds for RX Power High RX Power Low TX Power High and TX Power Low Note You must modify 15 Min and 1 Day independently To do so choose the appropriate radio button and click Refresh Step 8 Click Apply Step 9 Return to your originating procedure NTP Table 5 21 MXP_2 5G_10G and MXP_2 5G_10E Trunk Port TCA Thresholds Card TCA RX Power Low TCA RX Power High TCA TX ...

Page 381: ...e radio button and click Refresh Step 4 Click Apply Step 5 Repeat Steps 3 and 4 to provision each additional client port Step 6 Under Types click the Alarm radio button and click Refresh Step 7 Referring to Table 5 24 provision the Port N where N 1 through 4 Alarm thresholds for RX Power High RX Power Low TX Power High and TX Power Low based on the client interface that is provisioned Note You mus...

Page 382: ...modify Near End and Far End independently 15 Min and 1 Day independently and SM and PM independently To do so choose the appropriate radio button and click Refresh Table 5 25 describes the values on the Provisioning OTN OTN Lines tab Note In Table 5 25 some parameter tabs or values do not always apply to both the MXP_2 5G_10G and the MXP_2 5G_10E card When the tabs or values do not apply they do n...

Page 383: ...E 5 SD BER Sets the signal degrade bit error rate 1E 5 1E 6 1E 7 1E 8 1E 9 Asynch Synch Mapping MXP_2 5G_10E only The MXP_2 5G_10E can perform standard ODU multiplexing according to ITU T G 709 The card uses this to aggregate the four OC 48 client signals ODU Multiplex Table 5 26 MXP_2 5G_10G and MXP_2 5G_10E Muxponder Card ITU T G 709 Threshold Settings Parameter Description Options Port Display ...

Page 384: ...5 26 MXP_2 5G_10G and MXP_2 5G_10E Muxponder Card ITU T G 709 Threshold Settings Parameter Description Options Table 5 27 MXP_2 5G_10G and MXP_2 5G_10E Muxponder Card FEC Threshold Settings Parameter Description Options Port Display only Displays the port number 5 Bit Errors Corrected Displays the number of bit errors corrected during the interval selected The interval can be set for 15 minutes or...

Page 385: ...on changes to Hex String of trace string size trail trace identifier is 64 bytes in length Expected Displays the current expected string sets a new expected string You can click the button on the right to change the display Its title changes based on the current display mode Click Hex to change the display to hexadecimal button changes to ASCII click ASCII to change the display to ASCII button cha...

Page 386: ...r TXP_MR_2 5G and TXPP_MR_2 5G Cards page 5 53 DLP G232 Change TXP_MR_2 5G and TXPP_MR_2 5G Cards Line Threshold Settings for SONET or SDH Payloads page 5 54 DLP G320 Change the TXP_MR_2 5G or TXPP_MR_2 5G Card Line Thresholds for 1G Ethernet or 1G FC FICON Payloads page 5 56 DLP G305 Provision the TXP_MR_2 5G and TXPP_MR_2 5G Trunk Port Alarm and TCA Thresholds page 5 57 DLP G306 Provision the TX...

Page 387: ... Log into CTC page 2 25 Required As Needed As needed Onsite Remote Onsite or remote Security Level Provisioning or higher Table 5 29 TXP_MR_2 5G and TXPP_MR_2 5G Transponder Card Settings Parameter Description Options Termination Mode Sets the mode of operation option only supported for SONET SDH payloads See the 16 12 Termination Modes section on page 16 117 for more information Transparent Secti...

Page 388: ...ion peer group A regeneration peer group facilitates management of two TXP_MR_2 5G or TXPP_MR_2 5G cards that are needed to perform a complete signal regeneration The regeneration peer group synchronizes provisioning of the two cards Payload type and ITU T G 709 OTN changes made on one TXP_MR_2 5G or TXPP_MR_2 5G card are reflected on the peer TXP_MR_2 5G or TXPP_MR_2 5G card Note Y cable protecti...

Page 389: ...state that gives the overall condition of the port Service states appear in the format Primary State Primary State Qualifier Secondary State For more information about service states see Appendix C DWDM Administrative and Service States IS NR ANSI or Unlocked enabled ETSI OOS AU AINS ANSI or Unlocked disabled automaticInService ETSI OOS MA DSBLD ANSI or Locked enabled disabled ETSI OOS MA MT ANSI ...

Page 390: ...ice soak period Duration of valid input signal in hh mm format after which the card becomes in service IS automatically 0 to 48 hours 15 minute increments Type OC N and STM N payloads only The optical transport type SONET SDH Reach Displays the optical reach distance of the client port Autoprovision default I1 S1 S2 L1 L2 L3 Wavelength Displays the wavelength of the client port First Tunable Wavel...

Page 391: ... and TXPP_MR_2 5G transponder cards Tools Equipment None Prerequisite Procedures DLP G46 Log into CTC page 2 25 Required As Needed As needed Onsite Remote Onsite or remote Security Level Provisioning or higher Table 5 31 TXP_MR_2 5G and TXPP_MR_2 5G Transponder Card Section Trace Settings Parameter Description Options Port Display only Port number 1 2 3 TXPP_MR_2 5G only Trace Mode Sets the trace ...

Page 392: ...Displays the current expected string sets a new expected string You can click the button on the right to change the display Its title changes based on the current display mode Click Hex to change the display to hexadecimal button changes to ASCII click ASCII to change the display to ASCII button changes to Hex String of trace string size Received Display only Displays the current received string Y...

Page 393: ...the bullet and click Refresh ES Errored seconds Numeric Can be set for Near End or Far End for 15 minute or one day intervals or for Line Far End only Section or Path Select the bullet and click Refresh SES Severely errored seconds Numeric Can be set for Near End or Far End for 15 minute or one day intervals or for Line Far End only Section or Path Select the bullet and click Refresh SEFS Section ...

Page 394: ... of time period Step 8 Type in an appropriate number of seconds for the Sample Period Step 9 Type in the appropriate number of occurrences for the Rising Threshold For a rising type of alarm the measured value must move from below the falling threshold to above the rising threshold For example if a network is running below a rising threshold of 1000 collisions every 15 seconds and a problem causes...

Page 395: ...therwise a single network problem might cause a rising threshold to be exceeded multiple times and cause a flood of events Step 11 Click OK Step 12 Return to your originating procedure NTP DLP G305 Provision the TXP_MR_2 5G and TXPP_MR_2 5G Trunk Port Alarm and TCA Thresholds Step 1 In node view double click the TXP_MR_2 5G or TXPP_MR_2 5G card where you want to change the trunk port alarm and TCA...

Page 396: ...alarm and TCA settings Step 2 Click the Provisioning Optics Thresholds tabs The TCA thresholds are shown by default Step 3 Referring to Table 5 35 provision the Port 1 client TCA thresholds for RX Power High RX Power Low TX Power High and TX Power Low based on the client interface at the other end For additional information about client SFP and XFP interfaces also known as PPMs refer to Appendix B...

Page 397: ...6 STM 16 ONS SE 2G S1 18 3 16 3 15454E SFP L 16 1 18 0 11 6 ONE_GE 15454 SFP GEFC SX 15454E SFP GEFC S 17 0 16 3 15454 SFP GE LX 15454E SFP GE LX 20 3 16 3 ESCON 15454 SFP 200 15454E SFP 200 21 14 35 8 DV6000 15454 SFP OC48 IR 28 7 21 2 15454E SFP L 16 1 18 0 11 6 SDI_D1_ VIDEO 15454 SFP12 4 IR 28 7 21 2 15454E SFP L 4 1 28 8 21 2 HDTV 15454 SFP GE LX 15454E SFP GE LX 20 3 16 3 PASS THRU 2R MODE n...

Page 398: ... 35 TXP_MR_2 5G and TXPP_MR_2 5G Card Client Interface TCA Thresholds continued Port Type by CTC Pluggable Port Module SFP or XFP TCA RX Power Low TCA RX Power High TCA TX Power Low TCA TX Power High Table 5 36 TXP_MR_2 5G and TXPP_MR_2 5G Card Client Interface Alarm Thresholds Port Type by CTC Pluggable Port Module SFP Alarm RX Power Low Alarm RX Power High Alarm TX Power Low Alarm TX Power High ...

Page 399: ...FC2G 15454 SFP GEFC SX 15454E SFP GEFC S 18 3 13 1 15454 SFP GE LX 15454E SFP GE LX 23 0 13 0 FICON1G 15454 SFP GEFC SX 15454E SFP GEFC S 20 3 13 1 15454 SFP GE LX 15454E SFP GE LX 23 0 13 0 FICON2G 15454 SFP GEFC SX 15454E SFP GEFC S 20 3 13 1 15454 SFP GE LX 15454E SFP GE LX 23 0 13 0 ETR_CLO 15454 SFP 200 15454E SFP 200 20 3 13 1 ISC compat 15454 SFP GE LX 15454E SFP GE LX 23 0 13 0 ISC peer 15...

Page 400: ...dependently To do so choose the appropriate radio button and click Refresh Table 5 37 describes the values on the Provisioning OTN OTN Lines tab Table 5 38 describes the values on the Provisioning OTN G 709 Thresholds tab Purpose This task changes the OTN settings for TXP_MR_2 5G and TXPP_MR_2 5G transponder cards Tools Equipment None Prerequisite Procedures DLP G46 Log into CTC page 2 25 Required...

Page 401: ...or Near End or Far End for 15 minute or one day intervals or for SM OTUk or PM ODUk Select a bullet and click Refresh UAS Unavailable seconds Numeric Can be set for Near End or Far End for 15 minute or one day intervals or for SM OTUk or PM ODUk Select a bullet and click Refresh BBE Background block errors Numeric Can be set for Near End or Far End for 15 minute or one day intervals or for SM OTUk...

Page 402: ...display to ASCII button changes to Hex String of trace string size Expected Displays the current expected string sets a new expected string You can click the button on the right to change the display Its title changes based on the current display mode Click Hex to change the display to hexadecimal button changes to ASCII click ASCII to change the display to ASCII button changes to Hex String of tr...

Page 403: ...ngs for MXP_MR_2 5G and MXPP_MR_2 5G Cards page 5 71 DLP G239 Change Section Trace Settings for MXP_MR_2 5G and MXPP_MR_2 5G Cards page 5 73 DLP G240 Change MXP_MR_2 5G and MXPP_MR_2 5G Card Line Threshold Settings for SONET or SDH Payloads page 5 74 DLP G321 Change the MXP_MR_2 5G or MXPP_MR_2 5G Card Line Thresholds for 1G Ethernet or 1G FC FICON Payloads page 5 77 DLP G307 Provision the MXP_MR_...

Page 404: ...task changes the card settings for MXP_MR_2 5G and MXPP_MR_2 5G muxponder cards Tools Equipment None Prerequisite Procedures DLP G46 Log into CTC page 2 25 Required As Needed As needed Onsite Remote Onsite or remote Security Level Provisioning or higher Table 5 41 MXP_MR_2 5G and MXPP_MR_2 5G Muxponder Card Settings Parameter Description Options Card Mode Sets the mode of operation option only sup...

Page 405: ...Settings Parameter Description Options Port Display only Port number 1 2 Port Name The user can assign a logical name for each of the ports shown by filling in this field User defined Name can be up to 32 alphanumeric special characters Blank by default See the DLP G104 Assign a Name to a Port task on page 7 10 Admin State Sets the port service state unless network conditions prevent the change Fo...

Page 406: ...affic outages LOS occur It automatically restarts when the conditions that caused the outage are resolved Manual Restart ALS is on the laser automatically shuts down when traffic outages LOS occur However the laser must be manually restarted when conditions that caused the outage are resolved Manual Restart for Test Manually restarts the laser for testing Reach Displays the optical reach distance ...

Page 407: ...ce extension parameters only apply to client ports Ports 1 to 8 and not to the trunk ports Port 9 for MXP_MR_2 5G card or Ports 9 and 10 for the MXPP_MR_2 5G card Step 1 In node view double click the MXP_MR_2 5G or MXPP_MR_2 5G card where you want to change the distance extension settings Step 2 Click the Provisioning Line Distance Extension tabs Tabs and parameter selections vary according to PPM...

Page 408: ...e source and destination MXP_MR_2 5G MXPP_MR_2 5G cards is greater than 5 km The FC switch buffer at either end is less than 128 bytes If distance extension is enabled the Fibre Channel switch must be set to Interop or Open Fabric mode depending on the switch By default the MXP_MR_2 5G MXPP_MR_2 5G card interoperates with the Cisco Multilayer Director Switch MDS storage products Checked or uncheck...

Page 409: ...Autoadjust GFP Buffer Threshold If checked the threshold of the GFP buffer between two MXP_MR_2 5G or two MXPP_MR_2 5G cards is automatically adjusted This guarantees the best utilization of the SONET SDH transport by balancing bandwidth and latency Checked or unchecked GFP Buffers Available If Autoadjust GFP Buffer Threshold is not checked sets the GFP buffer depth For shorter SONET transport dis...

Page 410: ...SI or Unlocked automaticInService ETSI OOS DSBLD ANSI or Locked disabled ETSI OOS MT ANSI or Locked maintenance ETSI Service State Identifies the autonomously generated state that gives the overall condition of the port Service states appear in the format Primary State Primary State Qualifier Secondary State For more information about service states see Appendix C DWDM Administrative and Service S...

Page 411: ...utomatically shuts down when traffic outages LOS occur However the laser must be manually restarted when conditions that caused the outage are resolved Manual Restart for Test Manually restarts the laser for testing ProvidesSync Sets the ProvidesSync card parameter If checked the card is provisioned as an NE timing reference Checked or unchecked SyncMsgIn Sets the EnableSync card parameter Enables...

Page 412: ... sets a new transmit string You can click the button on the right to change the display Its title changes based on the current display mode Click Hex to change the display to hexadecimal button changes to ASCII click ASCII to change the display to ASCII button changes to Hex String of trace string size Expected Displays the current expected string sets a new expected string You can click the butto...

Page 413: ...Far End Interval 15 Min minutes or 1 day Types Line or Section near end only Choose an option in each category and click Refresh Numeric Threshold display options include Direction Near End or Far End Interval 15 Min minutes or 1 day Types Multiplex Section or Regeneration Section near end only Choose an option in each category and click Refresh ES Errored seconds Numeric Threshold display options...

Page 414: ...click Refresh FC Line only Failure count Numeric Threshold display options include Direction Near End or Far End Interval 15 Min minutes or 1 day Types SM OTUk or PM ODUk Choose an option in each category and click Refresh Numeric Threshold display options include Direction Near End or Far End Interval 15 Min minutes or 1 day Types SM OTUk or PM ODUk Choose an option in each category and click Ref...

Page 415: ...emote Onsite or remote Security Level Provisioning or higher Table 5 47 MXP_MR_2 5G and MXPP_MR 2 5G Card 1G Ethernet or 1G FC FICON Variables Variable Description ifInOctets Number of bytes received since the last counter reset rxTotalPkts Total number of receive packets ifInDiscards Number of inbound packets that were chosen to be discarded even though no errors had been detected to prevent thei...

Page 416: ...ost cases a falling threshold is set lower than the rising threshold A falling threshold is the counterpart to a rising threshold When the number of occurrences is above the rising threshold and then drops below a falling threshold it resets the rising threshold For example when the network problem that caused 1001 collisions in 15 seconds subsides and creates only 799 collisions in 15 seconds occ...

Page 417: ...ick Refresh Step 3 Provision the trunk port Port 9 TCA thresholds for RX Power High to 9 dBm and for RX Power Low to 23 dBm Step 4 Under Types click the Alarm radio button and click Refresh Note Do not modify the Laser Bias parameters Step 5 Provision the trunk port Port 9 Alarm thresholds for RX Power High to 7 dBm and for RX Power Low to 26 dBm Note You must modify 15 Min and 1 Day independently...

Page 418: ...to Appendix B Hardware Specifications Note Do not modify the Laser Bias parameters Note You must modify 15 Min and 1 Day independently To do so choose the appropriate radio button and click Refresh Step 4 Click Apply Purpose This task provisions the client port alarm and TCA thresholds for the MXP_MR_2 5G and MXPP_MR_2 5G cards Tools Equipment None Prerequisite Procedures DLP G278 Provision the Op...

Page 419: ...16 3 15454 SFP GE LX 15454E SFP GE LX 20 3 16 3 ONE_GE 15454 SFP GEFC SX 15454E SFP GEFC S 17 0 16 3 15454 SFP GE LX 15454E SFP GE LX 20 3 16 3 Table 5 48 MXP_MR_2 5G and MXPP_MR_2 5G Card Client Interface TCA Thresholds continued Port Type by CTC Pluggable Port Module XFP TCA RX Power Low TCA RX Power High TCA TX Power Low TCA TX Power High Table 5 49 MXP_MR_2 5G and MXPP_MR_2 5G Card Client Inte...

Page 420: ...ep 9 Repeat Steps 7 and 8 to provision each additional client port Otherwise continue with Step 10 Step 10 Return to your originating procedure NTP ONE_GE 15454 SFP GEFC SX 15454E SFP GEFC S 20 3 13 1 15454 SFP GE LX 15454E SFP GE LX 23 0 13 0 Table 5 49 MXP_MR_2 5G and MXPP_MR_2 5G Card Client Interface Alarm Thresholds Port Type by CTC Pluggable Port Module XFP Alarm RX Power Low Alarm RX Power ...

Page 421: ... supported are hub terminal optical add drop multiplexing OADM reconfigurable optical add drop multiplexing ROADM anti amplified spontaneous emissions ASE and line amplifier For DWDM and hybrid node turn up procedures see Chapter 3 Turn Up a Node Note Unless otherwise specified ONS 15454 refers to both ANSI and ETSI shelf assemblies Before You Begin This section lists the chapter procedures NTPs T...

Page 422: ... procedure on page 10 6 Step 5 Click the Provisioning Network tabs Ensure that the IP settings and other Cisco Transport Controller CTC network access information is correct according to documentation provided by the network administrator If not see the NTP G81 Change CTC Network Access procedure on page 10 18 Step 6 Click the Provisioning Protection tabs Verify that all required protection groups...

Page 423: ...y that OSC terminations were created for the east and west OSC CSM or OSCM cards and that the port state is In Service and Normal IS NR ANSI Unlocked enabled ETSI If so continue with Step 5 If OSC terminations are not created complete the NTP G38 Provision OSC Terminations procedure on page 3 84 Step 5 Complete the NTP G76 Verify Optical Span Loss Using CTC procedure on page 10 2 If the measured s...

Page 424: ...he Provisioning Timing General tabs Step 2 In the General Timing area complete the following information Timing Mode Choose External if the ONS 15454 derives its timing from a BITS source wired to the backplane pins ANSI or a MIC C T P FMEC ETSI choose Line if timing is derived from an OSC CSM or OSCM card that is optically connected to the timing node A third option Mixed allows you to set extern...

Page 425: ...can be directly wired to the reference NE Reference Allows you to define three timing references Ref 1 Ref 2 Ref 3 The node uses Reference 1 unless a failure occurs to that reference in which case the node uses Reference 2 If Reference 2 fails the node uses Reference 3 which is typically set to Internal Clock Reference 3 is the Stratum 3 clock provided on the TCC2 TCC2P card The options displayed ...

Page 426: ...If equipment is not attached to the BITS output pins set the BITS Out State to OOS Step 7 If the BITS In State for BITS 1 and BITS 2 is set to OOS continue with Step 8 If the BITS In State is set to IS for either BITS 1 or BITS 2 complete the following information Coding Set to the coding used by your BITS reference either B8ZS binary 8 zero substitution or AMI alternate mark inversion Framing Set...

Page 427: ...timing Revertive Time Does not apply to internal timing Step 3 In the Reference Lists area enter the following information NE Reference Ref 1 Set to Internal Clock Ref 2 Set to Internal Clock Ref 3 Set to Internal Clock BITS 1 Out BITS 2 Out Set to None Step 4 Click Apply Step 5 Click the BITS Facilities tab Step 6 In the BITS Facilities area change the BITS In State and BITS Out State to OOS for ...

Page 428: ... Traffic Matrix Complete the DLP G105 Provision DWDM Optical Channel Network Connections task on page 7 10 Note Every time a channel is created on the DWDM network the amplifiers automatically calculate the optical output power to maintain a constant power level on each channel Automatic power control APC also starts every 60 minutes If the span length changes APC modifies amplifier gains and expr...

Page 429: ...inue with Step 10 If the circuit is terminated inside the node change to node view single node mode or multishelf view multishelf mode and click the Provisioning WDM ANS Provisioning tabs In the Selector area click the West Pin Pin AD Stage parameters Verify that the value matches the value shown in the COM RX port of the first OADM card in your circuit heading west to east 2 dB If the values are ...

Page 430: ...ask on page 9 7 for the TXP MXP or line card b Display the TXP MXP or line card in card view c Click the Performance Payload PM tabs or if OTN is provisioned the Performance OTN PM tabs d Perform a short term BER test using a test signal from a test set or protocol analyzer e Monitor the payload performance monitoring PM for at least 10 minutes for errors Note To see an accurate PM count the BER t...

Page 431: ... node b Type a patchcord identifier 0 through 32767 in the TX and RX ID fields The origination and termination IDs must be different if the patchcord is set up between two cards on the same node c Click the desired termination slot port from the list of available slots ports The origination port and the termination port must be different Step 5 If you need to provision transmit Tx and receive Rx s...

Page 432: ...Step 3 If the OSNR is too low check the following depending on your node configuration Note The purpose of this step is not to improve the signal to noise ratio SNR but to match the per channel power level within the RX port power range Check the fiber connections between the OPT BST or OSC CSM and the OPT PRE amplifier If needed clean the connectors See the NTP G115 Clean Fiber Connectors procedu...

Page 433: ...nect the client or test set receiver to Port 5 on the Y cable module If not connect the client or test set receiver to Port 11 of the Y cable module Step 7 At the far end site for the circuit under test physically loop the Y cable module as follows a If this is the first client on the Y cable module loop Port 10 to Port 5 on the far end Y cable module b If this is the second client on the Y cable ...

Page 434: ... Client port is green b For the Standby TXP card record the slot number _____ Verify port LEDs are as follows DWDM Port is green Client Port is not illuminated Step 14 In the Selected Group area highlight the Active transponder slot Step 15 From the Switch Commands area below the Selected Group area click Manual then click YES Step 16 From the Selected Group area record the following information a...

Page 435: ... Network Map Step 1 Complete the DLP G46 Log into CTC task on page 2 25 at a node on the network where you want to create the network map If you are already logged in continue with Step 2 Step 2 From the View menu choose Go to Network View Step 3 Change the position of the nodes in the network view according to your site plan a Click a node to select it then press the Ctrl key while you drag and d...

Page 436: ...al Network Map Note Retrieve Provisioning and Maintenance users can move nodes on the network map but only Superusers can save new network map configurations To restore the view to a previously saved version of the network map right click the network view map and choose Reset Node Position Stop You have completed this procedure ...

Page 437: ...ary This section lists the chapter procedures NTPs Turn to a procedure for applicable tasks DLPs 1 NTP G58 Locate and View Optical Channel Network Connections page 7 2 Complete as needed to find view and filter OCHNCs 2 NTP G59 Create and Delete Optical Channel Network Connections page 7 9 Complete as needed 3 NTP G60 Create Overhead Circuits page 7 13 Complete as needed to create IP encapsulated ...

Page 438: ...e DLP G102 Filter the Display of Optical Channel Network Connections task on page 7 7 Step 5 As needed complete the DLP G103 View Optical Channel Network Connections on a Span task on page 7 8 Stop You have completed this procedure DLP G100 Search for Optical Channel Network Connections Step 1 Navigate to the appropriate Cisco Transport Controller CTC view To search the entire network choose View ...

Page 439: ...ire word matches the text in the Find What field Match case Check this check box to instruct CTC to select circuits only when the capitalization matches the capitalization entered in the Find What field Direction Choose the direction for the search Searches are conducted up or down from the currently selected circuit Step 6 Click Find Next If a match is found the circuit will be highlighted To con...

Page 440: ...C11 VC3 and VC4 OCHNC Wlen The wavelength provisioned for the OCHNC See Table 7 3 on page 7 11 for a list of channels and wavelengths Direction The circuit direction either two way or one way OCHNC Dir The line direction of the OCHNC either East to West or West to East If the direction is West to East the channel exits from the node through the LINE TX port of the OSC CSM E or OPT BST E named the ...

Page 441: ...s connects are Locked enabled maintenance and or Locked enabled disabled OOS PARTIAL Locked partial At least one cross connect is In Service and Normal IS NR ANSI or Unlocked enabled ETSI and others are out of service Note Right clicking a column title Circuit name Type etc opens a shortcut menu that allows you to show or hide the desired circuit details Table 7 1 Circuit Protection Types Protecti...

Page 442: ...cuit traffic failure has occurred because traffic might flow on a protect path Network spans are in one of two states up or down On CTC circuit and network maps up spans are shown as green lines and down spans are shown as gray lines If a failure occurs on a network span during a CTC session the span remains on the network map but its color changes to gray to indicate the span is down If you resta...

Page 443: ... to West displays only east to west circuits or West to East displays only west to east circuits OCHNC Wlen DWDM OCHNCs only Choose an OCHNC wavelength to filter the circuits For example choosing 1530 33 will display channels provisioned on the 1530 33 nm wavelength Status Choose one Any status not used to filter circuits or Discovered display only discovered circuits Other statuses do not apply t...

Page 444: ...4 6c VC4 8c VC4 9c VC4 16c and VC4 64 are not applicable to ETSI DWDM nodes The check boxes shown depend on the Type field selection If you chose Any all sizes are available If you chose OCHNC as the circuit type only Multi rate Equipment non specific 2 5 Gbps FEC 2 5 Gbps No FEC 10 Gbps FEC and 10 Gbps No FEC appear Step 4 Click OK Circuits matching the attributes in the Filter Circuits dialog bo...

Page 445: ... Network Connections Step 1 Complete the DLP G46 Log into CTC task on page 2 25 at a node on the network where you want to create and delete OCHNCs If you are already logged in continue with Step 2 Step 2 If you want to assign a name to the OCHNC source and destination ports before you create the circuit complete the DLP G104 Assign a Name to a Port task on page 7 10 If not continue with the next ...

Page 446: ...Type list Step 4 Click Next Step 5 Define the circuit attributes Name Assign a name to the OCHNC The name can be alphanumeric and up to 48 characters including spaces Circuit names should be 44 characters or less if you want the ability to create monitor circuits If you leave the field blank CTC assigns a default name to the circuit Purpose This task assigns a name to a port on any ONS 15454 card ...

Page 447: ...8 1531 12 3 31 9 195 7 1531 90 4 32 6 195 6 1532 68 5 34 2 195 4 1534 25 6 35 0 195 3 1535 04 7 35 8 195 2 1535 82 8 36 6 195 1 1536 61 9 38 1 194 9 1538 19 10 38 9 194 8 1538 98 11 39 7 194 7 1539 77 12 40 5 194 6 1540 56 13 42 1 194 4 1542 14 14 42 9 194 3 1542 94 15 43 7 194 2 1543 73 16 44 5 194 1 1544 53 17 46 1 193 9 1546 12 18 46 9 193 8 1546 92 19 47 7 193 7 1547 72 20 48 5 193 6 1548 51 2...

Page 448: ...k If problems persist refer to the Cisco ONS 15454 DWDM Troubleshooting Guide as necessary Step 11 Return to your originating procedure NTP DLP G106 Delete Optical Channel Network Connections Step 1 Complete the NTP G103 Back Up the Database procedure on page 13 2 or record the circuit information if it will be recreated Step 2 Consult your network operations center NOC or other appropriate person...

Page 449: ... to save it continue with Step 10 a Click Save b Click Browse and navigate to the directory where you want to save the file c Type the file name using a txt file extension and click OK Step 10 Click Close to close the CTC Alerts dialog box Step 11 Complete the NTP G103 Back Up the Database procedure on page 13 2 if you require a backup of your changes Step 12 Return to your originating procedure N...

Page 450: ... From the GCC Rate drop down list choose from two options 192k is the line rate of Section DCC SDCC This is the default option 576k is the line rate of Line DCC LDCC This option will be supported in a future software release Step 5 Click Set to IS if you want to put ports in service Step 6 If the SDCC termination is to include a non ONS node check the Far End is Foreign check box This automaticall...

Page 451: ...PDU propagation frequency The IS IS Hello PDUs establish and maintain adjacencies between ISs The default is 3 seconds The range is 1 to 600 seconds Metric Sets the cost for sending packets on the LAN subnet The IS IS protocol uses the cost to calculate the shortest routing path The default metric cost for LAN subnets is 20 It normally should not be changed Step 9 Click Finish Until all network GC...

Page 452: ... Step 2 Click Create Step 3 In the Create Tunnel dialog box complete the following Source Address Type the IP address of the source node 32 bit length or source subnet any other length Length Choose the length of the source subnet mask Destination Address Type the IP address of the destination node 32 bit length or destination subnet any other length Length Choose the length of the destination sub...

Page 453: ... Tunnel D1 D3 Maximum Bandwidth Type the percentage of total SDCC bandwidth used in the IP tunnel the minimum percentage is 10 percent Step 5 Click Next Step 6 In the Circuit Source area complete the following Node Choose the source node Slot Choose the source slot Port If applicable choose the source port Channel Displays IPT D1 D3 Step 7 Click Next Step 8 In the Circuit Destination area complete...

Page 454: ...enance service state This service state does not interrupt traffic flow but alarm reporting is suppressed and loopbacks are allowed Raised fault conditions whether or not their alarms are reported can be retrieved on the CTC Conditions tab or by using the TL1 RTRV COND command Use the OOS MA MT Locked enabled maintenance service state for testing or to suppress alarms temporarily Change to the IS ...

Page 455: ...nding on the orderwire path that you want to create If regenerators are not used between ONS 15454 nodes you can use either local or express orderwire channels If regenerators exist use the express orderwire channel You can provision up to four ONS 15454 OC N ports for each orderwire path PCM Choose the Pulse Code Modulation voice coding and companding standard either Mu_Law North America Japan or...

Page 456: ...he name can be alphanumeric and up to 48 characters including spaces Type Choose either User Data F1 or User Data D 4 D 12 from the drop down list User Data D 4 D 12 is not available if the ONS 15454 is provisioned for DWDM Step 4 Click Next Step 5 In the Circuit Source area complete the following Node Choose the source node Slot Choose the source slot Port If applicable choose the source port Ste...

Page 457: ... procedure DLP G111 Repair an IP Tunnel Step 1 Obtain the original IP address of the node in question Step 2 From the View menu choose Go to Network View Step 3 From the Tools menu choose Overhead Circuits Repair IP Circuits Step 4 Review the text in the IP Repair wizard and click Next Step 5 In the Node IP address area complete the following Node Choose the node that has a PARTIAL circuit Purpose...

Page 458: ... a Port task on page 7 18 Step 1 From the View menu choose Go to Network View Step 2 Click the Provisioning Overhead Circuits tabs Step 3 Click the overhead circuit that you want to delete local or express orderwire user data IP encapsulated tunnel or DCC tunnel Step 4 Click Delete Step 5 In the confirmation dialog box click Yes to continue Step 6 Return to your originating procedure NTP Purpose T...

Page 459: ...tring that makes the destination port easy to identify such as the node IP address node name or another string If the New Transmit String field is left blank the J0 transmits a string of null characters Step 8 If you set the Section Trace Mode field to Manual enter the string that the destination port should receive from the source port in the New Expected String field If you set Section Trace Mod...

Page 460: ...ction trace default settings Section Trace Mode is set to Off and the New Transmit and New Expected Strings are null Caution Clicking Default will generate alarms if the port on the other end is provisioned with a different string The expect and receive strings are updated every few seconds if the Section Trace Mode field is set to Auto or Manual Stop You have completed this procedure ...

Page 461: ...d condition messages 3 NTP G65 Delete Cleared Alarms from Display page 8 13 Complete this procedure as needed to delete cleared alarm information 4 NTP G66 View Alarm Affected Circuits page 8 14 Complete this procedure as needed to find circuits that are affected by a particular alarm or condition 5 NTP G67 View Alarm Counts on the LCD for a Node Slot or Port page 8 15 Complete this procedure as n...

Page 462: ...t For example click the Alarms tab to print Alarms window data The print operation is available for all network node and card view windows Step 2 From the File menu choose Print The Print dialog box appears Figure 8 1 Purpose Use this procedure to document existing provisioning by printing card node or network CTC information or exporting card node or network information as delineated text files t...

Page 463: ...g Network General windows Provisioning Security Policy Access and Legal Disclaimer windows Provisioning SNMP window Provisioning Timing window General and BITS Facilities windows Provisioning OSI Main Setup window Maintenance Cross Connect Cards window Maintenance Database window Maintenance Diagnostic window Maintenance Protection window Maintenance Timing Source window The Table Contents option ...

Page 464: ... CTC table as tab separated values TSV Step 4 If you want to open a file in a text editor or word processor application procedures will vary Typically you can use the File Open command to view the CTC data or you can double click the file name and choose an application such as Notepad Text editor and word processor applications format the data exactly as it is exported including comma or tab separ...

Page 465: ...sioning Timing window Provisioning OSI Main Setup window Provisioning OSI TARP Config window Maintenance Cross Connect Cards windows Maintenance Database window Maintenance Diagnostic window Maintenance Protection window Maintenance Timing Source windows Maintenance DWDM ROADM Power Monitoring window ETSI only Step 6 Click OK Step 7 In the Save dialog box enter a name in the File name field using ...

Page 466: ...8 12 as needed Stop You have completed this procedure DLP G115 View Alarms Step 1 In card node or network view click the Alarms tab to view the alarms for that card node or network Table 8 1 describes the columns in the Alarms window Purpose Use this procedure to view current or historical alarms and conditions for a card node or network This information is useful for monitoring and troubleshootin...

Page 467: ... card the port where the alarm is raised for STSTerm and VTTerm the port refers to the upstream card it is partnered with Path Width Indicates how many STSs are contained in the alarmed path This information complements the alarm object notation which is explained in the Cisco ONS 15454 DWDM Troubleshooting Guide the Cisco ONS 15454 Troubleshooting Guide or the the Cisco ONS 15454 SDH Troubleshoot...

Page 468: ... See the DLP G126 Enable Alarm Filtering task on page 8 25 for information Tip Double click an alarm in the alarm table or an event condition message in the history table to display the view that corresponds to the alarm message For example double clicking a card alarm takes you to card view In network view double clicking a node alarm takes you to node view Step 3 To view network alarm history a ...

Page 469: ...tical alarm messages 640 major alarm messages 640 minor alarm messages and 640 condition messages When any of these limits is reached the ONS 15454 discards the oldest events in that category Raised and cleared alarm messages and events if selected appear Step 5 Return to your originating procedure NTP DLP G117 Change the Maximum Number of Session Entries for Alarm History Step 1 From the Edit men...

Page 470: ...ow buttons next to the Maximum History Entries field to change the entry Step 3 Click Apply and OK Note Setting the Maximum History Entries value to the high end of the range uses more CTC memory and could impair CTC performance Note This task changes the maximum history entries recorded for CTC sessions It does not affect the maximum number of history entries viewable for a network node or card S...

Page 471: ... as raise clear messages arrive from the node Note Alarms that have been raised during the session will have a check mark in the Alarms window New column When you click Synchronize the check mark disappears Step 3 Return to your originating procedure NTP Purpose This task changes the time stamp for events to the time zone of the ONS node reporting the alarm By default the events time stamp is set ...

Page 472: ... window Note For more information about alarm suppression see the DLP G129 Suppress Alarm Reporting task on page 8 29 Current conditions are shown with the severity chosen in the alarm profile if used For more information about alarm profiles see the NTP G68 Create Download and Assign Alarm Severity Profiles procedure on page 8 16 Note When a port is placed in the Out of Service and Management Mai...

Page 473: ... an alarm disappears from the window when it is cleared If the Autodelete Cleared Alarms check box is not checked an alarm remains in the window when it is cleared The alarm appears white in the window and has a Clear CL severity The alarm can be removed by clicking the Delete Cleared Alarms button This action removes any cleared ONS 15454 alarms from the Alarms tab The rows of cleared alarms turn...

Page 474: ...arms tab or Conditions tab and then right click anywhere in the row of an active alarm or condition Note The node view is the default but you can also navigate to the Alarms tab in the network view or card view to perform Step 2 The Select Affected Circuit option appears on the shortcut menu Step 3 Left click or right click Select Affected Circuits The Circuits window appears with the affected OCH...

Page 475: ... Alm Sum 0 MJ 1 MN 2 This means that there are no critical alarms one major alarm and two minor alarms against the slot Step 5 If you want to view the alarms against a port on the card such as Port 3 of the OC 3 card you viewed previously press the Port button until you see Port 3 Status Alm Ct Step 6 Press Status to view alarm count against the port You will see a message similar to Slot 3 Port 0...

Page 476: ...e new profile Step 3 Complete the DLP G122 Download an Alarm Severity Profile task on page 8 20 This task downloads an alarm severity profile from a CD or a node Note After storing a created or downloaded alarm profile you must go to the node either by logging into it or clicking on it from the network view and activate the profile by applying it to the shelf one or more cards or one or more ports...

Page 477: ...is stored locally or on a network drive click From File in the Load Profiles dialog box a Click Browse b Navigate to the file location in the Open dialog box c Click Open Note All default or user defined severity settings that are Critical CR or Major MJ are demoted to Minor MN in Non Service Affecting NSA situations as defined in Telcordia GR 474 CORE Step 6 Click OK The alarm severity profile ap...

Page 478: ...choose the Inherited profile from the network view the severities at the lower levels node card and port will be copied from this selection A card with an Inherited alarm profile copies the severities used by the node that contains the card If you are creating profiles you can apply these separately at any level To do this refer to the DLP G124 Apply Alarm Profiles to Cards and Nodes task on page ...

Page 479: ...profile Click Browse and navigate to the profile save location Enter a name in the File name field Click Select to choose this name and location Long file names are supported CTC supplies a suffix of pfl to stored files Click OK to store the profile Step 15 As needed perform any of the following actions The following options are located at the bottom of the Provision Alarm Profile window Click the...

Page 480: ...ed locally or on a network drive click From File in the Load Profile dialog box a Click Browse b Navigate to the file location in the Open dialog box c Click Open Note All default or user defined severity settings that are Critical CR or Major MJ are demoted to Minor MN in Non Service Affecting NSA situations as defined in Telcordia GR 474 Step 5 Click OK The downloaded profile appears at the righ...

Page 481: ...sing the DLP G124 Apply Alarm Profiles to Cards and Nodes task on page 8 23 Step 1 In node view double click the card that you want to change to open the card view Note The card view is not available for the TCC2 TCC2P card Step 2 Click the Provisioning Alarm Profiles Alarm Behavior tabs Figure 8 6 shows alarm profiles for the AD 1C card for example CTC shows Parent Card Profile Inherited Purpose ...

Page 482: ...pply Confirm that the profile updated to the port correctly Step 4 To apply profiles to all ports on a card a In card view click the Force all ports to profile drop down arrow at the bottom of the window b Choose the new profile from the drop down list c Click Force still need to Apply d Click Apply Confirm the profile updated to all ports correctly In node view the Port Level Profiles column indi...

Page 483: ...te Alarm Severity Profiles Step 1 To access the alarm profile editor from network view click the Provisioning Alarm Profiles tabs Note To access the profile editor from node or card view click the Provisioning Alarm Profiles Alarm Profile Editor tabs Step 2 Click the profile that you want to delete Click the column that displays the profile name to select it Step 3 Click Delete Purpose This task a...

Page 484: ... nodes Step 5 Click the profile names that you want to delete in the Profile Names list Step 6 Click OK Step 7 Click Yes in the Delete Alarm Profile dialog box If you delete a profile from a node it still appears in the network view Provisioning Alarm Profile Editor window unless you remove it using the following step Step 8 To remove the alarm profile from the window right click the column of the...

Page 485: ...LP G128 Disable Alarm Filtering task on page 8 28 to disable alarm profile filtering for all network nodes Stop You have completed this procedure DLP G126 Enable Alarm Filtering Step 1 At node network or card view click the Alarms tab Step 2 Click the Filter tool icon on the right side of the bottom toolbar Note The Filter tool icon differs from the Filter button at the bottom left of the screen A...

Page 486: ...history repeat Steps 1 and 2 using the History window Step 5 Return to your originating procedure NTP DLP G127 Modify Alarm Condition and History Filtering Parameters Step 1 At node network or card view click the Alarms tab Conditions tab or History tab Step 2 Click the Filter button on the left side of the bottom toolbar The filter dialog box appears displaying the General tab Figure 8 8 shows th...

Page 487: ...own arrows in the From Date To Date and Time fields to modify the period of alarms that is shown To modify filter parameters for conditions continue with Step 5 If you do not need to modify them continue with Step 6 Step 5 Click the filter dialog box Conditions tab Figure 8 9 Figure 8 9 Alarm Filter Dialog Box Conditions Tab When filtering is enabled conditions in the Show list are visible and con...

Page 488: ...is indented and disabled if the tool is raised not selected Step 3 If you want alarm filtering disabled when you view conditions click the Conditions tab and click the Filter tool Step 4 If you want alarm filtering disabled when you view alarm history click the History tab and click the Filter tool Step 5 Return to your originating procedure NTP Purpose This task turns off specialized alarm filter...

Page 489: ... Alarm Suppression task on page 8 31 to discontinue alarm suppression and resume normal alarm reporting Stop You have completed this procedure DLP G129 Suppress Alarm Reporting Caution If multiple CTC TL1 sessions are open suppressing alarms in one session suppresses the alarms in all other open sessions Purpose Use this procedure to prevent alarms from being reported for a port card or node in ci...

Page 490: ...rately Step 3 To suppress alarms for individual cards a In the alarm behavior window locate the card row using the Location column for the slot number or the Eqpt Type column for the equipment name b Check the Suppress Alarms column check box in that row Alarms that directly apply to this card will change appearance as described in Step 2 For example if you suppressed raised alarms for an OC 48 ca...

Page 491: ... Suppress Alarms column check box for that slot d Click Apply Suppressed alarms will reappear in the Alarms window They might have previously been cleared from the window using the Synchronize button The AS CMD alarm with the slot object for example SLOT 16 will be cleared in all views Step 3 To discontinue alarm suppression for ports click the Provisioning Alarm Profiles Alarm Behavior tabs Step ...

Page 492: ...dure on page 1 44 Otherwise see the NTP G10 Attach Wires to Alarm Timing LAN and Craft Pin Connections procedure on page 1 47 for information about the ONS 15454 backplane pins a For external alarms verify that the external device relays are wired to the ENVIR ALARMS IN backplane pins b For external controls verify that the external device relays are wired to the ENVIR ALARMS OUT backplane pins St...

Page 493: ...both options is AEP Step 8 Click Apply Step 9 If you are provisioning external alarms click the External Alarms tab Figure 8 10 If you are not provisioning external alarms skip Steps 10 through 12 and go to Step 13 Figure 8 10 Provisioning External Alarms on the AIC I Card Step 10 For external alarms complete the following fields Enabled Check the check box to activate the fields for the alarm inp...

Page 494: ...ntrols tab and complete the following fields for each control wired to the ONS 15454 backplane ANSI or FMEC connector pins ETSI Enabled Check this check box to activate the fields for the alarm input number Control Type Choose the control type from the drop down list air conditioner engine fan generator heat light sprinkler or miscellaneous Trigger Type Choose a trigger type a local minor major or...

Page 495: ... and clear any trouble conditions Refer to the Cisco ONS 15454 Troubleshooting Guide or the Cisco ONS 15454 SDH Troubleshooting Guide as necessary This section lists the chapter procedures NTPs Turn to a procedure for applicable tasks DLPs 1 NTP G73 Change the PM Display page 9 2 Complete as needed to change the displayed PM counts 2 NTP G74 Monitor DWDM Card Performance page 9 9 Complete as neede...

Page 496: ...h PM Counts at 15 Minute Intervals Step 1 In node view single shelf mode or shelf view multishelf mode double click the DWDM TXP or MXP card where you want to change the PM count display interval The card view appears Purpose This procedure enables you to change the display of PM counts by selecting drop down list or radio button options in the Performance window Tools Equipment None Prerequisite ...

Page 497: ...od If the value of the counter exceeds the threshold value for a particular 15 minute interval a threshold crossing alert TCA is raised The number represents the counter value for each specific PM parameter Step 9 View the Prev n columns to find PM counts for the previous 15 minute intervals Note If a complete 15 minute interval count is not possible the value appears with a yellow background An i...

Page 498: ...r the previous 1 day intervals Note If a complete count over a 1 day interval is not possible the value appears with a yellow background An incomplete or incorrect count can be caused by monitoring for less than 24 hours after the counter started changing node timing settings changing the time zone settings replacing a card resetting a card or changing port service states When the problem is corre...

Page 499: ... MXP card where you want to view far end PM counts The card view appears Step 2 Click the Performance tab Step 3 If you want to view far end PM counts for a subtab click the relevant subtab s located along the left side of the Performance tab Note Performance subtabs vary depending on the card viewed Step 4 If you want to view far end PM counts for a specific port select the port from the Ports dr...

Page 500: ...he PM count interval on the TXP or MXP card Optics PM Current Values tab Step 5 Click Baseline Note The Baseline button clears the PM counts displayed in the current time interval but does not clear the PM counts on the card When the current time interval expires or the window view changes the total number of PM counts on the card and in the window appears in the appropriate column The baseline va...

Page 501: ...e TXP or MXP card Optics PM Current Values tab Step 5 Click Clear Step 6 From the Clear Statistics dialog box click one of the following radio buttons Displayed statistics Clearing displayed statistics erases all PM counts associated with the current combination of statistics on the selected port from the card and the window This means that the selected time interval direction and signal type coun...

Page 502: ... of the following options None This option disables the auto refresh feature 15 Seconds This option sets the window auto refresh at 15 second time intervals 30 Seconds This option sets the window auto refresh at 30 second time intervals 1 Minute This option sets the window auto refresh at 1 minute time intervals 3 Minutes This option sets the window auto refresh at 3 minute time intervals 5 Minute...

Page 503: ... page 9 10 DLP G140 View Optical Amplifier Power Statistics page 9 12 DLP G141 View Optical Power Statistics for 32MUX O 32 WSS 32 DMX O and 32DMX Cards page 9 13 Purpose This task changes the window view to display PM counts for another port on a TXP or MXP card Tools Equipment None Prerequisite Procedures DLP G46 Log into CTC page 2 25 Required As Needed As needed Onsite Remote Onsite or remote ...

Page 504: ...G73 Change the PM Display procedure on page 9 2 Stop You have completed this procedure DLP G139 View Optical Service Channel PM Parameters Step 1 In node view double click the OSCM or OSC CSM card where you want to view PM counts The card view appears Step 2 Click the Performance OC3 Line tabs Figure 9 1 Purpose This task enables you to view optical service channel OSC PM counts at selected time i...

Page 505: ...rt where you want to view the power statistics 2 COM RX 3 COM TX 4 LINE RX available only on the OSC CSM card 5 LINE TX available only on the OSC CSM card 6 OSC RX available only on the OSC CSM card 7 OSC TX available only on the OSC CSM card Step 6 Click Refresh The minimum maximum and average optical power statistics for the selected line port appear Step 7 Return to your originating procedure N...

Page 506: ...dow Step 3 In the Port drop down list choose an optical line port where you want to view the optical power statistics For the OPT PRE card the following ports are available to view 1 COM RX 3 DC RX Purpose This task enables you to view the power statistics on an OPT PRE or OPT BST amplifier card Tools Equipment None Prerequisite Procedures DLP G46 Log into CTC page 2 25 Required As Needed As neede...

Page 507: ...tput port COM TX Port 02 for the OPT PRE card and Line TX Port 06 for the OPT BST card appear Step 7 Return to your originating procedure NTP DLP G141 ViewOptical PowerStatistics for32MUX O 32 WSS 32 DMX O and 32DMX Cards Step 1 In node view double click the 32MUX O 32WSS 32 DMX O or 32DMX card where you want to view PM counts The card view appears Step 2 Click the Performance Optical Chn tabs Fig...

Page 508: ... through port PT Ports 33 through 64 32DMX O and 32DMX optical channel transmit port CHAN TX Ports 01 through 32 Step 4 Click Refresh Optical channel power statistics minimum maximum average for the selected port appear Step 5 Click the Optical Line tab Step 6 For a 32WSS card select the port for which you wish to monitor power statistics 65 66 67 68 or 69 For a 32DMX or 32DMX O card accept the de...

Page 509: ... you want to view the power statistics Step 4 Click Refresh The minimum maximum and average optical power for the selected channel port appear Step 5 To change the auto refresh interval click Auto Refresh and choose one of the automatic refresh intervals None 15 seconds 30 seconds 1 minute 3 minutes or 5 minutes Purpose This task enables you to view the minimum maximum and average optical power st...

Page 510: ...matic refresh intervals None 15 seconds 30 seconds 1 minute 3 minutes or 5 minutes Step 10 Return to your originating procedure NTP DLP G142 View Channel Optical Add Drop Multiplexer Power Statistics Step 1 In node view double click the optical AD xC xx x card where you want to view the optical power statistics The card view appears Step 2 Click the Performance Optical Line tabs Figure 9 5 Purpose...

Page 511: ... Step 4 Click Refresh Optical line power statistics for the selected port appear Step 5 Click the Optical Chn tab Step 6 In the Port drop down list choose an optical channel port Table 9 1 where you want to view the optical power statistics Table 9 1 Channel OADM Optical Line Ports Port Name Port Number AD 1C xx x AD 2C xx x AD 4C xx x EXP RX 3 5 9 EXP TX 4 6 10 COM RX 5 7 11 COM TX 6 8 12 96973 D...

Page 512: ...tabs Step 3 In the Port drop down list choose an optical line port Table 9 3 where you want to view the optical power statistics Table 9 2 Channel OADM Optical Line Ports Port Name Port Number AD 1C xx x AD 2C xx x AD 4C xx x CHAN RX 1 1 1 CHAN TX 2 2 2 CHAN RX 3 3 CHAN TX 4 4 CHAN RX 5 CHAN TX 6 CHAN RX 7 CHAN TX 8 Purpose This task enables you to view band OADM minimum maximum and average power ...

Page 513: ...ntinue with Step 2 Table 9 4 Band OADM Optical Line Ports Port Name Port Number AD 1B xx x AD 4B xx x BAND RX 1 1 BAND TX 2 2 BAND RX 3 BAND TX 4 BAND RX 5 BAND TX 6 BAND RX 7 BAND TX 8 Purpose This procedure enables you to view node near end or far end performance during selected time intervals on a transponder TXP_MR_10G TXP_MR_2 5G TXPP_MR_2 5G TXP_MR_10E or muxponder MXP_2 5G_10E MXP_MR_2 5G M...

Page 514: ...ters page 9 31 Note To refresh reset or clear PM counts see the NTP G73 Change the PM Display procedure on page 9 2 Stop You have completed this procedure DLP G144 Enable or Disable OTN ITU T G 709 Performance Monitoring Step 1 In node view double click the card you want to monitor The card view appears Step 2 Determine if the port where you want to enable or disable OTN ITU T G 709 is in service ...

Page 515: ...u want to monitor The card view appears Step 2 Determine if the port where you want to enable or disable FEC is in service IS Click the Provisioning Line tabs and observe the Service State column for that port If it is IS perform the following tasks for that port If not go to Step 3 a DLP G108 Change the Service State for a Port page 7 18 to set the port to OOS DSBLD b DLP G185 Delete a GCC Termin...

Page 516: ...46 View Optics PM Parameters Step 1 In node view double click the transponder or muxponder card where you want to view PM counts The card view appears Step 2 Click the Performance Optics PM tabs Figure 9 6 Purpose This task enables you to view the optics PM counts on a transponder TXP_MR_10G TXP_MR_2 5G TXPP_MR_2 5G TXP_MR_10E or muxponder MXP_2 5G_10E MXP_MR_2 5G MXPP_MR_2 5G MXP_2 5G_10G card an...

Page 517: ...ing procedure NTP DLP G147 View Payload PM Parameters Step 1 In node view double click the transponder or muxponder card where you want to view PM counts The card view appears Step 2 Click the Performance Payload PM tabs Figure 9 7 Purpose This task enables you to view the payload PM counts on a transponder TXP_MR_10G TXP_MR_2 5G TXPP_MR_2 5G TXP_MR_10E or muxponder MXP_2 5G_10E MXP_2 5G_10G card ...

Page 518: ...454 SDH Troubleshooting Guide Note The payload PMs for data parameters can be viewed only after creating a pluggable port module PPM See the NTP G128 Manage Pluggable Port Modules procedure on page 5 2 for more information about PPMs Note The PM parameters that appear depend on the data payload and framing type provisioned on the port Unframed data payloads such as Enterprise System Connection ESC...

Page 519: ...09 Performance Monitoring Information Purpose This task enables you to view the OTN PM counts on a transponder TXP_MR_10G TXP_MR_2 5G TXPP_MR_2 5G TXP_MR_10E or muxponder MXP_2 5G_10E MXP_2 5G_10G card and port to detect possible performance problems Tools Equipment None Prerequisite Procedures DLP G46 Log into CTC page 2 25 Required As Needed As needed Onsite Remote Onsite or remote Security Leve...

Page 520: ...ep 4 Click the FEC PM tab Figure 9 9 Figure 9 9 Viewing OTN FEC Performance Monitoring Information Step 5 View the PM parameter names that appear in the Param column The PM parameter values appear in the Curr current and Prev n previous columns For PM parameter definitions refer to the Performance Monitoring chapter in the Cisco ONS 15454 Troubleshooting Guide or the Cisco ONS 15454 SDH Troublesho...

Page 521: ...he PM parameter names that appear in the Param column The current PM parameter values appear in the Port columns For PM parameter definitions refer to the Performance Monitoring chapter in the Cisco ONS 15454 Troubleshooting Guide or the Cisco ONS 15454 SDH Troubleshooting Guide Purpose This task enables you to view current statistical PM counts on an MXP_MR_2 5G or MXPP_MR_2 5G card and port to d...

Page 522: ...ation PM Parameters Step 1 In node view double click the MXP_MR_2 5G or MXPP_MR_2 5G card where you want to view PM counts The card view appears Step 2 Click the Performance Payload PM Utilization tabs Figure 9 11 Purpose This task enables you to view line utilization PM counts on an MXP_MR_2 5G or MXPP_MR_2 5G card and port to detect possible performance problems Tools Equipment None Prerequisite...

Page 523: ...monitor Step 5 The transmit Tx and receive Rx bandwidth utilization values for the previous time intervals appear in the Prev n columns For PM parameter definitions refer to the Performance Monitoring chapter in the Cisco ONS 15454 Troubleshooting Guide or the Cisco ONS 15454 SDH Troubleshooting Guide Note To refresh reset or clear PM counts see the NTP G73 Change the PM Display procedure on page ...

Page 524: ...e selected port Step 5 View the PM parameter names that appear in the Param column The PM parameter values appear in the Prev n columns For PM parameter definitions refer to the Performance Monitoring chapter in the Cisco ONS 15454 Troubleshooting Guide or the Cisco ONS 15454 SDH Troubleshooting Guide Purpose This task enables you to view historical PM counts at selected time intervals on an MXP_M...

Page 525: ...ameters Step 1 In node view double click the MXP_MR_2 5G or MXPP_MR_2 5G card where you want to view PM counts The card view appears Step 2 Click the Performance Payload PM SONET PM tabs Figure 9 13 Purpose This task enables you to view SONET PM counts at selected time intervals on an MXP_MR_2 5G or MXPP_MR_2 5G card and port to detect possible performance problems Tools Equipment None Prerequisit...

Page 526: ...ter definitions refer to the Performance Monitoring chapter in the Cisco ONS 15454 Troubleshooting Guide or the Cisco ONS 15454 SDH Troubleshooting Guide Note The MXP_MR_2 5G and MXPP_MR_2 5G cards support only the OC48 STM16 payload Each payload has a set of PM parameters Note To refresh reset or clear PM counts see the NTP G73 Change the PM Display procedure on page 9 2 Step 5 Return to your ori...

Page 527: ...or modify the DWDM span loss values 2 NTP G77 Manage Automatic Power Control page 10 3 Complete this procedure as needed to manage the DWDM APC 3 NTP G78 View ROADM Node Power Equalization page 10 5 Complete this procedure as needed to view and update a reconfigurable optical add drop multiplexing ROADM node s power equalization 4 NTP G80 Change Node Management Information page 10 6 Complete this ...

Page 528: ...needed to convert a DWDM node to a hybrid node 15 NTP G89 Change SNMP Settings page 10 61 Complete this procedure as needed NTP G76 Verify Optical Span Loss Using CTC Note Using CTC to verify span loss is faster than a span loss measurement using an optical time domain reflectometer OTDR and does not require fibers to be removed However the resolution is not as precise as an OTDR measurement Step ...

Page 529: ...Bm 1 5 dB for measured span losses between 0 and 25 dB 2 5 dB for measured span losses between 25 and 38 dB Step 6 If the measured span loss is not between the minimum and maximum expected span loss contact your site planner for further instructions Stop You have completed this procedure NTP G77 Manage Automatic Power Control Step 1 Complete the DLP G46 Log into CTC task on page 2 25 If you are al...

Page 530: ... troubleshooting or node provisioning tasks Always enable APC as soon as the tasks are completed Leaving APC disabled can cause traffic loss Step 1 In node view click the Maintenance DWDM APC tabs Step 2 Click Enable APC Step 3 In the confirmation dialog box Click Yes Purpose This task disables the DWDM APC Tools Equipment None Prerequisite Procedures All procedures in the following chapters Chapt...

Page 531: ... E power information Padd Add power This power level is represented by the red bar Ppt Pass through power This power level is represented by the yellow bar Pout Output power This power level is represented by the blue bar It shows the per channel wavelength power at the 32WSS output COM_TX port Purpose This task refreshes the DWDM APC information Tools Equipment A node provisioning plan prepared b...

Page 532: ...ready logged in continue with Step 2 Step 2 Complete the NTP G103 Back Up the Database procedure on page 13 2 Step 3 In node view click the Provisioning General tabs Step 4 Complete the DLP G160 Change the Node Name Date Time and Contact Information task on page 10 7 as needed Step 5 Complete the DLP G161 Change the Login Legal Disclaimer task on page 10 8 as needed Step 6 After confirming the cha...

Page 533: ...rk map you must go to network view and right click the specified node then click Reset Node Position Time Use NTP SNTP Server Time Date M D Y Time Time H M S Time Time Zone Time Use Daylight Saving Time AIS V Insertion On STS 1 Signal Degrade Path Insert AIS V on STS 1 SD P AIS V Insertion On STS 1 Signal Degrade Path SD P BER See the NTP G24 Set Up Name Date Time and Contact Information procedure...

Page 534: ...tep 5 Return to your originating procedure NTP Purpose This task modifies the legal disclaimer statement shown in the CTC login dialog box so that it will display customer specific information when users log into the network Tools Equipment None Prerequisite Procedures DLP G46 Log into CTC page 2 25 Required As Needed As needed Onsite Remote Onsite or remote Security Level Superuser Table 10 1 HTM...

Page 535: ...6 Remove a Static TID to NSAP Entry from the TARP Data Cache page 10 12 DLP G287 Add a TARP Manual Adjacency Table Entry page 10 13 DLP G292 Remove a TARP Manual Adjacency Table Entry page 10 13 DLP G293 Change the OSI Routing Mode page 10 14 DLP G294 Edit the OSI Router Configuration page 10 15 DLP G295 Edit the OSI Subnetwork Point of Attachment page 10 16 DLP G296 Edit an IP Over CLNS Tunnel pa...

Page 536: ...in a Level 2 routing area The propagation occurs if the NE is not the target of the Type 2 PDU and PDUs are not propagated to the NE from which the PDU was received Note The TARP PDUs L2 Propagation parameter is only used when the Node Routing Area is provisioned to Intermediate System Level 1 Level 2 TARP PDUs Origination If checked default the node performs all TARP origination functions includi...

Page 537: ... at the NE The default setting is not enabled Type 4 PDU Delay Sets the amount of time that will pass before the Type 4 PDU is generated when Send Type 4 PDU on Startup is enabled 60 seconds is the default The range is 0 to 255 seconds Note The Send Type 4 PDU on Startup and Type 4 PDU Delay parameters are not used if the TARP PDUs Origination parameter is not enabled LDB Entry Sets the TARP loop ...

Page 538: ... click OK to close the Add Static Entry dialog box Step 5 Return to your originating procedure NTP DLP G286 Remove a Static TID to NSAP Entry from the TARP Data Cache Step 1 In node view click the Provisioning OSI TARP Static TDC tabs Step 2 Click the static entry that you want to delete Step 3 Click Delete Static Entry Step 4 In the Delete TDC Entry dialog box click Yes Purpose This task adds a s...

Page 539: ...asked NSAP Entry dialog box Step 4 Click OK to close the Masked NSAP Entry dialog box if used and then click OK to close the Add Static Entry dialog box Step 5 Return to your originating procedure NTP DLP G292 Remove a TARP Manual Adjacency Table Entry Caution If TARP manual adjacency is the only means of communication to a group of nodes loss of visibility will occur when the adjacency table entr...

Page 540: ...l NEs within the OSI have the same buffer size Caution LSP buffer sizes cannot be greater than the LAP D MTU size within the OSI area Step 1 Verify the following All L1 L2 virtual routers on the NE must reside in the same area This means that all neighboring virtual routers must have at least one common area address For OSI L1 L2 to ES routing mode changes only one L1 L2 virtual router and no more...

Page 541: ...er size L2 LSP Buffer Size Adjusts the Level 2 link state PDU buffer size Step 5 Return to your originating procedure NTP DLP G294 Edit the OSI Router Configuration Step 1 Click the Provisioning OSI Routers Setup tabs Step 2 Choose the router you want provision and click Edit Step 3 In the OSI Router Editor dialog box a Check or uncheck the Enabled box to enable or disable the router Note Router 1...

Page 542: ...ds The range is 10 to 1000 seconds IIH The Intermediate System to Intermediate System Hello IIH PDU propagation frequency The IS IS Hello PDUs establish and maintain adjacencies between ISs The default is 3 seconds The range is 1 to 600 seconds Note The IS IS Cost and DIS Priority parameters are provisioned when you create or enable a subnet You cannot change the parameters after the subnet is cre...

Page 543: ...a few support both GRE and Cisco IP tunnels You generally should create Cisco IP tunnels if you are tunneling between two Cisco routers or between a Cisco router and an ONS node Caution Always verify that the IP over CLNS tunnel type you choose is supported by the equipment at the other end of the tunnel IP Address Enter the IP address of the IP over CLNS tunnel destination IP Mask Enter the IP ad...

Page 544: ... and Routing Information Protocol RIP options are provided in Chapter 22 Management Connectivity Reference Step 1 Complete the DLP G46 Log into CTC task on page 2 25 If you are already logged in continue with Step 2 Step 2 Complete the NTP G103 Back Up the Database procedure on page 13 2 Step 3 Perform any of the following tasks as needed DLP G162 Change IP Settings page 10 19 DLP G265 Lock Node S...

Page 545: ...thernet circuits using Spanning Tree Protocol STP originate or terminate on E Series Ethernet cards installed in the node circuit traffic will be lost for several minutes while the spanning trees reconverge Other circuits are not affected by TCC2 TCC2P reboots Step 1 In node view click the Provisioning Network General tabs Step 2 Change any of the following as required IP Address Suppress CTC IP D...

Page 546: ...rm that the changes appear on the Provisioning Network General tab If not refer to the Cisco ONS 15454 Troubleshooting Guide or the Cisco ONS 15454 SDH Troubleshooting Guide as necessary Step 6 Return to your originating procedure NTP DLP G265 Lock Node Security Caution This task is irreversible Do not proceed unless you want the node to permanently have two IP addresses Note The options in this t...

Page 547: ...low it to be changed using the LCD buttons Suppress Display Suppresses the display of the IP address on the LCD Suppress CTC IP Address If checked suppresses the IP address from display on the Data Comm subtab CTC node view information area and other locations Step 3 Click Apply If you changed the IP address subnet mask or default router the node will reboot This will take 5 to 10 minutes Step 4 R...

Page 548: ... 15454 to which the CTC computer is connected The computer is not visible to the data communications channel DCC connected nodes In addition firewall is enabled which means that the node prevents IP traffic from being routed between the DCC and the LAN port Gateway Network Element GNE If selected the CTC computer is visible to other DCC connected nodes The node prevents IP traffic from being route...

Page 549: ...e Static Routing tab Step 3 Click the static route you want to edit Step 4 Click Edit Step 5 In the Edit Selected Static Route dialog box enter the following Mask Next Hop Cost See the DLP G58 Create a Static Route task on page 3 18 for detailed field descriptions Step 6 Click OK Step 7 Return to your originating procedure NTP Purpose This task modifies a static route on an ONS 15454 Tools Equipme...

Page 550: ... LAN area uncheck the OSPF active on LAN check box Step 3 Click Apply Confirm that the changes appear Step 4 Return to your originating procedure NTP Purpose This task deletes an existing static route on an ONS 15454 Tools Equipment None Prerequisite Procedures DLP G46 Log into CTC page 2 25 DLP G58 Create a Static Route page 3 18 Required As Needed As needed Onsite Remote Onsite or remote Securit...

Page 551: ...tep 1 Click the Provisioning Network Firewall subtabs Step 2 Click the firewall tunnel that you want to delete Step 3 Click Delete Step 4 Return to your originating procedure NTP Purpose This task removes a proxy tunnel Tools Equipment None Prerequisite Procedures DLP G46 Log into CTC page 2 25 Required As Needed As needed Onsite Remote Onsite or remote Security Level Superuser Purpose This task r...

Page 552: ...k View Background Color Note If you modify background colors the change is stored in your CTC user profile on the computer The change does not affect other CTC users Step 1 From the View menu in CTC choose Go to Network View Step 2 If you want to change a domain background double click the domain If not continue with Step 3 Purpose This procedure modifies the CTC network view including grouping no...

Page 553: ... You might have to scroll down on the list to find network Step 7 Click the Default Value field and choose a default map from the drop down list Map choices are Germany Japan Netherlands South Korea United Kingdom and the United States Step 8 Click Apply Step 9 Click OK Step 10 From the View menu select Go to Network View Confirm that the new map is displayed Step 11 If the ONS 15454 icons are not...

Page 554: ...lick the network view and choose Zoom Out Repeat this step until all the ONS 15454 icons are visible Step 8 If you need to reposition the node icons hold down the Ctrl key while you drag and drop them one at a time to a new location on the map Step 9 If you want to change the magnification of the icons right click the network view and choose Zoom In Repeat until the ONS 15454 icons are displayed a...

Page 555: ...s task manages CTC network view domain icons Tools Equipment None Prerequisite Procedures DLP G46 Log into CTC page 2 25 DLP G171 Create Domain Icons page 10 28 Required As Needed As needed Onsite Remote Onsite or remote Security Level Provisioning or higher Table 10 2 Managing Domains Domain Action Steps Move a domain Press Ctrl and drag and drop the domain icon to the new location Rename a domai...

Page 556: ...led Step 3 Choose one of the following options or uncheck the individual dialog boxes that you want to appear Don t Show Any Hides all do not display check boxes Show All Overrides do not display check box selections and displays all dialog boxes Step 4 Click OK Step 5 Return to your originating procedure NTP Preview domain contents Right click the domain icon and choose Show Domain Overview The d...

Page 557: ...ice affecting Step 1 Complete the DLP G46 Log into CTC task on page 2 25 If you are already logged in continue with Step 2 Step 2 Perform any of the following tasks as needed DLP G175 Modify a Y Cable Protection Group page 10 32 DLP G176 Modify a Splitter Protection Group page 10 33 DLP G177 Delete a Y Cable Protection Group page 10 33 Step 3 Complete the NTP G103 Back Up the Database procedure on...

Page 558: ...d for the amount of time chosen from the Reversion Time list Uncheck this box if you do not want traffic to revert Reversion time If the Revertive check box is selected choose the reversion time from the Reversion time drop down list The range is 0 5 to 12 0 minutes The default is 5 0 minutes This is the amount of time that will elapse before the traffic reverts to the working card Traffic can rev...

Page 559: ... 0 5 to 12 0 minutes The default is 5 0 minutes This is the amount of time that will elapse before the traffic reverts to the working card Traffic can revert when conditions causing the switch are cleared Step 5 Click OK Confirm that the changes appear Step 6 Return to your originating procedure NTP DLP G177 Delete a Y Cable Protection Group Step 1 In node view click the Provisioning Protection ta...

Page 560: ...clear a Force or Manual protection switch complete the DLP G180 Clear a Manual or Force Y Cable or Splitter Protection Switch task on page 10 36 Step 5 To prevent traffic on a working or protect card from switching to the other card in the pair complete the DLP G181 Apply a Lock On task on page 10 37 Step 6 To prevent traffic from switching to the protect card complete the DLP G182 Apply a Lockout...

Page 561: ... the DLP G180 Clear a Manual or Force Y Cable or Splitter Protection Switch task on page 10 36 Step 6 Return to your originating procedure NTP DLP G179 Apply a Force Y Cable or Splitter Protection Switch Caution A Force switch will move traffic from the active to the standby card or port immediately regardless of network conditions The switch will remain in effect until it is cleared Step 1 In nod...

Page 562: ...1 In node view click the Maintenance Protection tabs Step 2 In the Protection Groups area click the protection group that contains the card you want to clear Step 3 In the Selected Group area click the card that you want to clear Step 4 In the Switch Commands drop down list click Clear Step 5 Click Yes in the confirmation dialog box The Manual or Force protection switch is cleared Step 6 Return to...

Page 563: ... on page 10 38 Note Provisioning a lock on raises a LOCKON REQ or an FE LOCKON condition in CTC Clearing the lock on switch request clears these conditions Step 6 Return to your originating procedure NTP DLP G182 Apply a Lockout Note You can apply the lockout to the protect standby card or port If the protect card or port is active traffic is switched the lockout task cannot be performed Purpose T...

Page 564: ...raises a LOCKOUT REQ or an FE LOCKOUT condition in CTC Clearing the lockout switch request clears these conditions Step 6 Return to your originating procedure NTP DLP G183 Clear a Lock On or Lockout Step 1 In node view click the Maintenance Protection tabs Step 2 In the Protection Groups area click the protection group that contains the card you want to clear Step 3 In the Selected Group area clic...

Page 565: ...tion complete the DLP G184 Change a GCC Termination task on page 10 40 To delete a GCC termination complete the DLP G185 Delete a GCC Termination task on page 10 40 To delete an OSC termination complete the DLP G186 Delete an OSC Termination task on page 10 41 To delete a provisionable patchcord complete the DLP G187 Delete a Provisionable Patchcord task on page 10 42 Stop You have completed this ...

Page 566: ... end node or leave the 0 0 0 0 default An IP address of 0 0 0 0 means that any address can be used by the far end Step 5 Click OK Step 6 Return to your origination procedure NTP DLP G185 Delete a GCC Termination Note Deleting the GCC termination on a port also deletes any provisionable patchcord links that might exist on the port Step 1 Click the Provisioning Comm Channel GCC tabs Purpose This tas...

Page 567: ...ep 1 Click the Provisioning Comm Channel OSC tab Step 2 If a Ring ID is created complete the following steps Otherwise continue with Step 3 a Select the DWDM Ring ID that you want to delete and click Delete b In the Delete DWDM Ring ID confirmation box click Yes Confirm that the changes appear Step 3 Click the OSC termination that you want to delete and click Delete Step 4 In the Delete OSC Termin...

Page 568: ...k the Provisioning WDM ANS Connections tabs to identify the card ports to be removed The pass through connection that you are removing can be connected in both OADM and hub nodes For a hub node Connect the 32DMX O or 32DMX output port to the 32MUX O input port Purpose This task deletes a provisionable patchcord Tools Equipment None Prerequisite Procedures DLP G46 Log into CTC page 2 25 DLP G99 Cre...

Page 569: ...the DLP G99 Create a Provisionable Patchcord task on page 6 11 Step 8 As necessary add an optical attenuator between the channel TX port of the OADM 4MD xx x 32DMX O or 32DMX card and the DWDM RX port on the TXP MXP or ITU T line card Note If the channel is coming from a 32DMX O the optical power can be adjusted in CTC by modifying the value of the internal per channel variable optical attenuator ...

Page 570: ...f RES Revertive Revertive Time See the NTP G53 Set Up Timing task on page 6 4 for field descriptions Step 5 In the Reference Lists area you can change the following information Note Reference lists define up to three timing references for the node and up to six BITS Out references BITS Out references define the timing references used by equipment that can be attached to the node s BITS Out pins on...

Page 571: ... State Coding Framing AIS Threshold LBO Step 8 Click Apply Confirm that the changes appear Caution Internal timing is Stratum 3 and is not intended for permanent use All ONS 15454s should be timed to a Stratum 2 or better primary reference source Step 9 Complete the NTP G103 Back Up the Database procedure on page 13 2 Stop You have completed this procedure NTP G88 Modify Users and Change Security ...

Page 572: ... Policy tabs Step 2 If you want to modify the idle user timeout period click the hour H and minute M arrows in the Idle User Timeout area for the security level that you want to provision RETRIEVE MAINTENANCE PROVISIONING or SUPERUSER The idle period time range is 0 and 16 hours and 0 and 59 minutes The user is logged out after the idle user timeout period is reached Step 3 In the User Lockout are...

Page 573: ...e user will be warned to change his or her password for each security level The range is 2 to 20 days Step 6 In the Other area you can provision the following Single Session Per User If checked limits users to one login session at one time Disable Inactive User If checked disables users who do not log into the node for the period of time specified in the Inactive Duration box The Inactive Duration...

Page 574: ...ssword for days If checked prevents users from changing their password for the specified period The range is 20 to 95 days Require Password Change on First Login to New Account If checked requires users to change their password the first time they log into their account Step 7 To require users to change their password at periodic intervals check the Enforce Password Aging check box in the Password...

Page 575: ...o set the shell program access mode to Disable disables shell access Non Secure or Secure Secure mode allows access to the node using the Secure Shell SSH program SSH is a terminal remote host Internet protocol that uses encrypted links Telnet Port Allows access to the node using the Telnet port Telnet is the terminal remote host Internet protocol developed for the Advanced Agency Research Project...

Page 576: ...s state to Non Secure or Disabled disables SNMP access Step 10 Click Apply Step 11 Return to your originating procedure NTP DLP G191 Change User Password and Security Level on a Single Node Step 1 In node view click the Provisioning Security Users tabs Step 2 Click the user whose settings you want to modify then click Edit Step 3 In the Change User dialog box you can Change a user password Modify ...

Page 577: ...The Change User dialog box appears Step 4 In the Change User dialog box you can Change a user s password Modify the user s security level Lock out the user See the DLP G55 Create a New User on Multiple Nodes task on page 3 7 for field descriptions Step 5 In the Select Applicable Nodes area uncheck any nodes where you do not want to change the user s settings all network nodes are selected by defau...

Page 578: ...ser name displayed is the one that you want to delete Click Logout before delete if the user is currently logged in You cannot delete users if they are logged in Step 5 Click OK Step 6 In the User Deletion Results box click OK Step 7 Return to your originating procedure NTP DLP G194 Delete a User From Multiple Nodes Note You cannot delete a user who is currently logged in To log out a user you can...

Page 579: ...at the task Step 7 Return to your originating procedure NTP DLP G195 Log Out a User on a Single Node Step 1 In node view click the Provisioning Security Active Logins tabs Step 2 Choose the user that you want to log out and click Logout Step 3 In the Logout User dialog box check Lockout before Logout if you want to lock the user out This prevents the user from logging in after logout based on user...

Page 580: ...logout based on user lockout parameters provisioned in the Policy tab A manual unlock by a Superuser is required or else the user is locked out for the amount of time specified in the Lockout Duration field See the DLP G189 Change Security Policy for Multiple Nodes task on page 10 47 for more information Step 7 In the Select Applicable Nodes area uncheck any nodes where you do not want to change t...

Page 581: ...cific attribute VSA needs to be specified when adding users to the RADIUS server shell priv lvl N where N is equal to 0 for Retrieve user 1 for Maintenance user 2 for Provisioning user 3 for Superuser Step 1 In node view click the Provisioning Security RADIUS Server tabs Figure 10 2 Purpose This task allows you to configure a node for Remote Authentication Dial In User Service RADIUS authenticatio...

Page 582: ...sts to the RADIUS server you must add the ENEs to the RADIUS server individually for authentication If you do not add the ENE node to a RADIUS server prior to activating RADIUS authentication no user will be able to access the node Refer to the User Guide for Cisco Secure ACS for Windows Server for more information about adding a node to a RADIUS server Step 4 Enter the shared secret in the Shared...

Page 583: ...in the audit trail Step 13 Click the Enable the Node as the Final Authenticator check box if you want the node to be the final autheticator This means that if every RADIUS authenticator is unavailable the node will authenticate the login rather than locking the user out Step 14 Click Apply to save all changes or Reset to clear all changes Step 15 Return to your originating procedure NTP DLP G282 V...

Page 584: ...e the timing source a In node view click the Provisioning Timing tabs b Scroll to the Reference Lists area c In the NE Reference column select Internal Clock from the drop down list for all entries where the selected Clock Source is the OSCM that you are removing d Click Apply Step 4 If you have overhead circuits on the node complete the DLP G112 Delete Overhead Circuits task on page 7 22 Step 5 D...

Page 585: ...en the ejectors on the OSC CSM card d Slide the OSC CSM card into the slot along the guide rails according to your site plan e Close the ejectors Note On the OSC CSM card the fail LED above the ACT STBY LED becomes red blinks for several seconds and turns off The ACT STBY LED turns green and remains on In node view the OSC CSM appears green Step 11 If an OSCM card was removed from Slot 8 and an OS...

Page 586: ...matically calculated in the Connections tab as described in Step 13 Step 15 Launch ANS port regulation a In node view click the Provisioning WDM ANS Port Status tabs b Click the Launch ANS button c In the Link Status column the ports change to Regulated Step 16 Create OSC terminations starting from the OSC CSM card See the NTP G38 Provision OSC Terminations task on page 3 84 Step 17 Optional If yo...

Page 587: ...ONS 15454 SDH Troubleshooting Guide Step 3 Highlight the Destination row field entry in the Community column and change the entry to another valid community name The community name is a form of authentication and access control The community name assigned to the ONS 15454 is case sensitive and must match the community name of the network management system NMS Step 4 If needed modify the UDP port i...

Page 588: ... Step 8 Click Apply Step 9 SNMP settings are now modified To view SNMP information for each node highlight the node IP address in the Trap Destinations area of the Trap Destinations area Confirm that the changes appear if not repeat the task Step 10 Return to your originating procedure NTP DLP G198 Delete SNMP Trap Destinations Step 1 In node view click the Provisioning SNMP tabs Step 2 In the Tra...

Page 589: ...ection lists the chapter procedures NTPs Turn to a procedure for applicable tasks DLPs 1 NTP G90 Modify OSCM and OSC CSM Line Settings and PM Parameters and Thresholds page 11 2 As needed complete this procedure to change the OSCM and OSC CSM card settings 2 NTP G91 Modify OPT PRE and OPT BST Line Settings and PM Parameters and Thresholds page 11 12 As needed complete this procedure to change the ...

Page 590: ...and OSC CSM ALS Maintenance Settings page 11 10 Step 4 Complete the NTP G103 Back Up the Database procedure on page 13 2 Stop You have completed this procedure DLP G199 Change the OSCM and OSC CSM Optical Service Channel Settings Step 1 In node view double click the OSCM or OSC CSM card where you want to change the OC 3 optical line settings Step 2 Click the Provisioning OC3 Line OC3 Line tabs Ste...

Page 591: ...op down list choose one of the following 1E 3 1E 4 1E 5 SD BER Sets the signal degrade bit error rate From the drop down list choose one of the following 1E 5 1E 6 1E 7 1E 8 1E 9 Provides Synch Display only If checked the card is provisioned as a network element NE timing reference Checked Unchecked SynMsgIn Enables synchronization status messages SSM on the S1 byte which allow the node to choose ...

Page 592: ...t gives the overall condition of the port Service states appear in the format Primary State Primary State Qualifier Secondary State For more information about service states see Appendix C DWDM Administrative and Service States IS NR In Service and Normal ANSI or Unlocked enabled ETSI The port is fully operational and is performing as provisioned OOS AU AINS Out Of Service and Autonomous Automatic...

Page 593: ...automatically 0 to 48 hours 15 minute increments Type Defines the port as SONET or SDH The Enable Sync Msg field and the Send Do Not Use field must be disabled before the port can be set to SDH From the drop down list choose one of the following SONET SDH Purpose This task changes the OC 3 STM 1 SONET SDH thresholds settings for the OSC signal transmitted by the OSCM and OSC CSM cards Tools Equipm...

Page 594: ... set for Far End for 15 minute or one day intervals for Section only Select the bullet and click Refresh FC Failure count Numeric Can be set for 15 minute or one day intervals for Line or Section Select the bullet and click Refresh or Path Near and Far End UAS Unavailable seconds Numeric Can be set for 15 minute or one day intervals for Line or Section Near and Far End Select the bullet and click ...

Page 595: ...C DWDM Administrative and Service States IS NR Unlocked enabled OOS AU AINS Unlocked disabled automaticInService OOS MA DSBLD Locked enabled disabled OOS MA MT Locked enabled maintenance Type Display only Identifies the type of port Input Com Output Com Input Line Output Line Input OSC Output OSC Power Display only Shows the current power level per port VOA Mode Display only Shows the functional m...

Page 596: ...ed through custom alarm profiles Step 4 Click Refresh Step 5 Modify any of the warning or alarm threshold settings Table 11 4 shows the thresholds for warnings Table 11 5 shows the thresholds for alarms Purpose This task changes the optical line threshold settings for OSCM and OSC CSM cards Tools Equipment None Prerequisite Procedures DLP G46 Log into CTC page 2 25 Required As Needed As needed Ons...

Page 597: ... adjusts the Power setpoint The threshold is automatically set to a value that is 5 dB higher than the Power setpoint Numeric Power Degrade High dBm Shows the power degrade high threshold This power value applies to the corresponding port and is automatically calculated when ANS is run This threshold applies to a port that is associated to a VOA OSC VOA In Constant Power mode the port is always ac...

Page 598: ...settings Step 2 Click the Maintenance ALS tabs Step 3 Modify any of the settings described in Table 11 6 The provisionable parameters are listed in the options column in the table VOA Degrade High dBm Does not apply to OSCM and OSC CSM cards VOA Degrade Low dBm Does not apply to OSCM and OSC CSM cards Purpose This task changes the automatic laser shutdown ALS maintenance settings for the OSC CSM a...

Page 599: ...OS For OSC CSM cards ALS provides the same functions as the OSCM card and also enables an optical safety mechanism at the DWDM network layer See the 16 8 5 13 Automatic Laser Shutdown section on page 16 105 for more information From the drop down list choose one of the following Disable Deactivates ALS Auto Restart Default ALS is active The power is automatically shut down when needed and automati...

Page 600: ...G207 Change Optical Channel Threshold Settings for OPT PRE and OPT BST Amplifiers page 11 18 DLP G322 Change the OPT BST ALS Maintenance Settings page 11 22 Step 4 Complete the NTP G103 Back Up the Database procedure on page 13 2 Stop You have completed this procedure DLP G204 Change Optical Line Settings for OPT PRE and OPT BST Amplifiers Step 1 In node view double click the OPT PRE or OPT BST am...

Page 601: ...ne of the following IS Unlocked IS AINS Unlocked automaticInService OOS DSBLD Locked disabled OOS MT Locked maintenance Line Direction Provides the ability to associate a card with the line direction CTC automatically configures the line direction during node setup To change this setting you must change the Cisco MetroPlanner site plan and import it to the node From the drop down list choose one o...

Page 602: ...either Warning or Alarm Step 4 Click Refresh Step 5 Modify any of the warning or alarm threshold settings Table 11 8 shows the thresholds for warnings Table 11 9 shows the thresholds for alarms The provisionable parameters are listed in the options column in the table Purpose This task changes the optical line threshold settings for OPT PRE and OPT BST amplifier cards Tools Equipment None Prerequi...

Page 603: ...ort The threshold is calculated automatically when you run ANS You can manually change the threshold The value must be within the optical power range that is specified for the card See Appendix B Hardware Specifications For OPT BST cards this parameter applies to Port 2 Output COM and Port 4 Output OSC are related to Optical Safety mechanism at DWDM Network layer see Chapter 16 16 4 Network Optica...

Page 604: ... name User defined Name can be up to 32 alphanumeric special characters Blank by default See the DLP G104 Assign a Name to a Port task on page 7 10 Admin State Sets the port service state unless network conditions prevent the change For more information about administrative states see Appendix C DWDM Administrative and Service States From the drop down list choose one of the following IS Unlocked ...

Page 605: ...you to manually change the total optical power going to the amplifiers Numeric Gain Display only The current gain of the amplifiers Gain Set Point The value of the gain that the amplifier must achieve Automatic Power Control APC can modify this value based on the number of optical channel network connection OCHNC circuits that are managed by the amplifier or to compensate for fiber aging insertion...

Page 606: ...s Table 11 11 shows the amplifier line thresholds for warnings Table 11 12 shows the amplifier line thresholds for alarms The provisionable parameters are listed in the options column in the table Purpose This task changes the optical channel threshold settings for OPT PRE and OPT BST amplifier cards Tools Equipment None Prerequisite Procedures DLP G46 Log into CTC page 2 25 Required As Needed As ...

Page 607: ...for the card See Appendix B Hardware Specifications Numeric Display only Power Degrade High dBm Shows the current value of the optical power degrade high threshold This threshold applies only when the amplifier is active and in constant power mode Power Degrade High refers to the port s Signal Output Power value and is automatically calculated by the TCC2 TCC2P when the amplifier is turned up The ...

Page 608: ...ode Power Degrade Low refers to the port s Signal Output Power value and is automatically calculated by the TCC2 TCC2P when the amplifier is turned up The Power Degrade Low threshold is automatically linked to the Output Power Setpoint on the Parameters tab Changing the setpoint changes the Power Degrade Low threshold The threshold value is always 2 dB lower than the Output Power Setpoint APC can ...

Page 609: ...de High threshold The threshold value is always 2 dB higher than the Gain Setpoint value APC can modify this value based on the number of OCHNC circuits the amplifier is managing and to compensate for insertion loss due to fiber aging Gain Degrade Low dBm Shows the current value of the gain degrade low threshold configured in the card This threshold applies only when the amplifier is active and in...

Page 610: ...TX output power is shut down From the drop down list choose one of the following On Off ALS Mode Automatic laser shutdown mode For OPT BST cards ALS provides the ability to shut down the OPT BST TX laser when the OPT BST RX detects an LOS ALS also enables an optical safety mechanism at the DWDM network layer See the 16 8 5 13 Automatic Laser Shutdown section on page 16 105 for more information Fro...

Page 611: ...Step 2 Complete the NTP G103 Back Up the Database procedure on page 13 2 Step 3 Perform any of the following tasks as needed DLP G208 Change Optical Line Settings for Multiplexer and Demultiplexer Cards page 11 24 DLP G209 Change Optical Line Threshold Settings for Multiplexer and Demultiplexer Cards page 11 26 DLP G210 Change Optical Channel Settings for Multiplexer and Demultiplexer Cards page 1...

Page 612: ...vides the ability to assign the specified port a name User defined Name can be up to 32 alphanumeric special characters Blank by default Double click enter the name and press Enter See the DLP G104 Assign a Name to a Port task on page 7 10 Admin State Sets the port service state unless network conditions prevent the change For more information about administrative states see Appendix C DWDM Admini...

Page 613: ...VOA Mode is set to Constant Power This parameter can only be modified by ANS VOA Power Calib 32DMX only Modifies the optical power value of the VOA when VOA Mode is set to Constant Power Numeric Double click the parameter enter a value and press Enter VOA ATTenuation Ref 32DMX only display only Shows the VOA attenuation value when VOA Mode is set to Constant Attenuation This parameter can only be ...

Page 614: ...n Warning thresholds are not monitored by CTC They must be user provisioned and monitored through custom alarm profiles Table 11 16 shows the amplifier line thresholds for alarms Purpose This task changes the optical line threshold settings for 32MUX O 32DMX O 32DMX and 4MD xx x multiplexer and demultiplexer cards Tools Equipment None Prerequisite Procedures DLP G46 Log into CTC page 2 25 Required...

Page 615: ... Parameter Description Options Port Display only Displays the port number Power Failure Low dBm Shows the optical power failure low threshold for the port The threshold is calculated automatically when you run ANS You can manually change the threshold The value must be within the optical power range that is specified for the card See Appendix B Hardware Specifications Numeric Double click the para...

Page 616: ...the line direction during node setup To change this setting you must change the Cisco MetroPlanner site plan and import it to the node From the drop down list choose one of the following East to West West to East Service State Display only Identifies the autonomously generated state that gives the overall condition of the port Service states appear in the format Primary State Primary State Qualifi...

Page 617: ...ured as Access in the Provisioning WDM ANS tab Numeric Double click the parameter enter a value and press Enter VOA Attenuation Ref Display only 32MUX O 32DMX 0 4MD only Shows the attenuation value of the VOA when the VOA is set in attenuation mode This parameter can only be modified by ANS and APC VOA Attenuation Calib 32MUX O 32DMX 0 and 4MD only Allows the user to modify the attenuation value o...

Page 618: ...arm threshold settings Table 11 18 shows the amplifier line thresholds for warnings Table 11 19 shows the amplifier line thresholds for alarms Purpose This task changes the optical channel threshold settings for 32MUX O 32DMX O 32DMX and 4MD xx x multiplexer and demultiplexer cards Tools Equipment None Prerequisite Procedures DLP G46 Log into CTC page 2 25 Required As Needed As needed Onsite Remot...

Page 619: ...omatically calculated when ANS is run This threshold applies to a port associated to a VOA OSC VOA always active in Constant Power mode The threshold is automatically linked to the Power Setpoint VOA Power Ref VOA Power Calib provisioned Changing the setpoint results in changing the threshold always 5 dB lower The 32DMX is an exception 32DMX Power Failure Low thresholds apply to ports not associat...

Page 620: ...ed to the Power Setpoint VOA Power Ref VOA Power Calib provisioned Changing the setpoint will result in changing the threshold always 3 dB higher This threshold does not apply to the 32DMX card Power Degrade Low dBm Shows the power degrade low threshold This power value applies to the corresponding port and is automatically calculated when ANS is run This threshold applies to a port associated to ...

Page 621: ...e 32WSS Card page 11 39 DLP G215 Change the 32WSS Card Optical Line Thresholds page 11 40 Step 4 Complete the NTP G103 Back Up the Database procedure on page 13 2 Stop You have completed this procedure DLP G212 Change Optical Channel Parameters for the 32WSS Card Step 1 In node view double click the 32WSS card where you want to change the optical channel parameter settings Step 2 Click the Provisi...

Page 622: ...ort service state unless network conditions prevent the change For more information about administrative states see Appendix C DWDM Administrative and Service States From the drop down list choose one of the following IS Unlocked IS AINS Unlocked automaticInService OOS DSBLD Locked disabled OOS MT Locked maintenance Service State Display only Identifies the autonomously generated state that gives ...

Page 623: ...ified by ANS Numeric value dB VOA Attenuation Calibration Allows you to modify the VOA attenuation value when VOA Mode is Constant Attenuation Double click the parameter enter a value and press Enter Numeric value dB 30 dB to 30 dB Actual Wavelength Display only Displays the actual wavelength utilized by the channel Actual measured value nm UNKNOWN Expected Wavelength Display only Displays the exp...

Page 624: ...tep 5 Modify any of the warning or alarm threshold settings Table 11 21 shows the 32WSS optical line thresholds for warnings The provisionable parameters are listed in the options column in the table Table 11 22 shows the 32WSS optical line thresholds for alarms Purpose This task changes the optical channel optics threshold settings for the 32WSS card Tools Equipment None Prerequisite Procedures D...

Page 625: ...rt and is automatically calculated when ANS is run This threshold applies to a port associated to a VOA OSC VOA always active in Constant Power mode The threshold is automatically linked to the Power Setpoint VOA Power Ref VOA Power Calib provisioned Changing the setpoint results in changing the threshold always 5 dB lower The threshold is calculated automatically when you run ANS You can manually...

Page 626: ...Power Ref VOA Power Calib provisioned Changing the setpoint results in changing the threshold always 2 dB lower Numeric display only Power ADD Failure Low dBm Shows the power add failure low threshold This power value applies to the corresponding port and is automatically calculated when ANS is run This threshold applies to the actual measurement of the optical power on the ADD RX port that is the...

Page 627: ...of the ports shown User defined Name can be up to 32 alphanumeric special characters Blank by default Double click enter the name and press Enter See the DLP G104 Assign a Name to a Port task on page 7 10 Admin State Sets the port service state unless network conditions prevent the change For more information about administrative states see Appendix C DWDM Administrative and Service States From th...

Page 628: ...rm Step 4 Click Refresh Step 5 Modify any of the warning or alarm threshold settings Table 11 24 shows the 32WSS optical line thresholds for warnings The provisionable parameters are listed in the options column in the table Type Port type From the drop down list choose one of the following Output Express Input Express Out Com Input Com Drop Power Power value read by the photodiode associated with...

Page 629: ...ower High dBm Set the high power warning level Numeric Can be set for 15 minute or one day intervals The default is 30 dBm Table 11 25 32WSS Optical Channel Alarm Threshold Settings Parameter Description Options Port Display only Displays the port number Power Failure Low dBm Shows the power failure low threshold This power value applies to the corresponding port and is automatically calculated wh...

Page 630: ...ng the alarm expansion panel AEP In this case the number of contacts that are shown on the screen is changed accordingly Step 1 Confirm that external device relays are wired to the ENVIR ALARMS IN pins See the DLP G20 Install Alarm Wires on the MIC A P ETSI Only task on page 1 48 ETSI or DLP G23 Install Alarm Wires on the Backplane ANSI Only task on page 1 53 ANSI for more information Purpose This...

Page 631: ...he number of contacts that are shown on the screen is changed accordingly Step 1 Verify the external control relays to the ENVIR ALARMS OUT backplane pins See the DLP G20 Install Alarm Wires on the MIC A P ETSI Only task on page 1 48 ETSI or DLP G23 Install Alarm Wires on the Backplane ANSI Only task on page 1 53 ANSI for more information Step 2 In node view double click the AIC I card to display ...

Page 632: ...n node view double click the AIC I card to display it in card view Step 2 Click the Provisioning Local Orderwire tabs or the Provisioning Express Orderwire tabs depending on the orderwire path that you want to change Provisioning steps are the same for both types of orderwire Step 3 If needed adjust the transmit Tx and receive Rx dBm values by moving the slider to the right or left for the headset...

Page 633: ...ed ETSI OOS MT ANSI or Locked enabled ETSI Step 4 Click Apply Step 5 If an error message appears indicating that the card state cannot be changed from its current state click OK For information about the enhanced state model and card state transitions refer to the DWDM Administrative and Service States section on page C 1 Stop You have completed this procedure Purpose This procedure changes a card...

Page 634: ...11 46 Cisco ONS 15454 DWDM Installation and Operations Guide R6 0 September 2005 Chapter 11 Change DWDM Card Settings NTP G102 Change Card Service State ...

Page 635: ...for general troubleshooting information and alarm or error descriptions This section lists the chapter procedures NTPs Turn to a procedure to view its tasks DLPs 1 NTP G107 Remove and Replace DWDM Cards page 12 1 Complete as needed 2 NTP G127 Add an AD xC xx x Card to an OADM Node page 12 5 Complete as needed 3 NTP G129 Add a DWDM Node page 12 7 Complete as needed 4 NTP G130 Remove a DWDM Node pag...

Page 636: ...nections task on page 7 12 If the card you want to replace is an active transponder TXP or muxponder MXP in a Y cable protection group complete the DLP G179 Apply a Force Y Cable or Splitter Protection Switch task on page 10 35 to force traffic away from the TXP or MXP that you will remove If the card you want to replace is the standby TXP or MXP in a Y cable protection group complete the DLP G182...

Page 637: ...E Ports In Service task on page 12 4 Step 9 Click the Alarms tab a Verify that the alarm filter is not on See the DLP G128 Disable Alarm Filtering task on page 8 28 as necessary b Verify that no unexplained alarms appear on the network If alarms appear investigate and resolve them Refer to the Cisco ONS 15454 Troubleshooting Guide or the Cisco ONS 15454 SDH Troubleshooting Guide for procedures Sto...

Page 638: ...orts In Service Step 1 On the shelf graphic in CTC double click the OPT BST or OPT PRE card with the ports that you want to put in service Step 2 Click the Provisioning Optical Line Parameters tabs Step 3 Under Admin State choose choose IS ANSI or Unlocked ETSI for Port 1 of the OPT PRE or Ports 2 and 3 of the OPT BST Step 4 Click Apply Step 5 In the confirmation dialog box click Yes Step 6 Return...

Page 639: ...h east to west E W and west to east W E directions Step 5 For OCHNCs identified in Step 4 that are routed on the active path of a splitter or Y cable protection group force the traffic to the protect path in the opposite side of the ring using the DLP G179 Apply a Force Y Cable or Splitter Protection Switch task on page 10 35 Step 6 Click the Circuits tab Step 7 Complete the following steps for al...

Page 640: ...sical express cables between the EXP_TX and EXP_RX ports specified in Step 13 Step 16 Insert the new AD xCxx x card in the slot identified by your Cisco MetroPlanner site plan Step 17 Complete the NTP G34 Install Fiber Optic Cables on DWDM Cards and DCUs procedure on page 3 48 for the OADM node following the new internal connections table generated by Cisco MetroPlanner Step 18 Complete the NTP G3...

Page 641: ...with the new DWDM node Note During this procedure you will use TL1 commands to delete and recreate OCHNC cross connects You might need to refer to the Cisco ONS SONET TL1 Command Guide or the Cisco ONS 15454 SDH TL1 Command Guide Caution To complete this procedure a span will be disconnected where the new node is added This will affect the service of any unprotected circuits that pass through that...

Page 642: ...ation page 3 4 NTP G26 Set Up CTC Network Access page 3 11 NTP G30 Install the DWDM Cards page 3 39 NTP G36 Calculate Cable Connections page 3 80 NTP G138 Import a Cisco MetroPlanner Configuration File page 3 82 NTP G37 Run Automatic Node Setup page 3 83 Node acceptance tests in Chapter 4 Perform Node Acceptance Tests Step 10 Create cross connects on the new node for all circuits identified in Ste...

Page 643: ...ork plan has been updated and recalculated with the DWDM node removed Note During this procedure you will use TL1 commands to delete and recreate OCHNC cross connects You might need to refer to the Cisco ONS SONET TL1 Reference Guide or the Cisco ONS 15454 SDH TL1 Reference Guide Caution This procedure will affect the service of unprotected circuits that pass through the span where the node will b...

Page 644: ...ollows DLT WLEN TID AID CTAG SIZE SIZE PST SST where AID is the wavelength AID SIZE is the circuit size allocated on this wavelength PST is the primary state SST is the secondary state For additional information and a list of valid command values see the Cisco ONS SONET TL1 Reference Guide or the Cisco ONS 15454 SDH TL1 Reference Guide d Close the TL1 dialog box e Repeat Step 6 to change the circu...

Page 645: ...ase page 13 2 Complete as needed 2 NTP G104 Restore the Database page 13 3 Complete as needed 3 NTP G105 Restore the Node to Factory Configuration page 13 4 Complete as needed to clear the database and upload a blank database and the latest software 4 NTP G133 View and Manage OSI Information page 13 9 Complete as needed 5 NTP G106 Reset Cards Using CTC page 13 12 Complete as needed to reset the TC...

Page 646: ...stored node name IP address subnet mask and gateway and Internet Inter ORB Protocol IIOP port If you change the node name and then restore a backed up database with a different node name the circuits map to the new node name Cisco recommends keeping a record of the old and new node names Step 1 Complete the DLP G46 Log into CTC task on page 2 25 at the node you want to back up If you are already l...

Page 647: ...circuits have a PARTIAL_OOS state If so investigate and resolve the partial state before continuing Step 3 Complete the DLP G157 Disable Automatic Power Control task on page 10 4 Step 4 In node view click the Maintenance Database tabs Step 5 Click Restore Step 6 Locate the database file stored on the workstation hard drive or on network storage To clear all existing provisioning locate and upload ...

Page 648: ...to the factory configuration deletes all cross connects on the node Caution Cisco recommends that you save the node database to safe location if you will not be restoring the node using the database provided on the software CD Purpose This procedure reinitializes the ONS 15454 using the CTC reinitialization tool Reinitialization uploads a new software package to the TCC2 TCC2P cards clears the nod...

Page 649: ...ad Software UNIX task on page 13 7 Stop You have completed this procedure DLP G248 Use the Reinitialization Tool to Clear the Database and Upload Software Windows Caution Restoring a node to the factory configuration deletes all cross connects on the node Purpose This task reinitializes the ONS 15454 using the CTC reinitialization tool on a Windows computer Reinitialization uploads a new software ...

Page 650: ...e IP Enter the node name or IP address of the node that you are reinitializing User ID Enter the user ID needed to access the node Password Enter the password for the user ID Upload Package Check this box to send the software package file to the node If unchecked the software stored on the node is not modified Force Upload Check this box to send the software package file to the node even if the no...

Page 651: ...Set Up CTC Network Access procedure on page 3 11 Step 10 Return to your originating procedure NTP DLP G249 Use the Reinitialization Tool to Clear the Database and Upload Software UNIX Caution Restoring a node to the factory configuration deletes all cross connects on the node Purpose This task reinitializes the ONS 15454 using the CTC reinitialization tool on a UNIX computer Reinitialization uploa...

Page 652: ...ame version Activate Revert Check this box to activate the uploaded software if the software is a later than the installed version or revert to the uploaded software if the software is earlier than the installed version as soon as the software file is uploaded If unchecked the software is not activated or reverted after the upload allowing you to initiate the functions later from the node view Mai...

Page 653: ...Open Systems Interconnection OSI including the End System to Intermediate System ES IS and Intermediate System to Intermediate System IS IS routing information tables the Target Identifier Address Resolution Protocol TARP data cache and the manual area table Tools Equipment None Prerequisite Procedures NTP G103 Back Up the Database page 13 2 NTP G17 Set Up Computer for CTC page 2 2 NTP G132 Provis...

Page 654: ...I ES IS RIB tabs Step 2 View the following RIB information for Router 1 Subnet Type Indicates the OSI subnetwork point of attachment type used to access the destination address Subnet types include SDCC LDCC GCC OSC and LAN Location Indicates the subnet interface For DCC subnets the slot and port are displayed LAN subnets are shown as LAN Destination Address The destination IS NSAP MAC Address For...

Page 655: ... Note The TID to NSAP function is not available if the TDC is not enabled on the Provisioning OSI TARP subtab a Click the TID to NSAP button b In the TID to NSAP dialog box enter the TID you want to map to an NSAP c Click OK then click OK in the information message box d On the TDC tab click Refresh If TARP finds the TID in its TDC it returns the matching NSAP If not TARP sends protocol data units...

Page 656: ...e you reset the TCC2 TCC2P you should wait at least 60 seconds after the last provisioning change you made to avoid losing any changes to the database Note When a software reset is performed on an active TCC2 TCC2P the AIC I card goes through an initialization process and also resets The AIC I card reset is normal and happens each time an active TCC2 TCC2P card goes through a software initiated re...

Page 657: ...ur originating procedure NTP DLP G251 Reset DWDM Cards Using CTC Warning Do not reach into a vacant slot or chassis while you install or remove a module or a fan Exposed circuitry could constitute an energy hazard Statement 206 Note ONS 15454 cards normally do not need to be reset However you might occasionally need to reset a card for testing or as an initial trouble clearing step For additional ...

Page 658: ...ntinue with Step 6 Step 6 Return to your originating procedure NTP NTP G108 Viewing the Audit Trail Records Step 1 Complete the DLP G46 Log into CTC task on page 2 25 at the node where you want to view the audit trail log If you are already logged in continue with Step 2 Step 2 In node view click the Maintenance Audit tabs Step 3 Click Retrieve A window containing the most recent audit trail recor...

Page 659: ...the following options Reset Sorting Resets the column to the default setting Hide Column Hides the column from view Reset Columns Order Visibility Displays all hidden columns Row Count Provides a numerical count of log entries Shift click the column heading for an incremental sort of the list Stop You have completed this procedure Table 13 1 Audit Trail Column Definitions Column Definition Date Da...

Page 660: ...uch as WordPad Microsoft Word imported etc Step 7 Click Save Click OK The 640 entries are saved in this file The next entries continue with the next number in the sequence rather than starting over Note Archiving does not delete entries from the CTC audit trail log However entries can be self deleted by the system after the log maximum is reached If you archived the entries you cannot reimport the...

Page 661: ...icating the percentage of the file being saved then shows Get Diagnostics Complete Step 7 Click OK Stop You have completed this procedure NTP G112 Change the Node Timing Reference Step 1 Complete the DLP G46 Log into CTC task on page 2 25 at the node where you want to enable timing switching If you are already logged in continue with Step 2 Purpose This procedure describes how to off load a diagno...

Page 662: ...nchronization status message SSM quality of the reference is not lower than the current timing reference Force This operation commands the node to switch to the reference you have selected regardless of the SSM quality if the reference is valid Note For information about the Clear option see the DLP G260 Clear a Manual or Force Switch on a Node Timing Reference task on page 13 19 Step 4 Click Appl...

Page 663: ...og into CTC task on page 2 25 at the node where you want to view the node timing status If you are already logged in continue with Step 2 Step 2 Click the Maintenance Timing Report tabs Step 3 In the Timing Report area you can view node timing information The date and time of the report appear at the top of the report The time stamp is the same as the alarms time stamp and can be configured using ...

Page 664: ...calibrated value to bring timing to 0 PPM Freerun state can occur when a Force switch to the Internal clock is initiated when all references fail without the 140 seconds of holdover data or when only Internal timing references are defined This status appears for NE references only NO_SYNC_STATE A synchronization timing reference is not defined BITS 1 Out or BITS 2 Out default to this status until ...

Page 665: ...ly BITS clock attached to the node s BITS 1 pins BITS 2 The timing facility is a BITS clock attached to the node s BITS 2 pins OC N STM N card with port number If the node is set to line timing this is the OC N STM N card and port provisioned as the timing reference Internal clock The node is using its internal clock State Indicates the timing reference state IS The timing reference is in service ...

Page 666: ... the surface of the filter Step 1 Verify that you are replacing a reusable air filter The reusable filter is made of a gray open cell polyurethane foam that is specially coated to provide fire and fungi resistance NEBS 3E and later versions of the ONS 15454 use a reusable air filter SSM Quality Indicates the SSM timing quality 8 to 10 SSM quality messages might be displayed For a list of SSM messa...

Page 667: ...open the front door of the shelf assembly If the front door is already open proceed to Step 4 a Open the front door lock The ONS 15454 comes with a pinned hex key for locking and unlocking the front door Turn the key counterclockwise to unlock the door and clockwise to lock it b Press the door button to release the latch c Swing the door open Step 4 Optional Remove the front door If you do not wan...

Page 668: ...not to dislodge any dust that might have collected on the filter Step 9 Visually inspect the air filter material for dirt and dust Step 10 If the reusable air filter contains a concentration of dirt and dust replace the dirty air filter with a clean air filter spare filters should be kept in stock and reinsert the fan tray assembly Then vacuum the dirty air filter or wash it under a faucet with a ...

Page 669: ...iately after the fan tray assembly is correctly inserted Step 13 To verify that the tray is plugged into the backplane ensure that the LCD on the front of the fan tray assembly is activated and displays node information Step 14 Rotate the retractable handles back into their compartments Step 15 If you replace the door also reattach the ground strap Step 16 Close and lock the door Stop You have com...

Page 670: ... Do not view directly with optical instruments Viewing the laser output with certain optical instruments for example eye loupes magnifiers and microscopes within a distance of 100 mm may pose an eye hazard Statement 1056 Step 1 Remove the dust cap from the fiber connector Step 2 Wipe the connector tip with the premoistened alcohol wipe Step 3 Blow dry using filtered air Step 4 Use an inspection mi...

Page 671: ...adapter or attach a dust cap to the fiber connector Note If you must replace a dust cap on a connector first verify that the dust cap is clean To clean the dust cap wipe the outside of the cap using a dry lint free wipe and the inside of the dust cap using a CLETOP stick swab 14100400 Step 6 Return to your originating procedure NTP DLP G263 Clean the Fiber Adapters Step 1 Remove the dust plug from...

Page 672: ... attached Step 1 Insert the front door into the hinges on the shelf assembly Step 2 Attach one end of the ground strap terminal lug 72 3622 01 to the male stud on the inside of the door Attach and tighten the 6 Kepnut 49 0600 01 using the open end wrench Figure 13 6 Purpose This procedure replaces the front door and door ground strap after installing cards and fiber optic cables Tools Equipment 2 ...

Page 673: ...open end wrench attach and tighten the 4 Kepnut 49 0337 01 on the terminal lug Note To avoid interference with the traffic line card make sure the ground strap is in a flat position when the door is open To move the ground strap into a flat position rotate the terminal lug counterclockwise before tightening the Kepnut Step 4 Replace the left cable routing channel Step 5 Using a Phillips screwdrive...

Page 674: ...Door Figure 13 7 Shelf Assembly with Door Ground Strap Retrofit Kit Installed Step 6 Swing the door closed Note The ONS 15454 comes with a pinned hex key tool for locking and unlocking the front door Turn the key counterclockwise to unlock the door and clockwise to lock it Stop You have completed this procedure 71046 Ground strap cable ...

Page 675: ...ly it is not necessary to move any of the cable management facilities Step 1 Review Table 13 3 ANSI or Table 13 4 ETSI to ensure that you have compatible components when replacing the fan tray assembly Note the alarms that will be generated when an incompatibility occurs Note If you need to determine the hardware that has been installed on a node click the Inventory tab in node view Purpose This p...

Page 676: ...r 15454 FTA3 T P N 800 21448 xx 2A Fan Tray 15454 FTA2 P Ns 800 07145 xx 800 07385 xx 800 19591 xx 800 19590 xx 3 5A AIP P N 73 7665 01 2A AIP P N 73 5262 01 4 10G cards include the XC10G OC192 and OC48AS 5 2 5G compatible indicates cards that are compatible with the XCVT cross connect card 10G compatible indicates cards that are compatible with the XC10G and XC VXC 10G cross connect cards Table 1...

Page 677: ...lacement c Secure the dangling end of the ground strap to the door or chassis with tape Step 4 Push the outer side of the handles on the fan tray assembly to expose the handles Step 5 Fold out the retractable handles at the outside edges of the fan tray Step 6 Pull the handles and slide the fan tray assembly one inch 25 4 mm out of the shelf assembly and wait until the fans stop Step 7 When the fa...

Page 678: ... and Operations Guide R6 0 September 2005 Chapter 13 Maintain the Node NTP G116 Replace the Fan Tray Assembly Figure 13 8 Removing or Replacing the Fan Tray Assembly Front Door Removed ANSI FAN FAIL CR IT MA J MIN 38532 Fan tray assembly LCD ...

Page 679: ...air filter and it is installed in the external bottom bracket ANSI shelf only you can slide the existing air filter out of the bracket and replace it at anytime For more information on the fan tray air filter see the NTP G114 Inspect Clean and Replace the Air Filter procedure on page 13 22 Step 9 Slide the new fan tray into the shelf assembly until the electrical plug at the rear of the tray plugs...

Page 680: ...occur when an incompatibility occurs Step 2 Ensure that all nodes in the affected network are running the same software version before replacing the AIP and repairing circuits a In network view click the Maintenance Software tabs The working software version for each node is listed in the Working Version column b If you need to upgrade the software on a node refer to the release specific software ...

Page 681: ...vi Step 5 Unscrew the five screws that hold the lower backplane cover in place Figure 13 11 Figure 13 11 Lower Backplane Cover Step 6 Grip the lower backplane cover and gently pull it away from the backplane Step 7 Unscrew the two screws that hold the AIP cover in place Step 8 Grip the cover and gently pull away from the backplane Note On the 15454 SA HD P N 800 24848 15454 SA NEBS3E 15454 SA NEBS...

Page 682: ... cover with the two screws Step 15 Replace the lower backplane cover and secure the cover with the five screws Step 16 In node view click the Provisioning Network tabs Caution Cisco recommends that TCC2 TCC2P card resets be performed in a maintenance window to avoid any potential service disruptions Step 17 Reset the standby TCC2 TCC2P card a Right click the standby TCC2 TCC2P card and choose Rese...

Page 683: ...ure that you have the old and new MAC addresses Figure 13 12 Repairing Circuits Step 25 The Node MAC Addresses dialog box appears Figure 13 13 a From the Node drop down list choose the name of the node where you replaced the AIP b In the Old MAC Address field enter the old MAC address that was recorded in Step 3 c Click Next Figure 13 13 Recording the Old MAC Address Before Replacing the AIP Step ...

Page 684: ...ll circuits listed are not DISCOVERED call the Cisco TAC at 800 553 2447 to open a Return Material Authorization RMA Stop You have completed this procedure NTP G118 Replace the ANSI Shelf Plastic Lower Backplane Cover Step 1 Use the Phillips screwdriver to unscrew the five retaining screws that hold the metal cover in place Step 2 Grasp the metal cover on each side Step 3 Gently pull the metal cov...

Page 685: ...er 2005 Chapter 13 Maintain the Node NTP G118 Replace the ANSI Shelf Plastic Lower Backplane Cover Figure 13 15 Attaching Plastic Lower Backplane Cover Step 5 Tighten the five retaining screws that hold the plastic cover in place Stop You have completed this procedure 78400 ...

Page 686: ...ultiple default values before applying the changes A pencil icon will appear next to any default value that will be changed as a result of editing the defaults file Step 7 If you are modifying node level defaults a dialog box appears telling you that defaults were successfully applied to the node Click Yes If you are modifying the IIOP Listener Port setting a dialog box appears warning you that th...

Page 687: ...ame and location appear in the dialog box click OK If you are importing the factory defaults the correct file name is 15454 defaults txt for ANSI shelves and 15454SDH defaults txt for ETSI shelves A pencil icon will appear next to any default value that will be changed as a result of importing the new defaults file Step 6 Click Apply Step 7 If the imported file fails to pass all edits the problem ...

Page 688: ...pared for the occurrence of any side effects listed for that default Stop You have completed this procedure NTP G137 Export Network Element Defaults Note The defaults currently displayed are exported whether or not they have been applied to the current node Note The NE defaults can also be exported from the File Export menu These exported defaults are for reference only and cannot be imported Note...

Page 689: ... 45 Cisco ONS 15454 DWDM Installation and Operations Guide R6 0 September 2005 Chapter 13 Maintain the Node NTP G137 Export Network Element Defaults Step 6 Click OK Stop You have completed this procedure ...

Page 690: ...13 46 Cisco ONS 15454 DWDM Installation and Operations Guide R6 0 September 2005 Chapter 13 Maintain the Node NTP G137 Export Network Element Defaults ...

Page 691: ...the fan tray assembly or on the lower right outside edge of the shelf on the NEBS 3 shelf assembly To access the ESD plug on the NEBS 3 shelf assembly open the front door of the Cisco ONS 15454 The front door is grounded to prevent electrical shock Step 1 Identify the node that you want to power down If no cards are installed go to Step 16 If cards are installed log into the node See the DLP G46 L...

Page 692: ...ning Protection tabs and delete all protection groups a Click the protection group that needs to be deleted and click Delete b Click Yes Repeat until no protection groups appear Step 6 In node view click the Provisioning Comm Channels tabs and delete all communications channel terminations a Click the section data communications channel SDCC line data communications channel LDCC generic communicat...

Page 693: ...ce state a In card view click the appropriate tab depending on the card For MXP_2 5G_10G TXP_MR_10G TXP_MR_10E cards click the Provisioning Line SONET tabs if the card was provisioned for a SONET payload or the Provisioning Line SDH tabs if the card was provisioned for an SDH payload For TXP_MR_2 5G TXPP_MR_2 5G and MXPP_MR_2 5G cards click the Provisioning Line OC48 tabs For MXP_2 5G_10E cards cl...

Page 694: ...ep 14 for each installed card Note You cannot delete a TCC2 or TCC2P card in Cisco Transport Controller CTC Physically remove it after all the other cards have been deleted and removed Step 16 Shut off the power from the power supply that feeds the node Step 17 Disconnect the node from its external fuse source Step 18 Store all of the cards that you removed and update inventory records according t...

Page 695: ...5 3 15 3 ONS 15454 ETSI Rack Installation page 15 6 15 4 FlexLayer and Y Cable Protection page 15 9 15 5 Typical DWDM Rack Layouts page 15 17 15 6 Front Door page 15 19 15 7 ONS 15454 ANSI Backplane Covers page 15 26 15 8 ONS 15454 ETSI Front Mount Electrical Connection page 15 30 15 9 ONS 15454 ANSI Alarm Expansion Panel page 15 30 15 10 Filler Card page 15 35 15 11 Cable Routing and Management p...

Page 696: ...d alarm panel consult the user documentation for the related equipment The front door of the ONS 15454 ANSI allows access to the shelf assembly fan tray assembly and fiber storage area The backplanes provide access to alarm contacts external interface contacts power terminals and BNC SMB connectors You can mount the ONS 15454 ANSI in a 19 or 23 inch rack 482 6 or 584 2 mm The shelf assembly weighs...

Page 697: ...ive inches 127 mm from the front of the rack It mounts in both Electronic Industries Alliance EIA standard and Telcordia standard racks The shelf assembly is a total of 17 inches 431 8 mm wide with no mounting ears attached Ring runs are not provided by Cisco and might hinder side by side installation of shelves where space is limited The ONS 15454 ANSI measures 18 5 inches 469 9 mm high 19 or 23 ...

Page 698: ...f in a frame with a nonconductive coating such as paint lacquer or enamel either use the thread forming screws provided with the ONS 15454 ANSI shipping kit or remove the coating from the threads to ensure electrical continuity The shelf assembly comes preset for installation in a 23 inch 584 2 mm rack but you can reverse the mounting bracket to fit the smaller 19 inch 482 6 mm rack Front View Sid...

Page 699: ...ld be empty for easier lifting The front door can also be removed to lighten the shelf assembly 15 2 3 Mounting Multiple Nodes Most standard Telcordia GR 63 CORE 19 inch 482 6 mm or 23 inch 584 2 mm seven foot 2 133 m racks can hold four ONS 15454 ANSI shelves and a fuse and alarm panel However unequal flange racks are limited to three ONS 15454 ANSI shelves and a fuse and alarm panel or four ONS ...

Page 700: ...he shelf assembly is a total of 435 mm 17 35 inches wide with no mounting ears attached Ring runs are not provided by Cisco and might hinder side by side installation of shelves where space is limited The ONS 15454 ETSI measures 616 5 mm 24 27 inches high 535 mm 21 06 inches wide and 280 mm 11 02 inches deep You can install up to three ONS 15454 ETSI shelves in a seven foot 2133 6 mm equipment rac...

Page 701: ...the fan intake If a second ONS 15454 ETSI is installed above a shelf assembly the air ramp between the shelves provides space for air flow To ensure the mounting is secure use two to four M6 mounting screws for each side of the shelf assembly A shelf assembly should be mounted at the bottom of the rack if it is the only unit in the rack Figure 15 4 shows the rack mounting position for the ONS 1545...

Page 702: ... can install it using the temporary set screws included The shelf assembly should be empty for easier lifting The front door can also be removed to lighten the shelf assembly 15 3 2 Mounting Multiple Nodes Most standard Telcordia GR 63 CORE 23 inch 584 2 mm seven foot 2 133 mm racks can hold three ONS 15454 ETSI shelves two air ramps and a fuse and alarm panel Figure 15 5 shows a three shelf ONS 1...

Page 703: ...WDM system includes the following components Two channel add or drop flex module FlexLayer shelf assembly Y cable FlexLayer module The FlexLayer shelf assembly is 1 rack unit RU high and can be mounted in a 19 inch 482 6 mm or 23 inch 584 2 mm rack two way mounting brackets The FlexLayer shelf assembly is used to house the FlexLayer and Y Cable modules 61583 Fuse and Alarm Panel mountable in the r...

Page 704: ...avelength nm Two Channel A D Flex Module 59 30 3 195 9 1530 33 15216 FLB 2 31 1 58 31 1 195 8 1531 12 57 31 9 195 7 1531 90 15216 FLB 2 32 6 56 32 6 195 6 1532 68 54 34 2 195 4 1534 25 15216 FLB 2 35 0 53 35 0 195 3 1535 04 52 35 8 195 2 1535 82 15216 FLB 2 36 6 51 36 6 195 1 1536 61 49 38 1 194 9 1538 19 15216 FLB 2 38 9 48 38 9 194 8 1538 98 47 39 7 194 7 1539 77 15216 FLB 2 40 5 46 40 5 194 6 1...

Page 705: ... The rest of the WDM composite signal is sent to the DROP COM TX port A two percent tap coupler DROP MON is used to monitor the input WDM composite signal When the module is used as an add component the added channels coming from the two ADD CH RX ports are combined with the WDM composite signal coming from the ADD COM RX port The multiplexed WDM composite signal is sent to the ADD COM TX port A t...

Page 706: ...he component is used as a drop component The COM RX is mapped to Port 1 the COM TX is mapped to Port 12 and the two dropped channel TX ports are mapped to Ports 9 and 10 The two percent tap MON port is mapped to Port 6 Port 7 is not active Figure 15 8 Two Channel Drop Component Connector Mapping and Labeling Figure 15 9 shows how the connectors are mapped and labeled in the front panel when the co...

Page 707: ...and VoD applications The purpose of this module is to provide Y cable protection on the CLIENT side of transponder TXP cards such as the TXP_MR_10G XP_MR_10E or TXP_MR_2 5G Figure 15 10 There are two versions of this module one for multimode applications CS MM Y and one for single mode applications CS SM Y Using one Y cable protection module you can protect one client signal with two TXP cards and...

Page 708: ...irection the signal enters the module from the SPL RX port and is split through a passive star coupler to the SPL TXn ports This module although designed to pass wavelengths associated with the ONS 15454 32 channel plan is not selective to specific wavelengths modules do not filter wavelengths Figure 15 11 shows the block diagram of the Y cable protection module Figure 15 11 1 2 Splitter and 2 1 C...

Page 709: ... mode and multimode front panel Protection A mapping It shows how two DWDM receive inputs client working and protect provide one output signal to the customer client equipment using the module combiner function Front Panel CS MM Y 90940 1 2 Splitter and 2 1 Combiner 15216 CS MM SM Y 7 8 TXa2 RXb2 9 TXb2 12 RXb 2 3 4 TXa1 RXb1 TXb1 6 RXa2 1 RXa1 10 RXa 5 TXa 11 TXb 90941 Table 15 2 Protection A TXP...

Page 710: ...put signals working and protect to the client The following muxponder MXP and transponder TXP cards can use Y cable protection MXP_2 5_10G MXP_2 5_10E MXP_MR_2 5G TXP_MR_10G TXP_MR_10E TXP_MR_2 5G Table 15 3 Protection A TXP Cards 1 and 2 Port Mapping Splitter to DWDM Receive Port Signal Source 10 RXa TX port on customer client equipment A Transmit Port Signal Destinations 2 TXa1 Client RX port on...

Page 711: ...al dense wavelength division multiplexing DWDM applications might include 3 ONS 15454 shelves 1 Dispersion Compensating Unit DCU 7 patch panels or fiber storage trays Or alternatively 3 ONS 15454 shelves 2 DCUs 6 patch panels or fiber storage trays See Figure 15 15 for a typical rack layout Note Use the rack layout generated by Cisco MetroPlanner to determine your exact shelf layout ...

Page 712: ...are installing a patch panel or fiber storage tray below the ONS 15454 shelf you must install the air ramp between the shelf and patch panel tray fiber management tray or leave one rack unit RU space open 96605 2000 mm 78 74 in internal clearance FUSE ALARM PANEL FIBER STORAGE FIBER STORAGE FIBER STORAGE PATCH PANEL PATCH PANEL DCU DCU AIR RAMP STORAGE ANSI SHELF ANSI 23 in 584 2 mm or 19 in 482 6...

Page 713: ...re present on the ONS 15454 shelf or the network You can use the LCD to further isolate alarms The front door Figure 15 16 provides access to the shelf assembly fiber storage tray fan tray assembly and LCD screen Figure 15 16 The ONS 15454 Front Door The ONS 15454 ANSI ships with a standard door but can also accommodate a deep door and extended fiber clips 15454 DOOR KIT to provide additional room...

Page 714: ...nce 15 6 Front Door Figure 15 17 Cisco ONS 15454 ANSI Deep Door The ONS 15454 door locks with a pinned hex key that ships with the shelf assembly A button on the right side of the shelf assembly releases the door You can remove the front door to provide unrestricted access to the front of the shelf assembly 115011 ...

Page 715: ...ations Guide R6 0 September 2005 Chapter 15 Shelf Hardware Reference 15 6 Front Door Before you remove the ONS 15454 front door you must remove the ground strap of the front door Figure 15 18 Figure 15 18 ONS 15454 ANSI Front Door Ground Strap 71048 ...

Page 716: ...05 Chapter 15 Shelf Hardware Reference 15 6 Front Door Figure 15 19 shows how to remove the ONS 15454 ANSI front door Figure 15 19 Removing the ONS 15454 ANSI Front Door Door hinge Assembly hinge pin Assembly hinge Translucent circles for LED viewing 38831 FAN FAIL CR IT MA J MIN ...

Page 717: ...S 15454 ETSI front door Figure 15 20 Removing the ONS 15454 ETSI Front Door An erasable label is pasted on the inside of the front door You can use the label to record slot assignments port assignments card types node ID rack ID and serial number for the ONS 15454 61237 FAN FAIL CR IT MAJ MIN Door hinge Assembly hinge pin Assembly hinge Translucent circles for LED viewing ...

Page 718: ...nstallation and Operations Guide R6 0 September 2005 Chapter 15 Shelf Hardware Reference 15 6 Front Door Figure 15 21 shows the erasable label on the ONS 15454 ANSI shelf Figure 15 21 ONS 15454 ANSI Front Door Erasable Label 61840 ...

Page 719: ...ble label on the ONS 15454 ETSI shelf Figure 15 22 ONS 15454 ETSI Front Door Erasable Label The front door label also includes the Class I and Class 1M laser warning Figure 15 23 shows the ONS 15454 ANSI laser warning Figure 15 23 Laser Warning on the ONS 15454 ANSI Front Door Label Figure 15 24 shows the ONS 15454 ETSI laser warning P N 47 12460 01 78098 67575 ...

Page 720: ...gure 15 24 Laser Warning on the ONS 15454 ETSI Front Door Label 15 7 ONS 15454 ANSI Backplane Covers If a backplane does not have an electrical interface assembly EIA panel installed it should have two sheet metal backplane covers one on each side of the backplane See Figure 15 25 Each cover is held in place with nine 6 32 x 3 8 inch Phillips screws 78099 ...

Page 721: ...5454 ANSI backplane is covered by either a clear plastic protector 15454 SA ANSI or a sheet metal cover 15454 SA HD which is held in place by five 6 32 x 1 2 inch screws Remove the lower backplane cover to access the alarm interface panel AIP alarm pin fields frame ground and power terminals Figure 15 26 Figure 15 26 Removing the Lower Backplane Cover B A 32074 Lower Backplane Cover Backplane Shee...

Page 722: ...l clear plastic rear cover This clear plastic cover provides additional protection for the cables and connectors on the backplane Figure 15 27 shows the rear cover screw locations Figure 15 27 Backplane Attachment for Cover You can also install the optional spacers if more space is needed between the cables and rear cover Figure 15 28 32073 Screw locations for attaching the rear cover ...

Page 723: ...CC2P cards in the ONS 15454 ANSI also use the MAC address to store the node database Note The 5 A AIP 73 7665 XX is required when installing the new fan tray assembly 15454 FTA3 which comes preinstalled on the shelf assembly 15454 SA ANSI or 15454 SA HD Note A blown fuse on the AIP board can cause the LCD display to go blank 15 7 4 Alarm Interface Panel Replacement If the AIP fails a MAC Fail alar...

Page 724: ... terminals are located on FMEC cards in the Electrical Facility Connection Assembly EFCA The ground connection is the grounding receptacle on the side panel of the shelf The ONS 15454 ETSI EFCA at the top of the shelf has 12 FMEC slots numbered sequentially from left to right 18 to 29 Slots 18 to 22 and 25 to 29 provide electrical connections Slots 23 and 24 host the MIC A P and MIC C T P cards re...

Page 725: ...They have one common 32 VDC output and a maximum of 2 mA per input Each opto metal oxide semiconductor MOS alarm output can operate by definable alarm condition a maximum open circuit voltage of 60 VDC and a maximum current of 100 mA See the 23 7 External Alarms and Controls section on page 23 12 for further information Figure 15 31 shows the wire wrapping connections on the shelf backplane used t...

Page 726: ... OUT FG6 FG5 7 8 9 5 10 6 A B A B ENVIRONMENTAL ALARMS IN ACO FG7 1 2 3 4 IN A B FG8 1 2 3 4 A B MODEM FG9 1 2 3 4 A CRAFT AUD VIS FG10 1 2 3 4 A B LOCAL ALARMS IN FG12 FG11 11 12 A B B 96618 White Black Blue Green Slate Violet Orange Yellow Red Brown Table 15 6 Pin Assignments for the AEP AEP Cable Wire Backplane Pin AIC I Signal AEP Signal Black A1 GND AEP_GND White A2 AE_ 5 AEP_ 5 Slate A3 VBAT...

Page 727: ...73 Station 48 V max 2 mA AEP AIE GND VBAT VBAT Input 1 Input 48 Table 15 7 Alarm Input Pin Association AMPChamp Pin Number Signal Name AMPChamp Pin Number Signal Name 1 ALARM_IN_1 27 GND 2 GND 28 ALARM_IN_2 3 ALARM_IN_3 29 ALARM_IN_4 4 ALARM_IN_5 30 GND 5 GND 31 ALARM_IN_6 6 ALARM_IN_7 32 ALARM_IN_8 7 ALARM_IN_9 33 GND 8 GND 34 ALARM_IN_10 9 ALARM_IN_11 35 ALARM_IN_12 10 ALARM_IN_13 36 GND 11 GND ...

Page 728: ...ng switched by external controls 18 ALARM_IN_23 44 ALARM_IN_24 19 ALARM_IN_25 45 GND 20 GND 46 ALARM_IN_26 21 ALARM_IN_27 47 ALARM_IN_28 22 ALARM_IN_29 48 GND 23 GND 49 ALARM_IN_30 24 ALARM_IN_31 50 25 ALARM_IN_ 51 GND1 26 ALARM_IN_0 52 GND2 Table 15 7 Alarm Input Pin Association continued AMPChamp Pin Number Signal Name AMPChamp Pin Number Signal Name 78474 Station max 60 V 100 mA AEP AIE Output ...

Page 729: ...C When installed the filler card aids in maintaining proper air flow and EMI requirements Figure 15 34 shows the card faceplate The filler card has no card level LED indicators 5 COM_3 31 6 NO_3 32 NO_4 7 33 COM_4 8 COM_5 34 9 NO_5 35 NO_6 10 36 COM_6 11 COM_7 37 12 NO_7 38 NO_8 13 39 COM_8 14 COM_9 40 15 NO_9 41 NO_10 16 42 COM_10 17 COM_11 43 18 NO_11 44 NO_12 19 45 COM_12 20 COM_13 46 21 NO_13 ...

Page 730: ...d Management The ONS 15454 cable management facilities include the following Fiber patch panels A cable routing channel behind the fold down door that runs the width of the shelf assembly Figure 15 35 on page 15 37 Plastic horseshoe shaped fiber guides at each side opening of the cable routing channel that ensure that the proper bend radius is maintained in the fibers Figure 15 36 on page 15 38 12...

Page 731: ...o other devices Note To remove the jumper slack storage reels take out the screw in the center of each reel Optional fiber storage tray recommended for DWDM nodes Optional tie down bar ANSI only Figure 15 35 shows the cable management facilities that you can access through the fold down front door including the cable routing channel and the jumper routing fins Figure 15 35 Managing Cables on the F...

Page 732: ...of an ETSI shelf depending on fiber size and number of Ethernet cables running through that fiber channel Fiber guides 96518 Table 15 9 ANSI Fiber Channel Capacity One Side of the Shelf Fiber Diameter Maximum Number of Fibers Exiting Each Side No Ethernet Cables One Ethernet Cable Two Ethernet Cables 1 6 mm 0 6 inch 144 127 110 2 mm 0 7 inch 90 80 70 3 mm 0 11 inch 40 36 32 Table 15 10 ETSI Fiber ...

Page 733: ...ch panel module It can host up to eight ribbon cables with eight fibers each entering the drawer or 64 cables with a maximum outer diameter of 2 mm 0 079 inches Because the patch panel tray can host 64 connections hub and ROADM nodes will typically require two patch panel modules each and other DWDM nodes typically require one The module fits 19 and 23 inch 482 6 mm and 584 2 mm ANSI racks and 600...

Page 734: ...hrough the fiber storage tray Route fibers as necessary for your site configuration Figure 15 38 Fiber Storage Tray 15 11 4 Fiber Management Using the Optional ANSI Tie Down Bar You can install a 5 inch 127 mm tie down bar on the rear of the ANSI chassis You can use tie wraps or other site specific material to bundle the cabling and attach it to the bar so that you can more easily route the cable ...

Page 735: ...ion for all card slots including the number of Critical Major and Minor alarms The fan tray assembly features an air filter at the bottom of the tray that you can install and remove by hand Remove and visually inspect this filter every 30 days and keep spare filters in stock Refer to Chapter 13 Maintain the Node for information about cleaning and maintaining the fan tray air filter Caution Do not ...

Page 736: ...perature sensors The sensors measure the input air temperature at the fan tray assembly Fan speed options are low medium and high If the TCC2 TCC2P card fails the fans automatically shift to high speed The temperature measured by the TCC2 TCC2P sensors appears on the LCD screen Table 15 12 lists power requirements for the fan tray assembly 61236 FAN FAIL CR IT MAJ MIN Fan tray assembly LCD Table 1...

Page 737: ...ter that is installed beneath the fan tray assembly only However the reusable air filter is backward compatible 15 13 Power and Ground Description Ground the equipment according to Telcordia standards or local practices The following sections describe power and ground for the ONS 15454 shelves 15 13 1 ONS 15454 ANSI Power and Ground Cisco recommends the following wiring conventions but customer co...

Page 738: ...aution Only use the power cables shipped with the ONS 15454 ETSI 15 14 ONS 15454 ANSI Alarm Timing LAN and Craft Pin Connections Pin connections are provided on the ONS 15454 ANSI backplane For information about ONS 15454 ETSI connections see the 15 8 ONS 15454 ETSI Front Mount Electrical Connection section on page 15 30 Caution Always use the supplied ESD wristband when working with a powered ONS...

Page 739: ...ut 1 negative A4 Normally open output pair number 4 B4 BITS Input 1 positive B4 LAN Connecting to a hub or switch ACO A1 Normally open ACO pair A1 B1 B1 CRAFT A1 Receive PC pin 2 A2 A2 Transmit PC pin 3 B2 A3 Ground PC pin 5 A4 DTR PC pin 4 LOCAL ALARMS AUD Audible N O N O A1 Alarm output pair number 1 Remote audible alarm B1 B1 ENVIR ALARMS IN A2 Alarm output pair number 2 Critical audible alarm ...

Page 740: ... the TCC2 TCC2P card faceplate The ACO function clears all audible alarm indications After clearing the audible alarm indication the alarm is still present and viewable in the Alarms tab in CTC 15 14 2 Timing Connections The ONS 15454 ANSI backplane supports two building integrated timing supply BITS clock pin fields The first four BITS pins rows 3 and 4 support output and input from the first ext...

Page 741: ...4 TL1 Craft Interface Installation You can use the craft pins on the ONS 15454 ANSI backplane or the EIA TIA 232 port on the TCC2 TCC2P faceplate to create a VT100 emulation window to serve as a TL1 craft interface to the ONS 15454 ANSI Use a straight through cable to connect to the EIA TIA 232 port Table 15 15 shows the pin assignments for the CRAFT pin field Note You cannot use the craft backpla...

Page 742: ... ONS 15454 cards have electrical plugs at the back that plug into electrical connectors on the shelf assembly backplane When the ejectors are fully closed the card plugs into the assembly backplane Figure 15 43 shows card installation for an ONS 15454 ANSI shelf Figure 15 43 Installing Cards in the ONS 15454 ANSI FAN FAIL CRIT MAJ MIN 39391 Guide rail Ejector ...

Page 743: ...rd slots numbered sequentially from left to right Slots 7 and 11 are dedicated to TCC2 TCC2P cards Slot 9 is reserved for the optional AIC I card Caution Do not operate the ONS 15454 with a single TCC2 TCC2P card Always operate the shelf assembly with one working and one protect card of the same type Shelf assembly slots have symbols indicating the type of cards that you can install in them Each O...

Page 744: ... the card replacement is complete 15 16 Ferrites ANSI Only Place third party ferrites on certain cables to dampen electromagnetic interference EMI from the ONS 15454 ANSI Ferrites must be added to meet the requirements of Telcordia GR 1089 CORE Refer to the ferrite manufacturer documentation for proper use and installation of the ferrites Ferrite placements on the ONS 15454 ANSI can include power ...

Page 745: ...to support them as well as the optical plug in modules Small Form factor Pluggables SFPs For installation and card turn up procedures refer to Chapter 3 Turn Up a Node For card safety and compliance information refer to the Cisco Optical Transport Products Safety and Compliance Information document Note Unless otherwise specified ONS 15454 refers to both ANSI and ETSI shelf assemblies Chapter topi...

Page 746: ...nnels that connect ONS 15454 DWDM nodes and transport general purpose information including Cisco Transport Controller CTC management without affecting the client traffic ONS 15454 optical service channel cards include the Optical Service Channel Module OSCM and the Optical Service Channel and Combiner Separator Module OSC CSM Optical amplifier cards These cards are used in amplified DWDM nodes in...

Page 747: ...and converts a single incoming trunk signal to a single client signal All of the TXP and MXP cards perform optical to electrical to optical OEO conversion As a result they are not optically transparent cards The reason for this is that the cards must operate on the signals passing through them so it is necessary to do an OEO conversion On the other hand the termination mode for all of the TXPs and...

Page 748: ... ports located on the faceplate It operates in Slots 1 to 6 and 12 to 17 See the 16 6 3 32DMX Card section on page 16 52 4MD xx x The 4MD xx x card has five sets of ports located on the faceplate It operates in Slots 1 to 6 and 12 to 17 See the 16 6 4 4MD xx x Card section on page 16 55 Optical Add Drop Multiplexer Cards AD 1C xx x The AD 1C xx x card has three sets of ports located on the facepla...

Page 749: ...cated on the faceplate See the 16 8 4 MXP_2 5G_10G Card section on page 16 95 MXP_2 5G_10E The MXP_2 5G_10E card has 9 sets of ports located on the faceplate See the 16 8 5 MXP_2 5G_10E Card section on page 16 99 MXP_MR_2 5G The MXP_MR_2 5G card has 9 sets of ports located on the faceplate See the 16 8 6 MXP_MR_2 5G and MXPP_MR_2 5G Cards section on page 16 106 MXPP_MR_2 5G The MXPP_MR_2 5G card h...

Page 750: ...es Yes Yes Yes AD 1B xx x Yes Yes Yes Yes Yes AD 4B xx x Yes Yes Yes Yes Yes 32WSS No No Yes Yes Yes Transponder and Muxponder Cards Yes Yes Yes Yes Yes TXP_MR_10G Yes Yes Yes Yes Yes TXP_MR_10E No No Yes Yes Yes TXP_MR_2 5G Yes Yes Yes Yes Yes TXPP_MR_2 5G Yes Yes Yes Yes Yes MXP_2 5G_10G Yes Yes Yes Yes Yes MXP_2 5G_10E No No Yes Yes Yes MXP_MR_2 5G No No Yes Yes Yes MXPP_MR_2 5G No No Yes Yes Y...

Page 751: ...S 15454 Card Interfaces Assigned to Input Power Classes continued Input Power Class Card Table 16 4 10 Gbps Interface Optical Performance Parameter Class A Class B Class C Class I Type Power Limited OSNR1 Limited 1 OSNR optical signal to noise ratio Power Limited OSNR Limited OSNR Limited Power Limited OSNR Limited Maximum bit rate 10 Gbps 10 Gbps 10 Gbps 10 Gbps Regeneration 3R 3R 3R 3R FEC Yes N...

Page 752: ...imited OSNR Limited Power Limited OSNR Limited Power Limited OSNR Limited Power Limited Maximum bit rate 2 5 Gbps 2 5 Gbps 2 5 Gbps 2 5 Gbps 1 25 Gbps 2 5 Gbps Regeneration 3R 3R 2R 3R 3R 3R FEC Yes No No No No No Threshold Average Average Average Average Average Average Maximum BER 10 15 10 12 10 12 10 12 10 12 10 12 OSNR sensitivity 14 dB 6 dB 14 dB 10 dB 15 dB 14 dB 11 dB 13 dB 8 dB 12 dB Power...

Page 753: ... 2 195 4 1534 25 6 35 0 195 3 1535 04 7 35 8 195 2 1535 82 8 36 6 195 1 1536 61 9 38 1 194 9 1538 19 10 38 9 194 8 1538 98 11 39 7 194 7 1539 77 12 40 5 194 6 1540 56 13 42 1 194 4 1542 14 14 42 9 194 3 1542 94 15 43 7 194 2 1543 73 16 44 5 194 1 1544 53 17 46 1 193 9 1546 12 18 46 9 193 8 1546 92 19 47 7 193 7 1547 72 20 48 5 193 6 1548 51 21 50 1 193 4 1550 12 22 50 9 193 3 1550 92 23 51 7 193 2...

Page 754: ...communications channel DCC GCC termination optical service channel OSC DWDM data communications network DCN termination and system fault detection for the ONS 15454 The TCC2 also ensures that the system maintains Stratum 3 Telcordia GR 253 CORE timing requirements It monitors the supply voltage of the system Note The LAN interface of the TCC2 card meets the standard Ethernet specifications by supp...

Page 755: ... ACO CRIT MIN REM SYNC RS 232 TCP IP MAJ ACO TCC2 LAMP BACKPLANE Ethernet Repeater Mate TCC2 Ethernet Port Backplane Ethernet Port Shared with Mate TCC2 SDRAM Memory Compact Flash FPGA TCCA ASIC SCL Processor Serial Debug Modem Interface RS 232 Craft Interface Backplane RS 232 Port Shared with Mate TCC2 Faceplate RS 232 Port Note Only 1 RS 232 Port Can Be Active Backplane Port Will Supercede Facep...

Page 756: ...h two TCC2 cards When a second TCC2 card is inserted into a node it synchronizes its software its backup software and its database with the active TCC2 If the software version of the new TCC2 does not match the version on the active TCC2 the newly inserted TCC2 copies from the active TCC2 taking about 15 to 20 minutes to complete If the backup software version on the new TCC2 does not match the ve...

Page 757: ...49 degrees Fahrenheit 0 to 65 degrees Celsius The interfaces can operate with a cable length of 32 8 ft 10 m maximum at temperatures from 40 to 32 degrees Fahrenheit 40 to 0 degrees Celsius Figure 16 2 shows the faceplate and block diagram for the TCC2P card Table 16 8 TCC2 Network Level Indicators System Level LEDs Definition Red CRIT LED Indicates critical alarms in the network at the local term...

Page 758: ...ompact Flash FPGA TCCA ASIC SCL Processor Serial Debug Modem Interface RS 232 Craft Interface Backplane RS 232 Port Shared with Mate TCC2 Faceplate RS 232 Port Note Only 1 RS 232 Port Can Be Active Backplane Port Will Supercede Faceplate Port Faceplate Ethernet Port SCL Links to All Cards HDLC Message Bus Mate TCC2 HDLC Link Modem Interface Not Used 400MHz Processor Communications Processor SCC3 M...

Page 759: ...oltage out of the specified range Install TCC2P cards in Slots 7 and 11 for redundancy If the active TCC2P card fails traffic switches to the protect TCC2P card All TCC2P card protection switches conform to protection switching standards when the bit error rate BER counts are not in excess of 1 10 exp 3 and completion time is less than 50 ms The TCC2P card has two built in Ethernet interface ports...

Page 760: ... Definition Red FAIL LED This LED is on during reset The FAIL LED flashes during the boot and write process Replace the card if the FAIL LED persists ACT STBY LED Green Active Amber Standby Indicates the TCC2P is active green or in standby amber mode The ACT STBY LED also provides the timing reference and shelf control When the active TCC2P is writing to its database or to the standby TCC2P databa...

Page 761: ...D x2 AIC I FPGA SCL links 4 x IN OUT Power Monitoring 12 16 x IN Ringer Act Ring Ring Input Output 78828 FAIL ACT ACC INPUT OUTPUT EOW LOW RING AIC 1 DTMF DTMF UDC A UDC B DCC A DCC B ACC PWR A B RING DCC B DCC A UDC B UDC A Table 16 11 AIC I Card Level Indicators Card Level LEDs Description Red FAIL LED Indicates that the card s processor is not ready The FAIL LED is on during reset and flashes d...

Page 762: ...cannot assign the fan tray abbreviation for the alarm the abbreviation reflects the generic name of the input contacts The alarm condition remains raised until the external input stops driving the contact or you provision the alarm input The output contacts can be provisioned to close on a trigger or to close manually The trigger can be a local alarm severity threshold a remote alarm severity or a...

Page 763: ...sion the orderwire communications network during ring turn up so that all NEs on the ring can reach one another Orderwire terminations that is the optics facilities that receive and process the orderwire channels are provisionable Both express and local orderwire can be configured as on or off on a particular SONET SDH facility The ONS 15454 supports up to four orderwire channel terminations per s...

Page 764: ...eatures a dedicated data channel of 64 kbps F1 byte between two nodes in an ONS 15454 network Each AIC I card provides two user data channels UDC A and UDC B through separate RJ 11 connectors on the front of the AIC I card Each UDC can be routed to an individual optical interface in the ONS 15454 For instructions see the DLP G110 Create a User Data Channel Circuit task on page 7 20 The UDC ports a...

Page 765: ...T P FMECs which provide power external alarm and timing connections for the ONS 15454 ETSI shelf 16 3 1 MIC A P FMEC The MIC A P FMEC provides connection for the BATTERY B input one of the two possible redundant power supply inputs It also provides connection for eight alarm outputs coming from the TCC2 TCC2P card sixteen alarm inputs and four configurable alarm inputs outputs Its position is in S...

Page 766: ...C A P ALARM IN OUT CLEI CODE BARCODE POWER RATING BATTERY B Inventory Data EEPROM 61332 B a c k p l a n e 3W3 Connector Alarms DB62 Connector Power 16 Alarm inputs 4 Alarm in outputs Table 16 15 Alarm Interface Pinouts on the MIC A P DB 62 Connector Pin No Signal Name Signal Description 1 ALMCUTOFF N Alarm cutoff normally open ACO pair 2 ALMCUTOFF P Alarm cutoff normally open ACO pair 3 ALMINP0 N ...

Page 767: ...LM5 N External customer alarm 6 23 EXALM5 P External customer alarm 6 24 EXALM6 N External customer alarm 7 25 EXALM6 P External customer alarm 7 26 GND Ground 27 EXALM7 N External customer alarm 8 28 EXALM7 P External customer alarm 8 29 EXALM8 N External customer alarm 9 30 EXALM8 P External customer alarm 9 31 EXALM9 N External customer alarm 10 32 EXALM9 P External customer alarm 10 33 EXALM10...

Page 768: ...s must be installed in the shelf Figure 16 7 shows the MIC C T P FMEC faceplate 44 ALMOUP3 N Normally open output pair 4 45 ALMOUP3 P Normally open output pair 4 46 AUDALM0 N Normally open Minor audible alarm 47 AUDALM0 P Normally open Minor audible alarm 48 AUDALM1 N Normally open Major audible alarm 49 AUDALM1 P Normally open Major audible alarm 50 AUDALM2 N Normally open Critical audible alarm ...

Page 769: ...sent one for the West side and another for the East side The channel transports OSC overhead that is used to manage ONS 15454 DWDM networks An OSC signal uses the 1510 nm wavelength and does not affect client traffic The primary purpose of this channel is to carry clock synchronization and orderwire channel communications for the DWDM network It also provides transparent links between each node in...

Page 770: ...wire support and optical safety The OC 3 STM 1 section data communications channel SDCC overhead bytes are used for network communications An optical transceiver terminates the OC 3 STM 1 then it is regenerated and converted into an electrical signal The SDCC bytes are forwarded to the active and standby TCC2 TCC2P cards for processing via the system communication link SCL bus on the backplane Ord...

Page 771: ...tion and Operations Guide R6 0 April 2006 Chapter 16 Card Reference 16 4 1 OSCM Card Figure 16 9 shows the OSCM faceplate Figure 16 9 OSCM Card Faceplate Figure 16 10 shows a block diagram of the OSCM card OSCM FAIL ACT SF UC RX TX 96464 ...

Page 772: ...he OSCM card The returned power level value is calibrated to the OSC TX port Table 16 16 ASIC OC3 ULR Optical transceiver OSC Line OC 3 FPGA OC 12 POS OC 3 MII 96476 Processor VOA Physical Interface DC DC 19 44 MHz Line Ref clock Power supply Input filters BAT A B MT CLKt 0 Slot 1 6 MT CLKt 0 Slot 12 17 6 M P SCL Bus to TCCs FE FE User Data Channel 6 TOH Cell Bus P1 P1 OSC TX Physical photodiode O...

Page 773: ...ing features Optical combiner and separator module for multiplexing and demultiplexing the optical service channel to or from the wavelength division multiplexing WDM signal OC 3 STM 1 formatted OSC SDC forwarded to the TCC2 TCC2P cards for processing Distribution of the synchronous clock to all nodes in the ring 100BaseT FE UDC Monitoring functions such as orderwire support Optical safety Signal ...

Page 774: ...ckplane Orderwire bytes E1 E2 F1 are also forwarded via the SCL bus to the TCC2 TCC2P for forwarding to the AIC I card The payload portion of the OC 3 STM 1 is used to carry the fast Ethernet UDC The frame is sent to a POS processing block that extracts the Ethernet packets and makes them available at the RJ 45 front panel connector The OSC CSM distributes the reference clock information by removi...

Page 775: ... Guide R6 0 April 2006 Chapter 16 Card Reference 16 4 2 OSC CSM Card Figure 16 12 shows the OSC CSM faceplate Figure 16 12 OSC CSM Faceplate Figure 16 13 shows a block diagram of the OSC CSM card 96465 OSC CSM FAIL ACT SF UC RX MON TX RX COM TX RX LINE TX ...

Page 776: ...ence 16 4 2 OSC CSM Card Figure 16 13 OSC CSM Block Diagram ASIC OC3 ULR Optical transceiver OSC combiner separator OSC Line COM OC 3 FPGA OC 12 POS OC 3 MII TOH Cell Bus 96477 Processor Physical Interface DC DC Power supply Input filters BAT A B M P M P SCL Bus to TCCs RxClkRef FE User Data Channel ...

Page 777: ... insertion loss of the previous filter the reading of this power dynamic range has been brought backward towards the LINE RX output P3 The returned value is calibrated to the COM RX port P5 The returned value is calibrated to the LINE TX port including the insertion loss of the subsequent filter The returned power level values are calibrated to the ports as shown in Table 16 18 P P P P P V V 12489...

Page 778: ...ion maintenance and provisioning OAM P functions such as provisioning controls and alarms Optical amplifiers have a linear power feature that enables them to be kept in the constant gain mode if the gain is less than 28 dB However for longer span solutions it is necessary to place the amplifier in constant power mode In constant power mode automatic power control APC requirements change This is be...

Page 779: ...a reference value You can install the OPT PRE in Slots 1 to 6 and 12 to 17 The OPT PRE features Fixed gain mode with programmable tilt True variable gain Fast transient suppression Nondistorting low frequency transfer function Settable maximum output power Fixed output power mode mode used during provisioning MAL for fiber based DCU Amplified spontaneous emissions ASE compensation in fixed gain mo...

Page 780: ...uide R6 0 April 2006 Chapter 16 Card Reference 16 5 1 OPT PRE Amplifier Figure 16 15 shows the OPT PRE amplifier faceplate Figure 16 15 OPT PRE Faceplate Figure 16 16 shows a block diagram of the OPT PRE card OPT PRE FAIL ACT SF MON RX COM TX RX DC TX 96466 ...

Page 781: ... power for the OPT PRE card The returned power level values are calibrated to the ports as shown in Table 16 20 Optical module COM RX DC RX 96478 Processor DC TX COM TX MON FPGA For SCL Bus management SCL Bus TCCi M SCL Bus TCCi P DC DC Power supply Input filters BAT A B 98298 DCU COM RX COM TX DC RX DC TX MON P1 P2 P3 P4 P Physical photodiode Variable optical attenuator Table 16 20 OPT PRE Port C...

Page 782: ...alled it is only necessary to have the OSCM to process the OSC You can install the OPT BST in Slots 1 to 6 and 12 to 17 To control the gain tilt the OPT BST is equipped with a built in VOA The OPT BST features include Fixed gain mode with programmable tilt True variable gain Fast transient suppression Nondistorting low frequency transfer function Settable maximum output power Fixed output power mo...

Page 783: ...rs each have a ratio of 1 99 The result is that the power at the MON TX and MON RX ports is about 20 dB lower than the power at the COM TX and COM RX ports Figure 16 18 shows the OPT BST amplifier faceplate Figure 16 18 OPT BST Faceplate Figure 16 19 shows a block diagram of the OPT BST card OPT BST FAIL ACT SF RX MON TX RX COM TX RX OSC TX RX LINE TX 96467 ...

Page 784: ...Physical photodiodes P1 P2 P3 and P4 monitor the power for the OPT BST card The returned power level values are calibrated to the ports as shown in Table 16 22 Optical module Line RX Monitor Line RX 96479 Processor Line TX COM TX Com RX OSC TX Monitor Line TX OSC RX FPGA For SCL Bus management SCL Bus TCCi M SCL Bus TCCi P DC DC Power supply Input filters BAT A B Table 16 22 OPT BST Port Calibrati...

Page 785: ...the tilt unmanaged See Appendix B Hardware Specifications for detailed specification information The OPT BST E is designed to support 64 channels at 50 GHz channel spacing but currently is limited to 32 channels at 100 GHz The OPT BST E is a C band DWDM EDFA with OSC add and drop capability When an ONS 15454 has an OPT BST E installed it is only necessary to have the OSCM to process the OSC You ca...

Page 786: ... compensation in fixed gain mode Full monitoring and alarm handling with settable thresholds OSRI which is a software feature capable through CTC of shutting down the optical output power or reducing the power to a safe level automatic power reduction ALS which is a safety mechanism used in the event of a fiber cut Note The optical splitters each have a ratio of 1 99 The result is that the power a...

Page 787: ...006 Chapter 16 Card Reference 16 5 3 OPT BST E Amplifier Card Figure 16 21 shows the OPT BST E amplifier faceplate Figure 16 21 OPT BST E Faceplate Figure 16 22 shows a block diagram of the OPT BST E card OPT BST E FAIL ACT SF RX MON TX RX COM TX RX OSC TX RX LINE TX 131594 ...

Page 788: ...g Physical photodiodes P1 P2 P3 and P4 monitor the power for the OPT BST E card The returned power level values are calibrated to the ports as shown in Table 16 24 Optical module Line RX Monitor Line RX 96479 Processor Line TX COM TX Com RX OSC TX Monitor Line TX OSC RX FPGA For SCL Bus management SCL Bus TCCi M SCL Bus TCCi P DC DC Power supply Input filters BAT A B Table 16 24 OPT BST E Port Cal...

Page 789: ...r Cards This section describes the multiplexer and demultiplexer cards 16 6 1 32MUX O Card The 32 Channel Multiplexer 32MUX O card multiplexes 32 100 GHz spaced channels identified in the channel plan The 32MUX O card takes up two slots in an ONS 15454 and can be installed in Slots 1 to 5 and 12 to 16 The 32MUX O features include Arrayed waveguide grating AWG device that enables full multiplexing ...

Page 790: ... VOA is set to its maximum attenuation for safety purposes A manual VOA setting is also available Each single channel port is monitored using a photodiode to enable automatic power regulation An additional optical monitoring port with 1 99 splitting ratio is available Figure 16 24 shows the 32MUX O faceplate Figure 16 24 32MUX O Faceplate Figure 16 25 shows a block diagram of the 32MUX O card 30 3...

Page 791: ... functional block diagram Figure 16 26 32MUX O Optical Module Functional Block Diagram 16 6 1 1 Channel Plan The 32MUX O is typically used in hub nodes and provides the multiplexing of 32 channels spaced at 100 GHz into one fiber before their amplification and transmission along the line The channel plan is shown in Table 16 26 Optical module 30 3 to 36 6 8 CHS RX 38 1 to 44 5 8 CHS RX 46 1 to 52 ...

Page 792: ... 195 6 1532 68 5 34 2 195 4 1534 25 6 35 0 195 3 1535 04 7 35 8 195 2 1535 82 8 36 6 195 1 1536 61 9 38 1 194 9 1538 19 10 38 9 194 8 1538 98 11 39 7 194 7 1539 77 12 40 5 194 6 1540 56 13 42 1 194 4 1542 14 14 42 9 194 3 1542 94 15 43 7 194 2 1543 73 16 44 5 194 1 1544 53 17 46 1 193 9 1546 12 18 46 9 193 8 1546 92 19 47 7 193 7 1547 72 20 48 5 193 6 1548 51 21 50 1 193 4 1550 12 22 50 9 193 3 15...

Page 793: ...tiplexer 32DMX O card demultiplexes 32 100 GHz spaced channels identified in the channel plan The 32DMX O takes up two slots in an ONS 15454 and can be installed in Slots 1 to 5 and 12 to 16 The 32DMX O features include AWG that enables channel demultiplexing functions Each single channel port is equipped with VOAs for automatic optical power regulation after demultiplexing In the case of electric...

Page 794: ...card does not have VOAs on each drop port for optical power regulation The 32DMX optical demultiplexer module is used in conjunction with the 32 Channel Wavelength Selective Switch 32WSS card in ONS 15454 Multiservice Transport Platform MSTP nodes Each single channel port is monitored using a photodiode to enable automatic power regulation Figure 16 27 shows the 32DMX O card faceplate Figure 16 27...

Page 795: ...he 32DMX O card The returned power level values are calibrated to the ports as shown in Table 16 29 Optical module 30 3 to 36 6 8 CHS TX 38 1 to 44 5 8 CHS TX 46 1 to 52 5 8 CHS TX 54 1 to 60 6 8 CHS TX 96480 Processor MON COM RX FPGA For SCL Bus management SCL Bus TCCi M SCL Bus TCCi P DC DC Power supply Input filters BAT A B 98302 1 32 Control Control interface Physical photodiode Variable optic...

Page 796: ... COM RX is the input port for the aggregate optical signal being demultiplexed This port is supported by both a VOA for optical power regulation and a photodiode for optical power monitoring DROP ports 1 to 32 On its output the 32DMX provides 32 drop ports that are typically used for dropping channels within the ROADM node Each drop port has a photodiode for optical power monitoring Unlike the two...

Page 797: ...er push on MPO ribbon connectors The incoming optical signal to the demultiplexer comes into the COM RX This input port is connected using a single LC duplex optical connector A block diagram of the 32DMX card is shown in Figure 16 31 115290 32DMX FAIL ACT SF 54 1 60 6 46 1 52 5 38 1 44 5 30 3 36 6 COM RX TX 32 Drop Ports 32 Drop Port Outputs Logical View Drop 1 8 Drop 9 16 Drop 17 24 Drop 25 32 C...

Page 798: ...ouble slot cards six slots in the ONS 15454 chassis Equipped with ROADM functionality ONS 15454 MSTP nodes can be configured at the optical channel level using CTC Cisco MetroPlanner and Cisco Transport Manager CTM Both the 32DMX card and 32WSS card utilize planar lightwave circuit PLC technology to perform wavelength level processing Optical module 30 3 to 36 6 8 CHS TX 38 1 to 44 5 8 CHS TX 46 1...

Page 799: ...MD xx x card multiplexes and demultiplexes four 100 GHz spaced channels identified in the channel plan The 4MD xx x card is designed to be used with band OADMs both AD 1B xx x and AD 4B xx x The card is bidirectional The demultiplexer and multiplexer functions are implemented in two different sections of the same card In this way the same card can manage signals flowing in opposite directions Ther...

Page 800: ...each multiplexed channel Software monitored photodiodes at the input and output multiplexer and demultiplexer ports for power control and safety purposes Software monitored virtual photodiodes at the common DWDM output and input ports A virtual photodiode is a firmware calculation of the optical power at that port This calculation is based on the single channel photodiode reading and insertion los...

Page 801: ...ram The optical module shown in Figure 16 35 is optically passive and consists of a cascade of interferential filters that perform the channel multiplexing and demultiplexing functions Optical Module Channel Inputs 96482 Processor COM TX COM RX Channel Outputs FPGA For SCL Bus management SCL Bus TCC M SCL Bus TCC P DC DC converter Power supply input filters BAT A B 98303 Virtual photodiode COM TX ...

Page 802: ...ath insertion loss and then providing the TCC2 TCC2P card with the obtained value 16 6 4 1 Wavelength Pairs Table 16 33 shows the band IDs and the add drop channel IDs for the 4MD xx x card 16 6 4 2 Power Monitoring Physical photodiodes P1 through P8 and virtual photodiodes V1 and V2 monitor the power for the 4MD xx x card The returned power level values are calibrated to the ports as shown in Tab...

Page 803: ...n of the card has a different part number The AD 1C xx x can be installed in Slots 1 to 6 and 12 to 17 The AD 1C xx x has the following internal features Two cascaded passive optical interferential filters perform the channel add and drop functions One software controlled VOA regulates the optical power of the inserted channel Software controlled VOA regulates the insertion loss of the express opt...

Page 804: ... and Operations Guide R6 0 April 2006 Chapter 16 Card Reference 16 7 1 AD 1C xx x Card Figure 16 36 AD 1C xx x Faceplate Figure 16 37 shows a block diagram of the AD 1C xx x card AD 1C X XX FAIL ACT SF RX 15xx xx TX RX EXP TX RX COM TX 96473 ...

Page 805: ...e power for the AD 1C xx x card The returned power level values are calibrated to the ports as shown in Table 16 36 Optical Module COM RX COM TX 124074 uP8260 processor DC DC converter EXP TX EXP RX FPGA For SCL Bus management SCL Bus TCC M SCL Bus TCC P Power supply Input filters BAT A B Add Rx Drop Tx 98304 Control Control interface Virtual photodiode COM RX EXP RX EXP TX TX Channel 15xx xx RX P...

Page 806: ... part number The AD 2C xx x has the following features Passive cascade of interferential filters perform the channel add and drop functions Two software controlled VOAs in the add section one for each add port regulate the optical power of inserted channels Software controlled VOAs regulate insertion loss on express channels Internal control of the VOA settings and functions photodiode detection a...

Page 807: ...erations Guide R6 0 April 2006 Chapter 16 Card Reference 16 7 2 AD 2C xx x Card Figure 16 39 AD 2C xx x Faceplate Figure 16 40 shows a block diagram of the AD 2C xx x card AD 2C X XX FAIL ACT SF RX 15xx xx TX RX 15xx xx TX RX EXP TX RX COM TX 96474 ...

Page 808: ...pairs in Table 16 38 In this table channel IDs are given rather than wavelengths To compare channel IDs with the actual wavelengths they represent see Table 16 6 on page 16 9 Optical Module COM RX COM TX 98305 uP8260 processor DC DC converter EXP TX EXP RX FPGA For SCL Bus management SCL Bus TCC M SCL Bus TCC P Power supply input filters BAT A B Add RX Drop TX Add RX Drop TX CH 1 CH 2 98306 Contro...

Page 809: ...The AD 2C xx x card has three card level LED indicators described in Table 16 40 Table 16 38 AD 2C xx x Channel Pairs Band ID Add Drop Channel ID Band 30 3 A 30 3 31 2 31 9 32 6 Band 34 2 B 34 2 35 0 35 8 36 6 Band 38 1 C 38 1 38 9 39 7 40 5 Band 42 1 D 42 1 42 9 43 7 44 5 Band 46 1 E 46 1 46 9 47 7 48 5 Band 50 1 F 50 1 50 9 51 7 52 5 Band 54 1 G 54 1 54 9 55 7 56 5 Band 58 1 H 58 1 58 9 59 7 60 ...

Page 810: ...th eight part numbers The AD 4C xx x has the following features Passive cascade of interferential filters perform the channel add and drop functions Four software controlled VOAs in the add section one for each add port regulate the optical power of inserted channels Two software controlled VOAs regulate insertion loss on express and drop path respectively Internal control of the VOA settings and ...

Page 811: ... R6 0 April 2006 Chapter 16 Card Reference 16 7 3 AD 4C xx x Card Figure 16 42 AD 4C xx x Faceplate Figure 16 43 shows a block diagram of the AD 4C xx x card AD 4C X XX FAIL ACT SF RX 15xx xx TX RX 15xx xx TX RX 15xx xx TX RX 15xx xx TX RX EXP TX RX COM TX 96475 ...

Page 812: ...le channel IDs are given rather than wavelengths To compare channel IDs with the actual wavelengths they represent see Table 16 6 on page 16 9 Optical Module COM RX COM TX 124075 uP8260 processor DC DC converter EXP TX EXP RX FPGA For SCL Bus management SCL Bus TCC M SCL Bus TCC P Power supply Input filters BAT A B Add Rx Drop Tx Channel 1 Add Rx Drop Tx Channel 2 Add Rx Drop Tx Channel 3 Add Rx D...

Page 813: ...6 9 47 7 48 5 Band 50 1 F 50 1 50 9 51 7 52 5 Band 54 1 G 54 1 54 9 55 7 56 5 Band 58 1 H 58 1 58 9 59 7 60 6 Table 16 42 AD 4C xx x Port Calibration Photodiode CTC Type Name Calibrated to Port P1 P4 ADD COM TX P5 P8 DROP DROP TX P9 IN EXP EXP RX P10 OUT EXP EXP TX V1 IN COM COM RX V2 OUT COM COM TX Table 16 43 AD 4C xx x Card Level Indicators Card Level Indicators Description Red FAIL LED The red...

Page 814: ...gths are used in the ONS 15454 DWDM system The card bidirectionally adds and drops in two different sections on the same card to manage signal flow in both directions This card can be used when there is asymmetric adding and dropping on each side east or west of the node a band can be added or dropped on one side but not on the other The AD 1B xx x can be installed in Slots 1 to 6 and 12 to17 and ...

Page 815: ...n and Operations Guide R6 0 April 2006 Chapter 16 Card Reference 16 7 4 AD 1B xx x Card Figure 16 45 AD 1B xx x Faceplate Figure 16 46 shows a block diagram of the AD 1B xx x card AD 1B X XX FAIL ACT SF RX XX X TX RX EXP TX RX COM TX 96471 ...

Page 816: ...he power for the AD 1B xx x card The returned power level values are calibrated to the ports as shown in Table 16 44 Optical Module COM RX COM TX 124073 uP8260 processor DC DC converter EXP TX EXP RX FPGA For SCL Bus management SCL Bus TCC M SCL Bus TCC P Power supply Input filters BAT A B Band xx x Rx Band xx x Tx 98307 Control Control interface Virtual photodiode COM RX EXP RX EXP TX TX Band xx ...

Page 817: ...st of the node a band can be added or dropped on one side but not on the other The AD1B xx x can be installed in Slots 1 to 6 and 12 to 17 and has the following features Five software controlled VOAs regulate the optical power flowing in the OADM paths Output power of each dropped band is set by changing the attenuation of each VOA drop The VOA express is used to regulate the insertion loss of the...

Page 818: ... Guide R6 0 April 2006 Chapter 16 Card Reference 16 7 5 AD 4B xx x Card Figure 16 48 AD 4B xx x Faceplate Figure 16 49 shows a block diagram of the 4D 4B xx x card AD 4B X XX FAIL ACT SF RX XX X TX RX XX X TX RX XX X TX RX XX X TX RX EXP TX RX COM TX 96472 ...

Page 819: ...xx x card The returned power level values are calibrated to the ports as shown in Table 16 46 Optical Module COM RX COM TX 124075 uP8260 processor DC DC converter EXP TX EXP RX FPGA For SCL Bus management SCL Bus TCC M SCL Bus TCC P Power supply Input filters BAT A B Add Rx Drop Tx Channel 1 Add Rx Drop Tx Channel 2 Add Rx Drop Tx Channel 3 Add Rx Drop Tx Channel 4 Virtual photodiode COM RX TX B30...

Page 820: ...o add or drop individual optical channels using CTC Cisco MetroPlanner and CTM An ROADM network element utilizes two 32WSS cards two slots each and two 32DMX cards one slot each for a total of six slots in the chassis For a diagram of a typical ROADM configuration see the 17 1 4 ROADM Node section on page 17 8 The 32WSS card can be installed in Slots 1 and 2 3 and 4 5 and 6 12 and 13 14 and 15 or ...

Page 821: ...al signal from another 32WSS module in the same network element EXP TX port The EXP TX port sends an optical signal to the other 32WSS module within the network element COM TX port The COM TX port sends an aggregate optical signal to a booster amplifier card for example OPT BST for transmission outside of the network element COM RX port The COM RX port receives the optical signal from a preamplifi...

Page 822: ...S Card Figure 16 51 32WSS Faceplate and Ports Figure 16 52 provides a high level functional block diagram of the 32WSS card 115291 FAIL ACT SF 54 1 60 6 46 1 52 5 38 1 44 5 30 3 36 6 DROP TX TX RX EXP RX TX COM RX TX ADD RX 32WSS 32 Add Ports Add 1 8 Add 9 16 Add 17 24 Add 25 32 DROP TX EXP RX EXP TX COM RX COM TX ...

Page 823: ...ages are shown in Figure 16 53 which provides a detailed optical functional diagram of the 32WSS card EXP RX port In from other 32WSS within the network element EXP TX port To the other 32WSS within the network element DROP TX port dropped channels To COM RX port of 32DMX COM RX port In from preamplifier OPT PRE or OSC CSM COM TX port To OPT BST or OSC CSM 115293 32 add ports Add 1 Add 2 Add 32 Op...

Page 824: ...together into an aggregate optical signal which is sent out on the COM TX port The output is typically connected to an OPT BST or OPT BST E in the event a booster amplifier is needed or to an OSC CSM if no amplification is needed COM RX Port Optical Splitter Processing The incoming optical signal received at the COM RX port and is applied to the optical splitter within the 32WSS Channels that are ...

Page 825: ...ot dropped and DROP TX is the port for the dropped channels The xx x yy y TX ports represent the four groups of eight channels ranging from xx x wavelength to yy y wavelength according to the channel plan Table 16 48 32WSS Port Calibration Photodiode CTC Type Name Calibrated to Port P1 P32 ADD Power ADD ADD RX P33 P641 1 P33 P64 monitor either ADD or PASSTHROUGH power depending on the state of the...

Page 826: ...form of FEC that uses a wrapper approach The digital wrapper lets you transparently take in a signal on the client side wrap a frame around it and restore it to its original form FEC enables longer fiber links because errors caused by the optical signal degrading with distance are corrected The trunk port operates at 9 95328 Gbps or 10 70923 Gbps with ITU T G 709 Digital Wrapper FEC and at 10 3125...

Page 827: ...ion on page 16 114 for more information Note If you create a GCC on either card of the protection group the trunk span port stays permanently active regardless of the switch state When you provision a GCC you are provisioning unprotected overhead bytes The GCC is not protected by the protect group 16 8 1 2 Automatic Laser Shutdown The ALS procedure is supported on both client and trunk interfaces ...

Page 828: ...cates that the card s processor is not ready This LED is on during reset The FAIL LED flashes during the boot process Replace the card if the red FAIL LED persists ACT STBY LED Green Active Amber Standby Green indicates that the card is operational one or both ports active and ready to carry traffic Amber indicates that the card is operational and in standby protect mode SF LED Amber Amber indicat...

Page 829: ... one for the trunk port and one for the client port Each connector pair is labeled 16 8 2 1 Key Features The key features of the TXP_MR_10E card are A tri rate client interface available through the ONS XC 10G S1 XFP ordered separately OC 192 SR1 10GE 10GBASE LR 10G FC 1200 SM LL L OC 192 to ITU T G 709 OTU2 provisionable synchronous and asynchronous mapping 16 8 2 2 Faceplate and Block Diagram Fi...

Page 830: ...R 253 CORE standards The DWDM trunk port operates at a rate that is dependent on the input signal and the presence or absence of the ITU T G 709 Digital Wrapper FEC The possible trunk rates are OC192 9 95328 Gbps OTU2 10 70923 Gbps 10GE 10 3125 Gbps or 10GE into OTU2 nonstandard 11 0957 Gbps 10G FC 10 51875 Gbps or 10G FC into OTU2 nonstandard 11 31764 Gbps The maximum system reach in filterless a...

Page 831: ...ansmission than with FEC The E FEC feature is one of three basic modes of FEC operation FEC can be turned off FEC can be turned on or E FEC can be turned on to provide greater range and lower BER The default mode is FEC on and E FEC off E FEC is provisioned using CTC Caution Because the transponder has no visibility into the data payload and detect circuits the TXP_MR_10E card does not display cir...

Page 832: ...ur wavelengths in the 1550 nm ITU 100 GHz range They are available in eight versions each of which covers four wavelengths for a total coverage of 32 different wavelengths in the 1550 nm range Table 16 52 TXP_MR_10E Card Level Indicators Card Level LED Description Red FAIL LED The red FAIL LED indicates that the card s processor is not ready This LED is on during reset The FAIL LED flashes during ...

Page 833: ...709 frame The mapping function is simply done by placing a digital wrapper around the client signal Only OC 48 STM 16 client signals are fully ITU T G 709 compliant and the output bit rate depends on the input client signal Table 16 54 shows the possible combinations of client interfaces input bit rates 2R and 3R modes and ITU T G 709 monitoring The output bit rate is calculated for the trunk bit ...

Page 834: ...the TXP_MR_2 5G and TXPP_MR_2 5G cards apply a digital wrapper to the incoming client interface signals OC N STM N 1G FC 2G FC GE Performance monitoring is available on all of these signals except for 2G FC and varies depending upon the type of signal For client inputs other than OC 48 STM 16 a digital wrapper might be applied but the resulting signal is not ITU T G 709 compliant The card applies ...

Page 835: ... 5G and TXPP_MR_2 5G Cards Figure 16 56 TXP_MR_2 5G and TXPP_MR_2 5G Faceplates 16 8 3 2 Block Diagram Figure 16 57 shows a block diagram of the TXP_MR_2 5G and TXPP_MR_2 5G cards TXP_MR_2 5G TXPP_MR_2 5G 96504 TXP MR 2 5G FAIL ACT SF RX CLIENT DWDM TX RX TX TXPP MR 2 5G FAIL ACT SF RX CLIENT DWDMA DWDMB TX RX TX RX TX ...

Page 836: ...cal cable termination The TXPP_MR_2 5G card features a 1550 nm laser for the trunk line port and a 1310 nm or 850 nm laser depending on the SFP for the client port and contains three transmit and receive connector pairs labeled on the card faceplate The card uses dual LC connectors for optical cable termination 16 8 3 3 Y Cable Protection For the TXP_MR_2 5G card protection is done using Y cable p...

Page 837: ...aser Shutdown The ALS procedure is supported on both client and trunk interfaces On the client interface ALS is compliant with ITU T G 664 6 99 On the data application and trunk interface the switch on and off pulse duration is greater than 60 seconds The on and off pulse duration is user configurable For ALS provisioning information see the DLP G230 Change Line Settings for TXP_MR_2 5G and TXPP_M...

Page 838: ...FDA Compliance Statement Label Figure 16 61 shows the electrical energy hazard label This label alerts personnel to electrical hazards within the card The potential of shock hazard exists when adjacent cards are removed during maintenance and touching exposed electrical circuitry on the card itself Figure 16 61 Electrical Energy Hazard Label 16 8 3 7 TXP_MR_2 5G and TXPP_MR_2 5G Card Level Indicat...

Page 839: ... in 16 different versions each of which covers two wavelengths for a total coverage of 32 different wavelengths in the 1550 nm range Table 16 56 TXP_MR_2 5G and TXPP_MR_2 5G Card Level Indicators Card Level LED Description Red FAIL LED The red FAIL LED indicates that the card s processor is not ready This LED is on during reset The FAIL LED flashes during the boot process Replace the card if the r...

Page 840: ...G card Using direct fiber loopbacks causes irreparable damage to the MXP_2 5G_10G card You can install MXP_2 5G_10G cards in Slots 1 to 6 and 12 to 17 Caution Do not install an MXP_2 5G_10G card in Slot 3 if you have installed a DS3 EC1 48 card in Slots 1or 2 Likewise do not install an MXP_2 5G_10G card in Slot 17 if you have installed a DS3 EC1 48 card in Slots 15 or 16 If you do the cards will i...

Page 841: ...ons Guide R6 0 April 2006 Chapter 16 Card Reference 16 8 4 MXP_2 5G_10G Card Figure 16 62 MXP_2 5G_10G Faceplate Figure 16 63 shows a block diagram of the MXP_2 5G_10G card 83658 FAIL ACT STBY SF 10 Gb s MxP 1542 14 1542 94 RX TX RX TX RX TX RX TX RX TX ...

Page 842: ...8 4 2 Automatic Laser Shutdown The ALS procedure is supported on both client and trunk interfaces On the client interface ALS is compliant with ITU T G 664 6 99 On the data application and trunk interface the switch on and off pulse duration is greater than 60 seconds The on and off pulse duration is user configurable For ALS provisioning information see the DLP G223 Change Line Settings for MXP_2...

Page 843: ...y This LED is on during reset The FAIL LED flashes during the boot process Replace the card if the red FAIL LED persists ACT STBY LED Green Active Amber Standby If the ACT STBY LED is green the card is operational one or more ports active and ready to carry traffic If the ACT STBY LED is amber the card is operational and in standby protect mode Amber SF LED The amber SF LED indicates a signal fail...

Page 844: ...ange on these interfaces The E FEC functionality increases the correction capability of the transponder to improve performance allowing operation at a lower OSNR compared to the standard RS 237 255 correction algorithm A new BCH algorithm implemented in E FEC allows recovery of an input BER up to 1E 3 Pluggable client interface optic modules The MXP_MP_10E card has modular interfaces Two types of ...

Page 845: ...16 Card Reference 16 8 5 MXP_2 5G_10E Card 16 8 5 2 Faceplate Figure 16 64 shows the MXP_2 5G_10E faceplate Figure 16 64 MXP_2 5G_10E Faceplate Figure 16 65 shows a block diagram of the MXP_2 5G_10E card 115310 FAIL ACT STBY SF 4x2 5 10 E MxP 530 33 1550 12 RX TX TX RX TX RX TX RX TX RX ...

Page 846: ...oopbacks causes irreparable damage to the MXP_MP_10E card 16 8 5 5 Multiplexing Function The muxponder is an integral part of the optically transparent ROADM network in which data payload channels and wavelengths are processed exclusively at the optical level without electrical to optical E O conversion The key function of MXP_MP_10E is to multiplex 4 OC 48 STM16 signals onto one ITU T G 709 OTU2 ...

Page 847: ...valid frames processed until one of the TCC2 TCC2P cards supplies a valid clock In addition the card is allowed to select the recovered clock from one active and valid client channel and supply that clock to the TCC2 TCC2P card 16 8 5 7 Y Cable Protection The MXP_2 5G_10E card supports Y cable protection Two MXP_2 5G_10E cards can be joined in a Y cable protection group with one card assigned as t...

Page 848: ...gnal transparently The card can be provisioned to terminate regenerator section overhead This is used to eliminate forwarding of unneeded layer overhead It can help reduce the number of alarms and help isolate faults in the network 16 8 5 11 Client Interface Monitoring The following parameters are monitored on the MXP_2 5G_10E card Laser bias current is measured as a PM parameter LOS is detected a...

Page 849: ...n see the DLP G223 Change Line Settings for MXP_2 5G_10G and MXP_2 5G_10E Cards section on page 5 34 16 8 5 14 Jitter For SONET and SDH signals the MXP_2 5G_10E card complies to GR 253 CORE ITU T G 825 and ITU T G 873 for jitter generation jitter tolerance and jitter transfer 34 2 1535 82 34 2 1536 61 38 1 1538 19 38 1 1538 98 38 1 1539 77 38 1 1540 56 42 1 1542 14 42 1 1542 94 42 1 1543 73 42 1 1...

Page 850: ...TM 16 OC 48 port per card and is compliant with Telcordia GR 253 CORE Table 16 61 MXP_2 5G_10E Card Level Indicators Card Level LED Description Red FAIL LED The red FAIL LED indicates that the card s processor is not ready This LED is on during reset The FAIL LED flashes during the boot process Replace the card if the red FAIL LED persists ACT STBY LED Green Active Amber Standby If the ACT STBY LE...

Page 851: ...pes GE 1G FC 2G FC 1G FICON 2G FICON Note Because the client payload cannot oversubscribe the trunk a mix of client signals can be accepted up to a maximum limit of 2 5 Gbps Table 16 64 shows the input data rate for each client interface and the encapsulation method The current version of the Transparent Generic Framing Procedure GFP T G 7041 supports transparent mapping of 8B 10B block coded prot...

Page 852: ... CORE and ITU G 783 826 Client PM is achieved through RMON for FC and GE A buffer to buffer credit management scheme provides FC flow control With this feature enabled a port indicates the number of frames that can be sent to it its buffer credit before the sender is required to stop transmitting and wait for the receipt of a ready indication The MXP_MR_2 5G and MXPP_MR_2 5 cards support FC credit...

Page 853: ...eled TX and RX on the faceplate The trunk port is a dual LC connector with a 45 degree downward angle The MXPP_MR_2 5G card features a 1550 nm laser for the trunk line port and a 1310 nm or 850 nm laser depending on the SFP for the client port The card contains eight 12 5 degree downward tilt SFP modules for the client interfaces For optical termination each SFP uses two LC connectors which are la...

Page 854: ...SERDES blocks dedicated to the high speed interfaces GE FC and FICON and two SERDES blocks for future interfaces A field programmable gate array FPGA is provided to support different configurations for different modes of operation This FPGA has a Universal Test and Operations Physical Interface for ATM UTOPIA interface A transceiver add drop multiplexer TADM chip MXP_MR_2 5G MXPP_MR_2 5G 124077 MX...

Page 855: ...ing with the MXP_MR_2 5G and MXPP_MR_2 5G cards in a loopback configuration on the trunk port Do not use direct fiber loopbacks with the MXP_MR_2 5G and MXPP_MR_2 5G cards Using direct fiber loopbacks causes irreparable damage to the MXP_MR_2 5G and MXPP_MR_2 5G cards 16 8 6 3 MXP_MR_2 5G and MXPP_MR_2 5G Safety Labels The MXP_MR_2 5G and MXPP_MR_2 5G cards have several safety labels that provide ...

Page 856: ...FDA compliance label This label shows the statement of compliance to FDA standards and that the hazard level classification is in accordance with IEC60825 1 Am 2 or Ed 1 2 Figure 16 70 FDA Compliance Statement Label Figure 16 71 shows the electrical energy hazard label This label alerts personnel to electrical hazards within the card The potential of shock hazard exists when adjacent cards are rem...

Page 857: ...r both ports active and ready to carry traffic Amber indicates that the card is operational and in standby protect mode SF LED Amber Amber indicates a signal failure or condition such as LOS LOF or high BERs on one or more of the card s ports The amber SF LED is also illuminated if the transmit and receive fibers are incorrectly connected If the fibers are properly connected and the link is workin...

Page 858: ...nnect the client ports of the two cards physically with a Y cable The single client signal is sent into the Rx Y cable and is split between the two TXP or MXP cards The two Tx signals from the client side of the TXP or MXP cards are combined in the TX Y cable into a single client signal Only the active card signal passes through as the single TX client signal The other card must have its laser tur...

Page 859: ...e two trunk Tx ports The two signals are transmitted over diverse optical paths The far end MXPP or TXPP card uses an optical switch to choose one of the two trunk Rx port signals and injects it into the Tx client port When using splitter protection with two MXPP or TXPP cards there are two different optical signals that flow over diverse paths in each direction In case of failure the far end swit...

Page 860: ...TN overhead the far end detects the changed bytes and the far end client squelch is removed FELC also covers the situation in which the trunk port detects that it has an invalid signal the client is squelched so as not to propagate the invalid signal Payload types with the 2R mode preclude the use of OTN overhead bytes In 2R mode an LOS on the client port causes the trunk laser to turn off The far...

Page 861: ...el regenerator DCCr bytes In the section termination mode the SONET TOH line and SDH multiplex section overhead bytes are passed transparently In line termination mode the section and line overhead bytes for SONET and the overhead bytes for the SDH multiplex and regenerator sections are terminated None of the overhead bytes are passed through They are all regenerated including the SONET SDCC and l...

Page 862: ...assembly numbers TANs are provided in Table 16 69 Table 16 69 SFP XFP Card Compatibility Card Compatible SFP XFP Cisco Product ID Cisco Top Assembly Number TAN MXP_2 5G_10G ONS 15454 SONET SDH 15454 SFP OC48 IR ONS SE 2G S1 10 1975 01 10 2017 01 MXP_2 5G_10E ONS 15454 SONET SDH 15454 SFP OC48 IR ONS SE 2G S1 ONS SE 2G L2 10 1975 01 10 2017 01 10 2013 01 MXP_MR_2 5G MXPP_MR_2 5G 15454 SFP GE LX 154...

Page 863: ...or LX LH or technology type such as Gigabit Ethernet See the label on the SFP or XFP for technology type and model The SFPs use the latches show in the following figures One type of latch is a mylar tab Figure 16 74 Figure 16 74 Mylar Tab SFP A second type of latch is an actuator button Figure 16 75 Figure 16 75 Actuator Button SFP A third type of latch is a bail clasp Figure 16 76 Figure 16 76 Ba...

Page 864: ...atched in Figure 16 77 and latched in Figure 16 78 See the label on the XFP for technology type and model Figure 16 77 Bail Clasp XFP Unlatched Figure 16 78 Bail Clasp XFP Latched XFP dimensions are Height 0 33 in 8 5 mm Width 0 72 in 18 3 mm Depth 3 1 in 78 mm XFP temperature ranges are COM Commercial operating temperature range 5 to 70 degrees Celsius 23 to 158 degrees Fahrenheit EXT Extended op...

Page 865: ... page 17 14 17 3 Automatic Node Setup page 17 29 17 1 DWDM Node Configurations The ONS 15454 supports the following DWDM node configurations hub terminal OADM reconfigurable OADM anti ASE line amplifier and OSC regeneration line Note The Cisco MetroPlanner tool creates a plan for amplifier placement and proper node equipment 17 1 1 Hub Node A hub node is a single ONS 15454 node equipped with two T...

Page 866: ... 32 channels from the client ports are multiplexed and equalized onto one fiber using the 32MUX O card Then multiplexed channels are transmitted on the line in the eastward direction and fed to the Optical Booster OPT BST amplifier The output of this amplifier is combined with an output signal from the Optical Service Channel Modem OSCM card and transmitted toward the east line Received signals fr...

Page 867: ... 32DMX or a 32DMX O cards Terminal nodes can be either east or west In west terminal nodes the cards are installed in the east slots Slots 1 through 6 In east terminal nodes cards are installed in the west slots Slots 12 through 17 Figure 17 3 shows an example of an east terminal configuration with a 32MUX O and 32DMX O cards installed The channel flow for a terminal node is the same as the hub no...

Page 868: ... be passed through one OADM card to another OADM card without using a TDM ITU line card called optical passthrough if an external patch cord is installed Unlike express path an optical passthrough channel can be converted later to an add drop channel in an altered ring without affecting another channel OADM amplifier placement and required card placement is determined by the Cisco MetroPlanner too...

Page 869: ... OADM node Since the 32 wavelength plan is based on eight bands each band contains four channels optical adding and dropping can be performed at the band level and or at the channel level meaning individual channels can be dropped OPT BST OPT PRE OADM or mux demux DCU Air ramp DCU OADM or mux demux OADM or mux demux OADM or mux demux TCC2 TCC2P OSCM OSCM TCC2 TCC2P OADM OADM or mux demux OADM or m...

Page 870: ...ows an example of a passive OADM node configuration The passive OADM node is equipped with a band filter one four channel multiplexer demultiplexer and a channel filter on each side of the node OPT PRE 4 ch demux 4MD xx x OPT PRE OPT BST Line Line 96427 OPT BST DCU DCU OSCM TCC TCC2 OSCM AIC I AD yB xx x AD 1C xx x AD 1C xx x AD yB xx x By By Ch Ch 4 ch mux 4 ch demux 4MD xx x 4 ch mux ...

Page 871: ...d Combiner Separator Module OSC CSM card is used instead of the OPT BST amplifier and the OSCM card Figure 17 7 Passive OADM Node Channel Flow Example OSC CSM OADM OADM or mux demux Air ramp OADM or mux demux OADM or mux demux OADM or mux demux TCC2 TCC2P Available Available TCC2 TCC2P OADM or mux demux OADM or mux demux OADM or mux demux OADM OSC CSM OADM or mux demux AIC I 96424 4 ch demux 4MD x...

Page 872: ...not used in any open slot Figure 17 8 shows an example of an amplified ROADM node configuration Both 32DMX O and 32 DMX cards can be used in ROADM nodes Cisco MetroPlanner automatically determines at ROADM Node level which Demultiplexer to use based on the overall Network design Note Both 32DMX O and 32DMX cards can be used in an ROADM node Cisco Metroplanner automatically chooses the demultiplexe...

Page 873: ...T and 32DMX O Cards Installed Figure 17 10 shows an example of a reconfigurable OADM east to west optical signal flow The west to east optical signal flow follows an identical path through the west OSC CSM and west 32WSS modules In this example OSC CSM modules are installed so OPT BST modules are not needed OPT PRE OPT BST 32WSS DCU W Air ramp DCU E 32DMX O 32DMX O TCC2 TCC2P OSCM OSCM TCC2 TCC2P ...

Page 874: ...the best configuration for anti ASE nodes 1 The OSC CSM receives the optical signal It separates the optical service channel from the optical payload and sends the payload to the OPT PRE module 2 The OPT PRE compensates for chromatic dispersion amplifies the optical payload and sends it to the 32WSS 3 The 32WSS splits the signal into two components The 80 component is sent to the DROP TX port and ...

Page 875: ...ier and booster amplifier to match the optical input power value and to maintain the amplifier gain tilt value Two OSCM cards are connected to the east or west ports of the booster amplifiers to multiplex the optical service channel OSC signal with the pass though channels If the node does not contain OPT BST amplifiers you must use OSC CSM cards rather than OSCM cards in your configuration Figure...

Page 876: ...nger and payload amplification and add drop capabilities are not present Cisco MetroPlanner places an OSC regeneration node in spans longer than 37 dB 31 dB is the longest span between the OSC regeneration node and the next DWDM network site To add data communications network DCN capability wherever needed within the network OSC regeneration nodes require two OSC CSM cards as shown in Figure 17 13...

Page 877: ...node OSC signal flow Figure 17 14 OSC Regeneration Line Node Flow OSC CSM Available Available DCU Air ramp DCU Available Available Available TCC2 TCC2P Available Available TCC2 TCC2P Available Available Available Available OSC CSM Available AIC I 115232 115255 Fiber Fiber Fiber Fiber Side B OSC CSM Side A OSC CSM Side B Side A COM TX Line TX Side B Side A COM RX Line RX Side B Side A COM RX Side B...

Page 878: ...will support TDM configurations in a future release 17 2 1 1 1 Protected Flexible Terminal Node The 1 1 protected flexible terminal node is a single ONS 15454 node equipped with a series of OADM cards acting as a hub node configuration This configuration uses a single hub or OADM node connected directly to the far end hub or OADM node through four fiber links This node type is used in a ring confi...

Page 879: ...exible Terminal Node Figure 17 15 Double Terminal Protection Configuration Figure 17 16 shows a 1 1 protected single span link with hub nodes This node type cannot be used in a hybrid configuration Hub site with OADM node Hub site with OADM node 110437 Traffic transmits east Traffic transmits west Storage server Storage server ...

Page 880: ...with Hub Nodes Figure 17 17 shows a 1 1 protected single span link with active OADM nodes This node type can be used in a hybrid configuration OPT BST 110608 OPT PRE DCU 32DMX 0 32MUX 0 32MUX 0 32DMX 0 TCC OPT BST Hub node TCC AIC I OPT PRE DCU DCU Client equipment Client equipment 32MUX 0 32DMX 0 OSCM OSCM TCC Hub node TCC AIC I OPT BST OPT PRE OSCM 32DMX 0 32MUX 0 DCU OPT BST OPT PRE OSCM ...

Page 881: ...110609 Client equipment Client equipment OADM node TCC TCC2 AIC I OSCM OPT BST 4MD xx x 4MD xx x OPT BST DCU DCU 4 ch mux 4 ch demux AD yB xx x By AD 4C xx x Ch AD 2C xx x Ch AD 1C xx x Ch By Ch Ch AD yB xx x AD 4C xx x AD 2C xx x AD 1C xx x Ch 4 ch demux 4 ch mux OSCM Client equipment Client equipment OADM node TCC TCC2 AIC I OSCM OPT BST OPT PRE OPT PRE OPT PRE OPT PRE OPT BST DCU DCU 4 ch demux...

Page 882: ...iguration exceeding 16 channels because the 32 channel terminal site is more cost effective for 17 channels and beyond Note The dash in the following table below means not applicable 110610 Client equipment Client equipment OADM node TCC TCC2 AIC I OSC CSM 4MD xx x 4MD xx x 4 ch mux 4 ch demux AD yB xx x By AD 4C xx x Ch AD 2C xx x Ch AD 1C xx x Ch By Ch Ch AD yB xx x AD 4C xx x AD 2C xx x AD 1C x...

Page 883: ...ration Table 17 1 Typical AD Configurations for Scalable Terminal Nodes Numberof Channels Terminal Configuration Option 1 Option 2 1 AD 1C xx x 2 AD 2C xx x 3 AD 4C xx x AD 1B xx x 4MD xx x 4 AD 4C xx x AD 1B xx x 4MD xx x 5 AD 1C xx x AD 4C xx x AD 1C xx x AD 1B xx x 4MD xx x 6 AD 2C xx x AD 4C xx x AD 2C xx x AD 1B xx x 4MD xx x 7 2 x AD 4C xx x 2 x AD 1B xx x 4MD xx x 8 2 x AD 4C xx x 2 x AD 1B...

Page 884: ...the most flexible of all node types because the OADM filter cards can be configured to accommodate node traffic If the node does not contain amplifiers it is considered a passive hybrid terminal node Figure 17 20 shows an example of a scalable terminal node configuration This node type can be used without add or drop cards OPT PRE Client equipment Line 96892 OPT BST DCU TCC TCC2 OSCM AIC I AD 1C x...

Page 885: ...node becomes passive if the amplifiers are removed The hybrid terminal node type is based on the DWDM terminal node type described in the 17 1 2 Terminal Node section on page 17 3 Figure 17 21 shows an example of an amplified hybrid terminal node configuration OPT BST or OSC CSM OPT PRE DCU Air ramp Available TCC2 TCC2P XC10G XC10G TCC2 TCC2P AIC I 96902 OSC CSM or OADM OADM or 4MD or ITU T line c...

Page 886: ...al Example Figure 17 22 shows an example of a passive hybrid terminal node configuration OPT BST or OSC CSM OPT PRE 32MUX O 32MUX O DCU Air ramp Available TCC2 TCC2P XC10G XC10G TCC2 TCC2P AIC I 96899 TXP MXP or ITU T line card TXP MXP or ITU T line card TXP MXP or ITU T line card TXP MXP or ITU T line card TXP MXP or ITU T line card OSC CSM TXP MXP or ITU T line card ...

Page 887: ...scribed in the 17 1 3 OADM Node section on page 17 4 TDM cards can be installed in any available slot Review the plan produced by MetroPlanner to determine slot availability Figure 17 23 shows an example of an amplified hybrid OADM node configuration The hybrid OADM node can also become passive by removing the amplifier cards OSC CSM Available 32MUX O 32MUX O DCU Air ramp Available TCC2 TCC2P XC10...

Page 888: ...page 17 26 shows a channel flow example of a hybrid line node configuration Since this node contains both TDM and DWDM rings both TDM and DWDM rings should be terminated even if no interactions are present between them Note For DWDM applications if the OPT BST is not installed within the node the OSC CSM card must be used instead of the OSCM card OPT BST W OPT PRE W OADM W DCU Air ramp DCU TCC2 TC...

Page 889: ...mple OPT BST W or OSC CSM OPT PRE W DCU Air ramp DCU TCC2 TCC2P XC10G XC10G TCC2TCC2P OPT PRE E OPT BST or OSC CSM E AIC I 110436 TXP MXP or ITU T line card W TXP MXP or ITU T line card W TXP MXP or ITU T line card E TXP MXP or ITU T line card E TXP MXP or ITU T line card W OSC CSM TXP MXP or ITU T line card W TXP MXP or ITU T line card E OSC CSM TXP MXP or ITU T line card E ...

Page 890: ...Amplified TDM Node An amplified TDM node is a single ONS 15454 node that increases the span length between two ONS 15454 nodes that contain TDM cards and optical amplifiers There are three possible installation configurations for an amplified TDM node Scenario 1 uses client cards and OPT BST amplifiers Scenario 2 uses client cards OPT BST amplifiers OPT PRE amplifiers and FlexLayer filters Scenari...

Page 891: ... 28 shows the second amplified TDM node configuration scenario with client cards AD 1C xx x cards OPT BST amplifiers OPT PRE amplifiers and FlexLayer filters OPT BST W Blank DCU Air ramp DCU TCC2 TCC2P XC10G XC10G TCC2 TCC2P AIC I 110435 TXP MXP or ITU T line card W TXP MXP or ITU T line card W TXP MXP or ITU T line card W TXP MXP or ITU T line card W TXP MXP or ITU T line card E TXP MXP or ITU T ...

Page 892: ...iguration scenario with client cards OPT BST amplifiers OPT PRE amplifiers AD 1C xx x cards and OSC CSM cards OPT BST W DCU Air ramp DCU TCC2 TCC2P XC10G XC10G TCC2 TCC2P AIC I 110606 TXP MXP or ITU T line card W TXP MXP or ITU T line card W TXP MXP or ITU T line card W TXP MXP or ITU T line card W TXP MXP or ITU T line card E TXP MXP or ITU T line card E TXP MXP or ITU T line card E TXP MXP or IT...

Page 893: ...d VOAs and photodiodes are provided in the following ONS 15454 DWDM cards OADM band cards AD xB xx x express and drop path OADM channel cards AD xC xx x express and add path 4 Channel Terminal Multiplexer Demultiplexer 4MD xx x input port 32 Channel Terminal Multiplexer 32MUX O input port 32 Channel Wavelength Selective Switch 32WSS input port 32 Channel Terminal Demultiplexer 32DMX O and 32DMX ou...

Page 894: ...re divided into two contributions Reference Contribution read only Set by ANS Calibration Contribution read and write Set by user The ANS equalization algorithm requires the following knowledge of the DWDM transmission element layout The order in which the DWDM elements are connected together on the express paths Channels that are dropped and added Channels or bands that have been configured as pa...

Page 895: ...d wavelength When provisioning the expected wavelength the following rules apply The card name is generically characterized by the card family and not the particular wavelengths supported for example AD 2C for all 2 channel OADMs At the provisioning layer you can provision a generic card for a specific slot using CTC or TL1 Wavelength assignment is done at the port level An equipment mismatch alar...

Page 896: ... Add and Drop Stage Input Power West Side Add and Drop Stage Drop Power West Side Add and Drop Stage Band i Drop Power i 1 through 8 West Side Add and Drop Stage Channel i Drop Power i 1 through 32 East Side Receive East Side Rx Max Expected Span Loss East Side Rx Min Expected Span Loss East Side Rx Amplifier Working Mode East Side Rx Amplifier Ch Power East Side Rx Amplifier Gain East Side Rx Amp...

Page 897: ... Amplifier Power Threshold West Receiving Amplifier Power Threshold Transmitting West Side Transmit West Side Tx Amplifier Working Mode West Side Tx Amplifier Ch Power West Side Tx Amplifier Gain West Side Tx Amplifier Tilt West Side Fiber Stage Input Threshold West Side Add and Drop Stage Output Power West Side Add and Drop Stage By Pass Power East Side Transmit East Side Tx Amplifier Working Mod...

Page 898: ...n platform line direction and functional group 115717 Parameter tree view ANS parameters Parameter values Table 17 3 ANS WDM Provisioning Subtab Parameters Tree Element Parameters root Network Type dwdm root East Receiving East Side Rx Max Expected Span Loss East Side Rx Min Expected Span Loss root East Receiving Amplifier East Side Rx Amplifier Working Mode East Side Rx Amplifier Ch Power East Si...

Page 899: ... Threshold root West Receiving West Side Rx Max Expected Span Loss West Side Rx Min Expected Span Loss root West Receiving Amplifier West Side Rx Amplifier Working Mode West Side Rx Amplifier Ch Power West Side Rx Amplifier Gain West Side Rx Amplifier Tilt root West Receiving Power West Side Add and Drop Input Power West Side Add and Drop Drop Power West Side Band n Drop Power n 1 8 West Side Chan...

Page 900: ... West Side Transmit Amplifier Channel Power East and West Side Transmit Amplifier Gain East and West Side Transmit Amplifier Tilt Amplifier Rx East and West Side Receive Amplifier Working Mode East and West Side Receive Amplifier Channel Power East and West Side Receive Amplifier Gain East and West Side Receive Amplifier Tilt Thresholds Tx East and West Side Fiber Stage Input Threshold Thresholds ...

Page 901: ...d and Drop Input Power East or West Side Add and Drop Output Power East or West Side Channel n Drop Power n 1 32 Flexible Channel Count Terminal Network Network Type Span Loss East and West Expected Span Loss Amplifier Tx East and West Side Transmit Amplifier Working Mode East and West Side Transmit Amplifier Channel Power East and West Side Transmit Amplifier Gain East and West Side Transmit Ampl...

Page 902: ...ld East and West Side Receive Amplifier Input Power Fail Power East and West Side Add and Drop Input Power East and West Side Add and Drop Output Power East and West Side Band n Drop Power n 1 8 Line Amplifier Network Network Type Span Loss East and West Expected Span Loss Amplifier Tx East and West Side Transmit Amplifier Working Mode East and West Side Transmit Amplifier Channel Power East and W...

Page 903: ...and West Side Transmit Amplifier Channel Power East and West Side Transmit Amplifier Gain East and West Side Transmit Amplifier Tilt Amplifier Rx East and West Side Receive Amplifier Working Mode East and West Side Receive Amplifier Channel Power East and West Side Receive Amplifier Gain East and West Side Receive Amplifier Tilt Thresholds Tx East and West Side Fiber Stage Input Threshold Threshol...

Page 904: ...mplifier Tilt 0 30 0 WS Tx Amp MC MA TS FC O H LS R East Side Tx Amplifier Tilt 0 30 0 WS Tx Amp MC MA TS FC O H LS R West Side Rx Amplifier Tilt 0 30 0 WS Rx Amp MC MA TS FC O H LS R East Side Rx Amplifier Tilt 0 30 0 WS Rx Amp MC MA TS FC O H LS R West Side OSC LOS Threshold 50 30 U WS Rx Th MC MA TS FC O H LS R East Side OSC LOS Threshold 50 30 U WS Rx Th MC MA TS FC O H LS R West Side Channel ...

Page 905: ...e Reference 17 3 2 View and Provision ANS Parameters West Side Channel 1 32 Drop Power 50 30 14 WS Rx P DC B1 MC MA TS H R East Side Channel 1 32 Drop Power 50 30 14 ES Rx P DC B1 MC MA TS H R Table 17 5 ANS Parameters Summary continued General Name Min Max Def Group Network Type Optical Type ...

Page 906: ...17 42 Cisco ONS 15454 DWDM Installation and Operations Guide R6 0 August 2005 Chapter 17 Node Reference 17 3 2 View and Provision ANS Parameters ...

Page 907: ... 15454s can be provisioned for metro access and metro core DWDM network applications Metro access networks are 60 km or less in size Channels are not equalized and dispersion compensation is not applied Metro access networks have few spans and very low span loss so the signal link budget is the limiting factor for performance Metro core networks can be up to 400 km in size The channel power is equ...

Page 908: ...ected path must be regenerated in the hub node Protected traffic saturates a channel in a hubbed ring that is no channel reuse is possible However the same channel can be reused in different sections of the ring by provisioning unprotected multihop traffic From a transmission point of view this network topology is similar to two bidirectional point to point links with OADM nodes For more informati...

Page 909: ...nks with OADM nodes Figure 18 2 Multihubbed Ring 18 2 3 Any to Any Rings The any to any ring topology Figure 18 3 contains only reconfigurable OADM ROADM nodes or ROADM nodes with Optical Service Channel OSC regeneration or amplifier nodes This topology potentially allows you to route every wavelength from any source to any destination node inside the network See the 17 1 4 ROADM Node section on p...

Page 910: ...ode can be created in two ways Equip an OADM node with 32MUX O cards and 32DMX O cards This solution is adopted when the total number of wavelengths deployed in the ring is higher than ten OADM nodes equipped with 32MUX O cards and 32DMX O cards are called full OADM nodes When the total number of wavelengths deployed in the ring is lower than ten the anti ASE node is configured by using an OADM no...

Page 911: ...an be installed between the two terminal nodes Only unprotected traffic can be provisioned in a linear configuration Figure 18 5 shows five ONS 15454 nodes in a linear configuration with an amplified and a passive OADM node Figure 18 5 Linear Configuration with an OADM Node Figure 18 6 shows five ONS 15454 nodes in a linear configuration without an OADM node See the 17 1 2 Terminal Node section on...

Page 912: ...oned on a single span link Figure 18 7 shows ONS 15454s in a single span link Eight channels are carried on one span Single span link losses apply to OC 192 LR ITU cards The optical performance values are valid assuming that the sum of the OADM passive node insertion losses and the span losses does not exceed 35 dB Figure 18 7 Single Span Link 18 3 Optical Performance This section provides optical...

Page 913: ...2 channels SMF 281 E LEAF2 TW RS3 1 SMF 28 single mode fiber 28 2 E LEAF enhanced large effective area fiber 3 TW RS TrueWave reduced slope fiber Ring Linear Linear without OADM Hub Active OADM Passive OADM Terminal Line OSC regeneration 16 channels SMF 28 Ring Linear Linear without OADM Hub Active OADM Passive OADM Terminal Line OSC regeneration 8 channels SMF 28 Linear without OADM Terminal Line...

Page 914: ... Gbps TXP_MR_2 5G 3R payload data type FEC disabled TXPP_MR_2 5G 3R payload data type FEC disabled MXP_MR_2 5G MXPP_MR_2 5G F 2 5 Gbps TXP_MR_2 5G 2R payload data type TXPP_MR_2 5G 2R payload data type G 2 5 Gbps OC 48 ELR ITU H 2 5 Gbps 2 4 port Gigabit Ethernet Transponder GBIC WDM 100 GHz I 10 Gbps TXP_2 5G_10E E FEC1 enabled TXP_MR_10E E FEC enabled 1 Forward error correction Table 18 2 ONS 15...

Page 915: ... in each class A dash indicates the spans that are not supported Table 18 4 Span Loss for 16 Channel Ring and Linear Networks with OADM Nodes Using SMF Fiber Number of Spans 10 Gbps 2 5 Gbps Class A Class B Class C Class I Class D Class E Class F Class G Class H Class J 1 37 dB 29 dB 28 dB 37 dB 37 dB 36 dB 33 dB 35 dB 37 dB 33 dB 2 32 dB 24 dB 24 dB 34 dB 35 dB 31 dB 28 dB 30 dB 32 dB 28 dB 3 29 ...

Page 916: ...e 18 2 for a list of cards in each class A dash indicates the spans that are not supported Table 18 6 Span Loss for 32 Channel Ring and Linear Networks with OADM Nodes Using E LEAF Fiber Number of Spans 10 Gbps 2 5 Gbps Class A Class B Class C Class I Class D Class E Class F Class G Class H Class J 1 35 dB 25 dB 25 dB 37 dB 37 dB 33 dB 30 dB 32 dB 34 dB 30 dB 2 29 dB 21 dB 20 dB 31 dB 32 dB 28 dB ...

Page 917: ...an losses are equal The DCU loss is 9 dB Table 18 8 Span Loss for 32 Channel Linear Networks without OADM Nodes Using TW RS Fiber Number of Spans 10 Gbps 2 5 Gbps Class A Class B Class C Class I Class D Class E Class F Class G Class H Class J 1 35 dB 25 dB 25 dB 37 dB 37 dB 33 dB 30 dB 32 dB 34 dB 30 dB 2 28 dB 20 dB 20 dB 30 dB 31 dB 27 dB 24 dB 26 dB 27 dB 24 dB 3 26 dB 18 dB 17 dB 27 dB 28 dB 2...

Page 918: ...s assume the following All nodes in the ring or linear network are ROADM with equal span losses The DCU loss is 9 dB Table 18 10 Span Loss for 16 Channel Linear Networks without OADM Nodes Using SMF Fiber Number of Spans 10 Gbps 2 5 Gbps Class A Class B Class C Class I Class D Class E Class F Class G Class H Class J 1 37 dB 29 dB 28 dB 37 dB 37 dB 36 dB 33 dB 35 dB 37 dB 33 dB 2 32 dB 23 dB 23 dB ...

Page 919: ...ass H Class J 1 35 dB 25 dB 25 dB 36 dB 37 dB 33 dB 30 dB 32 dB 34 dB 2 30 dB 21 dB 20 dB 32 dB 34 dB 28 dB 25 dB 26 dB 29 dB 3 28 dB 18 dB 17 dB 30 dB 32 dB 26 dB 23 dB 24 dB 27 dB 4 26 dB 28 dB 30 dB 24 dB 21 dB 22 dB 25 dB 5 25 dB 27 dB 29 dB 23 dB 20 dB 20 dB 23 dB 6 24 dB 26 dB 28 dB 22 dB 18 dB 19 dB 22 dB 7 23 dB 25 dB 27 dB 21 dB 14 dB 17 dB 20 dB 8 22 dB 24 dB 26 dB 20 dB 18 dB 9 21 dB 23...

Page 920: ...er of Spans 10 Gbps 2 5 Gbps Class A Class B Class C Class I Class D Class E Class F Class G Class H Class J Table 18 14 Pass Fail Criteria for 32 Channel Eight Node ROADM Rings Using SMF Fiber Span Loss dB Amplifiers Installed 10 Gbps 2 5 Gbps Class A Class B Class C Class I Class D Class E Class F Class G Class H Class J 1 OPT PRE only Yes 7 7 Yes Yes Yes Yes Yes Yes 2 OPT PRE only Yes 7 7 Yes Y...

Page 921: ...talled 10 Gbps 2 5 Gbps Class A Class B Class C Class I Class D Class E Class F Class G Class H Class J Table 18 15 Pass Fail Criteria for 32 Channel 16 Node ROADM Rings Using SMF Fiber Span Loss dB Amplifiers Installed 10 Gbps 2 5 Gbps Class A Class B Class C Class I Class D Class E Class F Class G Class H Class J 1 OPT PRE only 151 151 151 Yes Yes 151 151 151 151 2 OPT PRE only 151 151 151 Yes Y...

Page 922: ... available channels 12 OPT PRE and OPT BST OPT BST E 151 151 151 Yes Yes 151 151 151 151 13 OPT PRE and OPT BST OPT BST E 151 151 151 Yes Yes 151 151 151 151 14 OPT PRE and OPT BST OPT BST E 151 151 151 Yes Yes 151 151 151 151 15 OPT PRE and OPT BST OPT BST E 151 151 151 Yes Yes 151 151 151 151 1 Cisco MetroPlanner calculates the maximum ring circumference and number of nodes that can be supported...

Page 923: ...nstead of the AD 1C xx x cards to reduce equipment costs and increase the span length since the optical service channel is not necessary The optical performance for this special configuration is given for Classes A through G Classes A B and C use 8 dBm nominal channel power Classes D E F and G use 12 dBm nominal channel power There are no restriction on the first 16 available wavelengths from 1530...

Page 924: ...rol loop performs the following input and output power calculations where G represents the gain and t represents time Pout t G Pin t mW Pout t G Pin t dB In a power equalized optical system the total input power is proportional to the number of channels The amplifier software compensates for any variation of the input power due to changes in the number of channels carried by the incoming signal Am...

Page 925: ...responsible for starting APC hourly or every time a new circuit is provisioned or removed Every time the master node signals for APC to start gain and VOA setpoints are evaluated on all nodes in the network If corrections are needed in different nodes they are always performed sequentially following the optical paths starting from the master node APC corrects the power level only if the variation ...

Page 926: ...se the difference between the expected and current values exceeds the 3 dB security range After the error condition is cleared signaling protocol enables APC on the network and the APC DISABLE INTERNAL condition is cleared Because APC is required after channel provisioning to compensate for ASE effects all optical channel network connection OCHNC circuits that you provision during the disabled APC...

Page 927: ...ich APC information is shown Card The card for which power control information is shown Last Modification Date and time APC last modified a setpoint for the parameters shown in Table 18 21 Last Check Date and time APC last verified the setpoints for the parameters shown in Table 18 21 APC State 134672 Table 18 21 APC Managed Parameters Card Port Parameters OPT BST LINE 3 TX Gain Total Signal Outpu...

Page 928: ...card equalization functions on the Maintenance DWDM Power Monitoring subtab Figure 18 9 The tab shows the input channel power Padd the express or pass through Ppt power and the power level at output Pout Figure 18 9 Power Monitoring Subtab AD 1C xx x AD 2C xx x LINE 1 TX VOA Target Attenuation AD 4C xx x LINE 1 TX CHAN i TX VOA Target Attenuation 32 DMX LINE 1 TX VOA Target Attenuation Table 18 21...

Page 929: ...he difference between the minimum and maximum span loss values is greater than 1 dB The minimum and maximum expected span loss values are calculated by Cisco MetroPlanner for the network and imported into CTC However you can manually change the minimum and expected span loss values CTC span loss measurements provide a quick span loss check and are useful whenever changes to the network occur for e...

Page 930: ...ss of signal LOS occurs Auto Restart ALS is on The laser and optical amplifiers OPT BST only automatically shuts down when traffic outages LOS occur It automatically restarts when the conditions that caused the outage are resolved Note Auto Restart is the default ALS provisioning Manual Restart ALS is on The laser and optical amplifiers OPT BST only automatically shuts down when traffic outages LO...

Page 931: ...e detects a Loss of Incoming Overhead LOS O on the OPT BST OPT BST E card and the OSCM card detects a LOS OC3 at the SONET layer Refer to the Cisco ONS 15454 Troubleshooting Guide or the Cisco ONS 15454 SDH Troubleshooting Guide 3 Node B power monitoring photodiode detects a Loss of Incoming Payload LOS P on the OPT BST OPT BST E card Refer to the Cisco ONS 15454 Troubleshooting Guide or the Cisco...

Page 932: ...CM laser is shut down Note The shutdown of the OPT BST OPT BST E and OSCM cards which launch power into the cut fiber achieves the aim of the Network Optical Safety feature 13 The node A OPT PRE card automatically shuts down due to a loss of incoming optical power When the fiber is repaired either an automatic or manual restart at the Node A OPT BST OPT BST E transmitter or at the Node B OPT BST O...

Page 933: ... 2 Node B power monitoring photodiode detects a LOS O on the OSC CSM card Refer to the Cisco ONS 15454 Troubleshooting Guide or the Cisco ONS 15454 SDH Troubleshooting Guide 3 Node B power monitoring photodiode detects a LOS P on the OSC CSM card Refer to the Cisco ONS 15454 Troubleshooting Guide or the Cisco ONS 15454 SDH Troubleshooting Guide 4 On the OSC CSM the simultaneous LOS O and LOS P det...

Page 934: ...hut down is reactivated through the use of a restart pulse The pulse is used to signal that the optical path has been restored and transmission can begin For example when the far end Node B receives a pulse it signals to the Node B OSC to begin transmitting its optical signal and for the optical switch to pass incoming traffic The OSC CSM at Node A then receives the signal and tells the Node A OSC...

Page 935: ... Variable Optical Attenuator VOA internal to the amplifier can be used to compensate for gain tilt An Optical Spectrum Analyzer OSA device is used to acquire the output power spectrum of an amplifier The OSA shows the peak to peak difference between the maximum and minimum power levels and takes into account the contributions of both gain tilt and gain ripple Note Peak to peak power acquisition us...

Page 936: ...nuation of the VOA to maintain a flat power profile at the output as shown in Figure 18 15 Figure 18 15 Effect of VOA Attenuation on Gain Tilt The VOA attenuator automatic regulation guarantees within limits a zero tilt condition in the EDFA amplifier for a wide range of possible gain setpoint values 3 2 0 1 1528 1536 1544 1552 1560 1 Gdesign VOAatt 0dB 2 3 2 0 1 1528 1536 1544 1552 1560 Wavelengt...

Page 937: ... gain value is equal to or greater than 21 dB In this case a system level tilt compensation strategy is adopted by the DWDM system A more detailed explanation is given in the following section 18 8 2 System Level Gain Tilt Control System level gain tilt control for OPT PRE cards is achievable with two main scenarios Without a reconfigurable optical add drop multiplexer ROADM node With a ROADM node...

Page 938: ...er Configuration File task on page 3 82 For both OPT PRE and OPT BST OPT BST E cards the provisionable Gain Tilt Reference range is between 3 dB and 3 dB During the Automatic Node Setup ANS procedure the Tilt value for the OPT BST OPT BST E or OPT PRE card is provisioned by the TCC card see Figure 18 17 The provisioned Tilt Reference Value is reported in the CTC OPT PRE or OPT BST OPT BST E card v...

Page 939: ...m Gain Tilt Compensation With ROADM Nodes When an ROADM Node is present in the network as shown in Figure 18 18 a per channel dynamic gain equalization can be performed Both gain tilt and gain ripple are completely compensated using the following techniques Implementing the per channel VOAs present inside the 32 WSS and Operating in Power Control Mode with the specific power setpoint designed by M...

Page 940: ...twork Reference 18 8 2 System Level Gain Tilt Control Figure 18 18 System Tilt Compensation With a ROADM SPAN 1 25 dB DCU 32 WSS SPAN 2 SPAN 3 SPAN 4 OPT BST GOPT PRE 21dB Unregulated Tilt SPAN 1 25 dB OPT PRE Tilt Reference 0 Per channel Power Equalization 32 WSS SPAN 2 SPAN 3 SPAN 4 134397 ...

Page 941: ...9 5 CTC Window page 19 7 19 6 TCC2 TCC2P Card Reset page 19 14 19 7 TCC2 TCC2P Card Database page 19 15 19 8 Software Revert page 19 15 19 1 CTC Software Delivery Methods ONS 15454 provisioning and administration is performed using the CTC software CTC is a Java application that is installed in two locations it is stored on the TCC2 or TCC2P card and it is downloaded to your workstation the first ...

Page 942: ...w CTC software the TCC2 TCC2P cards store the older CTC version as the protect CTC version and the newer CTC release becomes the working version You can view the software versions that are installed on an ONS 15454 by selecting the Maintenance Software tabs in node view Figure 19 1 Figure 19 1 CTC Software Versions Node View Select the Maintenance Software tabs in network view to display the softw...

Page 943: ...lete CTC Cache button to remove files stored in the temporary directory If the files are deleted they download the next time you connect to an ONS 15454 Downloading the Java archive JAR files for CTC takes several minutes depending on the bandwidth of the connection between your workstation and the ONS 15454 For example JAR files downloaded from a modem or a data communications channel DCC network...

Page 944: ...se TL1 commands to communicate with the Cisco ONS 15454 through VT100 terminals and VT100 emulation software or you can telnet to an ONS 15454 using TL1 port 3083 Refer to the Cisco ONS SONET TL1 Command Guide or Cisco ONS 15454 SDH TL1 Command Guide for a comprehensive list of TL1 commands 19 3 PC and UNIX Workstation Requirements To use CTC for the ONS 15454 your computer must have a web browser...

Page 945: ...or Windows XP Home Workstation Solaris versions 8 or 9 Java Runtime Environment JRE 1 4 2 JRE 1 4 2 is installed by the CTC Installation Wizard included on the Cisco ONS 15454 software and documentation CDs JRE 1 4 2 provides enhancements to CTC performance especially for large networks with numerous circuits If CTC must be launched directly from nodes running software earlier than R4 6 uninstall ...

Page 946: ...15454 backplane ANSI The RJ 45 jack on the MIC T C P FMEC ETSI A hub or switch to which the ONS 15454 is connected If you do not use Dynamic Host Configuration Protocol DHCP you must change the computer IP address subnet mask and default router or use automatic host detection Corporate LAN Refers to a connection to the ONS 15454 through a corporate or network operations center NOC LAN The ONS 1545...

Page 947: ...is the first view that appears after you log into an ONS 15454 The login node is the first node shown and it is the home view for the session Node view allows you to manage one ONS 15454 node The status area shows the node name IP address session boot date and time number of Critical CR Major MJ and Minor MN alarms name and security level of the current logged in user software version and network ...

Page 948: ...e Table 19 7 lists the port colors and their service states For more information about port service states refer to Appendix C DWDM Administrative and Service States White Slot is provisioned a functioning card is installed Yellow Slot is provisioned a Minor alarm condition exists Orange Slot is provisioned a Major alarm condition exists Red Slot is provisioned a Critical alarm exists Table 19 4 N...

Page 949: ...r to suppress alarms temporarily Change the state to IS NR Unlocked enabled OOS MA DSBLD Locked enabled disabled or OOS AU AINS Unlocked disabled automaticInService when testing is complete Gray Out of Service and Management Disabled OOS MA DSBLD ANSI Locked enabled disabled ETSI The port is out of service and unable to carry traffic Loopbacks are not allowed in this service state Green In Service...

Page 950: ...d Subtabs Tab Description Subtabs Alarms Lists current alarms CR MJ MN for the node and updates them in real time Conditions Displays a list of standing conditions on the node History Provides a history of node alarms including date type and severity of each alarm The Session subtab displays alarms and events for the current session The Node subtab displays alarms and events retrieved from a fixed...

Page 951: ...l network view feature which enables each user to see the same network view The lines show DCC connections between the nodes Table 19 9 DCC connections can be green active or gray fail The lines can also be solid circuits can be routed through this link or dashed circuits cannot be routed through this link Circuit provisioning uses active routable links Selecting a node or span in the graphic area...

Page 952: ... Service States Table 19 10 Node Status Shown in Network View Color Alarm Status Green No alarms Yellow Minor alarms Orange Major alarms Red Critical alarms Gray with Unknown Node initializing for the first time CTC displays Unknown because CTC has not discovered the name of the node yet Table 19 11 Network View Tabs and Subtabs Tab Description Subtabs Alarms Lists current alarms CR MJ MN for the ...

Page 953: ...end on the card type selected The Performance tab is not available for the Alarm Interface Controller International AIC I cards Table 19 12 Card View Tabs and Subtabs Tab Description Subtabs Alarms Lists current alarms CR MJ MN for the card and updates them in real time Conditions Displays a list of standing conditions on the card History Provides a history of card alarms including date object por...

Page 954: ...ss and also resets because it is controlled by the active TCC2 TCC2P card Provisioning Provisions an ONS 15454 card DS N and OC N cards Line Line Thresholds different threshold options are available for DS N and OC N cards Elect Path Thresholds SONET Thresholds SONET STS and Alarm Profiles TXP and MXP cards Card Line Line Thresholds Optics Thresholds OTN and Alarm Profiles DWDM cards subtabs depen...

Page 955: ...re is useful if the maintenance window in which you were performing an upgrade closes while you are still upgrading CTC software You can revert to the protect software load without losing traffic During the next maintenance window you can complete the upgrade and activate the new software load Circuits created or provisioning done after you activate a new software load upgrade to a higher release ...

Page 956: ...19 16 Cisco ONS 15454 DWDM Installation and Operations Guide R6 0 August 2005 Chapter 19 CTC Operation Reference 19 8 Software Revert ...

Page 957: ... but the system does not display the user ID when you sign into CTC This ID can be used to set up other ONS 15454 users You can have up to 500 user IDs on one ONS 15454 Each CTC or TL1 user can be assigned one of the following security levels Retrieve Users can retrieve and view CTC information but cannot set or modify parameters Maintenance Users can access only the ONS 15454 maintenance options ...

Page 958: ... 20 2 1 User Privileges by CTC Task Table 20 1 shows the actions that each user privilege level can perform in node view Table 20 1 ONS 15454 Security Levels Node View CTC Tab Subtab Subtab Actions Retrieve Maintenance Provisioning Superuser Alarms Synchronize Filter Delete Cleared Alarms X X X X Conditions Retrieve Filter X X X X History Session Filter X X X X Node Retrieve Filter X X X X Circuit...

Page 959: ... Delete X OSI Main Setup X TARP X Routers X GRE Tunnel Routes X Protection Create Delete Edit X X View X X X X BLSR ANSI MS SPRing ETSI Create Edit Delete X X Ring Map Squelch Table RIP Table X X X X Security Users Create Delete X Users Change Same user Same user Same user All users Users Clear Security Intrusion X Active Logins Logout X Policy Edit X Access Edit X RADIUS Server X Legal Disclaimer...

Page 960: ...ditor New Compare Available Usage X X X X Defaults Edit Import X Export X X X X UCP Node Edit Provision X X Neighbor Create Edit Delete X X IPCC Create Edit Delete X X Interface Create Edit Delete X X Circuit Create Edit Delete X X WDM ANS Provisioning Import X Provisioning Export X X X X Connections Create Edit Delete Commit Calculate X X Port Status Launch X X Inventory Delete X X Reset X X X Ma...

Page 961: ...ting Table Retrieve X X X X RIP Routing Table Retrieve X X X X Test Access Read only X X X X DWDM APC Run Disable Refresh X X X WDM Span Check Retrieve Span Loss values Reset X X X X Power Monitoring Refresh X X X X 1 A Provisioning user cannot change node name contact or AIS V insertion on STS 1 signal degrade SD parameters 2 The action buttons in the subtab are active for all users but the actio...

Page 962: ...dified by a Superuser refer to the NTP G88 Modify Users and Change Security procedure on page 10 45 Circuits Circuits Create Edit Delete X X Filter Search X X X X Rolls Create Edit Delete X X Filter Search X X X X Provisioning Security Users Create Delete X Users Change Same User Same User Same User All Users Active logins Logout X Policy Change X Alarm Profiles New Load Store Delete1 X X Compare ...

Page 963: ...cation over unsecure channels Port 22 is the default port and cannot be changed 20 3 Audit Trail The Cisco ONS 15454 maintains a Telcordia GR 839 CORE compliant audit trail log that resides on the TCC2 TCC2P card Audit trails are useful for maintaining security recovering lost transactions and enforcing accountability Accountability refers to tracing user activities that is associating a process o...

Page 964: ...ent full an AUD LOG LOW condition is raised and logged by way of Common Object Request Broker Architecture CORBA CTC When the log server reaches a maximum capacity of 640 entries and begins overwriting records that were not archived an AUD LOG LOSS condition is raised and logged This event indicates that audit trail records have been lost Until the user off loads the file this event occurs only on...

Page 965: ...assword 20 4 2 Shared Secrets A shared secret is a text string that serves as a password between A RADIUS client and RADIUS server A RADIUS client and a RADIUS proxy A RADIUS proxy and a RADIUS server For a configuration that uses a RADIUS client a RADIUS proxy and a RADIUS server the shared secret that is used between the RADIUS client and the RADIUS proxy can be different than the shared secret ...

Page 966: ...e are the attributes for example those used for passwords and encryption keys that are encrypted with it An example of a strong shared secret is 8d 9fq4bV H7 a3 Table 20 5 Shared Secret Character Groups Group Examples Letters uppercase and lowercase A B C D and a b c d Numerals 0 1 2 3 Symbols all characters not defined as letters or numerals Exclamation point asterisk colon ...

Page 967: ...a BITS source The internal ST3 clock on the TCC2 TCC2P card You can set ONS 15454 timing to one of three modes external line or mixed If timing is coming from the BITS pins set ONS 15454 timing to external If the timing comes from an OC N STM N card set the timing to line In typical ONS 15454 networks One node is set to external The external node derives its timing from a BITS source wired to the ...

Page 968: ...aution 21 2 Network Timing Figure 21 1 shows an ONS 15454 network timing setup example Node 1 is set to external timing Two timing references are set to BITS These are Stratum 1 timing sources wired to the BITS input pins on the Node 1 backplane The third reference is set to internal clock The BITS output pins on the backplane of Node 3 are used to provide timing to outside equipment such as a dig...

Page 969: ...idely deployed SSM message set Generation 2 is a newer version If you enable SSM for the ONS 15454 consult your timing reference documentation to determine which message set to use Table 21 1 and Table 21 2 on page 21 4 show the Generation 1 and Generation 2 message sets Node 4 Timing Line Ref 1 Slot 6 Ref 2 Slot 5 Ref 3 Internal ST3 Node 2 Timing Line Ref 1 Slot 5 Ref 2 Slot 6 Ref 3 Internal ST3 ...

Page 970: ... Reserved quality level set by user Table 21 2 SSM Generation 2 Message Set Message Quality Description PRS 1 Primary reference source Stratum 1 STU 2 Synchronization traceability unknown ST2 3 Stratum 2 TNC 4 Transit node clock ST3E 5 Stratum 3E ST3 6 Stratum 3 SMC 7 SONET minimum clock ST4 8 Stratum 4 DUS 9 Do not use for timing synchronization RES Reserved quality level set by user Table 21 1 S...

Page 971: ...Routing Table page 22 23 22 5 External Firewalls page 22 25 22 6 Open GNE page 22 26 Note To connect ONS 15454s to an IP network you must work with a LAN administrator or other individual at your site who has IP networking training and experience 22 1 IP Networking Overview ONS 15454s can be connected in many different ways within an IP environment They can be connected to LANs through direct conn...

Page 972: ...54s on Same Subnet Scenario 1 shows a basic ONS 15454 LAN configuration Figure 22 1 The ONS 15454s and CTC computer reside on the same subnet All ONS 15454s connect to LAN A and all ONS 15454s have DCC connections Table 22 1 General ONS 15454 IP Troubleshooting Checklist Item What to Check Link integrity Verify that link integrity exists between CTC computer and network hub switch ONS 15454s backp...

Page 973: ...nd the IP address of router interface B is set to LAN B 192 168 2 1 The routers each have a subnet mask of 255 255 255 0 On the CTC computer the default gateway is set to router interface A If the LAN uses DHCP Dynamic Host Configuration Protocol the default gateway and IP address are assigned automatically In the Figure 22 2 example a DHCP server is not available CTC Workstation IP Address 192 16...

Page 974: ...IP address can be translated to a physical address Proxy ARP enables one LAN connected ONS 15454 to respond to the ARP request for ONS 15454s not connected to the LAN ONS 15454 proxy ARP requires no user configuration For this to occur the DCC connected ONS 15454s must reside on the same subnet as the LAN connected gateway ONS 15454 When a LAN device sends an ARP request to an ONS 15454 that is no...

Page 975: ... as a gateway for ONS 15345 Node 2 and Node 3 Note This scenario assumes all CTC connections are to Node 1 If you connect a laptop to either ONS 15454 Node 2 or Node 3 network partitioning occurs neither the laptop or the CTC computer can see all nodes If you want laptops to connect directly to end network elements you must create static routes see Scenario 5 or enable the ONS 15454 proxy server s...

Page 976: ...table ensures that the IP packets addressed to the additional hosts are routed properly Other than establishing a static route between a node and an additional host no provisioning is necessary The following restrictions apply Only one node acts as the proxy ARP server for any given additional host A node cannot be the proxy ARP server for a host connected to its Ethernet port In Figure 22 4 Node ...

Page 977: ...fferent subnets For the CTC computer to communicate with Nodes 2 and 3 Node 1 is entered as the default gateway on the CTC computer CTC Workstation IP Address 192 168 1 100 Subnet Mark at CTC Workstation 255 255 255 0 Default Gateway N A ONS 15454 2 IP Address 192 168 1 20 Subnet Mask 255 255 255 0 Default Router N A Static Routes N A ONS 15454 1 IP Address 192 168 1 10 Subnet Mask 255 255 255 0 D...

Page 978: ... 22 6 one CTC residing on subnet 192 168 1 0 connects to a router through interface A the router is not set up with OSPF ONS 15454s residing on different subnets are connected through Node 1 to the router through interface B Because Nodes 2 and 3 are on different subnets proxy ARP does not enable Node 1 as a gateway To connect to CTC computers on LAN A a static route is created on Node 1 ONS 15454...

Page 979: ...ected to a router enter a destination of 0 0 0 0 and a subnet mask of 0 0 0 0 Figure 22 7 shows an example The IP address of router interface B is entered as the next hop and the cost number of hops from source to destination is 2 CTC Workstation IP Address 192 168 1 100 Subnet Mask 255 255 255 0 Default Gateway 192 168 1 1 Host Routes N A Router IP Address of interface A to LAN A 192 168 1 1 IP A...

Page 980: ...Routes are recalculated when topology changes occur ONS 15454s use the OSPF protocol in internal ONS 15454 networks for node discovery circuit routing and node management You can enable OSPF on the ONS 15454s so that the ONS 15454 topology is sent to OSPF routers on a LAN Advertising the ONS 15454 network topology to LAN routers CTC Workstation IP Address 192 168 1 100 Subnet Mask 255 255 255 0 De...

Page 981: ...network you must assign an OSPF area ID in decimal format to the ONS 15454 network An area ID is a dotted quad value that appears similar to an IP address Coordinate the area ID number assignment with your LAN administrator All DCC connected ONS 15454s should be assigned the same OSPF area ID Note It is recommended that the number of 15454s in an OSPF area be limited because this allows faster loa...

Page 982: ...e provisioned as end network elements ENEs The GNE ONS 15454 tunnels connections between CTC computers and ENE ONS 15454s providing management capability while preventing access for non ONS 15454 management purposes ONS 15454 1 IP Address 192 168 2 10 Subnet Mask 255 255 255 0 Default Router 192 168 2 1 Static Routes Destination 192 168 1 100 Mask 255 255 255 255 Next Hop 192 168 2 1 Cost 2 CTC Wo...

Page 983: ...he DCC CTC computers can communicate with the ONS 15454 using the TCC2 TCC2P craft port but they cannot communicate directly with any other DCC connected ONS 15454 In addition firewall is enabled which means that the node prevents IP traffic from being routed between the DCC and the LAN port The ONS 15454 can communicate with machines connected to the LAN port or connected through the DCC However ...

Page 984: ...ns Figure 22 10 Scenario 7 ONS 15454 Proxy Server with GNE and ENEs on the Same Subnet ANSI and ETSI Table 22 2 shows recommended settings for ONS 15454 GNEs and ENEs in the configuration shown in Figure 22 10 Remote CTC 10 10 20 10 10 10 20 0 24 10 10 10 0 24 Interface 0 0 10 10 20 1 Router A Interface 0 1 10 10 10 1 ONS 15454 Gateway NE 10 10 10 100 24 ONS 15454 End NE 10 10 10 250 24 ONS 15454 ...

Page 985: ... 15454 GNEs and ENEs are provisioned with the settings shown in Table 22 2 Figure 22 11 Scenario 7 ONS 15454 Proxy Server with GNE and ENEs on Different Subnets ANSI and ETSI 124254 Remote CTC 10 10 20 10 10 10 20 0 24 10 10 10 0 24 Interface 0 0 10 10 20 1 Router A Interface 0 1 10 10 10 1 ONS 15454 Gateway NE 10 10 10 100 24 ONS 15454 End NE 192 168 10 250 24 ONS 15454 End NE 192 168 10 150 24 O...

Page 986: ... 10 20 10 10 10 20 0 24 10 10 10 0 24 Interface 0 0 10 10 20 1 Router A Interface 0 1 10 10 10 1 ONS 15454 Gateway NE 10 10 10 100 24 ONS 15454 End NE 192 168 10 250 24 ONS 15454 End NE 192 168 10 150 24 ONS 15454 End NE 192 168 10 200 24 Ethernet Optical Fiber ONS 15454 Gateway NE 10 10 10 200 24 ONS 15454 End NE 192 168 80 250 24 ONS 15454 End NE 192 168 60 150 24 ONS 15454 End NE 192 168 70 200...

Page 987: ...ioning 22 2 8 Scenario 8 Dual GNEs on a Subnet The ONS 15454 provides GNE load balancing which allows CTC to reach ENEs over multiple GNEs without the ENEs being advertised over OSPF This feature allows a network to quickly recover from the loss of GNE even if the GNE is on a different subnet If a GNE fails all connections through that GNE fail CTC disconnects from the failed GNE and from all ENEs...

Page 988: ... 22 13 Scenario 8 Dual GNEs on the Same Subnet ANSI and ETSI 124256 Remote CTC 10 10 20 10 10 10 20 0 24 10 10 10 0 24 Interface 0 0 10 10 20 1 Router A Interface 0 1 10 10 10 1 ONS 15454 Gateway NE 10 10 10 100 24 ONS 15454 End NE 10 10 10 250 24 ONS 15454 Gateway NE 10 10 10 150 24 ONS 15454 End NE 10 10 10 200 24 Local Craft CTC 192 168 20 20 Ethernet Optical Fiber ...

Page 989: ...rts must follow general IP addressing guidelines In addition TCC2P IP addresses must reside on a different subnet from the ONS 15454 backplane port and ONS 15454 default router IP addresses The IP address assigned to the backplane LAN port becomes a private address which is used to connect the ONS 15454 GNE to an OSS Operations Support System through a central office LAN or private enterprise netw...

Page 990: ... Subnet with Secure Mode Enabled Figure 22 16 shows an example of ONS 15454s connected to a router with secure mode enabled In each example TCC2P port addresses are on a different subnet from the node backplane addresses Remote CTC 10 10 20 10 10 10 20 0 24 10 10 10 0 24 Interface 0 0 10 10 20 1 Router A Interface 0 1 10 10 10 1 ONS 15454 GNE Backplane 10 10 10 100 24 TCC2P 176 20 20 40 24 ONS 154...

Page 991: ... is carried transparently through the ring Transponder or muxponder client and trunk ports are in a regenerator group the cards are in transparent mode and DCC GCC termination is not available Provisionable patchcords are required on both ends of a physical link The provisioning at each end includes a local patchcord ID slot port information remote IP address and remote patchcord ID Patchcords app...

Page 992: ...P_2 5G_10G TXP_MR_10G TXP_MR_2 5G TXPP_MR_2 5G MXP_2 5G_10E TXP_MR_10E 32MUX O 32DMX O 32WSS 32DMX AD xC xx x 4MD xx x MXP_2 5G_10G TXP_MR_10G Yes Yes Yes Yes TXP_MR_2 5G TXPP_MR_2 5G Yes Yes Yes Yes MXP_2 5G_10E TXP_MR_10E Yes Yes Yes Yes MXP_MR_2 5G MXPP_MR_2 5G Yes Yes Yes Yes OC 192 Yes Yes OC 48 Yes Yes Yes OC 192 ITU Yes Yes Yes Yes OC 48 ITU Yes Yes Yes Yes Table 22 6 Cisco ONS 15454 Client...

Page 993: ...atchcord is allowed on a client port only if the card is in transparent mode DWDM cards support provisionable patchcords only on optical channel ports Each DWDM optical channel port can have only one provisionable patchcord 22 4 Routing Table ONS 15454 routing information is displayed on the Maintenance Routing Table tabs The routing table provides the following information Destination Displays th...

Page 994: ...is the destination host IP address Mask 255 255 255 255 is a 32 bit mask meaning only the 172 20 214 92 address is a destination Gateway 127 0 0 1 is a loopback address The host directs network traffic to itself using this address Interface lo0 indicates that the local loopback interface is used to reach the gateway Entry 4 shows the following Destination 172 20 214 93 is the destination host IP a...

Page 995: ...rom the GNE to CTC The CTC Common Object Request Broker Architecture CORBA Standard constant is 683 and the TCC CORBA Default is TCC Fixed 57790 access list 100 remark Inbound ACL CTC NE access list 100 remark Table 22 9 Ports Used by the TCC2 TCC2P Port Function Action1 1 D deny NA not applicable OK do not deny 0 Never used D 20 FTP D 21 FTP control D 22 SSH D 23 Telnet D 80 HTTP D 111 SUNRPC NA ...

Page 996: ...cess list 100 permit tcp host 192 168 10 10 host 10 10 10 100 eq 1080 access list 100 remark allows CTC communication with the 15454 GNE port 1080 access list 100 remark access list 101 remark Outbound ACL NE CTC access list 101 remark access list 101 permit tcp host 10 10 10 100 host 192 168 10 10 established access list 101 remark allows ACKs from the 15454 GNE to CTC 22 6 Open GNE The ONS 15454...

Page 997: ...source address matches a tunnel destination and its destination address matches a tunnel source Tunnels only affect TCP and UDP packets The availability of proxy and or firewall tunnels depends on the network access settings of the node If the node is configured with the proxy server enabled in GNE or ENE mode you must set up a proxy tunnel and or a firewall tunnel If the node is configured with t...

Page 998: ...re useful in this example because the GNE would otherwise block IP access between the PC and foreign node This configuration also requires a firewall tunnel on the ENE Remote CTC 10 10 20 10 10 10 20 0 24 10 10 10 0 24 Interface 0 0 10 10 20 1 Router A Interface 0 1 10 10 10 1 ONS 15454 GNE 10 10 10 100 24 ONS 15454 ENE 10 10 10 250 24 Non ONS node Foreign NE 130 94 122 199 28 ONS 15454 ENE 10 10 ...

Page 999: ...MSTP scenarios are provided in the following sections In OSI MSTP Scenario 1 Figure 22 19 an SDCC or RS DCC carries an OC N signal from an OSI based third party NE to an TXP MXP card on an ONS NE It is carried by GCC to a TXP MXP card on another MSTP NE and then by SDCC or RS DCC to a second third party NE This scenario requires TXPs MXPs whose client interfaces can be provisioned in section or li...

Page 1000: ...has OSI connectivity to its NEs with the MSTP ONS NE serving as the GNE for third party vendor OSI based SONET equipment Figure 22 19 OSI MSTP Scenario 1 OSI MSTP Scenario 2 Figure 22 20 is similar to Scenario 1 except the the MSTP NEs do not have connectivity to an OSI NMS Third party OSI based NMS OSC OSC GCC OSC OSC SDCC RS DCC SDCC RS DCC I over SDCC RS DCC OSI over SDCC RS DCC TXP MXP TXP MXP...

Page 1001: ...ver an SDCC or RS DCC termination OSI has to be carried or tunnelled to the other peer TXP MXP through an OSC termination GCC termination or both An OSS has IP connectivity to all the NEs The MSTP NE is a GNE for the third party OSI based SONET NEs the MSTP NEs perform all mediation functions OSC OSC OSC OSC SDCC RS DCC SDCC RS DCC I over SDCC RS DCC OSI over SDCC RS DCC TXP MXP TXP MXP er vendor ...

Page 1002: ...r tunnelled to the other peer TXP MXP through an OSC termination GCC termination or both An OSS has IP connectivity to all the NEs through third party NE network The MSTP NE is a GNE for the third party OSI based SONET NEs the MSTP NEs perform all mediation functions The third party vendor NE is a GNE for the Cisco MSTP network IP OSS OSC OSC GCC OSC OSC SDCC RS DCC SDCC RS DCC I over SDCC RS DCC ...

Page 1003: ...agement Connectivity Reference 22 7 TCP IP and OSI Networking Figure 22 22 OSI IP Scenario 4 OSC OSC GCC OSC OSC SDCC RS DCC SDCC RS DCC I over SDCC RS DCC OSI over SDCC RS DCC TXP MXP TXP MXP er vendor NET SDH Other vendor SONET SDH DCN IPP over CLNS tunnel MSTP GNE MSTP MSTP MSTP 137659 CTM ...

Page 1004: ...22 34 Cisco ONS 15454 DWDM Installation and Operations Guide R6 0 August 2005 Chapter 22 Management Connectivity Reference 22 7 TCP IP and OSI Networking ...

Page 1005: ...Severities page 23 7 23 5 Alarm Profiles page 23 7 23 6 Alarm Suppression page 23 11 23 7 External Alarms and Controls page 23 12 23 1 Overview CTC detects and reports alarms generated by the Cisco ONS 15454 and the larger network You can use CTC to monitor and manage alarms at the card node or network level Default alarm severities conform to the Telcordia GR 253 CORE standard but you can set ala...

Page 1006: ...network The Alarms window shows alarms in compliance with Telcordia GR 253 CORE This means that if a network problem causes two alarms such as loss of frame LOF and loss of signal LOS CTC only shows the LOS alarm in this window because it supersedes the LOF and replaces it The Path Width column in the Alarms and Conditions tabs expands on the alarmed object information contained in the access iden...

Page 1007: ...conditions that occur including those that are superseded For instance if a network problem causes two alarms such as LOF and LOS CTC shows both the LOF and LOS conditions in this window even though LOS supersedes LOF Having all conditions visible can Table 23 1 Alarm Display Button Check Box Tool Action Filter button Allows you to change the display on the Alarms window to show only alarms that m...

Page 1008: ...ppear If you click the button while displaying the network view all conditions for the network including ONS 15454 nodes and other connected nodes appear and the card view shows only card specific conditions You can also set a node to display conditions using the time zone where the node is located rather than the time zone of the PC where they are being viewed See the DLP G118 Display Alarms and ...

Page 1009: ...ll port card and STS alarm or condition history that directly affects the card See the DLP G116 View Alarm or Event History task on page 8 8 The ONS 15454 can store up to 640 critical alarm messages 640 major alarm messages 640 minor alarm messages and 640 condition messages When any of these limits is reached the ONS 15454 discards the oldest events in that category Note In the Preference dialog ...

Page 1010: ...h 23 3 6 1 History Column Descriptions Table 23 4 lists the History window column headings and the information recorded in each column Table 23 4 History Column Description Column Information Recorded Num Num number is the quantity of alarm messages received and is incremented automatically as alarms occur to display the current total of received error messages The column is hidden by default to v...

Page 1011: ...nditions with severity settings based on Telcordia GR 253 CORE and other standards but users can create their own profiles with different settings for some or all conditions and apply these wherever desired See the 23 5 Alarm Profiles section on page 23 7 For example in a custom alarm profile the default severity of a carrier loss CARLOSS alarm on an Ethernet port could be changed from major to cr...

Page 1012: ...ault list of alarm severities A default alarm severity following Telcordia GR 253 CORE standards is preprovisioned for every alarm After loading the default profile or another profile on the node you can clone a profile to create custom profiles After the new profile is created the Alarm Profiles window shows the original profile frequently Default and the new profile Figure 23 2 Network View Alar...

Page 1013: ...e a circuit UNEQ P alarms for the card with the custom profile would not display on the Alarms tab but they would still be recorded on the Conditions and History tabs When you modify severities in an alarm profile All Critical CR or Major MJ default or user defined severity settings are demoted to Minor MN in Non Service Affecting NSA situations as defined in Telcordia GR 474 Default severities ar...

Page 1014: ...the network or node view the Alarm Profiles window Alarm Profile Editor for Node view displays three check boxes at the bottom of the window Only show service affecting severities If unchecked the editor shows severities in the format sev1 sev2 where sev1 is a service affecting severity and sev2 is not service affecting If checked the editor only shows sev1 alarms Hide reference values Highlights ...

Page 1015: ...T BST Card Alarm Profiles 23 6 Alarm Suppression ONS 15454 nodes have an alarm suppression option that clears raised alarm messages for the node chassis one or more slots cards or one or more ports After they are cleared these alarms change appearance from their normal severity color to white and they can be cleared from the display by clicking Synchronize Alarm suppression itself raises an alarm ...

Page 1016: ...vices such as generators heaters and fans Up to 12 external alarm inputs and four external controls are available with the AIC I card If you also provision the alarm extension panel AEP there are 32 inputs and 16 outputs The AEP is compatible with the ONS 15454 ANSI shelf only It is not compatible with the ONS 15454 ETSI shelf See the NTP G72 Provision External Alarms and Controls on the Alarm Int...

Page 1017: ... severity A chosen alarm severity for example major and any higher severity alarm in this case critical causes output closure Remote NE alarm severity Similar to local NE alarm severity trigger setting but applies to remote alarms Virtual wire entities You can provision an alarm that is input to a virtual wire to trigger an external control output 23 7 3 Virtual Wires Provisioning the AIC and AIC ...

Page 1018: ...l wires you can Assign different external devices to the same virtual wire Assign virtual wires as the trigger type for different external controls ONS 15454 Node 1 Virtual Wire 1 is external control trigger Virtual Wire 1 Smoke detector Bell Smoke detector ONS 15454 Node 2 ONS 15454 Node 3 ONS 15454 Node 4 Virtual Wire 1 Virtual Wire 1 Virtual Wire 1 External alarm External control Smoke detector...

Page 1019: ...escribes the shelf inventory data presented in CTC For more information about CTC see Chapter 19 CTC Operation Reference Note Unless otherwise specified ONS 15454 refers to both ANSI and ETSI shelf assemblies A 1 Display Node Card and Network Views CTC provides three views of the ONS 15454 and the ONS network Node view appears when you first log into an ONS 15454 This view shows a graphic of the O...

Page 1020: ...then choose Go To Selected Object View from the View menu From the View menu choose Go To Other Node then choose the node you want from the shortcut menu Use the arrows on the CTC toolbar to navigate up or down views For example in network view click a node then click the down arrow Network view In node view click the up arrow or the Network View tool on the CTC toolbar From the View menu choose G...

Page 1021: ...assive hybrid terminal node has the same equipment as the hybrid terminal node but does not contain amplifiers An amplified TDM node is a node that increases the span length between two ONS 15454 nodes that contain TDM cards and optical amplifiers Amplified TDM nodes contain either Optical Booster OPT BST amplifiers or AD 1C cards Hub A DWDM hub node icon is represented as a three dimensional cyli...

Page 1022: ...ned A flexible terminal node contains a series of OADM and amplifier cards Terminal east A terminal east node is represented as a three dimensional square with one amplifier on the east side of the icon A terminal node contains one 32DMX or 32DMX O and one 32MUX O No OADM cards are provisioned A flexible terminal node contains a series of OADM and amplifier cards Line OSC regeneration line Line an...

Page 1023: ...on Edit Preferences Displays the Preferences dialog box which shows the following tabs General Allows you to change event defaults and manage preferences Login Node Groups Allows you to create login node groups See the DLP G48 Create Login Node Groups task on page 2 28 Map Allows you to customize the network view See the DLP G168 Change the Network View Background Color task on page 10 26 and the ...

Page 1024: ...w the command displays network view Not available in network view Go To Selected Object View Displays the object selected in the CTC window Go To Home View Displays the login node in node view Go To Network View Displays the network view Go To Other Node Displays a dialog box allowing you to type in the node name or IP address of a a network node that you want to view Show Status Bar Click this it...

Page 1025: ...L status as a result of node IP address changes See the DLP G111 Repair an IP Tunnel task on page 7 21 Topology Upgrade Displays the following options Convert path protection or SNCP to BLSR or MS SPRing Converts a path protection to a bidirectional line switch ring BLSR Not applicable to DWDM nodes Convert Unprotected to path protection or SNCP Converts a point to point or linear add drop multipl...

Page 1026: ...ed triangle unread notifications exist When there are no unread notifications the CTC Alerts toolbar icon contains a gray triangle see the icons in the Toolbar column for comparison Notifications include Network disconnection Send PDIP inconsistency CTC discovers a new node that does not have a SEND PDIP setting consistent with the login node Circuit deletion status Reports when the circuit deleti...

Page 1027: ...ion about the span s source and destination ports the protection scheme and the optical or electrical level Card in node view Displays a menu that you can use to open delete reset and change cards The card that you choose determines the commands that appear Card in card view Displays a menu that you can use to reset the card or go to the parent view node view Empty slot in node view Displays a men...

Page 1028: ... menu Change a card In node view right click an OC N card or a DS3 card and choose Change Card In the Change Card dialog box choose the card type Change Card retains all card provisioning including data communications channel DCC terminations protection circuits and ring Table A 6 Network Management Tasks in Network View Action Task Open a node Any of the following Double click a node icon Right c...

Page 1029: ...f the shortcut menu Perform a path protection ANSI or SNCP ETSI protection switch for an entire span Right click a network span and click Circuits In the Circuits on Span dialog box switch options appear in the path protection or SNCP Span Switching field Display DWDM span properties Right click a DWDM network span and choose Circuits from the shortcut menu The optical channel network connection O...

Page 1030: ...ndary State For more information about card service states see Appendix C DWDM Administrative and Service States HW Part Displays the hardware part number this number is printed on the top of the card or equipment piece HW Rev Displays the hardware revision number Serial Displays the equipment serial number this number is unique to each card CLEI Code Displays the Common Language Equipment Identif...

Page 1031: ...ns for shelf bandwidth a list of topologies Cisco Transport Controller CTC specifications the LAN TL1 modem and alarm specifications timing power and environmental specifications and shelf dimensions B 1 1 Bandwidth The ONS 15454 has the following bandwidth specifications Total bandwidth 240 Gbps Data plane bandwidth 160 Gbps SONET SDH plane bandwidth 80 Gbps B 1 2 Configurations The ONS 15454 can...

Page 1032: ...ss LAN pin field ANSI only FMEC access LAN connector on MIC C T P faceplate ETSI only B 1 5 TL1 Craft Interface The ONS 15454 TL1 craft interface has the following specifications Speed 9600 bps TCC2 TCC2P access EIA TIA 232 DB 9 type connector Backplane access CRAFT pin field ANSI only B 1 6 Modem Interface The ONS 15454 modem interface has the following specifications Hardware flow control TCC2 T...

Page 1033: ...pply BITS interface has the following specifications 2 DS 1 BITS inputs 2 derived DS 1 outputs Backplane access BITS pin field B 1 10 System Timing The ONS 15454 ANSI has the following system timing specifications Stratum 3 per Telcordia GR 253 CORE Free running accuracy 4 6 ppm Holdover stability 3 7 x 10 7 per day including temperature 255 slips in first 24 hours Reference External BITS line int...

Page 1034: ...ns Operating temperature 32 to 131 degrees Farenheit 0 to 55 degrees Celsius 40 to 139 degrees Farenheit 40 to 65 degrees Celsius with industrial temperature rated cards Operating humidity 5 to 95 percent noncondensing The ONS 15454 ETSI has the following environmental specifications Operating temperature 32 to 104 degrees Fahrenheit 0 to 40 degrees Celsius Operating humidity 5 to 95 percent nonco...

Page 1035: ... Nominal 30 Maximum39 Minimum 0 52 Nominal 0 5 Maximum 0 81 Minimum 85 3 Nominal 102 36 Maximum 88 71 OPT BST Nominal 30 Maximum 39 Nominal 0 63 Maximum 0 81 Nominal 102 36 Maximum 88 71 OPT BST E Nominal 30 Maximum 39 Nominal 0 63 Maximum 0 81 Nominal 102 36 Maximum 88 71 32MUX O Nominal 16 Maximum 25 Nominal 0 33 Maximum 0 52 Nominal 54 59 Maximum 85 3 32DMX O Nominal 16 Maximum 25 Nominal 0 33 ...

Page 1036: ... Maximum 1 04 Nominal 136 6 Maximum 170 7 TXP_MR_2 5G 35 001 0 73 119 5 TXPP_MR_2 5G 501 1 04 170 5 MXP_2 5G_10G 501 1 04 170 7 MXP_2 5G_10E Nominal 40 Maximum 50 Nominal 1 11 Maximum 1 04 Nominal 136 6 Maximum 170 7 MXP_MR_2 5G Nominal 50 Maximum 60 Nominal 1 04 Maximum 1 25 Nominal 170 7 Maximum 204 MXPP_MR_2 5G Nominal 50 Maximum 60 Nominal 1 04 Maximum 1 25 Nominal 170 7 Maximum 204 1 Calculat...

Page 1037: ...4 OPT PRE OPT BST 15454 OPT BST OPT BST E 15454 OPT BST E 32MUX O 15454 32 MUX O 32DMX O 15454 32 DMX O 32DMX 15454 32 DMX 4MD xx x 15454 4MD xx x AD 1B xx x 15454 AD 1B xx x AD 4B xx x 15454 AD 4B xx x AD 1C xx x 15454 AD 1C xx x AD 2C xx x 15454 AD 2C xx x AD 4C xx x 15454 AD 4C xx x 32WSS 15454 WSS Transponder and Muxponder Cards TXP_MR_10G 15454 TXPMR10G TXP_MR_10E 15454 10EMRTXP TXP_MR_2 5G 1...

Page 1038: ...ting temperature 40 to 149 degrees Fahrenheit 40 to 65 degrees Celsius Operating humidity 5 to 95 percent noncondensing Power consumption 26 00 W 0 54 A at 48 V 88 8 BTU hr Dimensions Height 12 650 in 321 3 mm Width 0 716 in 18 2 mm Depth 9 000 in 228 6 mm Depth with backplane connector 235 mm 9 250 in Weight not including clam shell 0 7 kg 1 5 lb B 3 2 TCC2P Card Specifications The TCC2P card has...

Page 1039: ... following specifications Alarm inputs Number of inputs 12 without AEP 32 with AEP Opto coupler isolated Label customer provisionable Severity customer provisionable Common 32 V output for all alarm inputs Each input limited to 2 mA Termination Wire wrap on backplane without AEP on AEP connectors with AEP Alarm outputs Number of outputs 4 user configurable as inputs without AEP 16 with AEP Switche...

Page 1040: ...ces Connection to AEP Power monitoring alarming states Power failure 0 to 38 VDC Undervoltage 38 to 40 5 VDC Overvoltage beyond 56 7 VDC Environmental Operating temperature 40 to 149 degrees Fahrenheit 40 to 65 degrees Celsius Operating humidity 5 to 95 percent noncondensing Power consumption including AEP if used 8 00 W 0 17 A 27 3 BTU hr Dimensions Height 12 650 in 321 3 mm Width 0 716 in 18 2 m...

Page 1041: ...2 BTU hr max Dimensions of AEP board Height 20 mm 0 79 in Width 330 mm 13 0 in Depth 89 mm 3 5 in Weight 0 18 kg 0 4 lb B 3 5 MIC A P FMEC Specifications ETSI only The MIC A P FMEC card has the following specifications Power supply input BATTERY B System supply voltage Nominal 48 VDC Tolerance limits 40 5 to 57 0 VDC Connector 3WK3 Combo D power cable connector Alarm outputs Voltage open contact M...

Page 1042: ...10 ppm Signal level 0 75 to 1 5 V Impedance 75 ohms 5 percent switchable by jumper to high impedance 3 kohms Note 120 ohms balanced impedance is possible with external matching cable Cable attenuation Up to 6 dB at 2 MHz Connectors 1 0 2 3 miniature coax connector System management serial port System management serial port craft interface Modem port for future use Connectors 8 pin RJ 45 System man...

Page 1043: ...ambled non return to zero NRZ Loopback modes None Connector Duplex LC Compliance Telcordia GR 253 CORE ITU T G 957 Transmitter optical service channel OSC signal Maximum transmitter output power 1 dBm Minimum transmitter output power 5 dBm Nominal wavelength 1510 nm 10 nm Variable optical attenuator VOA necessary in the transmit path to adjust the in fiber optical power level Receiver OSC signal M...

Page 1044: ...R Minimum receiver level 40 dBm at 10 10 BER Span loss budget 35 dB span budget approximately 140 km assuming that the fiber path loss is equal to 0 25 dB km Jitter tolerance Telcordia GR 253 G 823 compliant Environmental Operating temperature C Temp 5 to 55 degrees Celsius 23 to 131 degrees Fahrenheit Operating humidity 5 to 95 percent noncondensing Dimensions Height 12 65 in 321 3 mm Width 0 92 ...

Page 1045: ... maximum 1 3 dB Optical connectors LC UPC 2 Environmental Operating temperature C Temp 5 to 55 degrees Celsius 23 to 131 degrees Fahrenheit Operating humidity 5 to 85 percent noncondensing Dimensions Height 12 65 in 332 mm Width 0 92 in 24 mm Depth 9 00 in 240 mm B 4 4 OPT BST Amplifier Card Specifications The OPT BST amplifier card has the following specifications Optical characteristics Total op...

Page 1046: ...peak to valley 1 8 dB Gain range 8 to 23 dB with programmable gain tilt Extended gain range 23 to 26 dB with gain tilt uncontrolled Gain and power regulation over undershoot 0 5 dB Limited maximum output power 20 5 dBm Maximum output power with full channel load 20 dB Minimum output power with one channel 1 dBm Input power Pin range at full channel load 6 to 12 dBm Input power Pin range at single ...

Page 1047: ...n 46 8 mm Depth 9 00 in 228 6 mm B 4 7 32DMX O Card Specifications The 32DMX O card optical specifications are listed in Table B 4 Note For power specifications see the 16 1 7 Multiplexer Demultiplexer and OADM Card Interface Classes section on page 16 6 Table B 3 32MUX O Optical Specifications Parameter Note Condition Min Max Unit Tx filter shape 1 dB bandwidth All standard operating procedures S...

Page 1048: ...terface Classes section on page 16 6 Table B 4 32DMX O Optical Specifications Parameter Note Condition Min Max Unit Rx filter shape 1 dB bandwidth All SOP and within whole operating temperature range In 1 32 Out BOL 180 300 pm In 1 32 Out EOL 160 300 pm Insertion loss All SOP and within whole operating temperature range In 1 32 Out BOL 4 8 0 dB In 1 32 Out EOL 4 8 5 dB VOA dynamic range 25 dB Maxi...

Page 1049: ...Table B 6 32DMX Channel Plan Channel Number Band Channel ID Frequency GHz Wavelength nm 1 1 30 3 195 9 1530 33 2 31 2 195 8 1531 12 3 31 9 195 7 1531 90 4 32 6 195 6 1532 68 5 2 34 2 195 4 1534 25 6 35 0 195 3 1535 04 7 35 8 195 2 1535 82 8 36 6 195 1 1536 61 9 3 38 1 194 9 1538 19 10 38 9 194 8 1538 98 11 39 7 194 7 1539 77 12 40 5 194 6 1540 56 13 4 42 1 194 4 1542 14 14 42 9 194 3 1542 94 15 43...

Page 1050: ...2 65 in 321 3 mm Width 0 92 in 23 4 mm Depth 9 00 in 228 6 mm B 4 9 4MD xx x Card Specifications The 4MD xx x card optical specifications are listed in Table B 7 Note For power specifications see the 16 1 7 Multiplexer Demultiplexer and OADM Card Interface Classes section on page 16 6 25 7 54 1 192 9 1554 13 26 54 9 192 8 1554 94 27 55 7 192 7 1555 75 28 56 5 192 6 1556 55 29 8 58 1 192 4 1558 17 ...

Page 1051: ...x x Optical Specifications Parameter Note Condition Min Max Unit Trx filter shape 0 5 dB bandwidth TrxBW2 All SOP and within whole operating temperature range COM Rx xx xx Tx COM Rx yy yy Tx COM Rx zz zz Tx COM Rx kk kk Tx 180 pm xx xx Rx COM Tx yy yy Rx COM Tx zz zz Rx COM Tx kk kk Rx COM Tx Insertion loss demultiplexer section All SOP and within whole operating temperature range COM Rx xx xx Tx ...

Page 1052: ...B 9 lists the AD 2C xx x optical specifications Table B 8 AD 1C xx x Card Optical Specifications Parameter Note Condition Min Max Unit Trx filter shape 0 5 dB bandwidth TrxBW2 All SOP and within whole operating temperature range COM Rx xx xx Tx xx xx Rx COM Tx 180 pm Rfx filter shape 0 5 dB bandwidth RfxBW2 All SOP and within whole operating temperature range COM Rx Exp Tx Exp Rx COM Tx 180 pm Ins...

Page 1053: ...ions Table B 9 AD 2C xx x Card Optical Specifications Parameter Note Condition Min Max Unit Trx filter shape 0 5 dB bandwidth TrxBW2 All SOP and within whole operating temperature range COM Rx xx xx Tx COM Rx yy yy Tx 180 pm xx xx Rx COM Tx yy yy Rx COM Tx 180 Rfx filter shape 0 5 dB bandwidth RfxBW2 All SOP and within whole operating temperature range COM Rx Exp Tx Exp Rx COM Tx 180 pm Insertion ...

Page 1054: ...lan for the AD 1B xx x card Trx filter shape 0 5 dB bandwidth TrxBW2 All SOP and within whole operating temperature range COM Rx xx xx Tx COM Rx yy yy Tx COM Rx zz zz Tx COM Rx kk kk Tx xx xx Rx COM Tx yy yy Rx COM Tx 180 pm Rfx filter shape 1 dB bandwidth RfxBW2 All SOP and within whole operating temperature range COM Rx Exp Tx Exp Rx COM Tx pm Insertion loss drop section All SOP and within whole...

Page 1055: ... Allocation Plan by Band Unit Name Band ID Channel ID Frequency GHz Wavelength nm AD 1B 30 3 B30 3 30 3 195 9 1530 33 30 7 195 85 1530 72 31 1 195 8 1531 12 31 5 195 75 1531 51 31 9 195 7 1531 90 32 2 195 65 1532 29 32 6 195 6 1532 68 33 3 195 55 1533 07 AD 1B 34 2 B34 2 34 2 195 4 1534 25 34 6 195 35 1534 64 35 0 195 3 1535 04 35 4 195 25 1535 43 35 8 195 2 1535 82 36 2 195 15 1536 22 36 6 195 1 ...

Page 1056: ...46 9 193 8 1546 92 47 3 193 75 1547 32 47 7 193 7 1547 72 48 1 193 65 1548 11 48 5 193 6 1548 51 48 9 193 55 1548 91 AD 1B 50 1 B50 1 50 1 193 4 1550 12 50 5 193 35 1550 52 50 9 193 3 1550 92 51 3 193 25 1551 32 51 7 193 2 1551 72 52 1 193 15 1552 12 52 5 193 1 1552 52 52 9 193 05 1552 93 AD 1B 54 1 B54 1 54 1 192 9 1554 13 54 5 192 85 1554 54 54 9 192 8 1554 94 55 3 192 75 1555 34 55 7 192 7 1555...

Page 1057: ...x Unit 1 dB bandwidth All SOP and within whole operating environmental range COM Rx Band Tx Band Rx COM Tx 3 6 nm 1 dB bandwidth All SOP and within whole operating temperature range COM Rx Exp Tx Exp Rx COM Tx Refer to Table B 13 nm Insertion loss drop section All SOP and within whole operating environmental range two connectors included VOA set at minimum attenuation COM Rx Band Tx 3 0 dB Inserti...

Page 1058: ... 321 3 mm Width 0 92 in 23 4 mm Depth 9 0 in 228 6 mm B 4 14 AD 4B xx x Card Specifications Table B 14 lists the unit names band IDs channel IDs frequencies and wavelengths assigned to the two versions of the card Table B 13 AD 1B xx x Transmit and Receive Dropped Band Wavelength Ranges Tx Dropped Band Rx Express Band Left Side nm Right Side nm B30 3 Wavelengths 1533 825 or higher B34 2 Wavelength...

Page 1059: ... 9 195 7 1531 90 32 2 195 65 1532 29 32 6 195 6 1532 68 33 3 195 55 1533 07 B34 2 34 2 195 4 1534 25 34 6 195 35 1534 64 35 0 195 3 1535 04 35 4 195 25 1535 43 35 8 195 2 1535 82 36 2 195 15 1536 22 36 6 195 1 1536 61 37 0 195 05 1537 00 B38 1 38 1 194 9 1538 19 38 5 194 85 1538 58 38 9 194 8 1538 98 39 3 194 75 1539 37 39 7 194 7 1539 77 40 1 194 65 1540 16 40 5 194 6 1540 56 40 9 194 55 1540 95 ...

Page 1060: ... 4 1550 12 50 5 193 35 1550 52 50 9 193 3 1550 92 51 3 193 25 1551 32 51 7 193 2 1551 72 52 1 193 15 1552 12 52 5 193 1 1552 52 52 9 193 05 1552 93 B54 1 54 1 192 9 1554 13 54 5 192 85 1554 54 54 9 192 8 1554 94 55 3 192 75 1555 34 55 7 192 7 1555 75 56 1 192 65 1556 15 56 5 192 6 1556 96 56 9 192 55 1556 96 B58 1 58 1 192 4 1558 17 58 5 192 35 1558 58 58 9 192 3 1558 98 59 3 192 25 1559 39 59 7 1...

Page 1061: ...8 dB COM Rx Band Tx 42 1 58 1 4 5 dB Insertion loss express section All SOP and within whole operating environmental range two connectors included Exp Rx COM Tx 4 9 dB All SOP and within whole operating environmental range two connectors included VOA set at its minimum attenuation COM Rx Exp Tx 3 dB Insertion loss add section All SOP and within whole operating environmental range two connectors in...

Page 1062: ...ecifications are listed in Table B 17 Note For power specifications see the 16 1 7 Multiplexer Demultiplexer and OADM Card Interface Classes section on page 16 6 B46 1 Wavelengths 1545 245 or lower Wavelengths 1549 695 or higher B50 1 Wavelengths 1549 235 or lower Wavelengths 1553 705 or higher B54 1 Wavelengths 1553 255 or lower Wavelengths 1557 745 or higher B58 1 Wavelengths 1557 285 or lower T...

Page 1063: ...X 1 5 dB Add 1 32 COM TX 7 6 dB COM RX DROP TX 6 8 5 dB VOA dynamic range EXP RX COM TX 20 dB Add 1 32 COM TX 25 dB Maximum optical input power 300 mW Table B 17 32WSS Optical Specifications continued Parameter Note Condition Min Typical Max Units Table B 18 32WSS Channel Plan Channel Number Band Channel ID Frequency GHz Wavelength nm 1 1 30 3 195 9 1530 33 2 31 2 195 8 1531 12 3 31 9 195 7 1531 9...

Page 1064: ...ection provides specifications for the TXP_MR_10G MXP_2 5G_10G TXP_MR_2 5G TXPP_MR_2 5G MXP_MR_2 5G MXPP_MR_2 5G MXP_2 5G_10E and TXP_MR_2 5G cards 13 4 42 1 194 4 1542 14 14 42 9 194 3 1542 94 15 43 7 194 2 1543 73 16 44 5 194 1 1544 53 17 5 46 1 193 9 1546 12 18 46 9 193 8 1546 92 19 47 7 193 7 1547 72 20 48 5 193 6 1548 51 21 6 50 1 193 4 1550 12 22 50 9 193 3 1550 92 23 51 7 193 2 1551 72 24 5...

Page 1065: ... 20 dB when working with the TXP_MR_10G card in a loopback on the trunk port Do not use direct fiber loopbacks with the TXP_MR_10G card Using direct fiber loopbacks causes irreparable damage to the TXP_MR_10G card Connectors LC Compliance Telcordia GR 253 CORE ITU T G 707 ITU T G 691 Transmitter trunk side Maximum transmitter output power 3 5 dBm Minimum transmitter output power 2 5 dBm Transmitte...

Page 1066: ... to 20 dBm Receiver input power no FEC amplified 19 dB OSNR at 1000 ps nm BER 1 10 exp 12 8 to 18 dBm Receiver input power FEC unamplified 23 dB OSNR BER 8 10 exp 5 8 to 24 dBm Receiver input power FEC unamplified 23 dB OSNR at 1000 ps nm BER 8 10 exp 5 8 to 22 dBm Receiver input power FEC amplified 9 dB OSNR BER 8 10 exp 5 8 to 18 dBm Receiver input power FEC unamplified 11 dB OSNR at 800 ps nm B...

Page 1067: ... mm Depth with backplane connector 9 250 in 235 mm Weight not including clam shell 3 1 lb 1 3 kg B 5 2 MXP_2 5G_10G Card Specifications The MXP_2 5G_10G card has the following specifications Line trunk side Bit rate 9 95328 Gbps for OC 192 STM 64 10 70923 Gbps with ITU T G 709 Digital Wrapper FEC Code Scrambled NRZ Fiber 1550 nm single mode Maximum chromatic dispersion allowance 1000 ps nm Loopbac...

Page 1068: ...46 92 nm two wavelengths 1547 72 to 1548 51 nm two wavelengths 1550 12 to 1550 92 nm two wavelengths 1551 72 to 1552 52 nm two wavelengths 1554 13 to 1554 94 nm two wavelengths 1555 75 to 1556 55 nm two wavelengths 1558 17 to 1558 98 nm two wavelengths 1559 79 to 1560 61 nm two wavelengths Receiver trunk side Receiver input power no FEC unamplified 23 dB OSNR BER 1 10 exp 12 8 to 21 dBm Receiver i...

Page 1069: ...ion 50 00 W 1 04 A at 48 V 170 7 BTU hr Dimensions Height 12 650 in 321 3 mm Width 0 716 in 18 2 mm Depth 9 000 in 228 6 mm Depth with backplane connector 9 250 in 235 mm Weight not including clam shell 3 1 lb 1 3 kg B 5 3 TXP_MR_2 5G and TXPP_MR_2 5G Card Specifications The TXP_MR_2 5G and TXPP_MR_2 5G cards have the following specifications Line trunk side Bit rate 2 488 Gbps for OC 48 STM 16 2 ...

Page 1070: ... 22 dB optical path loss at BER 1 10 exp 12 including dispersion Receiver input wavelength range 1290 to 1605 nm Line client side Bit rate 8 Mbps to 2 488 Gbps Code Scrambled NRZ Fiber 1310 nm single mode Maximum chromatic dispersion allowance 1600 ps nm Loopback modes Terminal and facility Connectors LC Compliance Telcordia GR 253 CORE ITU T G 707 ITU T G 957 Table B 19 TXP_MR_2 5G TXPP_MR_2 5G R...

Page 1071: ...ng humidity 5 to 95 percent noncondensing Power consumption 35 00 W 0 73 A at 48 V 119 5 BTU hr Dimensions Height 12 650 in 321 3 mm Width 0 716 in 18 2 mm Depth 9 000 in 228 6 mm Depth with backplane connector 9 250 in 235 mm Weight not including clam shell 3 1 lb 1 3 kg B 5 4 MXP_MR_2 5G and MXPP_MR_2 5G Card Specifications The MXP_MR_2 5G and MXPP_MR_2 5G cards have the following specifications...

Page 1072: ...eviation is less than 0 040 nm through wavelocker deployment Four channel wavelength tunability at 100 GHz spacing Transmitter maximum return reflectance 27 dB Chromatic dispersion allowance 5400 ps nm giving an optical power penalty 2 0 dB Minimum side mode suppression ratio 30 dB Transmitter is a direct modulated laser Wavelength stability drift 25 picometers pm Note An optical device on the car...

Page 1073: ...FB laser Receiver client side Maximum receiver level 1 dBm at BER 1 10 exp 12 Minimum receiver level 14 dBm at BER 1 10 exp 12 Receiver APD Link loss budget 8 dB minimum at BER 1 10 exp 12 Receiver input wavelength range 1290 to 1605 nm Environmental Operating temperature 5 to 40 degrees Celsius 23 to 104 degrees Fahrenheit Operating humidity 5 to 85 percent noncondensing Power consumption maximum...

Page 1074: ...ing with the MXP_2 5G_10E card in a loopback on the trunk port Do not use direct fiber loopbacks with the MXP_2 5G_10E card Using direct fiber loopbacks causes irreparable damage to the MXP_2 5G_10E card Connectors LC Compliance ITU T G 707 ITU T G 709 ITU T G 957 and Telcordia GR 253 CORE Transmitter trunk side Maximum transmitter output power 6 dBm Minimum transmitter output power 3 dBm Transmit...

Page 1075: ...s used Receiver client side Depends on the SFP that is used Environmental Operating temperature 5 to 55 degrees Celsius 23 to 113 degrees Fahrenheit Operating humidity 5 to 95 percent noncondensing Power consumption 50 00 W maximum 1 11 A at 48 V 136 6 BTU hr Dimensions Height 12 650 in 321 3 mm Width 0 716 in 18 2 mm Depth 9 000 in 228 6 mm Table B 21 MXP_2 5G_10E Receiver Trunk Side Specificatio...

Page 1076: ... port Do not use direct fiber loopbacks with the TXP_MR_10E card Using direct fiber loopbacks causes irreparable damage to the TXP_MR_10E card Connectors LC Compliance Telcordia GR 253 CORE ITU T G 707 ITU T G 957 and ITU T G 709 Transmitter trunk side Maximum transmitter output power 6 dBm Minimum transmitter output power 3 dBm for C band and 2 dBm for L band Transmitter LN external modulator tra...

Page 1077: ...192 Code Scrambled NRZ Fiber 1310 nm single mode Maximum chromatic dispersion allowance 6 6 ps nm Loopback modes Terminal and facility Connectors LC Compliance Telcordia GR 253 CORE ITU T G 707 ITU T G 957 ITU T G 691 Transmitter client side Maximum transmitter output power 1 dBm Minimum transmitter output power 6 dBm Center wavelength 1290 to 1330 nm Table B 22 TXP_MR_10E Receiver Trunk Side Spec...

Page 1078: ...in 321 3 mm Width 0 716 in 18 2 mm Depth 9 000 in 228 6 mm Depth with backplane connector 9 250 in 235 mm Weight not including clam shell 3 1 lb 1 3 kg B 6 SFP Specifications Table B 23 lists the specifications for available SFPs Table B 23 SFP Specifications SFP Product ID Interface Transmitter Output Power Min Max dBm Receiver Input Power Min Max dBm 15454 SFP3 1 IR OC 3 15 to 8 23 to 8 15454E S...

Page 1079: ...fications continued SFP Product ID Interface Transmitter Output Power Min Max dBm Receiver Input Power Min Max dBm Table B 24 Single Mode Fiber SFP Port Cabling Specifications SFP Product ID Wavelength1 1 Typical loss on a 1310 nm wavelength is 0 6 dB km Fiber Type Cable Distance 15454 SFP3 1 IR Intermediate Reach 1310 nm 9 micron SMF 15 km 9 3 miles 15454E SFP L 1 1 Short Haul 1310 nm 9 micron SM...

Page 1080: ...SFP 200 Long Reach 1310 nm 62 5 micron MMF 2 km 1 2 miles 15454 SFP GEFC SX 15454E SFP GEFC S Short Reach 850 nm 62 5 micron MMF 300 m 984 ft for FC 1 Gbps and 1 2 Gbps GE 150 m 492 ft for FC 2 Gbps 50 0 micron MMF 550 m 1804 ft for FC 1 Gbps and 1 2 Gbps GE 300 m 984 ft for FC 2 Gbps Table B 26 XFP Specifications XFP Product ID Interface Transmitter Output Power Min Max dBm Receiver Input Power M...

Page 1081: ...more Secondary States SST Table C 1 lists the ANSI and ETSI service state PSTs and PSTQs supported by the ONS 15454 Table C 2 defines the ANSI and ETSI SSTs supported by the ONS 15454 Table C 1 ONS 15454 Service State Primary States and Primary State Qualifiers ANSI Primary State Primary State Qualifier ETSI Primary State Primary State Qualifier Definition IS NR In Service and Normal Unlocked enab...

Page 1082: ...he entity was manually removed from service and does not provide its provisioned functions All services are disrupted unable to carry traffic FLT failed The entity has a raised alarm or condition MEA mismatchOfEquipment An improper card is installed For example an installed card is not compatible with the card preprovisioning or the slot This SST applies only to cards MT maintenance The entity has...

Page 1083: ... Locked maintenance Removes the entity from service for maintenance Table C 3 ONS 15454 Administrative States continued ANSI Administrative State PST SST ETSI Administrative State PST SST Definition Table C 4 ONS 15454 Optical Unit Service State Transitions Current Service State Action Next Service State IS NR ANSI Unlocked enabled ETSI Delete the card OOS AUMA UAS ANSI Locked disabled unassigned ...

Page 1084: ...SI Delete the card OOS AUMA UAS UEQ ANSI Locked disabled unassigned notInstalled ETSI OOS AU FLT ANSI Unlocked disabled failed ETSI Pull the card OOS AU UEQ ANSI Unlocked disabled unequipped ETSI Delete the card OOS AUMA UAS ANSI Locked disabled unassigned ETSI Change the administrative state to OOS MT ANSI or Locked maintenance ETSI OOS AUMA FLT MT ANSI Locked disabled failed maintenance ETSI Res...

Page 1085: ...disabled maintenance notInstalled ETSI Delete the card OOS AUMA UAS ANSI Locked disabled unassigned ETSI Change the administrative state to IS ANSI or Unlocked ETSI OOS AU FLT ANSI Unlocked disabled failed ETSI Reset the card OOS AUMA MT SWDL ANSI Locked disabled maintenance softwareDownload ETSI Alarm condition is cleared IS NR ANSI Unlocked enabled ETSI OOS AUMA MEA UAS ANSI Locked disabled mism...

Page 1086: ...ed notInstalled ETSI Insert a valid card OOS AU SWDL ANSI Unlocked disabled softwareDownload ETSI Insert an invalid card OOS AUMA MEA UAS ANSI Locked disabled mismatchOfEquipment unassigned ETSI Preprovision a card OOS AU AINS UEQ ANSI Unlocked disabled automaticInService notInstalled ETSI Table C 4 ONS 15454 Optical Unit Service State Transitions continued Current Service State Action Next Servic...

Page 1087: ...administrative state OOS AU FLT ANSI Unlocked disabled failed ETSI Put the port or cross connect in the OOS DSBLD ANSI or Locked disabled ETSI administrative state OOS MA DSBLD ANSI Locked enabled disabled ETSI Put the port or cross connect in the OOS MT ANSI or Locked maintenance ETSI administrative state OOS AUMA FLT MT ANSI Locked disabled failed maintenance ETSI OOS AU FLT ANSI Unlocked disabl...

Page 1088: ...onnect in the OOS DSBLD ANSI or Locked disabled ETSI administrative state OOS MA DSBLD ANSI Locked enabled disabled ETSI Put the port or cross connect in a loopback OOS AUMA FLT LPBK MT ANSI Locked disabled failed loopback maintenance ETSI OOS MA DSBLD ANSI Locked enabled disabled ETSI Put the port in the IS AINS ANSI or Unlocked automaticInService ETSI administrative state OOS AU AINS ANSI Unlock...

Page 1089: ...ailed ETSI OOS AU AINS FLT ANSI Unlocked disabled automaticInService failed ETSI Alarm condition is cleared OOS AU AINS ANSI Unlocked disabled automaticInService ETSI Put the port in the IS ANSI or Unlocked ETSI administrative state OOS AU FLT ANSI Unlocked disabled failed ETSI Put the port in the OOS DSBLD ANSI or Locked disabled ETSI administrative state OOS MA DSBLD ANSI Locked enabled disabled...

Page 1090: ...abled ETSI Put the port in a loopback OOS AUMA FLT LPBK MT ANSI Locked disabled failed loopback maintenance ETSI OOS MA MT ANSI Locked enabled maintenance ETSI Put the port in the IS AINS ANSI or Unlocked automaticInService ETSI administrative state OOS AU AINS ANSI Unlocked disabled automaticInService ETSI Alarm condition is raised OOS AUMA FLT MT ANSI Locked disabled failed maintenance ETSI Tabl...

Page 1091: ...the port in the OOS MT ANSI or Locked maintenance ETSI administrative state OOS AUMA FLT MT ANSI Locked disabled failed maintenance ETSI OOS AU FLT ANSI Unlocked disabled failed ETSI Alarm condition is cleared IS NR ANSI Unlocked enabled ETSI Put the port in the IS AINS ANSI or Unlocked automaticInService ETSI administrative state OOS AU AINS FLT ANSI Unlocked disabled automaticInService failed ET...

Page 1092: ...ve state OOS MA DSBLD ANSI Locked enabled disabled ETSI Put the port in a loopback OOS AUMA FLT LPBK MT ANSI Locked disabled failed loopback maintenance ETSI OOS MA DSBLD ANSI Locked enabled disabled ETSI Put the connection in the IS AINS ANSI or Unlocked automaticInService ETSI administrative state OOS AU AINS ANSI Unlocked disabled automaticInService ETSI Table C 7 ONS 15454 OCHNC Service State ...

Page 1093: ... unassigned ETSI OOS AU AINS SWDL ANSI Unlocked disabled automaticInService softwareDownload ETSI Restart completed IS NR ANSI Unlocked enabled ETSI Pull the card OOS AU AINS UEQ ANSI Unlocked disabled automaticInService notInstalled ETSI OOS AU AINS UEQ ANSI Unlocked disabled automaticInService notInstalled ETSI Insert a valid card OOS AU AINS SWDL ANSI Unlocked disabled automaticInService softwa...

Page 1094: ...I Alarm condition is cleared IS NR ANSI Unlocked enabled ETSI OOS AU MEA ANSI Pull the card OOS AU UEQ ANSI Unlocked disabled notInstalled ETSI Delete the card If the card is valid OOS AUMA UAS ANSI Locked disabled unassigned ETSI If the card is invalid OOS AUMA MEA UAS ANSI Locked disabled mismatchOfEquipment unassigned ETSI Change the administrative state to OOS MT ANSI or Locked maintenance ETS...

Page 1095: ...ntenance notInstalled ETSI Delete the card OOS AUMA UAS ANSI Locked disabled unassigned ETSI Change the administrative state to IS ANSI or Unlocked ETSI OOS AU FLT ANSI Unlocked disabled failed ETSI Reset the card OOS AUMA MT SWDL ANSI Locked disabled maintenance softwareDownload ETSI Alarm condition is cleared IS NR ANSI Unlocked enabled ETSI OOS AUMA MEA MT ANSI Locked disabled mismatchOfEquipme...

Page 1096: ... valid card OOS AUMA MT SWDL ANSI Locked disabled maintenance softwareDownload ETSI Insert an invalid card OOS AUMA MEA MT ANSI Locked disabled mismatchOfEquipment maintenance ETSI Delete the card OOS AUMA UAS UEQ ANSI Locked disabled unassigned notInstalled ETSI OOS AUMA UAS ANSI Locked disabled unassigned ETSI Pull the card OOS AUMA UAS UEQ ANSI Locked disabled unassigned notInstalled ETSI Provi...

Page 1097: ...aintenance softwareDownload ETSI Alarm condition is raised OOS AUMA FLT MT ANSI Locked disabled failed maintenance ETSI Table C 8 ONS 15454 Transponder Muxponder Card Service State Transitions continued Current Service State Action Next Service State Table C 9 ONS 15454 Transponder Muxponder Port Service State Transitions Current Service State Action Next Service State IS NR ANSI Unlocked enabled ...

Page 1098: ...e port in the OOS DSBLD ANSI or Locked disabled ETSI administrative state OOS MA DSBLD ANSI Locked enabled disabled ETSI Put the port in the OOS MT ANSI or Locked maintenance ETSI administrative state OOS AUMA FLT MT ANSI Locked disabled failed maintenance ETSI OOS AU FLT ANSI Unlocked disabled failed ETSI Alarm condition is cleared IS NR ANSI Unlocked enabled ETSI Put the port in the IS AINS ANSI...

Page 1099: ...ETSI administrative state OOS MA DSBLD ANSI Locked enabled disabled ETSI Put the port in a loopback OOS AUMA FLT LPBK MT ANSI Locked disabled failed loopback maintenance ETSI OOS MA DSBLD ANSI Locked enabled disabled ETSI Put the port in the IS ANSI or Unlocked ETSI administrative state IS NR1 ANSI Unlocked enabled ETSI Put the port in the IS AINS ANSI or Unlocked automaticInService ETSI administr...

Page 1100: ...ity loopback the client port is in the OOS MA LPBK MT ANSI Locked enabled loopback and maintenance ETSI service state and the remaining client and trunk ports can be in any other service state In a client side terminal loopback on transponder cards the client port is in the OOS MA LPBK MT service state and the trunk ports are in IS NR ANSI Unlocked enabled ETSI For client side terminal loopbacks o...

Page 1101: ... see Chapter 10 Manage the Node Note Unless otherwise specified in this appendix ONS 15454 refers to both ANSI ONS 15454 SONET and ETSI ONS 15454 SDH shelf assemblies D 1 Network Element Defaults Description The NE defaults are preinstalled on each Cisco ONS 15454 TCC2 and TCC2P card They also ship as a file called 15454 defaults txt ANSI shelves or 15454SDH defaults txt ETSI shelves on the CTC so...

Page 1102: ...k Time All cards The length of time that elapses between an automaticInService AINS port receiving a valid signal and when it automatically changes to in service status Port State All cards Sets the port to one of the four available states IS OOS OOS_MT or IS_AINS depending on whether you need ports in or out of service SF BER Level TXP and MXP cards Defines the signal fail SF bit error rate BER S...

Page 1103: ...gs ANSI Default Name Default Value Default Domain MXP 2_5G 10E config client AINSSoakTime 08 00 hours mins 00 00 00 15 00 30 48 00 MXP 2_5G 10E config client AisSquelchMode Squelch Ais Squelch MXP 2_5G 10E config client AlsMode Disabled Disabled Auto Restart Manual Restart Manual Restart for Test MXP 2_5G 10E config client AlsRecoveryPulseDuration 2 0 seconds 2 0 2 1 2 2 100 0 when AlsMode is Disa...

Page 1104: ...ghTxP ower 2 0 dBm 7 0 6 9 6 8 30 0 MXP 2_5G 10E opticalthresholds client warning 15min LowRxPo wer 20 0 dBm 40 0 39 9 39 8 2 0 MXP 2_5G 10E opticalthresholds client warning 15min LowTxPo wer 7 0 dBm 40 0 39 9 39 8 2 0 MXP 2_5G 10E opticalthresholds client warning 1day HighLaser Bias 85 5 0 0 0 1 0 2 100 0 MXP 2_5G 10E opticalthresholds client warning 1day HighRxPo wer 2 5 dBm 20 5 20 4 20 3 30 0 ...

Page 1105: ...811200 MXP 2_5G 10E otn fecthresholds enhanced 15min Uncorrectable Words 5 count 0 4724697600 MXP 2_5G 10E otn fecthresholds enhanced 1day BitErrorsCorrec ted 86719680 count 0 867227693875200 MXP 2_5G 10E otn fecthresholds enhanced 1day UncorrectableW ords 480 count 0 453570969600 MXP 2_5G 10E otn fecthresholds standard 15min BitErrorsCorre cted 903330 count 0 9033621811200 MXP 2_5G 10E otn fecthr...

Page 1106: ...709thresholds sm farend 15min SES 500 seconds 0 900 MXP 2_5G 10E otn g709thresholds sm farend 15min UAS 500 seconds 0 900 MXP 2_5G 10E otn g709thresholds sm farend 1day BBE 100000 count 0 849657600 MXP 2_5G 10E otn g709thresholds sm farend 1day ES 5000 seconds 0 86400 MXP 2_5G 10E otn g709thresholds sm farend 1day FC 40 count 0 6912 MXP 2_5G 10E otn g709thresholds sm farend 1day SES 5000 seconds 0...

Page 1107: ...thresholds client line nearend 15min FC 10 count 0 72 MXP 2_5G 10E pmthresholds client line nearend 15min SES 1 seconds 0 900 MXP 2_5G 10E pmthresholds client line nearend 15min UAS 3 seconds 0 900 MXP 2_5G 10E pmthresholds client line nearend 1day CV 212600 B2 count 0 212371200 MXP 2_5G 10E pmthresholds client line nearend 1day ES 864 seconds 0 86400 MXP 2_5G 10E pmthresholds client line nearend ...

Page 1108: ...XP 2_5G 10G config client SDBER 1 00E 07 1E 5 1E 6 1E 7 1E 8 1E 9 MXP 2_5G 10G config client SendDoNotUse FALSE TRUE FALSE MXP 2_5G 10G config client SFBER 1 00E 04 1E 3 1E 4 1E 5 MXP 2_5G 10G config client SyncMsgIn TRUE FALSE TRUE MXP 2_5G 10G config client TerminationMode Transparent Transparent Line MXP 2_5G 10G config trunk AINSSoakTime 08 00 hours mins 00 00 00 15 00 30 48 00 MXP 2_5G 10G co...

Page 1109: ...ay LowRxPower 20 5 dBm 40 0 39 9 39 8 HighRxPower MXP 2_5G 10G opticalthresholds client warning 1day LowTxPower 7 5 dBm 40 0 39 9 39 8 HighTxPower MXP 2_5G 10G opticalthresholds trunk alarm HighLaserBias 90 0 0 0 0 1 0 2 100 0 MXP 2_5G 10G opticalthresholds trunk alarm HighRxPower 8 0 dBm LowRxPower LowRxPower 0 1 LowRxPower 0 2 30 0 MXP 2_5G 10G opticalthresholds trunk alarm HighTxPower 4 0 dBm L...

Page 1110: ...min UAS 3 seconds 0 900 MXP 2_5G 10G otn g709thresholds pm farend 1day BBE 850400 count 0 849657600 MXP 2_5G 10G otn g709thresholds pm farend 1day ES 864 seconds 0 86400 MXP 2_5G 10G otn g709thresholds pm farend 1day FC 40 count 0 6912 MXP 2_5G 10G otn g709thresholds pm farend 1day SES 4 seconds 0 86400 MXP 2_5G 10G otn g709thresholds pm farend 1day UAS 10 seconds 0 86400 MXP 2_5G 10G otn g709thre...

Page 1111: ...otn g709thresholds sm nearend 1day SES 5000 seconds 0 86400 MXP 2_5G 10G otn g709thresholds sm nearend 1day UAS 5000 seconds 0 86400 MXP 2_5G 10G otn otnLines FEC Standard Disable Standard Enhanced when G709OTN is Enable Disable when G709OTN is Disable MXP 2_5G 10G otn otnLines G709OTN Enable Disable Enable MXP 2_5G 10G otn otnLines SDBER 1 00E 07 1E 5 1E 6 1E 7 1E 8 1E 9 MXP 2_5G 10G pmthresholds...

Page 1112: ...earend 1day ES 5000 seconds 0 86400 MXP 2_5G 10G pmthresholds client section nearend 1day SEFS 5000 seconds 0 86400 MXP 2_5G 10G pmthresholds client section nearend 1day SES 5000 seconds 0 86400 MXP 2_5G 10G pmthresholds trunk line farend 15min CV 85040 B2 count 0 8850600 MXP 2_5G 10G pmthresholds trunk line farend 15min ES 87 seconds 0 900 MXP 2_5G 10G pmthresholds trunk line farend 15min FC 10 c...

Page 1113: ...899200 MXP 2_5G 10G pmthresholds trunk section nearend 1day ES 5000 seconds 0 86400 MXP 2_5G 10G pmthresholds trunk section nearend 1day SEFS 5000 seconds 0 86400 MXP 2_5G 10G pmthresholds trunk section nearend 1day SES 5000 seconds 0 86400 Table D 2 MXP_2 5G_10G Card Default Settings ANSI continued Default Name Default Value Default Domain Table D 3 MXP_MR_2 5G Card Default Settings ANSI Default ...

Page 1114: ...lds client alarm HighLaserBias 90 0 0 0 0 1 0 2 100 0 MXP MR 2_5G opticalthresholds client alarm HighRxPower 3 0 dBm LowRxPower LowRxPower 0 1 LowRxPower 0 2 30 0 MXP MR 2_5G opticalthresholds client alarm HighTxPower 3 0 dBm LowTxPower LowTxPower 0 1 LowTxPower 0 2 30 0 MXP MR 2_5G opticalthresholds client alarm LowRxPower 21 0 dBm 40 0 39 9 39 8 HighRxPower MXP MR 2_5G opticalthresholds client a...

Page 1115: ...5G opticalthresholds trunk warning 15min HighTxPo wer 30 0 dBm LowTxPower LowTxPower 0 1 LowTxPower 0 2 30 0 MXP MR 2_5G opticalthresholds trunk warning 15min LowRxPo wer 24 5 dBm 40 0 39 9 39 8 HighRxPower MXP MR 2_5G opticalthresholds trunk warning 15min LowTxPow er 40 0 dBm 40 0 39 9 39 8 HighTxPower MXP MR 2_5G opticalthresholds trunk warning 1day HighLaserBi as 96 0 0 0 0 1 0 2 100 0 MXP MR 2...

Page 1116: ...2_5G pmthresholds trunk line nearend 1day SES 4 seconds 0 86400 MXP MR 2_5G pmthresholds trunk line nearend 1day UAS 10 seconds 0 86400 MXP MR 2_5G pmthresholds trunk section nearend 15min CV 10000 B1 count 0 2151900 MXP MR 2_5G pmthresholds trunk section nearend 15min ES 500 seconds 0 900 MXP MR 2_5G pmthresholds trunk section nearend 15min SEFS 500 seconds 0 900 MXP MR 2_5G pmthresholds trunk se...

Page 1117: ...to Restart Manual Restart 80 0 80 1 80 2 100 0 when AlsMode is Manual Restart for Test MXPP MR 2_5G config trunk AlsRecoveryPulseInterval 100 seconds 60 300 MXPP MR 2_5G config trunk SDBER 1 00E 07 1E 5 1E 6 1E 7 1E 8 1E 9 MXPP MR 2_5G config trunk SFBER 1 00E 04 1E 3 1E 4 1E 5 MXPP MR 2_5G opticalthresholds client alarm HighLaserBias 90 0 0 0 0 1 0 2 100 0 MXPP MR 2_5G opticalthresholds client al...

Page 1118: ... 39 9 39 8 HighRxPower MXPP MR 2_5G opticalthresholds trunk alarm LowTxPower 40 0 dBm 40 0 39 9 39 8 HighTxPower MXPP MR 2_5G opticalthresholds trunk warning 15min HighLase rBias 95 0 0 0 0 1 0 2 100 0 MXPP MR 2_5G opticalthresholds trunk warning 15min HighRxP ower 7 5 dBm LowRxPower LowRxPower 0 1 LowRxPower 0 2 30 0 MXPP MR 2_5G opticalthresholds trunk warning 15min HighTxP ower 30 0 dBm LowTxPo...

Page 1119: ...pmthresholds trunk line nearend 15min UAS 3 seconds 0 900 MXPP MR 2_5G pmthresholds trunk line nearend 1day CV 212600 B2 count 0 212371200 MXPP MR 2_5G pmthresholds trunk line nearend 1day ES 864 seconds 0 86400 MXPP MR 2_5G pmthresholds trunk line nearend 1day FC 40 count 0 6912 MXPP MR 2_5G pmthresholds trunk line nearend 1day SES 4 seconds 0 86400 MXPP MR 2_5G pmthresholds trunk line nearend 1d...

Page 1120: ... 1E 5 TXP MR 10E config client SyncMsgIn TRUE FALSE TRUE TXP MR 10E config client TerminationMode Transparent Transparent Line when ppmPortAssignment is UNASSIGNED SONET including 10G Ethernet WAN Phy Transparent when ppmPortAssignment is 10G Ethernet LAN Phy 10G Fiber Channel TXP MR 10E config trunk AINSSoakTime 08 00 hours mins 00 00 00 15 00 30 48 00 TXP MR 10E config trunk AlsMode Disabled Dis...

Page 1121: ...rning 1day HighTxPow er 1 5 dBm 8 5 8 4 8 3 30 0 TXP MR 10E opticalthresholds client warning 1day LowRxPowe r 16 5 dBm 40 0 39 9 39 8 1 5 TXP MR 10E opticalthresholds client warning 1day LowTxPowe r 8 5 dBm 40 0 39 9 39 8 1 5 TXP MR 10E opticalthresholds trunk alarm HighLaserBias 98 0 0 0 0 1 0 2 100 0 TXP MR 10E opticalthresholds trunk alarm HighRxPower 8 0 dBm 25 0 24 9 24 8 30 0 TXP MR 10E opti...

Page 1122: ...standard 1day BitErrorsCorrecte d 86719680 count 0 867227693875200 TXP MR 10E otn fecthresholds standard 1day UncorrectableWor ds 480 count 0 453570969600 TXP MR 10E otn g709thresholds pm farend 15min BBE 85040 count 0 8850600 TXP MR 10E otn g709thresholds pm farend 15min ES 87 seconds 0 900 TXP MR 10E otn g709thresholds pm farend 15min FC 10 count 0 72 TXP MR 10E otn g709thresholds pm farend 15mi...

Page 1123: ...in BBE 10000 count 0 8850600 TXP MR 10E otn g709thresholds sm nearend 15min ES 500 seconds 0 900 TXP MR 10E otn g709thresholds sm nearend 15min FC 10 count 0 72 TXP MR 10E otn g709thresholds sm nearend 15min SES 500 seconds 0 900 TXP MR 10E otn g709thresholds sm nearend 15min UAS 500 seconds 0 900 TXP MR 10E otn g709thresholds sm nearend 1day BBE 100000 count 0 849657600 TXP MR 10E otn g709thresho...

Page 1124: ...s client section nearend 15min ES 500 seconds 0 900 TXP MR 10E pmthresholds client section nearend 15min SEFS 500 seconds 0 900 TXP MR 10E pmthresholds client section nearend 15min SES 500 seconds 0 900 TXP MR 10E pmthresholds client section nearend 1day CV 100000 B1 count 0 764899200 TXP MR 10E pmthresholds client section nearend 1day ES 5000 seconds 0 86400 TXP MR 10E pmthresholds client section...

Page 1125: ...5min SES 500 seconds 0 900 TXP MR 10E pmthresholds trunk section nearend 1day CV 100000 B1 count 0 764899200 TXP MR 10E pmthresholds trunk section nearend 1day ES 5000 seconds 0 86400 TXP MR 10E pmthresholds trunk section nearend 1day SEFS 5000 seconds 0 86400 TXP MR 10E pmthresholds trunk section nearend 1day SES 5000 seconds 0 86400 Table D 5 TXP_MR_10E Card Default Settings ANSI continued Defau...

Page 1126: ...t alarm HighLaserBias 90 0 0 0 0 1 0 2 100 0 TXP MR 10G opticalthresholds client alarm HighRxPower 2 0 dBm LowRxPower LowRxPower 0 1 LowRxPower 0 2 30 0 TXP MR 10G opticalthresholds client alarm HighTxPower 2 0 dBm LowTxPower LowTxPower 0 1 LowTxPower 0 2 30 0 TXP MR 10G opticalthresholds client alarm LowRxPower 17 0 dBm 40 0 39 9 39 8 HighRxPower TXP MR 10G opticalthresholds client alarm LowTxPow...

Page 1127: ... trunk warning 15min HighLaser Bias 81 0 0 0 0 1 0 2 100 0 TXP MR 10G opticalthresholds trunk warning 15min HighRxPo wer 7 5 dBm LowRxPower LowRxPower 0 1 LowRxPower 0 2 30 0 TXP MR 10G opticalthresholds trunk warning 15min HighTxPo wer 3 5 dBm LowTxPower LowTxPower 0 1 LowTxPower 0 2 30 0 TXP MR 10G opticalthresholds trunk warning 15min LowRxPo wer 24 5 dBm 40 0 39 9 39 8 HighRxPower TXP MR 10G o...

Page 1128: ...pm nearend 15min SES 1 seconds 0 900 TXP MR 10G otn g709thresholds pm nearend 15min UAS 3 seconds 0 900 TXP MR 10G otn g709thresholds pm nearend 1day BBE 850400 count 0 849657600 TXP MR 10G otn g709thresholds pm nearend 1day ES 864 seconds 0 86400 TXP MR 10G otn g709thresholds pm nearend 1day FC 40 count 0 6912 TXP MR 10G otn g709thresholds pm nearend 1day SES 4 seconds 0 86400 TXP MR 10G otn g709...

Page 1129: ... farend 1day CV 850400 B2 count 0 849657600 TXP MR 10G pmthresholds client line farend 1day ES 864 seconds 0 86400 TXP MR 10G pmthresholds client line farend 1day FC 40 count 0 6912 TXP MR 10G pmthresholds client line farend 1day SES 4 seconds 0 86400 TXP MR 10G pmthresholds client line farend 1day UAS 10 seconds 0 86400 TXP MR 10G pmthresholds client line nearend 15min CV 85040 B2 count 0 8850600...

Page 1130: ...line nearend 15min CV 85040 B2 count 0 8850600 TXP MR 10G pmthresholds trunk line nearend 15min ES 87 seconds 0 900 TXP MR 10G pmthresholds trunk line nearend 15min FC 10 count 0 72 TXP MR 10G pmthresholds trunk line nearend 15min SES 1 seconds 0 900 TXP MR 10G pmthresholds trunk line nearend 15min UAS 3 seconds 0 900 TXP MR 10G pmthresholds trunk line nearend 1day CV 850400 B2 count 0 849657600 T...

Page 1131: ... TXP MR 2_5G config client AlsRecoveryPulseDuration 40 0 seconds 2 0 2 1 2 2 100 0 when AlsMode is Disabled Auto Restart Manual Restart 80 0 80 1 80 2 100 0 when AlsMode is Manual Restart for Test TXP MR 2_5G config client AlsRecoveryPulseInterval 100 seconds 60 300 TXP MR 2_5G config client ppmPortAssignment UNASSIGNED UNASSIGNED OC3_PORT OC12_PORT OC48_PORT ONE_GE_PORT ESCON_PORT DV6000_PORT SDI...

Page 1132: ...00 0 when AlsMode is Disabled Auto Restart Manual Restart 80 0 80 1 80 2 100 0 when AlsMode is Manual Restart for Test TXP MR 2_5G config trunk AlsRecoveryPulseInterval 100 seconds 60 300 TXP MR 2_5G config trunk SDBER 1 00E 07 1E 5 1E 6 1E 7 1E 8 1E 9 TXP MR 2_5G config trunk SFBER 1 00E 04 1E 3 1E 4 1E 5 TXP MR 2_5G opticalthresholds client alarm HighLaserBias 90 0 0 0 0 1 0 2 100 0 TXP MR 2_5G ...

Page 1133: ... 8 HighTxPower TXP MR 2_5G opticalthresholds trunk alarm HighLaserBias 98 0 0 0 0 1 0 2 100 0 TXP MR 2_5G opticalthresholds trunk alarm HighRxPower 8 0 dBrn LowRxPower LowRxPower 0 1 LowRxPower 0 2 30 0 TXP MR 2_5G opticalthresholds trunk alarm LowRxPower 25 0 dBrn 40 0 39 9 39 8 HighRxPower TXP MR 2_5G opticalthresholds trunk warning 15min HighLaser Bias 95 0 0 0 0 1 0 2 100 0 TXP MR 2_5G optical...

Page 1134: ...berchannel 15min Uncorrect ableWords 1 count 0 4724697600 TXP MR 2_5G otn fecthresholds 2gfiberchannel 1day BitErrorsC orrected 17366400 count 0 867227693875200 TXP MR 2_5G otn fecthresholds 2gfiberchannel 1day Uncorrecta bleWords 96 count 0 453570969600 TXP MR 2_5G otn fecthresholds 2gficon 15min BitErrorsCorrect ed 180900 count 0 9033621811200 TXP MR 2_5G otn fecthresholds 2gficon 15min Uncorrec...

Page 1135: ... g709thresholds pm nearend 15min BBE 21260 count 0 8850600 TXP MR 2_5G otn g709thresholds pm nearend 15min ES 87 seconds 0 900 TXP MR 2_5G otn g709thresholds pm nearend 15min FC 10 count 0 72 TXP MR 2_5G otn g709thresholds pm nearend 15min SES 1 seconds 0 900 TXP MR 2_5G otn g709thresholds pm nearend 15min UAS 3 seconds 0 900 TXP MR 2_5G otn g709thresholds pm nearend 1day BBE 212600 count 0 849657...

Page 1136: ... 2_5G pmthresholds oc12 line farend 15min FC 10 count 0 72 TXP MR 2_5G pmthresholds oc12 line farend 15min SES 1 seconds 0 900 TXP MR 2_5G pmthresholds oc12 line farend 15min UAS 3 seconds 0 900 TXP MR 2_5G pmthresholds oc12 line farend 1day CV 53150 B2 count 0 53049600 TXP MR 2_5G pmthresholds oc12 line farend 1day ES 864 seconds 0 86400 TXP MR 2_5G pmthresholds oc12 line farend 1day FC 40 count ...

Page 1137: ... oc3 line farend 1day UAS 10 seconds 0 86400 TXP MR 2_5G pmthresholds oc3 line nearend 15min CV 1312 B2 count 0 137700 TXP MR 2_5G pmthresholds oc3 line nearend 15min ES 87 seconds 0 900 TXP MR 2_5G pmthresholds oc3 line nearend 15min FC 10 count 0 72 TXP MR 2_5G pmthresholds oc3 line nearend 15min SES 1 seconds 0 900 TXP MR 2_5G pmthresholds oc3 line nearend 15min UAS 3 seconds 0 900 TXP MR 2_5G ...

Page 1138: ...mthresholds oc48 line nearend 15min SES 1 seconds 0 900 TXP MR 2_5G pmthresholds oc48 line nearend 15min UAS 3 seconds 0 900 TXP MR 2_5G pmthresholds oc48 line nearend 1day CV 212600 B2 count 0 212371200 TXP MR 2_5G pmthresholds oc48 line nearend 1day ES 864 seconds 0 86400 TXP MR 2_5G pmthresholds oc48 line nearend 1day FC 40 count 0 6912 TXP MR 2_5G pmthresholds oc48 line nearend 1day SES 4 seco...

Page 1139: ... TXPP MR 2_5G config client AlsRecoveryPulseDuration 40 0 seconds 2 0 2 1 2 2 100 0 when AlsMode is Disabled Auto Restart Manual Restart 80 0 80 1 80 2 100 0 when AlsMode is Manual Restart for Test TXPP MR 2_5G config client AlsRecoveryPulseInterval 100 seconds 60 300 TXPP MR 2_5G config client ppmPortAssignment UNASSIGNED UNASSIGNED OC3_PORT OC12_PORT OC48_PORT ONE_GE_PORT ESCON_PORT DV6000_PORT ...

Page 1140: ...g trunk AINSSoakTime 08 00 hours mins 00 00 00 15 00 30 48 00 TXPP MR 2_5G config trunk AlsMode Disabled Disabled Auto Restart Manual Restart Manual Restart for Test TXPP MR 2_5G config trunk AlsRecoveryPulseDuration 40 0 seconds 2 0 2 1 2 2 100 0 when AlsMode is Disabled Auto Restart Manual Restart 80 0 80 1 80 2 100 0 when AlsMode is Manual Restart for Test TXPP MR 2_5G config trunk AlsRecoveryP...

Page 1141: ...ticalthresholds client warning 15min LowTxPower 7 0 dBm 40 0 39 9 39 8 HighTxPower TXPP MR 2_5G opticalthresholds client warning 1day HighLaserBias 85 5 0 0 0 1 0 2 100 0 TXPP MR 2_5G opticalthresholds client warning 1day HighRxPower 2 5 dBm LowRxPower LowRxPower 0 1 LowRxPower 0 2 30 0 TXPP MR 2_5G opticalthresholds client warning 1day HighTxPower 2 5 dBm LowTxPower LowTxPower 0 1 LowTxPower 0 2 ...

Page 1142: ...nt 0 453570969600 TXPP MR 2_5G otn fecthresholds 1gficon 15min BitErrorsCorrected 90000 count 0 9033621811200 TXPP MR 2_5G otn fecthresholds 1gficon 15min UncorrectableWords 1 count 0 4724697600 TXPP MR 2_5G otn fecthresholds 1gficon 1day BitErrorsCorrected 8640000 count 0 867227693875200 TXPP MR 2_5G otn fecthresholds 1gficon 1day UncorrectableWords 96 count 0 453570969600 TXPP MR 2_5G otn fecthr...

Page 1143: ... g709thresholds pm farend 1day ES 864 seconds 0 86400 TXPP MR 2_5G otn g709thresholds pm farend 1day FC 40 count 0 6912 TXPP MR 2_5G otn g709thresholds pm farend 1day SES 4 seconds 0 86400 TXPP MR 2_5G otn g709thresholds pm farend 1day UAS 10 seconds 0 86400 TXPP MR 2_5G otn g709thresholds pm nearend 15min BBE 21260 count 0 8850600 TXPP MR 2_5G otn g709thresholds pm nearend 15min ES 87 seconds 0 9...

Page 1144: ...s G709OTN Enable Disable Enable TXPP MR 2_5G otn otnLines SDBER 1 00E 07 1E 5 1E 6 1E 7 1E 8 1E 9 TXPP MR 2_5G pmthresholds oc12 line farend 15min CV 5315 B2 count 0 552600 TXPP MR 2_5G pmthresholds oc12 line farend 15min ES 87 seconds 0 900 TXPP MR 2_5G pmthresholds oc12 line farend 15min FC 10 count 0 72 TXPP MR 2_5G pmthresholds oc12 line farend 15min SES 1 seconds 0 900 TXPP MR 2_5G pmthreshol...

Page 1145: ..._5G pmthresholds oc3 line farend 1day CV 13120 B2 count 0 13219200 TXPP MR 2_5G pmthresholds oc3 line farend 1day ES 864 seconds 0 86400 TXPP MR 2_5G pmthresholds oc3 line farend 1day FC 40 count 0 6912 TXPP MR 2_5G pmthresholds oc3 line farend 1day SES 4 seconds 0 86400 TXPP MR 2_5G pmthresholds oc3 line farend 1day UAS 10 seconds 0 86400 TXPP MR 2_5G pmthresholds oc3 line nearend 15min CV 1312 B...

Page 1146: ...TXPP MR 2_5G pmthresholds oc48 line nearend 15min ES 87 seconds 0 900 TXPP MR 2_5G pmthresholds oc48 line nearend 15min FC 10 count 0 72 TXPP MR 2_5G pmthresholds oc48 line nearend 15min SES 1 seconds 0 900 TXPP MR 2_5G pmthresholds oc48 line nearend 15min UAS 3 seconds 0 900 TXPP MR 2_5G pmthresholds oc48 line nearend 1day CV 212600 B2 count 0 212371200 TXPP MR 2_5G pmthresholds oc48 line nearend...

Page 1147: ...pmthresholds line nearend 15min CV 1312 B2 count 0 137700 OSCM pmthresholds line nearend 15min ES 87 seconds 0 900 OSCM pmthresholds line nearend 15min FC 10 count 0 72 OSCM pmthresholds line nearend 15min SES 1 seconds 0 900 OSCM pmthresholds line nearend 15min UAS 3 seconds 0 900 OSCM pmthresholds line nearend 1day CV 13120 B2 count 0 13219200 OSCM pmthresholds line nearend 1day ES 864 seconds 0...

Page 1148: ... farend 1day SES 4 seconds 0 86400 OSC_CSM pmthresholds line farend 1day UAS 10 seconds 0 86400 OSC_CSM pmthresholds line nearend 15min CV 1312 B2 count 0 137700 OSC_CSM pmthresholds line nearend 15min ES 87 seconds 0 900 OSC_CSM pmthresholds line nearend 15min FC 10 count 0 72 OSC_CSM pmthresholds line nearend 15min SES 1 seconds 0 900 OSC_CSM pmthresholds line nearend 15min UAS 3 seconds 0 900 O...

Page 1149: ...systems or networks without authorization NTP SNTP Server Sets the IP address of the Network Time Protocol NTP Simple Network Time Protocol SNTP server to be used with the node Time Zone Sets the time zone where the node is located Use DST Enables or disables the use of Daylight Savings Time DST Use NTP SNTP Server Enables or disables the use of the specified NTP SNTP server with the node 1 1 prot...

Page 1150: ...UE FALSE NODE general NtpSntpServer 0 0 0 0 IP Address NODE general RaiseConditionOnEmptySlot FALSE TRUE FALSE NODE general SDPBER 1 00E 06 1E 5 1E 6 1E 7 1E 8 1E 9 NODE general TimeZone GMT 08 00 Pacific Time US Canada Tijuana For applicable time zones see Table D 24 on page D 114 NODE general UseDST TRUE TRUE FALSE NODE network general AlarmMissingBackplaneLAN FALSE TRUE FALSE NODE network gener...

Page 1151: ...UE NODE osi tarp LDBEntry 5 min 1 10 NODE osi tarp LDBFlush 5 sec 0 1440 NODE osi tarp PDUsL1Propagation TRUE FALSE TRUE NODE osi tarp PDUsL2Propagation TRUE FALSE TRUE NODE osi tarp PDUsOrigination TRUE FALSE TRUE NODE osi tarp T1Timer 15 sec 0 3600 NODE osi tarp T2Timer 25 sec 0 3600 NODE osi tarp T3Timer 40 sec 0 3600 NODE osi tarp T4Timer 20 sec 0 3600 NODE osi tarp Type4PDUDelay 0 sec 0 255 N...

Page 1152: ...IpDisplaySuppression NOT SUPPORTED FALSE TRUE when isSecureModeSupportedOnC ontrolCard is TRUE NOT SUPPORTED when isSecureModeSupportedOnC ontrolCard is FALSE NODE security dataComm isSecureModeSupportedOnControlCard FALSE FALSE TRUE NODE security dataComm LcdBackplaneIpSetting NOT SUPPORTED Allow Configuration Display Only Suppress Display when isSecureModeSupportedOnC ontrolCard is TRUE NOT SUPP...

Page 1153: ...ningMessage html center b WARNING b center T his system is restricted to authorized users for business purposes Unauthorized p access is a violation of the law This service may be monitored for administrative p and security reasons By proceeding you consent to this monitoring Free form field NODE security other DisableInactiveUser FALSE FALSE TRUE NODE security other InactiveDuration 45 days 1 2 3...

Page 1154: ...ver ctc AccountingPort 1813 port 0 32767 NODE security radiusServer ctc AuthenticationPort 1812 port 0 32767 NODE security radiusServer EnableNodeAsFinalAuthenticatorWhen AuthenticationEnabled TRUE FALSE TRUE NODE security serialCraftAccess EnableCraftPort TRUE TRUE FALSE NODE security shellAccess AccessState NonSecure Disabled NonSecure Secure NODE security shellAccess EnableShellPassword FALSE T...

Page 1155: ...iming bits 1 State IS IS OOS DSBLD NODE timing bits 1 StateOut IS IS OOS DSBLD NODE timing bits 2 AdminSSMIn STU PRS STU ST2 TNC ST3E ST3 SMC ST4 DUS RES NODE timing bits 2 AISThreshold SMC PRS STU ST2 TNC ST3E ST3 SMC ST4 DUS RES NODE timing bits 2 Coding B8ZS B8ZS AMI when FacilityType is DS1 AMI when FacilityType is 64kHz 8kHz NODE timing bits 2 CodingOut B8ZS B8ZS AMI when FacilityTypeOut is D...

Page 1156: ... IS IS OOS DSBLD NODE timing general Mode External External Line Mixed NODE timing general QualityOfRES RES DUS PRS RES STU RES PRS ST2 RES STU ST3 RES ST2 SMC RES ST3 ST4 RES SMC RES ST4 RES DUS when SSMMessageSet is Generation 1 PRS RES STU RES PRS ST2 RES STU TNC RES ST2 ST3E RES TNC ST3 RES ST3E SMC RES ST3 ST4 RES SMC RES ST4 RES DUS when SSMMessageSet is Generation 2 NODE timing general Reve...

Page 1157: ...sages S1 byte which allow the node to choose the best timing source Send Do Not Use TXP and MXP cards Sends a DUS message on the S1 byte when enabled Payload Type TXP and MXP cards Defines the type of client signal Termination Mode TXP and MXP cards Defines the type of termination line section or transparent ALS Mode TXP and MXP cards Sets the automatic laser shutdown feature to one of four availa...

Page 1158: ...sMode is Disabled Auto Restart Manual Restart 80 0 80 1 80 2 100 0 when AlsMode is Manual Restart for Test MXP 2_5G 10G config client AlsRecoveryPulseInterval 100 seconds 60 300 MXP 2_5G 10G config client ppmPortAssignment STM16_POR T UNASSIGNED STM16_PORT MXP 2_5G 10G config client ppmSlotAssignment UNASSIGNE D UNASSIGNED PPM 1 Port MXP 2_5G 10G config client SDBER 1E 7 1E 5 1E 6 1E 7 1E 8 1E 9 M...

Page 1159: ...warning 15min LowTxPower 7 0 dBm 40 0 39 9 39 8 HighTxPower MXP 2_5G 10G opticalthresholds client warning 1day HighLaserBias 85 5 0 0 0 1 0 2 100 0 MXP 2_5G 10G opticalthresholds client warning 1day HighRxPower 2 5 dBm LowRxPower LowRxPower 0 1 LowRxPower 0 2 30 0 MXP 2_5G 10G opticalthresholds client warning 1day HighTxPower 2 5 dBm LowTxPower LowTxPower 0 1 LowTxPower 0 2 30 0 MXP 2_5G 10G optic...

Page 1160: ...ds standard 1day BitErrorsCorrected 86719680 count 0 867227693875200 MXP 2_5G 10G otn fecthresholds standard 1day UncorrectableWords 480 count 0 453570969600 MXP 2_5G 10G otn g709thresholds pm farend 15min BBE 85040 count 0 8850600 MXP 2_5G 10G otn g709thresholds pm farend 15min ES 87 seconds 0 900 MXP 2_5G 10G otn g709thresholds pm farend 15min FC 10 count 0 72 MXP 2_5G 10G otn g709thresholds pm ...

Page 1161: ...5G 10G otn g709thresholds sm farend 1day SES 5000 seconds 0 86400 MXP 2_5G 10G otn g709thresholds sm farend 1day UAS 5000 seconds 0 86400 MXP 2_5G 10G otn g709thresholds sm nearend 15min BBE 10000 count 0 8850600 MXP 2_5G 10G otn g709thresholds sm nearend 15min ES 500 seconds 0 900 MXP 2_5G 10G otn g709thresholds sm nearend 15min FC 10 count 0 72 MXP 2_5G 10G otn g709thresholds sm nearend 15min SE...

Page 1162: ...nt ms nearend 15min SES 1 seconds 0 900 MXP 2_5G 10G pmthresholds client ms nearend 15min UAS 3 seconds 0 900 MXP 2_5G 10G pmthresholds client ms nearend 1day BBE 212600 count 0 212371200 MXP 2_5G 10G pmthresholds client ms nearend 1day EB 212600 count 0 212371200 MXP 2_5G 10G pmthresholds client ms nearend 1day ES 864 seconds 0 86400 MXP 2_5G 10G pmthresholds client ms nearend 1day SES 4 seconds ...

Page 1163: ...unk ms nearend 15min SES 1 seconds 0 900 MXP 2_5G 10G pmthresholds trunk ms nearend 15min UAS 3 seconds 0 900 MXP 2_5G 10G pmthresholds trunk ms nearend 1day BBE 850400 count 0 849657600 MXP 2_5G 10G pmthresholds trunk ms nearend 1day EB 850400 count 0 849657600 MXP 2_5G 10G pmthresholds trunk ms nearend 1day ES 864 seconds 0 86400 MXP 2_5G 10G pmthresholds trunk ms nearend 1day SES 4 seconds 0 86...

Page 1164: ...g client ppmPortAssignment STM16_PO RT UNASSIGNED STM16_PORT MXP 2_5G 10E config client ppmSlotAssignment UNASSIGN ED UNASSIGNED PPM 1 Port MXP 2_5G 10E config client SDBER 1E 7 1E 5 1E 6 1E 7 1E 8 1E 9 MXP 2_5G 10E config client SendDoNotUse FALSE TRUE FALSE MXP 2_5G 10E config client SFBER 1E 4 1E 3 1E 4 1E 5 MXP 2_5G 10E config client SyncMsgIn TRUE FALSE TRUE MXP 2_5G 10E config client Termina...

Page 1165: ... 1 0 1 1 1 2 30 0 MXP 2_5G 10E opticalthresholds trunk alarm LowRxPower 25 0 dBm 40 0 39 9 39 8 8 0 MXP 2_5G 10E opticalthresholds trunk alarm LowTxPower 1 0 dBm 40 0 39 9 39 8 8 0 MXP 2_5G 10E opticalthresholds trunk warning 15min HighLaserBias 95 0 0 0 0 1 0 2 100 0 MXP 2_5G 10E opticalthresholds trunk warning 15min HighRxPower 7 5 dBm 24 5 24 4 24 3 30 0 MXP 2_5G 10E opticalthresholds trunk war...

Page 1166: ...m farend 1day UAS 10 seconds 0 86400 MXP 2_5G 10E otn g709thresholds pm nearend 15min BBE 85040 count 0 8850600 MXP 2_5G 10E otn g709thresholds pm nearend 15min ES 87 seconds 0 900 MXP 2_5G 10E otn g709thresholds pm nearend 15min FC 10 count 0 72 MXP 2_5G 10E otn g709thresholds pm nearend 15min SES 1 seconds 0 900 MXP 2_5G 10E otn g709thresholds pm nearend 15min UAS 3 seconds 0 900 MXP 2_5G 10E ot...

Page 1167: ..._5G 10E otn g709thresholds sm nearend 1day BBE 100000 count 0 849657600 MXP 2_5G 10E otn g709thresholds sm nearend 1day ES 5000 seconds 0 86400 MXP 2_5G 10E otn g709thresholds sm nearend 1day FC 40 count 0 6912 MXP 2_5G 10E otn g709thresholds sm nearend 1day SES 5000 seconds 0 86400 MXP 2_5G 10E otn g709thresholds sm nearend 1day UAS 5000 seconds 0 86400 MXP 2_5G 10E otn otnLines AsynchSynchMappin...

Page 1168: ... 900 MXP 2_5G 10E pmthresholds client ms nearend 1day BBE 212600 count 0 212371200 MXP 2_5G 10E pmthresholds client ms nearend 1day EB 212600 count 0 212371200 MXP 2_5G 10E pmthresholds client ms nearend 1day ES 864 seconds 0 86400 MXP 2_5G 10E pmthresholds client ms nearend 1day SES 4 seconds 0 86400 MXP 2_5G 10E pmthresholds client ms nearend 1day UAS 10 seconds 0 86400 MXP 2_5G 10E pmthresholds...

Page 1169: ...Auto Restart Manual Restart 80 0 80 1 80 2 100 0 when AlsMode is Manual Restart for Test MXP MR 2_5G config client AlsRecoveryPulseInterval 100 seconds 60 300 MXP MR 2_5G config client ppmPortAssignment UNASSIGNE D UNASSIGNED ONE_GE FC1G ISL FC2G ISL FICON1G ISL FICON2G ISL MXP MR 2_5G config client ppmSlotAssignment UNASSIGNE D UNASSIGNED PPM 1 Port MXP MR 2_5G config fc distanceExtension Autoadj...

Page 1170: ... 2_5G opticalthresholds client warning 15min HighLaserBias 81 0 0 0 0 1 0 2 100 0 MXP MR 2_5G opticalthresholds client warning 15min HighRxPower 2 0 dBm LowRxPower LowRxPower 0 1 LowRxPower 0 2 30 0 MXP MR 2_5G opticalthresholds client warning 15min HighTxPower 2 0 dBm LowTxPower LowTxPower 0 1 LowTxPower 0 2 30 0 MXP MR 2_5G opticalthresholds client warning 15min LowRxPower 20 0 dBm 40 0 39 9 39 ...

Page 1171: ...resholds trunk warning 1day HighTxPower 30 0 dBm LowTxPower LowTxPower 0 1 LowTxPower 0 2 30 0 MXP MR 2_5G opticalthresholds trunk warning 1day LowRxPower 24 7 dBm 40 0 39 9 39 8 HighRxPower MXP MR 2_5G opticalthresholds trunk warning 1day LowTxPower 40 0 dBm 40 0 39 9 39 8 HighTxPower MXP MR 2_5G pmthresholds trunk ms farend 15min BBE 21260 count 0 2212200 MXP MR 2_5G pmthresholds trunk ms farend...

Page 1172: ...00 seconds 0 900 MXP MR 2_5G pmthresholds trunk rs nearend 15min SES 500 seconds 0 900 MXP MR 2_5G pmthresholds trunk rs nearend 15min UAS 3 seconds 0 900 MXP MR 2_5G pmthresholds trunk rs nearend 1day BBE 100000 count 0 206582400 MXP MR 2_5G pmthresholds trunk rs nearend 1day EB 100000 count 0 206582400 MXP MR 2_5G pmthresholds trunk rs nearend 1day ES 5000 seconds 0 86400 MXP MR 2_5G pmthreshold...

Page 1173: ...0 seconds 2 0 2 1 2 2 100 0 when AlsMode is Disabled Auto Restart Manual Restart 80 0 80 1 80 2 100 0 when AlsMode is Manual Restart for Test MXPP MR 2_5G config trunk AlsRecoveryPulseInterval 100 seconds 60 300 MXPP MR 2_5G config trunk SDBER 1E 7 1E 5 1E 6 1E 7 1E 8 1E 9 MXPP MR 2_5G config trunk SFBER 1E 4 1E 3 1E 4 1E 5 MXPP MR 2_5G opticalthresholds client alarm HighLaserBias 90 0 0 0 0 1 0 2...

Page 1174: ...1 LowTxPower 0 2 30 0 MXPP MR 2_5G opticalthresholds trunk alarm LowRxPower 25 0 dBm 40 0 39 9 39 8 HighRxPower MXPP MR 2_5G opticalthresholds trunk alarm LowTxPower 40 0 dBm 40 0 39 9 39 8 HighTxPower MXPP MR 2_5G opticalthresholds trunk warning 15min HighLaserBia s 95 0 0 0 0 1 0 2 100 0 MXPP MR 2_5G opticalthresholds trunk warning 15min HighRxPower 7 5 dBm LowRxPower LowRxPower 0 1 LowRxPower 0...

Page 1175: ...unk ms nearend 15min SES 1 seconds 0 900 MXPP MR 2_5G pmthresholds trunk ms nearend 15min UAS 3 seconds 0 900 MXPP MR 2_5G pmthresholds trunk ms nearend 1day BBE 212600 count 0 2212200 MXPP MR 2_5G pmthresholds trunk ms nearend 1day EB 212600 count 0 212371200 MXPP MR 2_5G pmthresholds trunk ms nearend 1day ES 864 seconds 0 86400 MXPP MR 2_5G pmthresholds trunk ms nearend 1day SES 4 seconds 0 8640...

Page 1176: ...0E config client ppmPortAssignment UNASSIGNE D UNASSIGNED SDH 10G Ethernet 10G Fiber Channel TXP MR 10E config client ppmSlotAssignment UNASSIGNE D UNASSIGNED PPM 1 Port TXP MR 10E config client SDBER 1E 7 1E 5 1E 6 1E 7 1E 8 1E 9 TXP MR 10E config client SendDoNotUse FALSE TRUE FALSE TXP MR 10E config client SFBER 1E 4 1E 3 1E 4 1E 5 TXP MR 10E config client SyncMsgIn TRUE FALSE TRUE TXP MR 10E c...

Page 1177: ...warning 1day LowTxPower 8 5 dBm 40 0 39 9 39 8 1 5 TXP MR 10E opticalthresholds trunk alarm HighLaserBias 98 0 0 0 0 1 0 2 100 0 TXP MR 10E opticalthresholds trunk alarm HighRxPower 8 0 dBm 25 0 24 9 24 8 30 0 TXP MR 10E opticalthresholds trunk alarm HighTxPower 8 0 dBm 1 0 1 1 1 2 30 0 TXP MR 10E opticalthresholds trunk alarm LowRxPower 25 0 dBm 40 0 39 9 39 8 8 0 TXP MR 10E opticalthresholds tru...

Page 1178: ...arend 1day SES 4 seconds 0 86400 TXP MR 10E otn g709thresholds pm farend 1day UAS 10 seconds 0 86400 TXP MR 10E otn g709thresholds pm nearend 15min BBE 85040 count 0 8850600 TXP MR 10E otn g709thresholds pm nearend 15min ES 87 seconds 0 900 TXP MR 10E otn g709thresholds pm nearend 15min FC 10 count 0 72 TXP MR 10E otn g709thresholds pm nearend 15min SES 1 seconds 0 900 TXP MR 10E otn g709threshold...

Page 1179: ...y SES 5000 seconds 0 86400 TXP MR 10E otn g709thresholds sm nearend 1day UAS 5000 seconds 0 86400 TXP MR 10E otn otnLines AsynchSynchMapping Synch Mapping Asynch mapping Synch Mapping TXP MR 10E otn otnLines FEC Standard Disable Standard Enhanced when G709OTN is Enable Disable when G709OTN is Disable TXP MR 10E otn otnLines G709OTN Enable Disable Enable TXP MR 10E otn otnLines SDBER 1E 7 1E 5 1E 6...

Page 1180: ... pmthresholds client rs nearend 15min ES 500 seconds 0 900 TXP MR 10E pmthresholds client rs nearend 15min SES 500 seconds 0 900 TXP MR 10E pmthresholds client rs nearend 15min UAS 3 seconds 0 900 TXP MR 10E pmthresholds client rs nearend 1day BBE 100000 count 0 849657600 TXP MR 10E pmthresholds client rs nearend 1day EB 100000 count 0 764899200 TXP MR 10E pmthresholds client rs nearend 1day ES 50...

Page 1181: ...MR 10E pmthresholds trunk ms nearend 1day UAS 10 seconds 0 86400 TXP MR 10E pmthresholds trunk rs nearend 15min BBE 10000 count 0 8850600 TXP MR 10E pmthresholds trunk rs nearend 15min EB 10000 count 0 7967700 TXP MR 10E pmthresholds trunk rs nearend 15min ES 500 seconds 0 900 TXP MR 10E pmthresholds trunk rs nearend 15min SES 500 seconds 0 900 TXP MR 10E pmthresholds trunk rs nearend 15min UAS 3 ...

Page 1182: ...Mode Disabled Disabled Auto Restart Manual Restart Manual Restart for Test TXP MR 10G config trunk AlsRecoveryPulseDuration 4 0 seconds 2 0 2 1 2 2 100 0 when AlsMode is Disabled Auto Restart Manual Restart 80 0 80 1 80 2 100 0 when AlsMode is Manual Restart for Test TXP MR 10G config trunk AlsRecoveryPulseInterval 100 seconds 60 300 TXP MR 10G config trunk SDBER 1E 7 1E 5 1E 6 1E 7 1E 8 1E 9 TXP ...

Page 1183: ... 90 0 0 0 0 1 0 2 100 0 TXP MR 10G opticalthresholds trunk alarm HighRxPower 8 0 dBm LowRxPower LowRxPower 0 1 LowRxPower 0 2 30 0 TXP MR 10G opticalthresholds trunk alarm HighTxPower 4 0 dBm LowTxPower LowTxPower 0 1 LowTxPower 0 2 30 0 TXP MR 10G opticalthresholds trunk alarm LowRxPower 25 0 dBm 40 0 39 9 39 8 HighRxPower TXP MR 10G opticalthresholds trunk alarm LowTxPower 2 0 dBm 40 0 39 9 39 8...

Page 1184: ...g709thresholds pm farend 1day SES 4 seconds 0 86400 TXP MR 10G otn g709thresholds pm farend 1day UAS 10 seconds 0 86400 TXP MR 10G otn g709thresholds pm nearend 15min BBE 85040 count 0 8850600 TXP MR 10G otn g709thresholds pm nearend 15min ES 87 seconds 0 900 TXP MR 10G otn g709thresholds pm nearend 15min FC 10 count 0 72 TXP MR 10G otn g709thresholds pm nearend 15min SES 1 seconds 0 900 TXP MR 10...

Page 1185: ...lds client ms farend 15min BBE 85040 count 0 8850600 TXP MR 10G pmthresholds client ms farend 15min EB 85040 count 0 8850600 TXP MR 10G pmthresholds client ms farend 15min ES 87 seconds 0 900 TXP MR 10G pmthresholds client ms farend 15min SES 1 seconds 0 900 TXP MR 10G pmthresholds client ms farend 15min UAS 3 seconds 0 900 TXP MR 10G pmthresholds client ms farend 1day BBE 850400 count 0 849657600...

Page 1186: ...mthresholds trunk ms farend 1day BBE 850400 count 0 849657600 TXP MR 10G pmthresholds trunk ms farend 1day EB 850400 count 0 849657600 TXP MR 10G pmthresholds trunk ms farend 1day ES 864 seconds 0 86400 TXP MR 10G pmthresholds trunk ms farend 1day SES 4 seconds 0 86400 TXP MR 10G pmthresholds trunk ms farend 1day UAS 10 seconds 0 86400 TXP MR 10G pmthresholds trunk ms nearend 15min BBE 85040 count...

Page 1187: ...gs ETSI Default Name Default Value Default Domain TXP MR 2_5G config client AINSSoakTime 08 00 hours mins 00 00 00 15 00 30 48 00 TXP MR 2_5G config client AlsMode Disabled Disabled Auto Restart Manual Restart Manual Restart for Test TXP MR 2_5G config client AlsRecoveryPulseDuration 40 0 seconds 2 0 2 1 2 2 100 0 when AlsMode is Disabled Auto Restart Manual Restart 80 0 80 1 80 2 100 0 when AlsMo...

Page 1188: ...Restart Manual Restart for Test TXP MR 2_5G config trunk AlsRecoveryPulseDuration 40 0 seconds 2 0 2 1 2 2 100 0 when AlsMode is Disabled Auto Restart Manual Restart 80 0 80 1 80 2 100 0 when AlsMode is Manual Restart for Test TXP MR 2_5G config trunk AlsRecoveryPulseInterval 100 seconds 60 300 TXP MR 2_5G config trunk SDBER 1E 7 1E 5 1E 6 1E 7 1E 8 1E 9 TXP MR 2_5G config trunk SFBER 1E 4 1E 3 1E...

Page 1189: ...warning 1day LowTxPower 7 5 dBm 40 0 39 9 39 8 HighTxPower TXP MR 2_5G opticalthresholds trunk alarm HighLaserBias 98 0 0 0 0 1 0 2 100 0 TXP MR 2_5G opticalthresholds trunk alarm HighRxPower 8 0 dBrn LowRxPower LowRxPower 0 1 LowRxPower 0 2 30 0 TXP MR 2_5G opticalthresholds trunk alarm LowRxPower 25 0 dBrn 40 0 39 9 39 8 HighRxPower TXP MR 2_5G opticalthresholds trunk warning 15min HighLaserBias...

Page 1190: ...iberchannel 1day BitErrorsCorrected 17366400 count 0 867227693875200 TXP MR 2_5G otn fecthresholds 2gfiberchannel 1day UncorrectableWor ds 96 count 0 453570969600 TXP MR 2_5G otn fecthresholds 2gficon 15min BitErrorsCorrected 180900 count 0 9033621811200 TXP MR 2_5G otn fecthresholds 2gficon 15min UncorrectableWords 1 count 0 4724697600 TXP MR 2_5G otn fecthresholds 2gficon 1day BitErrorsCorrected...

Page 1191: ...40 count 0 6912 TXP MR 2_5G otn g709thresholds pm farend 1day SES 4 seconds 0 86400 TXP MR 2_5G otn g709thresholds pm farend 1day UAS 10 seconds 0 86400 TXP MR 2_5G otn g709thresholds pm nearend 15min BBE 21260 count 0 8850600 TXP MR 2_5G otn g709thresholds pm nearend 15min ES 87 seconds 0 900 TXP MR 2_5G otn g709thresholds pm nearend 15min FC 10 count 0 72 TXP MR 2_5G otn g709thresholds pm nearen...

Page 1192: ...thresholds sm nearend 15min UAS 500 seconds 0 900 TXP MR 2_5G otn g709thresholds sm nearend 1day BBE 100000 count 0 849657600 TXP MR 2_5G otn g709thresholds sm nearend 1day ES 5000 seconds 0 86400 TXP MR 2_5G otn g709thresholds sm nearend 1day FC 40 count 0 6912 TXP MR 2_5G otn g709thresholds sm nearend 1day SES 5000 seconds 0 86400 TXP MR 2_5G otn g709thresholds sm nearend 1day UAS 5000 seconds 0...

Page 1193: ...t 0 13219200 TXP MR 2_5G pmthresholds stm1 ms nearend 1day EB 13120 count 0 13219200 TXP MR 2_5G pmthresholds stm1 ms nearend 1day ES 864 seconds 0 86400 TXP MR 2_5G pmthresholds stm1 ms nearend 1day SES 4 seconds 0 86400 TXP MR 2_5G pmthresholds stm1 ms nearend 1day UAS 10 seconds 0 86400 TXP MR 2_5G pmthresholds stm1 rs nearend 15min BBE 10000 count 0 138600 TXP MR 2_5G pmthresholds stm1 rs near...

Page 1194: ...ount 0 2212200 TXP MR 2_5G pmthresholds stm16 ms nearend 15min EB 21260 count 0 2212200 TXP MR 2_5G pmthresholds stm16 ms nearend 15min ES 87 seconds 0 900 TXP MR 2_5G pmthresholds stm16 ms nearend 15min SES 1 seconds 0 900 TXP MR 2_5G pmthresholds stm16 ms nearend 15min UAS 3 seconds 0 900 TXP MR 2_5G pmthresholds stm16 ms nearend 1day BBE 212600 count 0 212371200 TXP MR 2_5G pmthresholds stm16 m...

Page 1195: ...B 53150 count 0 53049600 TXP MR 2_5G pmthresholds stm4 ms farend 1day ES 864 seconds 0 86400 TXP MR 2_5G pmthresholds stm4 ms farend 1day SES 4 seconds 0 86400 TXP MR 2_5G pmthresholds stm4 ms farend 1day UAS 10 seconds 0 86400 TXP MR 2_5G pmthresholds stm4 ms nearend 15min BBE 5315 count 0 552600 TXP MR 2_5G pmthresholds stm4 ms nearend 15min EB 5315 count 0 552600 TXP MR 2_5G pmthresholds stm4 m...

Page 1196: ...sholds stm4 rs nearend 1day UAS 10 seconds 0 86400 Table D 19 TXP_MR_2 5G Card Default Settings ETSI continued Default Name Default Value Default Domain Table D 20 TXPP MR 2 5G Card Default Settings ETSI Default Name Default Value Default Domain TXPP MR 2_5G config client AINSSoakTime 08 00 hours mins 00 00 00 15 00 30 48 00 TXPP MR 2_5G config client AlsMode Disabled Disabled Auto Restart Manual ...

Page 1197: ...2G_PORT FICON1G_PORT FICON2G_PORT ISC peer TXPP MR 2_5G config trunk AINSSoakTime 08 00 hours mins 00 00 00 15 00 30 48 00 TXPP MR 2_5G config trunk AlsMode Disabled Disabled Auto Restart Manual Restart Manual Restart for Test TXPP MR 2_5G config trunk AlsRecoveryPulseDuration 40 0 seconds 2 0 2 1 2 2 100 0 when AlsMode is Disabled Auto Restart Manual Restart 80 0 80 1 80 2 100 0 when AlsMode is M...

Page 1198: ...icalthresholds client warning 1day HighTxPower 2 5 dBm LowTxPower LowTxPower 0 1 LowTxPower 0 2 30 0 TXPP MR 2_5G opticalthresholds client warning 1day LowRxPower 20 5 dBm 40 0 39 9 39 8 HighRxPower TXPP MR 2_5G opticalthresholds client warning 1day LowTxPower 7 5 dBm 40 0 39 9 39 8 HighTxPower TXPP MR 2_5G opticalthresholds trunk alarm HighLaserBias 98 0 0 0 0 1 0 2 100 0 TXPP MR 2_5G opticalthre...

Page 1199: ...XPP MR 2_5G otn fecthresholds 2gfiberchannel 15min BitErrorsCorre cted 180900 count 0 9033621811200 TXPP MR 2_5G otn fecthresholds 2gfiberchannel 15min Uncorrectable Words 1 count 0 4724697600 TXPP MR 2_5G otn fecthresholds 2gfiberchannel 1day BitErrorsCorrect ed 17366400 count 0 867227693875200 TXPP MR 2_5G otn fecthresholds 2gfiberchannel 1day UncorrectableW ords 96 count 0 453570969600 TXPP MR ...

Page 1200: ...arend 1day FC 40 count 0 6912 TXPP MR 2_5G otn g709thresholds pm farend 1day SES 4 seconds 0 86400 TXPP MR 2_5G otn g709thresholds pm farend 1day UAS 10 seconds 0 86400 TXPP MR 2_5G otn g709thresholds pm nearend 15min BBE 21260 count 0 8850600 TXPP MR 2_5G otn g709thresholds pm nearend 15min ES 87 seconds 0 900 TXPP MR 2_5G otn g709thresholds pm nearend 15min FC 10 count 0 72 TXPP MR 2_5G otn g709...

Page 1201: ...0 seconds 0 86400 TXPP MR 2_5G otn g709thresholds sm nearend 1day UAS 5000 seconds 0 86400 TXPP MR 2_5G otn otnLines FEC Enable Disable Enable when G709OTN is Enable Disable when G709OTN is Disable TXPP MR 2_5G otn otnLines G709OTN Enable Disable Enable TXPP MR 2_5G otn otnLines SDBER 1E 7 1E 5 1E 6 1E 7 1E 8 1E 9 TXPP MR 2_5G pmthresholds stm1 ms farend 15min BBE 1312 count 0 137700 TXPP MR 2_5G ...

Page 1202: ...stm1 rs nearend 1day EB 100000 count 0 13305600 TXPP MR 2_5G pmthresholds stm1 rs nearend 1day ES 5000 seconds 0 86400 TXPP MR 2_5G pmthresholds stm1 rs nearend 1day SES 5000 seconds 0 86400 TXPP MR 2_5G pmthresholds stm1 rs nearend 1day UAS 10 seconds 0 86400 TXPP MR 2_5G pmthresholds stm16 ms farend 15min BBE 21260 count 0 2212200 TXPP MR 2_5G pmthresholds stm16 ms farend 15min EB 21260 count 0 ...

Page 1203: ...00 TXPP MR 2_5G pmthresholds stm16 rs nearend 1day SES 5000 seconds 0 86400 TXPP MR 2_5G pmthresholds stm16 rs nearend 1day UAS 10 seconds 0 86400 TXPP MR 2_5G pmthresholds stm4 ms farend 15min BBE 5315 count 0 552600 TXPP MR 2_5G pmthresholds stm4 ms farend 15min EB 5315 count 0 552600 TXPP MR 2_5G pmthresholds stm4 ms farend 15min ES 87 seconds 0 900 TXPP MR 2_5G pmthresholds stm4 ms farend 15mi...

Page 1204: ... 0 53136000 TXPP MR 2_5G pmthresholds stm4 rs nearend 1day ES 5000 seconds 0 86400 TXPP MR 2_5G pmthresholds stm4 rs nearend 1day SES 5000 seconds 0 86400 TXPP MR 2_5G pmthresholds stm4 rs nearend 1day UAS 10 seconds 0 86400 Table D 20 TXPP MR 2 5G Card Default Settings ETSI continued Default Name Default Value Default Domain Table D 21 OSCM Card Default Settings ETSI Default Name Default Value De...

Page 1205: ...00 OSCM pmthresholds rs nearend 1day ES 5000 seconds 0 86400 OSCM pmthresholds rs nearend 1day SEFS 5000 seconds 0 86400 OSCM pmthresholds rs nearend 1day SES 5000 seconds 0 86400 Table D 21 OSCM Card Default Settings ETSI continued Default Name Default Value Default Domain Table D 22 OSC CSM Card Default Settings ETSI Default Name Default Value Default Domain OSC_CSM pmthresholds ms farend 15min ...

Page 1206: ...n about the possible legal or contractual ramifications of accessing equipment systems or networks without authorization NTP SNTP Server Sets the IP address of the NTP SNTP server to be used with the node Time Zone Sets the time zone where the node is located Use DST Enables or disables the use of Daylight Savings Time OSC_CSM pmthresholds ms nearend 15min UAS 3 seconds 0 900 OSC_CSM pmthresholds ...

Page 1207: ... disable inactive user after a set inactivity period BITS Timing settings Determine the AIS threshold coding framing State State Out and LBO settings for BITS1 and BITS2 timing General Timing settings Determine the mode External Line or Mixed quality of RES revertive reversion time and SSM message set for node timing Note For more information about each individual node setting see Chapter 10 Manag...

Page 1208: ...stem Intermediate System Level 1 Intermediate System Level 1 Level 2 NODE osi subnet ctc DISPriority 63 1 2 3 127 NODE osi subnet ctc ESH 10 sec 10 20 30 1000 NODE osi subnet ctc GCCISISCost 60 1 2 3 63 NODE osi subnet ctc IIH 3 sec 1 2 3 600 NODE osi subnet ctc ISH 10 sec 10 20 30 1000 NODE osi subnet ctc LANISISCost 20 1 2 3 63 NODE osi subnet ctc LDCCISISCost 40 1 2 3 63 NODE osi subnet ctc OSC...

Page 1209: ...er ReversionTime 5 0 minutes 0 5 1 0 1 5 12 0 NODE protection splitter Revertive FALSE TRUE FALSE NODE protection ycable ReversionTime 5 0 minutes 0 5 1 0 1 5 12 0 NODE protection ycable Revertive FALSE TRUE FALSE NODE security dataComm ctc DefaultTCCEthernetIP 10 0 0 1 IP Address NODE security dataComm ctc DefaultTCCEthernetIPNetmask 24 bits 8 9 10 32 NODE security dataComm CtcBackplaneIpDisplayS...

Page 1210: ...02 16 39 NODE security idleUserTimeout Retrieve 00 00 hours mins 00 00 00 01 00 02 16 39 NODE security idleUserTimeout Superuser 00 15 hours mins 00 00 00 01 00 02 16 39 NODE security lanAccess LANAccess May disconnect CTC from node Front Backplane No LAN Access Front Only Backplane Only Front Backplane NODE security lanAccess RestoreTimeout 5 minutes 0 60 NODE security legalDisclaimer LoginWarnin...

Page 1211: ...FALSE NODE security passwordChange CannotChangeNewPasswordForN Days 20 days 20 95 NODE security passwordChange NewPasswordMustDifferFromOld ByNCharacters 1 characters 1 20 NODE security passwordChange PreventReusingLastNPasswords 1 times 1 10 NODE security passwordChange RequirePasswordChangeOnFirstL oginToNewAccount FALSE TRUE FALSE NODE security radiusServer ctc AccountingPort 1813 port 0 32767 ...

Page 1212: ...yTypeOut is 2MHz AMI when FacilityTypeOut is 6MHz NODE timing bits 1 FacilityType E1 E1 64kHz 8kHz 2MHz NODE timing bits 1 FacilityTypeOut E1 E1 6MHz 2MHz NODE timing bits 1 Framing FAS CAS CR C FAS CRC FAS CAS FAS CAS CRC FAS Unframed when FacilityType is E1 N A when FacilityType is 2MHz FAS CRC FAS CAS FAS CAS CRC FAS Unframed Unframed 2Mhz when FacilityType is 64kHz 8kHz NODE timing bits 1 Fram...

Page 1213: ...U G812T G812L SETS DUS NODE timing bits 2 Coding HDB3 HDB3 AMI when FacilityType is E1 N A when FacilityType is 2MHz AMI when FacilityType is 64kHz 8kHz NODE timing bits 2 CodingOut HDB3 HDB3 AMI when FacilityTypeOut is E1 N A when FacilityTypeOut is 2MHz AMI when FacilityTypeOut is 6MHz NODE timing bits 2 FacilityType E1 E1 64kHz 8kHz 2MHz NODE timing bits 2 FacilityTypeOut E1 E1 6MHz 2MHz NODE t...

Page 1214: ...ype is 2MHz N A when FacilityType is 64kHz 8kHz NODE timing bits 2 State unlocked unlocked locked disabled NODE timing bits 2 StateOut unlocked unlocked locked disabled NODE timing general Mode External External Line Mixed NODE timing general ReversionTime 5 0 minutes 0 5 1 0 1 5 12 0 NODE timing general Revertive FALSE TRUE FALSE Table D 23 Node Default Settings ETSI continued Default Name Defaul...

Page 1215: ...T 00 00 Casablanca Reykjavik Monrovia GMT Greenwich Mean Time GMT 00 00 Dublin Edinburgh London Lisbon GMT 01 00 Amsterdam Berlin Rome Stockholm Paris GMT 01 00 Belgrade Bratislava Budapest Ljubljana Prague GMT 01 00 Brussels Copenhagen Madrid Vienna GMT 01 00 Sarajevo Skopje Sofija Vilnius Warsaw Zagreb GMT 01 00 West Central Africa Algiers Lagos Luanda GMT 01 00 Windhoek Namibia GMT 02 00 Al Jiz...

Page 1216: ... Krasnoyarsk Norilsk Novokuznetsk GMT 08 00 Irkutsk Ulaan Bataar GMT 08 00 Beijing Shanghai Hong Kong Urumqi GMT 08 00 Perth GMT 08 00 Singapore Manila Taipei Kuala Lumpur GMT 09 00 Chita Yakutsk GMT 09 00 Osaka Sapporo Tokyo GMT 09 00 Palau Pyongyang Seoul GMT 09 30 Adelaide Broken Hill GMT 09 30 Darwin GMT 10 00 Brisbane Port Moresby Guam GMT 10 00 Canberra Melbourne Sydney GMT 10 00 Hobart GMT ...

Page 1217: ...tructs the node to create only cross connects allowing the resulting circuits to be in an upgradable state Choose a default network map which country GMT 12 45 Chatham Island GMT 13 00 Nuku alofa Tonga GMT 13 00 Rawaki Phoenix Islands GMT 14 00 Line Islands Kiritimati Kiribati Table D 24 Time Zones ANSI and ETSI continued Time Zone GMT Hours Location s Table D 25 CTC Default Settings ETSI Default ...

Page 1218: ...D 118 Cisco ONS 15454 DWDM Installation and Operations Guide R6 0 August 2005 Appendix D Network Element Defaults D 3 3 ETSI CTC Default Settings ...

Reviews: