Configuring Quality of Service
WAN QoS Profiles
Cisco RV220W Administration Guide
150
8
STEP 2
If you change the QoS mode, a prompt appears. Click
OK
to continue with the new
mode, or click
Cancel
to retain the existing settings.
STEP 3
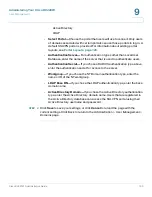
If you enabled WAN QoS, enter these settings in the
Priority Bandwidth Allocation
Settings
section:
•
If you chose Priority for the WAN QoS mode, allocate a percentage of the
Total WAN (Internet) Bandwidth to each priority class:
-
High Priority—
Enter a value between
61
(default) and
100
.
-
Medium Priority—
Enter a value between
31
(default) and
60
.
-
Low Priority—
Enter a value between
10
(default) and
30
.
•
Total WAN (Internet) Bandwidth—
Enter the total WAN bandwidth. (Valid
values are from 1 to 100 Mbps).
STEP 4
After changing the Global Settings or Priority Bandwidth Allocation Settings, click
Save
to save your settings, or click
Cancel
to reload the page with the current
settings.
STEP 5
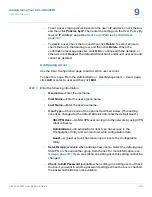
In the
WAN QoS Profile Table
, perform these tasks if you want to create profiles
for Profile Binding:
•
To add a new profile, click
Add
. Then enter these settings:
-
Name—
Enter a descriptive name to identify this profile.
-
Priority—
Choose the priority class.
-
Minimum Bandwidth Rate—
If you chose Rate Limit for the WAN QoS
mode, enter the minimum bandwidth rate for this profile. (Valid values are
from 1 to the total WAN bandwidth in Kbps).
-
Maximum Bandwidth Rate—
If you chose Rate Limit for the WAN QoS
mode, enter the maximum bandwidth rate for this profile. (Valid values are
from 100–1000000 Kbps).
•
To change the name or priority of an existing profile, check the box and then
click
Edit
. To select all profiles, check the box in the heading row. Then edit
the settings as described above.
•
To delete a profile, check the box and then click
Delete
. To select all profiles,
check the box in the heading row. When the confirmation message appears,
click
OK
to continue with the deletion, or otherwise click
Cancel
.

