background image

Hosted VoIP Handset User Guide – Cisco SPA Series 


10 


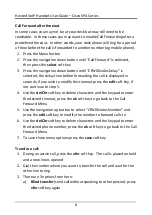
Personal Directory: 
Each phone is capable of being programmed with a personal phone 
directory.  There are 2 methods for populating this directory: 
Entry via the phone console 

1.


While your phone is inactive, press the dir soft key 

2.


While “1 NewPersonalDirEntry” is selected press the add soft key 

3.


Enter the record name using the keypad.  This is the same process as 
composing an SMS on early digital mobile phones…Each numbered 
button corresponds to a series of alphabetical characters, press the 
desired key until the desired character is displayed, wait 2 seconds for 
the character to be selected.  Press the delChr soft key to delete 

4.


Use the navigation down button to move to the “Number” field 

5.


Enter the phone number for this record 

6.


Press the save soft key to save this record in the Personal Directory 

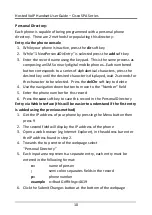
Entry via Web Interface (this will be easier to understand if the first entry 
is added using the previous method) 

1.


Get the IP address of your phone by pressing the Menu button then 
press 9 

2.


The second field will display the IP address of the phone  

3.


Open a web browser (eg Internet Explorer), in the address bar enter 
the IP address found in step 2. 

4.


Towards the top centre of the webpage select  
“Personal Directory” 

5.


Each input area represents a separate entry, each entry must be 
entered in the following format: 

n= 

name of person 

semi colon separates fields in the record 

p= 

phone number 

example  n=Brad Griffiths;p=4619 

6.


Click the Submit Changes button at the bottom of the webpage 

Summary of Contents for SPA Series

Page 1: ...ManIT Technology Hosted VoIP Handset User Guide Cisco SPA Series ...

Page 2: ...Hosted VoIP Handset User Guide Cisco SPA Series 2 Understanding your phone and buttons Cisco SPA509G with optional SPA500S module pictured ...

Page 3: ...bound call Orange Line is unregistered and cannot be used These keys may also be programmed to perform functions such as speed dial one touch blind call transfers call pickup or to monitor other extensions 5 Navigation button Press an arrow to scroll in a direction through items displayed on the screen 6 Keypad Use to dial phone numbers 7 Messages button Press to access voicemail 8 Menu button Pre...

Page 4: ...t key to set the volume Answering a Call To answer a call when phone is ringing Pick up the handset or Press the Speaker button speaker button will glow green or Press the Headset button headset button will glow green Ending a Call If you are using the handset hang up If you are using the speaker press the speaker button If you are using the headset press the headset button Initiating a Call To in...

Page 5: ...try and press the Dial soft key to dial the number Using Hold and Resume Mute both sides of the conversation caller will hear music on hold To put a call on hold press the Hold button or hold soft key To resume a call press the Hold button or resume soft key Mute a call When mute is enabled you can hear the other party but they cannot hear you while muted the Mute button will glow red To mute a ca...

Page 6: ...ess the edit soft key if not continue to step 5 4 Use the delChr soft key to delete characters and the keypad to enter the desired timeout press the ok soft key to go back to the Call Forward Menu 5 Use the navigation up button to select CFWDNoAnsNumber and press the edit soft key to modify the number to forward calls to 6 Use the delChr soft key to delete characters and the keypad to enter the de...

Page 7: ... Not Disturb press the dnd soft key Speed Dial A speed dial is a pre programmed phone number or extension associated with a single digit on the keypad Assigned speed dials can be from 2 9 Assigning Speed Dial destinations 1 Press the Menu button 2 Use the navigation down button to select Speed Dial then press the select soft key 3 Use the navigation down and up buttons to select desired Speed Dial...

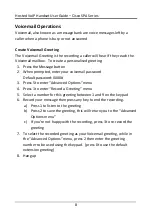
Page 8: ...d 0000 3 Press 5 to enter Advanced Options menu 4 Press 1 to enter Record a Greeting menu 5 Select a number for this greeting between 1 and 9 on the keypad 6 Record your message then press any key to end the recording a Press 1 to listen to the greeting b Press 2 to save the greeting this will return you to the Advanced Options menu c If you re not happy with the recording press 3 to re record the...

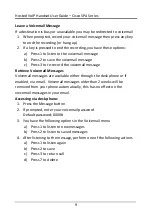
Page 9: ...Voicemail Messages Voicemail messages are available either through the desk phone or if enabled via email Voicemail messages older than 2 weeks will be removed from your phone automatically this has no effect on the voicemail messages in your email Accessing via desk phone 1 Press the Message button 2 If prompted enter your voicemail password Default password 0000 3 You have the following options ...

Page 10: ...key to delete 4 Use the navigation down button to move to the Number field 5 Enter the phone number for this record 6 Press the save soft key to save this record in the Personal Directory Entry via Web Interface this will be easier to understand if the first entry is added using the previous method 1 Get the IP address of your phone by pressing the Menu button then press 9 2 The second field will ...

Page 11: ... field by pressing the dial soft key Conference Calls Conference calls also known as a party line allow multiple people to speak to each other at the same time Establish a 3 party conference call using your phone 1 During an active call press the conf soft key this will place the first call on hold and a second line is opened 2 Dial the second number and either wait for it to timeout or to dial im...

Page 12: ...l press this button to place the call on hold in the associated park slot To unpark the call from any phone simply press the associated park slot button Unused Line Key Buttons Optionally use an unlabelled Line Key button as a personal speed dial To add a personal speed dial Press and hold the unlabelled Line Key button for four seconds When the Define Speed Dial window appears enter a Name for th...

Page 13: ...Hosted VoIP Handset User Guide Cisco SPA Series 13 NOTES ...

Page 14: ...Hosted VoIP Handset User Guide Cisco SPA Series 14 ...

Reviews: