S e n d d o c u m e n t c o m m e n t s t o n e x u s 5 k d o c s @ c i s c o . c o m
3-18
Cisco Nexus 2000 Series Hardware Installation Guide
OL-19013-05
Chapter 3 Installing a Cisco Nexus 2000 Series Fabric Extender
Removing and Installing Components
•
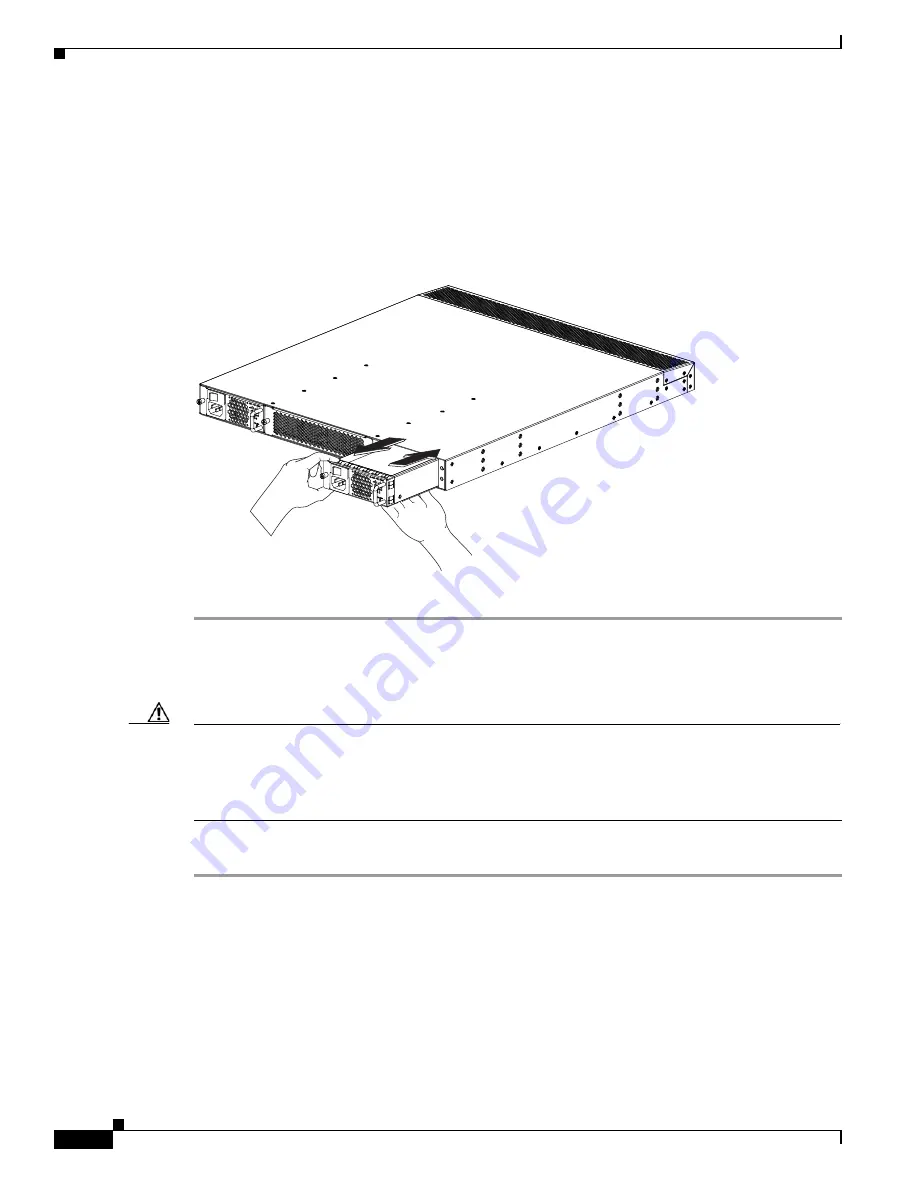
If you are removing a power supply from a Cisco Nexus 2248T, 2232PP, or 2224TP chassis, push
and hold the thumb latch to the left and pull the power supply part way out of the chassis (see
Figure 3-7
).
Step 3
Place your other hand under the power supply to support it while you slide it out of the chassis.
Step 4
If the power supply bay is to remain empty, install a blank power supply filler panel.
Figure 3-7
Removing an AC Power Supply from the Cisco Nexus 2000 Series FEX
Installing an AC Power Supply
Caution
Be sure that the power supply that you are installing has the same airflow direction as the fan tray module
and the other power supply. Either all of the modules must have front-to-back airflow (no black stripe
on the front of the module) or all of the modules must have back-to-front airflow (black stripe on the
front of the module). If the modules have different airflow directions in the same chassis, you will see
an error message.
To install a power supply, follow these steps:
Step 1
Ensure that the system (earth) ground connection has been made for the chassis. For ground connection
instructions, see the
“Grounding the System” section on page 3-9
.
Step 2
If the power supply bay has a filler panel, remove it from the slot as follows:
•
If you are removing a filler panel from a Cisco Nexus 2248TP, 2232PP, or 2224TP FEX, push its
thumb latch to the left and pull the panel out of the chassis.
•
If you are removing a filler panel from a Cisco Nexus 2148T FEX, loosen its captive screw, and then
pull the panel out of the power supply bay.
Step 3
Hold the replacement power supply by its handle and position it so that the captive screw is on the left,
and then slide it into the power supply bay, ensuring that the power supply is fully seated in the bay.
27
3
922
Summary of Contents for SR2016T-NA
Page 8: ...Contents viii Book Title 78 xxxxx xx ...
Page 13: ...xiii Cisco Nexus 2000 Series Hardware Installation Guide OL 19013 05 Preface ...
Page 15: ...xv Cisco Nexus 2000 Series Hardware Installation Guide OL 19013 05 Preface ...
Page 160: ...Index IN 8 Cisco Nexus 2000 Series Hardware Installation Guide OL 19013 05 ...


