• For RAID support: RAID controller card (UCSC-SAS9460-8i) installed in PCIe slot 11.
In a system with only one CPU module, this RAID controller must be installed
in PCIe slot 10 and a blank filler is required in slot 11 to ensure adequate air flow.
Note
• For RAID support: RAID cable (CBL-AUX-SAS-M5). This cable connects the rear RAID card to the
drive-bay module.
• For RAID support: Supercap RAID backup unit (UCSC-SCAP-M5). This unit installs to a clip on the
inside of the air diffuser. It cables to the rear RAID controller.
Replacing a Rear (Internal) SAS/SATA Drive
You do not have to shut down the server or drive to replace SAS/SATA hard drives or SSDs because they
are hot-swappable.
Note
Step 1
Prepare the server for component installation:
a) Slide the server out the front of the rack far enough so that you can remove the top cover.
If you cannot safely view and access the component, remove the server from the rack.
Caution
b) Remove the top cover from the server as described in
Removing the Server Top Cover, on page 9
.
Step 2
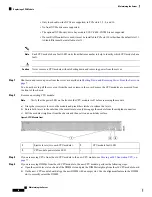
Remove the drive that you are replacing or remove a blank drive tray from the bay:
a) Press the release button on the face of the drive tray.
b) Grasp and open the ejector lever and then pull the drive tray up out of the bay.
c) If you are replacing an existing drive, remove the four drive-tray screws that secure the drive to the tray and then lift
the drive out of the tray.
Step 3
Install a new drive:
a) Place a new drive in the empty drive tray and install the four drive-tray screws.
b) With the ejector lever on the drive tray open, insert the drive tray into the empty drive bay.
c) Push the tray into the slot until it touches the backplane, and then close the ejector lever to lock the drive in place.
Step 4
Replace the top cover to the server.
Step 5
Reconnect power cords to all power supplies and then allow the server to boot to standby power mode (indicated when
the front panel Power button LED lights amber).
Step 6
Fully power on the server by pressing the Power button.
Maintaining the Server
24
Maintaining the Server
Replacing a Rear (Internal) SAS/SATA Drive


