background image

Page 41

Summary of Contents for FINTUNMAN67

Page 1: ...sons or property or for any special or consequential damages The liability of Cissell does not include furnishing or paying for any labor such as that required to service remove or install to diagnose...

Page 2: ...nel 13 OPERATION Control Panel Operation 14 Tunnel Operation Instructions 15 TROUBLE SHOOTING CHARTS 16 17 ILLUSTRATED PARTS Conveyor Struts 18 19 Jacket Assembly 20 Blower Assembly 21 Door Actuator P...

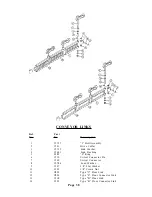
Page 3: ...Page 3...

Page 4: ...Page 4 REAR POWER STRUT BRACKETS ARE MOUNTED UPSIDE DOWN FOR SHIPPING PURPOSES FIG 1 WHEN INSTALLING POWER STRUTS BE SURE TO INSTALL REAR BRACKETS AS ILLUSTRATED IN FIG 2...

Page 5: ...y header to the return 4 In both the steam supply and steam return line it is recommended that each have a 1 2 union and 1 2 globe valve This will enable you to disconnect the steam connections and se...

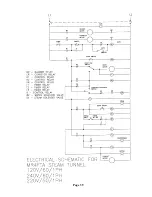
Page 6: ...Page 6...

Page 7: ...Page 7 NOTE This connection works best in most installations Should there be excessive condensate in the spray reverse these two connections Use the configuration that has the best results...

Page 8: ...by adjusting nuts on the bracket inside of tunnel as illustrated above in A of Figure 1 4 Using the selected hanger then adjust the height of the drop off as illustrated above in B of Figure 1 5 Adju...

Page 9: ...switch so that switch is completely depressed Tighten set screws onto door lever 1 Interlock switch should be positioned so that when a flag indicator activates the conveyor interlock switch a load of...

Page 10: ...ctions on Conveyor 1 Move connecting link preferably to a straight portion of the track 2 Insert the connecting pin as illustrated and replace the E ring in the Groove of the pin NOTE Inspect E ring t...

Page 11: ...gnment press start button and when the doors stop in the open position turn off main power switch Check to see that the roller is centered in the notch on the cam hub If the cam has not rotated a full...

Page 12: ...e screws A as illustrated 2 Lift off base plate pad 3 Remove screws marked B as shown 4 Remove washers plate insulation and switch 5 Remove wires from old switch Reinstall wires on new switch C and ti...

Page 13: ...Center Door and open End Doors F 4 Remove Thermometer Bulb by loosening clip that holds it 5 Break Union C and disconnect Copper Tube D to Condenser 6 Remove Upper Linkage between Doors and remove Do...

Page 14: ...ws during drying cycle 5 STEAM ONLY STEAM AIR SWITCH During the steam cycle if you select Steam Air a forceful combination speeds finishing of heavy garments Normal setting is Steam Only 6 MANUAL AUTO...

Page 15: ...l enter the tunnel the door close and the finishing cycle begins Refer to Control Panel Operation page for functions during cycle 4 While finishing is in progress load the next loading station 5 When...

Page 16: ...ct wiring clean terminals and repair Check dip switch settings 3 4 should be on the rest off Check replace if needed Check replace if needed Inspect wiring repair Check dip switch settings 3 4 should...

Page 17: ...structions on Page 9 Replace switch Replace or repair Replace switch Adjust switch Adjust indicator flag on conveyor link Adjust switch Adjust switch Replace motor Replace relay Repair or replace wire...

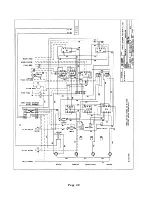
Page 18: ...Page 18...

Page 19: ...ong Conveyor Hanger 12 SC138 Short Conveyor Hanger 13 C107 12 Coupling 14 SC227 Rear Conveyor Track 15 SC109 Front Conveyor Hanger 16 SC858 Drive Assembly 17 Link Assembly See Separate Page 18 FG267 1...

Page 20: ...M262 8 32 x 3 8 Truss Screw 30 M271 8 I T Lockwasher 31 TU3266 8 32 Hex Nut 32 TU7733 8 18 x 1 2 Self Drill Screw 33 SC348 Hanger Bracket Ref Part No No Description 1 SC1 Base Frame Assembly 2 SC132 C...

Page 21: ...934 1 4 20 Hex Nut 29 TU4942 10 32 Hex Nut 30 PT210 10 I T Lock Washer 31 TU4820 10 Flat Washer 32 SC812 Plate Ref Part No No Description 1 MTR81 Motor 220 50 1 MTR82 Motor 110 60 1 2 SC187 Motor Moun...

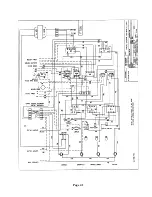
Page 22: ...Page 22...

Page 23: ...4 M373 Insulator 25 SC314 Interlock Switch Bracket 26 SC313 Motor Mtg Bracket 27 SC271 Gear Motor 28 SC306 Switch Mtg Bracket 29 TU3297 4 40 x 5 8 Rd Hd Screw 30 AT368 8 Split Lockwasher 31 V56 5 16 x...

Page 24: ...1 4 20 x 1 Hex Hd Cap Screw 26 C396 1 4 20 Crown Nut 27 M263 8 x 3 8 S M S Ref Part No No Description 1 SC94 Door Assembly 2 SC98 Door Assembly 3 SC23 Door Handle Weldment 4 SC93 Handle Grip 5 SC61 U...

Page 25: ...Includes parts marked Parts to repair one Dual Spray Gun SC370 Hose Assembly Only Ref Part No No Description 1 SG122 Tube Adapter 2 SC367 Blue Tube Only SC368 Black Tube Only SC369 White Tube Only 3...

Page 26: ...ard 25 SC874 Relay Bracket 26 SC889 Timer Mounting Plate 27 TU4660 Transformer Ref Part No No Description 1 TU13224 Steam Air Relay 120V 2 TU13224 Blow Relay 120V 3 TU13224 Conveyor Relay 120V 4 TU264...

Page 27: ...SC283 Drop Off Welded Assembly Standard 4 SC309 Internal Support 5 SC353 Adjustment Bracket 6 TU3124 3 8 16 x 3 4 Cap Screw 7 IB140 3 8 Cut Washer 8 TU4787 3 8 x 16 Hex Nut 9 TU3480 10 24 x 3 8 Machi...

Page 28: ...Page 28...

Page 29: ...ctor 4 F875 Straight Connector 5 50 4600 249 3 8 Cable 9 3 4 6 F876 90 Connector 7 50 4600 249 3 8 Cable 15 3 4 8 SC298 Junction Box Bracket 9 SC332 1 2 Conduit 10 M155 Strain Relief 11 PT527 Foot Swi...

Page 30: ...Page 30...

Page 31: ...washer 3 8 14 IB139 3 8 16 x 1 1 4 Screw 15 C1534 Gearbox Angle 16 C1539 Gearbox C1540 Gearbox Assembly includes Gearbox Mounting Angles and Hardware 17 TU2814 Lockwasher 5 16 18 C12312 Pinion Gear 19...

Page 32: ...Page 32...

Page 33: ...TU4934 1 4 20 Hex Nut 60 CB36 1 4 20 x 1 2 Cap Screw 61 M263 8 x 3 8 Screw 62 SC286 1 4 Compression Tee 63 SC287 3 8 Compression Tee Ref Part No No Description 1 SC110 Rear Boil Off Tube 2 SC158 Cros...

Page 34: ...Page 34...

Page 35: ...C196 Steam Supply Pipe Weldment 21 OP296 1 2 x 5 Pipe Nipple 22 SC220 1 2 x 1 4 Bell Reducer 23 SF46 1 4 M P T x 3 8 O D T Elbow 24 SC181 Steam Supply Tube 25 SC214 3 8 Bulkhead Union 26 TU4593 1 2 El...

Page 36: ...Page 36 MIXING JET ASSEMBLY SC108 Ref P a r t No No Description 1 SC166 Screw 1 4 20 x 2 2 SC107 Steam Spreader Disc 3 PT359 Washer 4 SC105 Mixing Jet Insert 5 SC106 Mixing Jet Body...

Page 37: ...h or air gun 4 To Reassemble Gun place Orifice over end of Plunger Tube end with seal and insert through thread hole in end of Gun Lift the end of plunger Tube over stop in middle of housing so that F...

Page 38: ...3 C1735 Link Washer 4 C1601 Link Bushing 5 F489 E Ring 6 C110 Swivel Connector Pin 7 C109 Swivel Connector 8 C1784 Load Washer 9 C147 3 8 Flat Washer 10 C149 3 8 Crown Nut 11 C892 Type S Floor Link 1...

Page 39: ...Page 39...

Page 40: ...Page 40...

Page 41: ...Page 41...

Reviews: