Page 5
INSTALLATION
SET UP
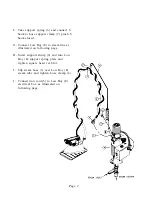
: Set unit in position and fasten securely to board. Slip support spring in position and fasten with set screw. Fasten iron
rest to board.
IMPORTANT
: Before making steam return connections to unit, make steam supply connections. Remove all drain plugs, open
steam supply globe valve to steam-flush any borings, grindings or foreign matter that may be clinging within casting or pipes. Close
globe valve; replace drain plugs and make steam return connections.
Before attaching steam hose from steam-electric iron to solenoid valve, with steam pressure on unit operate thumb switch several
times to remove loose particles of scale dirt, which may become embedded in valve seat. Then fasten steam hose to solenoid valve.
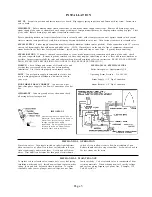
STEAM SUPPLY
: Steam supply connection must fall towards machine (without water pockets). Make connection with 12 or more
riser out of steam supply line with union and globe valve. (NOTE: If machine is on the end of a line of equipment, then extend
steam header line at least four feet beyond machine. Install check valve and trap at end of line. If gravity return omit trap.)
STEAM RETURN
: If steam is returned to atmosphere or sewer, make steam return connection with union, globe valve, check
valve and trap with drain. If steam is gravity returned to boiler, omit trap, but install trap as close to floor and as near machine as
possible. Inspect traps carefully for inlet and outlet marks and install according to factory instruction. BLOW SCALE AND DIRT
FROM STEAM LINES BEFORE INSTALLING TRAP TO INSURE PROPER OPERATION.)
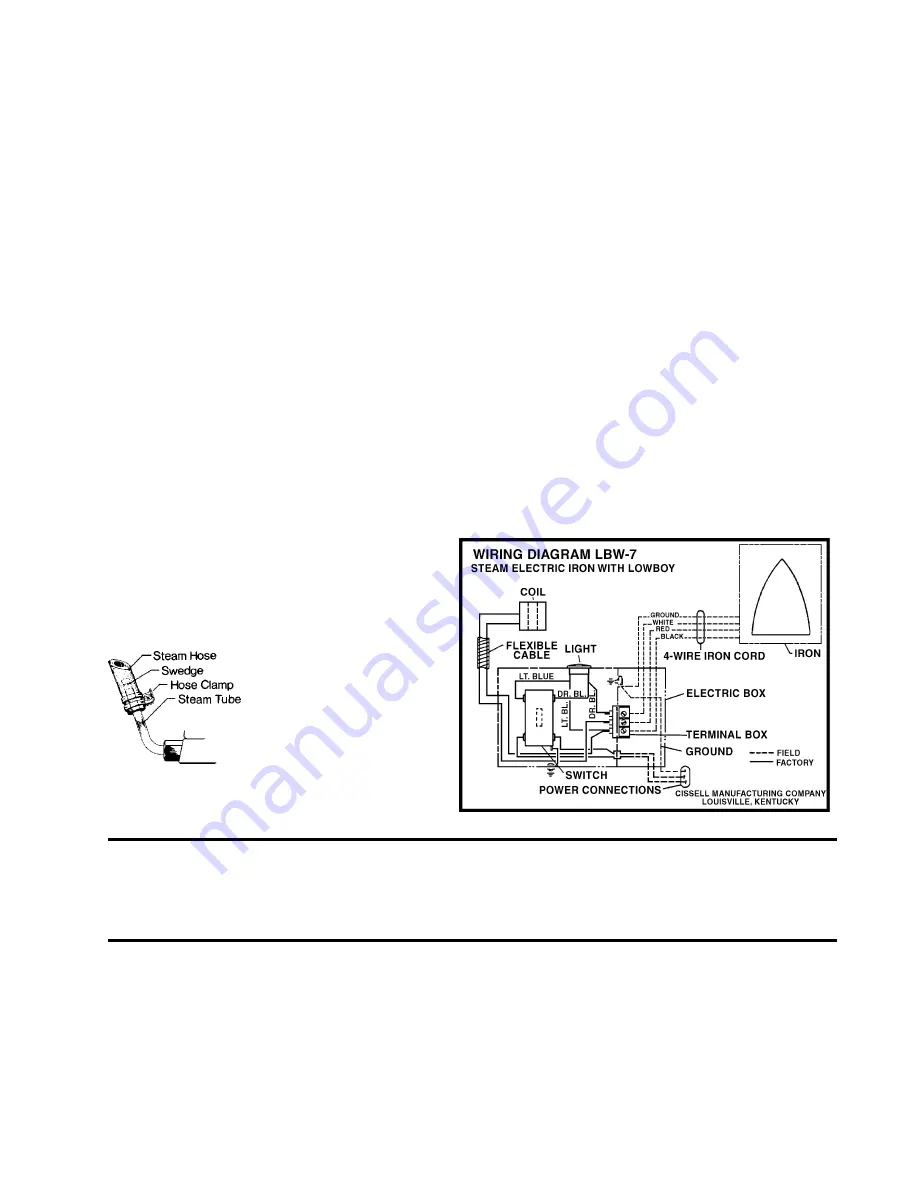
WIRING
: Check Voltage and current of solenoid valve and
see that they correspond with power line before making
installation. Use irons with properly rated thumb switch.
NOTE
: Connect power supply to terminals in electric box
as per wiring diagram in accordance with electric code in
your area.
FOR THREE PHASE CURRENT
: Connect two wires
from three phase supply to two Power Connections of outlet
box.
IMPORTANT
: Connect ground wire as shown and check
all wiring before closing switch.
MECHANICAL SPECIFICATIONS
Boiler Horsepower - Approximately 1/8.
Operating Steam Pressure - 5 to 100 lbs.
Steam Supply - 1/2 Pipe Connection.
Steam Return - 1/2 Pipe Connection.
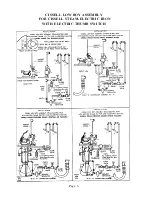
IMPORTANT
Attach Steam Hose to Steam Tube as
illustrated. Push Steam Hose down on
Steam Tube just far enough beyond
swedge to allow Hose clamp
connection. Do not push Steam Hose
all the way down on Steam Tube as
this will cause hose to burn out.
MECHANICAL OPERATION
Place iron on rest. Turn toggle switch on (pilot light indicates
when current is on); allow iron to heat, set indicator to Rayon
Open steam supply and return valves. A cold iron will throw
water. Wait until iron becomes hot then push electric thumb
switch of iron to allow steam to flow from soleplate of iron.
Release thumb switch to stop steam flow. Screw valve knob in
for less steam, out for more.
MECHANICAL MAINTENANCE
To replace coil in solenoid valve, remove bolt, cover, leaf spring,
insulating washer and coil. Install new coil and replace washer,
spring, cover and bolt. Solenoid valve is packless. To replace
renewable valve seat or plunger, unscrew large hex nut from
lower cast body. Coil or solenoid valve is constructed of heat
resisting materials. When ordering new coil, specify voltage
and current, giving frequency of power line. Example: 120
Volt, 60 cycle, A.C.