background image


8

PINPOINTING  

 
Accurate pinpoint location of a detected object takes practice and is best 
accomplished by “X-ing” the suspected target area. 
 

1) Once a buried target is indicated by a good tone response, continue 

sweeping over the target in a narrowing side to side pattern.


2) Take visual note of the place on the ground where the  
    “beep” happens as the coil is slowly moved from side to side. 


3) Stop the coil at this spot. Now move the coil straight forward and   straight 

back toward you a couple of times. Again, make a visual note of where the 
tone occurs. 

 
REMEMBER: The detector will beep just as the center of the search coil passes over 
a small buried target. If you have difficulty pinpointing very strong signals try lifting 
the coil higher from the ground until a weaker, but more definite signal is heard. For 
very weak signals try moving the coil in short quick sweeps closer to the ground.  
 

Figure 15 


Note: 

The detector is normally silent during operation until the search coil passes 

over a metallic object. 


WATER RESISTANCE 


The PROSPECTOR V’s search coil is water resistant for use in shallow water 
or in wet and muddy areas. However the control box must be kept dry. After 
use in salt water, rinse the search coil and stem in fresh water. 


TIP: If your metal detector fails to operate, first check the batteries’ strength 
and installation. You might also turn the power switch on and off a few times. 


WHERE TO USE YOUR DETECTOR 

 
Your PROSPECTOR V metal detector is a very versatile instrument. It can be used 
to search for lost coins, jewelry or other metal items. It is also useful for hunting for 
historic relics. 
 

Summary of Contents for Prospector V

Page 1: ...PROSPECTOR V Instruction Manual Manual Part 260708...

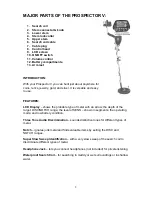
Page 2: ...the probable type of metal with an arrow the depth of the target DISC NOTCH range the level of SENS shown in segments the operating mode and low battery condition Three Tone Audio Discrimination soun...

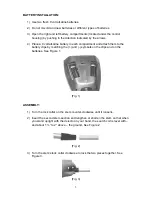
Page 3: ...mpartment and attach them to the battery clips by matching the and symbols on the clips and on the batteries See Figure 1 Fig 1 ASSEMBLY 1 Turn the lock collar on the stem counter clockwise until it l...

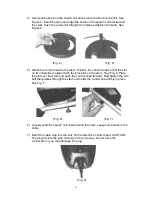
Page 4: ...its underside is aligned with the black tab on the stem See Fig 6 Place the slot over the stem and push the control head forward Now tighten the thin bolt that passes through the stem and holds the c...

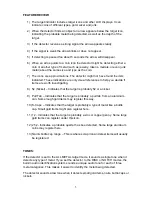
Page 5: ...worth investigating 8 5 Nickel Indicates that the target is probably 5 or a nickel 9 Pull Tab Indicates that the target is probably a pull tab from an aluminum can Some rough gold items may register...

Page 6: ...L button to set the ALL METAL mode In this mode the Prospector V will respond to all hidden metals and the LCD screen displays ALL METAL DISC NOTCH and SENS The inch value displayed gives an indicatio...

Page 7: ...al levels of the DISC NOTCH pillars light 3 To adjust the NOTCH range press the DISC NOTCH button Then press the or icons The DISC NOTCH display pillars will light up starting at both the right and le...

Page 8: ...ignals try lifting the coil higher from the ground until a weaker but more definite signal is heard For very weak signals try moving the coil in short quick sweeps closer to the ground Figure 15 Note...

Page 9: ...eement It is a good idea to check current local provincial state or federal laws 2 Metal detecting is usually forbidden at historic sites national and provincial or state parks Check before detecting...

Page 10: ...towel to remove the dirt BATTERY INFORMATION This unit uses 2 9 volt batteries Always use fresh batteries Do not use rechargeable batteries If the detector will not be used for a long time remove the...

Reviews: