Chapter 4 Troubleshooting
4-2. Troubleshooting
4-11
CL-E700 series
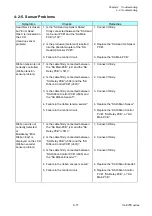
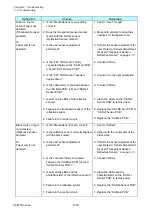
4-2-5. Sensor Problems
Symptoms
Checks
Remedies
Head block is closed,
but “Error Head
Open” is indicated on
the LCD.
(Head up sensor
problem)
1. Is the “SA Head Up Sensor Cable”
firmly connected between the “SA Head
Up Sensor PCB” and the “SA Main
PCB” (J10)?
2. Is the protrusion (metal end) inserted
into the photointerrupter of the “SA
Head Up Sensor PCB”?
3. Failure in the control circuit.
1. Connect it firmly.
2. Replace the “SA Head Up Sensor
PCB”.
3. Replace the “SA Main PCB”.
Ribbon tension is not
correctly controlled.
(Ribbon tension
sensor problem)
1. Is the cable firmly connected between
the “SA Main PCB” (J4) and the “SA
Relay PCB” (J301)?
2. Is the cable firmly connected between
“SA Relay PCB” (J304) and the “SA
Ribbon Control PCB” (J601)?
3. Is the cable firmly connected between
“SA Ribbon Control PCB” (J606) and
the “SA Ribbon Sensor”?
4. Failure in the ribbon tension sensor?
5. Failure in the control circuit.
1. Connect it firmly.
2. Connect it firmly.
3. Connect it firmly.
4. Replace the “SA Ribbon Sensor”.
5. Replace the “SA Ribbon Control
PCB”, “SA Relay PCB”, or “SA
Main PCB”.
Ribbon end is not
correctly detected.
or
Mistakenly “Error
Ribbon End” is
displayed on the LCD
(Ribbon encoder
sensor problem)
1. Is the cable firmly connected between
the “SA Main PCB” (J4) and the “SA
Relay PCB” (J301)?
2. Is the cable firmly connected between
“SA Relay PCB” (J304) and the “SA
Ribbon Control PCB” (J601)?
3. Is the cable firmly connected between
“SA Ribbon Control PCB” (J605) and
the “SA Ribbon Encoder”?
4. Failure in the ribbon encoder sensor?
5. Failure in the control circuit.
1. Connect it firmly.
2. Connect it firmly.
3. Connect it firmly.
4. Replace the “SA Ribbon Encoder”.
5. Replace the “SA Ribbon Control
PCB”, “SA Relay PCB”, or “SA
Main PCB”.
Summary of Contents for CL-E700 Series
Page 1: ...Technical Manual CL E700 series Thermal Transfer Printer...
Page 5: ...Chapter 1 Specifications 1 1 CL E700 series CHAPTER 1 SPECIFICATIONS...
Page 15: ...Chapter 2 Operating Principles 2 1 CL E700 series CHAPTER 2 OPERATING PRINCIPLES...
Page 87: ...Chapter 3 Disassembly and Maintenance 3 1 CL E700 series CHAPTER 3 DISASSEMBLY AND MAINTENANCE...
Page 151: ...Chapter 4 Troubleshooting 4 1 CL E700 series CHAPTER 4 TROUBLESHOOTING...
Page 167: ...Chapter 5 Parts Lists CL E700 series CHAPTER 5 PARTS LISTS...
Page 172: ...Chapter 5 Parts Lists CL E700 series 5 6 DRAWING NO 1 General Assembly Rev 0...
Page 195: ...Chapter 5 Parts Lists 5 29 CL E700 series DRAWING NO 7 Unit Opepane Rev 0...
Page 203: ...Chapter 5 Parts Lists 5 37 CL E700 series DRAWING NO 9 SA2 Ribbon Unit Fan Rev 0...
Page 206: ...Chapter 5 Parts Lists CL E700 series 5 40 DRAWING NO 10 Accessories Rev 0 3 2 4 1 1 1 2 1 3...
Page 208: ...Chapter 6 Circuit Diagrams 6 1 CL E700 series CHAPTER 6 CIRCUIT DIAGRAMS...
Page 230: ...Appendices AP 1 CL E700 series APPENDICES...
Page 233: ...Appendices A Mounting Diagrams CL E700 series AP 4 2 Solder side...

