background image

Chapter 2  Operating Principles 

2-2. 

Operation of Control Parts 

CL-E700 series

 2-38 


2-2-6. Other circuits 

(1) 

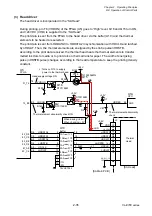
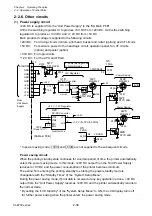
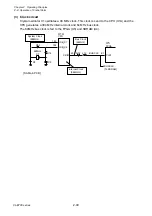
Power supply circuit 

+24V DC is supplied from the “Unit Power Supply” to the “SA Main PCB”. 
U19 is the switching regulator IC to p5V DC from +24V DC. U20 is the switching 
regulator IC to p3.3V DC and +1.2V DC from +5V DC. 
Each produced voltage is supplied to the following circuits. 

+24V DC:  For driving circuits (motors, print head, buzzer and cutter (option)) and I/F circuits 
+5V DC:  For sensors, power to the head logic circuit, operation panel, fan, I/F circuits 

(option) and peeler (option) 

+3.3V DC:  For logic circuits 
*1.2V DC:  For the CPU and FPGA 


* In power saving mode, +3VIO and +5VIO are not supplied to the subsequent circuits.     


Power saving circuit: 

When the printing standby state continues for a certain period of time, the printer automatically 
enters the power saving mode. In this mode, +24V DC output from the “Unit Power Supply” 
reduces to +9V DC and the power consumption of the printer becomes minimum. 
The period from entering the printing standby to entering the power standby mode is 
changeable with the “Standby Timer” of the “System Setup Menu”.   
During the power saving mode, if print data is received or any key operation is done, +9V DC 
output from the “Unit Power Supply” r24V DC and the printer automatically returns to 
the normal mode.   

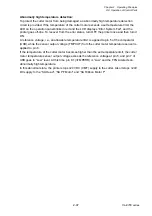
* By setting the “LCD Standby” of the “System Setup Menu” to ON, the LCD display turns off 

for further power saving when the printer enters the power saving mode.   

3

4

1

5

2

J13

6

7

+24V

R148

[SA Main PCB]

Q17

DTC114EM

22-P2

P2

C147

C155

+

VIN SW

FB

3

5

2

U20

NR119E

EN1
EN2

LX1

LX2

8

7

PAM2306AYPKB

+5V Regulator

+3.3V / 1.2V Regulator

+5V

nPWRSAVE

8

9

L: Power Saving mode
H: Normal mode

VIN1
VIN2

1
6

12

2

STANDBY

+24V
+24V
+24V
+24V

GND
GND
GND
GND

R130

R134

DC-DC Converter

U19

Q21

MCH6342

Q23

DTA115TM

DC-DC Converter

Q24

DTC114EM

R150

Q22

MCH6342

22_N2

N2

V3CE

Q26

DTC114EM

V3IOON

Q25

MCH6342

FPGA

U5

+1.2V (To CPU & FPGA)

Power Saving

Power Saving

FPGA

U5

R143

R146

R149

+3.3V

R144

R147

R153

R154

(Fixed to "H")

From
Unit Power
Supply

+3VIO

+5VIO

Summary of Contents for CL-E700 Series

Page 1: ...Technical Manual CL E700 series Thermal Transfer Printer...

Page 2: ...a registrada de CITIZEN HOLDINGS CO LTD Jap n Datamax is a registered trademark of Datamax Bar Code Products Corporation Zebra is a registered trade mark of ZIP corp TrueTypeTM is a trademark of Apple...

Page 3: ...iii CL E700 series CHAPTER 2 OPERATING PRINCIPLE CHAPTER 1 SPECIFICATIONS CHAPTER 3 DISASSEMBLY AND MAINTENANCE CHAPTER 4 TROUBLESHOOTING CHAPTER 5 PARTS LISTS CHAPTER 6 CIRCUIT DIAGRAMS APPENDICES...

Page 4: ...st the machine if it functions properly Particularly do not loosen screws on any component unless necessary After completing an inspection and before turning on the power be sure to check that there i...

Page 5: ...Chapter 1 Specifications 1 1 CL E700 series CHAPTER 1 SPECIFICATIONS...

Page 6: ...apter 1 Specifications CL E700 series 1 2 CHAPTER 1 SPECIFICATIONS TABLE OF CONTENTS 1 1 General Specifications 1 3 1 2 Printable Area 1 8 1 3 Printing Position Accuracy 1 9 1 4 Adjustable Sensors 1 1...

Page 7: ...eted Cut mode 1 Prints while cutting at designated sheet units The following two kinds of cut mode operations are available Back feed Cut through Cut through refers to stopping present printing to cut...

Page 8: ...th Max 80 0 mm Max 3 15 Ribbon end detection Ribbon end detection by a ribbon encoder sensor Bar code For Datamax emulation One dimension Code3of9 UPC A UPC E EAN 13 JAN 13 EAN 8 JAN 8 Interleaved2of5...

Page 9: ...10 Latin 6 ISO 8859 7 Latin Greek ISO 8859 15 Latin 9 ISO 8859 5 Latin Cyrillic ISO 69 French ISO 21 German ISO 15 Italian Legal Math 8 Macintosh Math PC 858 Multilingual Microsoft Publishing PC 8 Cod...

Page 10: ...nication interface Options Serial 2400 4800 9600 19200 38400 57600 115200 bps Parallel IEEE1284 Compatible Nibble ECP mode Network Multi functional Ethernet 10BASE T 100BASE TX Standard Wi Fi 1 IEEE80...

Page 11: ...ing and printing assurance condition Storage assurance condition External dimensions 250 W X 458 D X 261 H mm 9 8 W X 18 0 D X 10 3 H Weight 11 kg 24 3 lb excluding media and the power cord Accessorie...

Page 12: ...sm Though the available maximum media width is 118 mm 4 65 there are unprintable areas on both sides 2 5 mm 0 10 width on the left side and 11 5 mm 0 45 width on the right side The unprintable areas o...

Page 13: ...al position as follows 1 2 mm 2 0 04 0 08 Reference edge Paper guide Printable area Direction of media feed Ideal printing start position Actual printing start position 1 2 5 1 mm 3 0 10 0 04 100 2 mm...

Page 14: ...notches of tag The bottom sensor is used to detect the black marks on tag Also both sensors are used to detect media end The mechanical adjustable ranges of sensors are as follows Upper sensor transp...

Page 15: ...Chapter 2 Operating Principles 2 1 CL E700 series CHAPTER 2 OPERATING PRINCIPLES...

Page 16: ...ion 2 18 2 SA Main PCB 2 18 3 Operation panel SA Opepane PCB 2 18 4 Thermal print head 2 19 5 Sensors 2 19 6 Motors 2 19 7 USB I F USB2 0 compatible full speed mode high speed mode 2 19 8 Wired LAN I...

Page 17: ...1 LED Green Red 2 48 2 LCD 2 48 3 Keys 2 48 2 3 2 Test mode 2 50 1 Self print mode 2 50 2 Hex dump mode 2 51 3 Menu list print mode 2 52 2 3 3 Factory Service mode 2 54 1 How to enter Factory Service...

Page 18: ...s CL E700 series 2 4 3 Protocol 2 68 2 4 4 Parallel Interface Option 2 69 1 Specifications 2 69 2 Signal line and pin assignment 2 69 3 Parallel port status signals when an error occurs 2 70 4 Compati...

Page 19: ...SA Ribbon Motor F This motor takes up ribbon A thermistor is attached to the motor to detect the motor temperature SA Ribbon Sensor Ribbon Tension Sensor This sensor consists of two photointerrupters...

Page 20: ...parent Sensor This sensor is a photo sensor to detect a label stuck on liner or U shaped notches on tag It also detects the media end SA Ref Sensor PCB Reflective Sensor This sensor is a photo sensor...

Page 21: ...ounterclockwise via the gear train Gear PF1 Gear PF2 and Gear PF Idle and the media is fed forward by a friction force produced between the SA Platen and the SA Head In the direct thermal printing the...

Page 22: ...shaped notches of tag Both reflective and transparent sensors are used to detect the media end Aligning the sensors for label paper and tag with U shaped notches For label paper align both reflective...

Page 23: ...cting U shaped notches of tag Media Sensor menu See Through For detecting U shaped notches of tag both reflective sensor and transparent sensor are used The U shaped notches are detected in the same w...

Page 24: ...the reflective sensor detects the media end only LED light amount control According to the media selected by the Media Sensor menu See Through Reflect or None the amount of light is well controlled t...

Page 25: ...n 1 Gear 2 Ribbon Gear 3 Ribbon and Gear 4 Ribbon The ribbon is supplied from the supply reel via the Roller Ribbon Guide R and SA Ribbon Tension Shaft F and then taken up A back tension generating me...

Page 26: ...pply side As the media is fed the ribbon on the supply side is fed together with the media Thus the ribbon is supplied from the supply reel To the supply reel the back tension generating mechanism con...

Page 27: ...ers turn ON When the ribbon slackens and the photointerrupters turn ON the SA Ribbon Motor F increases its rotational speed to take up the ribbon Then the ribbon tightens again and the projecting part...

Page 28: ...lits are around the bottom of the Holder Ribbon Shaft Encoder as shown below When the ribbon is supplied from the supply reel the Holder Ribbon Shaft Encoder turns and its slits cross the photointerru...

Page 29: ...from the photointerrupter of the SA Head Up Sensor PCB head up sensor At this time the photointerrupter turns ON and Low level is output from the head up sensor When the head block is in the down pos...

Page 30: ...side of the SA Head the SA Head will slant to the right resulting in uneven printing density The part A of the Lever Head Balance is pushed against the cam part of the Cam Head Balance by the force o...

Page 31: ...toward the left viewing from the right side from the center of the SA Platen Since the optimum position varies according to the hardness of media it is necessary to adjust the Media thickness adjustme...

Page 32: ...tc 3 Operation panel SA Opepane PCB A panel used to indicate the operating status of the printer and to set specifications It consists of 4 keys 1 LED Green Red and 1 LCD Head Up Sensor SA Head Up Sen...

Page 33: ...Unit Ribbon Ribbon Encoder Sensor SA Ribbon Encoder Photointerrupter to detect the running status of ribbon Located on the ribbon supply side 6 Motors Two motors are used The SA PF Motor is a stepping...

Page 34: ...PPS00158 XX CUTTER PCB JM66735 XXF Wi Fi I F SA Ribbon Sensor PCB PPS00159 XX FPGA EP4CE10F17C8 BUS 64MHz USB 2 0 SA Ribbon Encoder PCB PPS00160 XX DC 24V 5V 3 3V 1 2V Option Auto Cutter DC Motor Dri...

Page 35: ...ffer and download buffer 4 FPGA The FPGA Field Programmable Gate Array incorporates a control circuit for the interface I O port motors print head etc 5 Head control This is a circuit to control the t...

Page 36: ...0h 1879FFFFh FPGA Data 187A0000h 187AFFFFh Setting Information User Settings Serial Flash ROM 187B0000h 16M Bytes 187BFFFFh Setting Information Factory set Settings 187C0000h 187CFFFFh LCD Character D...

Page 37: ...level When the head block is opened in the up position the projection A is disengaged from the head up sensor and the light emitted from the LED reaches the phototransistor Thus the phototransistor t...

Page 38: ...conducts and the voltage corresponding to the amount of light is applied to pin 96 SNSTRA of the CPU U1A Meanwhile when the portion of the liner where the label stuck on it passes between both sensors...

Page 39: ...detecting black marks on tag When tag with black marks is used light is reflected by the tag in the place where no black mark is on it In this case the phototransistor of the reflective sensor conduct...

Page 40: ...CD returns to normal display and printing automatically resumes If the temperature of the SA Head is too low the LED on the operation panel blinks in red and the LCD displays Error Head Cold In this c...

Page 41: ...nges accordingly The CPU senses the voltage at pin 97 TMPPF to detect the temperature of the SA PF Motor Printing operation when the SA PF Motor temperature rises When the temperature of the SA PF Mot...

Page 42: ...FF the printer once and then turn it ON A reference voltage i e an allowable temperature limit is applied to pin 6 of the comparator U7B while the sensor output voltage TMPPF from the PF motor tempera...

Page 43: ...D returns to normal display and printing automatically resumes Abnormally high temperature detection To protect the SA Ribbon Motor F from being damaged an abnormally high temperature detection circui...

Page 44: ...A Ribbon Tension Shaft F come off the photointerrupters PS401 and PS402 on the SA Ribbon Sensor Thus the photointerrupters turn ON and pin 26 RIBSENS_R1 and pin 31 RIBSENS_R2 go to High level At this...

Page 45: ...ss the interrupter PS501 on the SA Ribbon Encoder Thus a pulse train is output from the interrupter to pin 43 RIBSENS_ENC of the CPU U1A When the ribbon runs out during printing the CPU detects the ri...

Page 46: ...tal to analog converter U16 controls the drive current to the SA PF Motor Its output signal DAPFMT is fed to pin 15 REF of the motor driver U13 to determine the amount of drive current to the SA PF Mo...

Page 47: ...ives the SA Ribbon Motor F using these signals The digital to analog converter U16 controls the drive current to the SA Ribbon Motor F The output from pin 6 DARBMT_R of U16 is fed to pin 15 REF of the...

Page 48: ...D gate U11 If any of the following abnormally high temperature errors occurs the error signal nTMPERR changes from High level to Low level Thus pin 2 ENABLE of the motor driver U601 goes to High level...

Page 49: ...ots on thermal transfer paper The width of energizing pulse nHDSTB pulse changes according to the head temperature to keep the printing density constant J2 Thermal Head 1 4 23 26 nHDSTB HDCLK HDDAT1 n...

Page 50: ...e voltage divided by R52 and the thermal element resistance R1 is developed The CPU U1A monitors this voltage at pin 94 HDRES and checks if the voltage is within the allowable range For example if R1...

Page 51: ...e is under 45 C 113 F the SA Fan is not driven While the SA Ribbon Motor F is running if the temperature exceeds 45 C 113 F the SA Fan starts to turn If the temperature is 70 C 158 F or more the SA Fa...

Page 52: ...ces to 9V DC and the power consumption of the printer becomes minimum The period from entering the printing standby to entering the power standby mode is changeable with the Standby Timer of the Syste...

Page 53: ...power is turned ON 3 3V gradually increases from 0V When the voltage at pin 1 VIN of the voltage detector U2 reaches approx at 2 8 V pin 4 nRST of U2 changes from Low level to High level While the nR...

Page 54: ...clock This clock is send to the CPU U1A and the CPU generates a 384 MHz internal clock and 64 MHz bus clock The 64MHz bus clock is fed to the FPGA U5 and SDRAM U4 FPGA X1 R14 C8 System Clock 48MHz BUS...

Page 55: ...lay are driven respectively In power saving mode 3VIO and 5VIO are not supplied For details refer to 2 2 6 1 Power supply circuit 4 J3 From U5 FPGA SA Main PCB SW201 SW203 SW204 SW202 D201 LCD SI LCD...

Page 56: ...FF pin 176 USBVBUS0 of the CPU U1A goes to High level and USB connection is detected The data transmission is carried out via pins 174 USBDM0 and 175 USBDP0 of the CPU 1 2 3 4 5 D7 L6 J12 L7 C136 L5 S...

Page 57: ...7 8 G Y 1 2 3 4 5 6 7 8 9 X2 R159 C168 C169 R158 25MHz 10Base T 100Base TX Ethernet U21 LED0 31 3 3V Divers Receivers Transceivers 12 11 75 75 75 75 10 LED1 30 R160 R161 RXM 4 C171 C170 14 13 RXP 5 T...

Page 58: ...the FPGA To From U1A CPU STB OCI0 DATA0 7 DIPSW0 7 hEP00 hEP01 nPRIME BUSY RTS pEP00 ACK DTR pEP01 SELECT PPON0 PE USB_D USB_D VBUS TXD SO DIR 3 1 4 12 2 J7 SELECTIN CST pINT 13 14 15 AUTOFDXT DSR FA...

Page 59: ...eeler Then the printer stops printing When you remove the label the peeler sensor detects it and the printer resumes printing The peel sensor output signal analog voltage is input to pin 101 SNSPEEL o...

Page 60: ...thermistor is input to pin 100 TMPCUT of the CPU U1A The CPU detects the temperature by monitoring the TMPCUT signal and controls the printer as follows When the temperature is 78 C 172 4 F or more S...

Page 61: ...nce and then turn it ON A reference voltage i e an allowable temperature limit is applied to pin 5 of the comparator U8B while the sensor output voltage TMPCUT from the cutter motor temperature sensor...

Page 62: ...D and STOP PAUSE key Temporarily stops printing When the PAUSE key is pressed Pause is displayed on the LCD and the printer enters pause mode When it is pressed during printing the printer stops after...

Page 63: ...inting the current one label In pause mode if the STOP key is pressed for more than 4 seconds 1 batch of printing job is cancelled The LCD displays Job Clear during cancel MENU key Enters menu setup m...

Page 64: ...es Self Print Mode Label Media and then release the FEED key If the FEED key is kept pressed the display of the LCD changes to the next Self Print Mode Cont Media In this case repeat from Step 1 The p...

Page 65: ...and when print data is sent to the printer hex dump printing starts To exit from hex dump mode Turn off the power For continuous media 1 While pressing and holding the STOP key turn on the power 2 Wai...

Page 66: ...Head Check OK Print Counter 0002 2km Service Counter 0002 2km Cut Counter 0 Sensor Monitor 2 73V Option Interface None MAC Address Current Menu Settings Global Config Menu Config Set 1 PageSetup Menu...

Page 67: ...n Backfeed Paper Position 0 00 inch Menu Key Action Enters Menu Interface Menu USB Device Class Printer USB VCOM Protocol Auto USB 2 0 High Speed On IPv4 Address 169 254 001 010 IPv4 Subnet Mask 255 2...

Page 68: ...r Factory Service Mode How to print the Factory Mode Settings menus How to change the settings in Factory mode How to operate submenus in Service mode 1 How to enter Factory Service Mode To enter Fact...

Page 69: ...key While pressing the MENU FEED and STOP keys turn on the printer Factory Setup Service Mode MENU Page Setup System Setup After Print Interface Machine Info Test Mode Global Config Main menu Init Thr...

Page 70: ...Service mode by turning on the power while pressing and holding the MENU FEED and STOP keys Refer to 2 3 3 1 How to enter Factory Service Mode mentioned earlier 2 Press the MENU or FEED key until Test...

Page 71: ...flect Cal Level 2 10 V SensNone Cal Level 2 05 V Darkness Rate High Double Heat Menu Off TT Hot HeatRate Adjust 0 0 TT Cold HeatRate Adjust 0 0 DT Hot HeatRate Adjust 0 0 DT Cold HeatRate Adjust 0 0 P...

Page 72: ...or Reporting On Printing Buzzer Select On Metric Inch Inch Max Media Length 10 00 inch Settings Lock Off Keyboard Lock Off LCD Standby Off Standby Timer 5 min Control Code STD Emulation Select DMI Emu...

Page 73: ...rightward electrically while shows that it moves backward leftward electrically 8 dots correspond to 1 mm 203 dots correspond to 1 inch Submenu Name Factory Mode Settings Menu name Adjustable Value De...

Page 74: ...ow This menu is effective when Auto Cal Mode submenu is set to OFF The sensitivity of reflective sensor can be changed in three steps Cal Thru Level Through Cal Level 0 01 to 3 30V 2 30V Performs sens...

Page 75: ...s 001 to 848 Dot 001 Designates the start dot for head check Head Chk Stop Head Check Stop Pos Dots 001 to 848 Dot 848 Designates the end dot for head check Rbn End Detect Ribbon End Detection Normal...

Page 76: ...Press the MENU or FEED key until Through Pos submenu example appears 4 Press the STOP key to select that submenu The current value is shown on the LCD 5 Press the MENU or FEED key to increase or decr...

Page 77: ...displayed Example PASS 0000dots ROM Check Performs ROM checksum test and displays the check result OK or NG and the checksum value Example PROGRM OK 4F4E RAM Check Performs RAM capacity check and disp...

Page 78: ...ROM Check RAM Check and Print Counter the result is displayed and further operation is not necessary For submenu Head Check the following screen appears and prompts you whether to perform the head ch...

Page 79: ...key to enter Service mode 4 Press the MENU or FEED key until a desired submenu appears When selecting Service Counter 5 Press the STOP key to select Service Counter submenu Then the service counter l...

Page 80: ...120 00400 KST 2 Signal line and pin arrangement Pin No Signal code Signal Function 1 VBUS USB power USB power 5V 2 D Signal line signal line 3 D Signal line signal line 4 GND GND GND 2 4 2 Wired LAN I...

Page 81: ...unding 2 TXD Transmit Data Signal line that transmits data from the printer to the host 3 RXD Receive data Signal line that transmits data from the host to the printer 4 RTS Request To Send Signal lin...

Page 82: ...ode output are as follows When the remainder of receive buffer is 128 bytes or less When the printer is turned from on line to off line When the media end is detected When a printer error occurs READY...

Page 83: ...l channel ECP mode ECP mode permits bi directional asynchronous data transmission and by means of interlock handshake it does not require the timing necessary with Compatible mode Signal level IEEE128...

Page 84: ...y processed differently than with Compatible mode used up till now When bi directional parallel interface is on in the setting menu even if a printer error has occurred the BUSY signal line is not act...

Page 85: ...lling edge of Strobe and data is latched at the leading edge of Strobe While receiving PRIME signal Note If the PRIME signal width is 10 sec or less it is not accepted BUSY goes to High when the PRIME...

Page 86: ...Chapter 2 Operating Principles 2 4 Interface CL E700 series 2 72 Timing relationship between BUSY and ACK About 2 sec BUSY ACK Center...

Page 87: ...Chapter 3 Disassembly and Maintenance 3 1 CL E700 series CHAPTER 3 DISASSEMBLY AND MAINTENANCE...

Page 88: ...SA Ribbon Tension Unit R and SA Ribbon Encoder 3 17 2 Ribbon Gears 3 18 3 6 6 SA Ribbon Motor F and SA Ribbon Control PCB 3 19 3 6 7 Catch Ribbon Holder and Knob Ribbon Unit 3 19 3 6 8 Plate Ribbon Gu...

Page 89: ...Head Lock and SA Main Plate R 3 48 3 Frame Main SA Main Plate L and Plate Peeler 3 49 3 7 Adjustments 3 50 3 7 1 Transparent Reflective Sensor Adjustment 3 50 1 Sensor position adjustment Factory mod...

Page 90: ...there is no abnormality Never try to print without media Check that the media is properly set Do not lay anything on the cover or lean against it during maintenance or while the printer is in operati...

Page 91: ...ccordance with the following Cleaning frequency Every 6 months or 300 hours of operation Whichever comes first Materials Dry cloth gauze or soft cloth and thermal head cleaner 3 3 Lubrication 3 3 1 Lu...

Page 92: ...maintenance parts such as the SA Main PCB Unit PF Motor etc Maintenance Tools List No Name Q ty Description 1 Phillips Screwdriver Length 200mm 1 Bit 0 1 2 2 Phillips Screwdriver Length 100mm 1 Bit 0...

Page 93: ...nstalling the SA Head be careful not to damage the thermal elements Especially avoid contacting the thermal elements with a metal part etc Do not touch the thermal elements of the SA Head with your ba...

Page 94: ...the Lever Head Lock and open the Head Block 3 While pressing the part A of the SA Platen raise its right end by about indicated degrees and then remove the SA Platen by lifting it upwardly Note on rea...

Page 95: ...Unit R and Holder Clutch Shaft respectively as shown on the right side figure The Spring Ribbon Return R has no orientation The table below shows the positions where the ends A and B of the Spring Ri...

Page 96: ...e 3 5 2 See 3 6 1 See 3 6 4 See 3 6 7 See 3 6 5 SA Top Cover Block opened See 3 6 6 See 3 6 2 See 3 6 3 SA Ribbon Tension Unit R See 3 5 3 See 3 6 8 SA Ribbon Tension Shaft F SA Ribbon Sensor See 3 6...

Page 97: ...PF Motor See 3 6 20 SA Head Up Sensor PCB SA TRA Sen PCB FFC TRA Sensor Leaf Adjust Sensor U See 3 6 17 Unit Head Unit PF See 3 6 18 SA Head Cam Head Adjust Cam Head Balance See 3 6 19 SA Ref Sensor...

Page 98: ...e the 2 screws BH M3 0x6 NI on each side and detach the SA Top Cover Block 4 Remove the 2 screws BH M3 0x4 NI on each side and detach the Hinge 2 pcs from the main body 2 SA Top Cover 1 Remove the 2 s...

Page 99: ...bbon Frame with Support The SA Ribbon Frame with Support consists of three parts and is assembled with the 9 screws Once the SA Ribbon Frame with Support is disassembled correct ribbon running cannot...

Page 100: ...he connector J304 from the SA Relay PCB 5 Close the Head Block 6 Remove the 2 screws BH M3 0x4 NI and detach the Unit Ribbon by lifting it upwardly DO NOT loosen the following Forbidden Screws Once th...

Page 101: ...I and detach the Cover Ribbon Gear to the right 2 Remove the 3 screws BH M3 0x4 NI and detach the SA2 Ribbon Unit Fan to the left 3 Disconnect the connector J604 from the main body Note on reassemblin...

Page 102: ...Unit Fan Refer to 3 6 3 Unit Ribbon Covers 2 Remove the 2 screws BHT 2 M3 0x6 NI and detach the Plate Fan 2 pcs 3 Remove the SA Fan from the Cover Ribbon Motor Note on reassembling Referring to the m...

Page 103: ...t the connector J605 and detach the SA Ribbon Encoder Note on reassembling Correctly hook both ends of the Spring Ribbon Return R on the hook part of the SA Ribbon Tension Unit R and Holder Clutch Sha...

Page 104: ...in that order 2 Remove the 1 screw No0 PH 4 0 3 M2x5 NI and remove the Plate Ribbon Washer SA Holder R Shaft Spring Ribbon Return and Gear 5F Ribbon in that order Notes on reassembling Assemble the S...

Page 105: ...connectors J606 and J601 SA Ribbon Cable from the SA Ribbon Control PCB 5 Remove the 2 screws BH M3 0x4 NI and detach the SA Ribbon Control PCB 3 6 7 Catch Ribbon Holder and Knob Ribbon Unit 1 Remove...

Page 106: ...on Base Adjust unless you need to Once it is removed readjustment is required Note on reassembling When remounting the Cam Tension Base Adjust align the mark of the Cam Tension Base Adjust with the sc...

Page 107: ...st from the SA Ribbon Frame with Support Notes on reassembling Referring to the magnified view mount the Cover RBN Tension Adjust so that the spring end of the Ribbon Sensor Frame F Block is under the...

Page 108: ...I and detach the Cam Tension Base Adjust Do not remove the Cam Tension Base Adjust unless you need to Once it is removed readjustment is required Note on reassembling When remounting the Cam Tension B...

Page 109: ...rsely the circuit is not electrically connected Referring to the magnified view install the Unit Opepane so that its hole A is correctly engaged with the projection of the case 2 SA Opepane PCB 1 Remo...

Page 110: ...on 2 Remove the Unit Opepane Refer to 3 6 10 1 Unit Opepane 3 Remove the 3 screws BH M3 0x4 NI slide the Case toward the front and then detach it by lifting upwardly 4 Remove the 1 screw BH M3 0x5K an...

Page 111: ...eassembling When connecting J3 FFC Opepane see on which side the blue tape is and correctly insert it in the right direction If it is inserted reversely the circuit is not electrically connected 2 SA...

Page 112: ...ain PCB 5 Remove the 2 screws BH M3 0x4 NI and detach the Plate I F Cover from the Plate Main PCB Note on reassembling When the SA Main PCB is replaced with a new one be sure to perform the transparen...

Page 113: ...lifting it upwardly Notes on reassembling Media path left edge alignment Mount the Unit Mechanism so that the media guide end of the Cover Head Wire is aligned with the mark on the Label Mark and the...

Page 114: ...e the 4 screws BH M3 0x4 NI and detach the Frame Mechanism 7 Remove the 2 screws BH M3 0x4 NI and detach the Unit Power Supply Block by lifting it upwardly after shifting it toward the rear as shown b...

Page 115: ...Supply 3 Remove the Sheet Insulation Power PCB from the Plate Power PCB 3 Plate Holder Paper L 1 Remove the 3 screws BH M3 0x4 NI and detach the Cover Lever 2 Remove the SA Damper Shaft and Spring Da...

Page 116: ...ear and peel off the labels Label FCC ICES VCCI A Label Caution and Label Rating from it 9 Remove the 1 screw PH SW PW M4x6 and 2 screws NO2 FH M3 0x6 NI and detach the SA Power SW Cable and Cover Pla...

Page 117: ...e to the SA Power SW Cable so that the 2 AC power lines pass through the Ferrite Core Then securely close the hook to fasten the Ferrite Core 3 6 16 SA Platen 1 Open the Head Block 2 While pressing th...

Page 118: ...nit Mechanism Refer to 3 6 13 Unit Mechanism 6 Open the Head Block and release the right end of the Unit Sensor U from the frame to set it free 7 Remove the 3 screws BH M2 0x4 NI and detach the Unit S...

Page 119: ...ove the 1 screw NO 0 TFH PT4 0 5 M2 0x4 detach the SA TRA Sen PCB and disconnect the FFC TRA Sensor from the SA TRA Sen PCB Notes on reassembling Correctly insert the FFC TRA Sensor in the correct dir...

Page 120: ...ight and detach the FFC TRA Sensor 6 Peel off the Sheet Cable Support A and Sheet Cable Support B from the FFC TRA Sensor 7 Remove the Plate Friction Sen U and Spring Friction Sen U from the Holder Se...

Page 121: ...tion Sen U into the boss of the Holder Sensor U Next put the Plate Friction Sen U on the spring and mount it in place Run the FFC TRA Sensor as shown below Pass it through the two slits A and B and th...

Page 122: ...long end of the spring into the shorter slit in the Cover Head Wire 2 Hook a cable wire or similar on the short end of the spring and pull it to lower the short end of the spring 3 While pulling the c...

Page 123: ...isengage the 1 E ring E Ring 4 0 and then remove the 1 screw NO2 PH SW PW M4 0x16 NI and Shaft Head Holder 10 Remove the Unit Head from the Unit PF Notes on reassembling When assembling parts apply FL...

Page 124: ...oks of the Unit Head and next on the lower hooks of the Unit PF At this time hook the Spring Head Up so that its hook parts direct inward of the mechanism as shown below This can prevent unwanted nois...

Page 125: ...Refer to 3 6 12 1 SA Main PCB Connectors 5 Remove the Unit Mechanism Refer to 3 6 13 Unit Mechanism 6 Remove the Unit Head Refer to 3 6 18 Unit Head and Unit PF 7 Place the Unit Head upside down as sh...

Page 126: ...and move it to the direction At this time be sure that the screw A is inserted into the slit B If it is not correctly inserted the SA Head Block cannot be assembled on the frame 3 While lightly pressi...

Page 127: ...ead Connector 6 Remove the Spring Head Holder and Sheet Cable Protect from the Cam Head Adjust Block 7 Disassemble the Cam Head Adjust 1 Remove the 1 screw PHT 2 M3 0x8 NI and detach the 1 plain washe...

Page 128: ...fitting its 2 projections to the guide holes D of the frame as shown on the previous page Clean the thermal element surface of the SA Head with the head cleaner After assembling the SA Head perform t...

Page 129: ...lance Cam 3 Remove the 1 screw BH M3 0x4 NI and detach the Holder Guide Sensor U 4 Peel off the Label Head Adjust Label Head Balance and Label Heat Caution from the SA Head Holder Base Notes on reasse...

Page 130: ...F Motor with Thermistor can be removed without detaching the Unit Mechanism 6 Remove the 2 screws BH M3 0x4 NI and detach the PF Motor Block 7 Remove the 2 screws BH M3 0x4 NI and detach the Plate Mot...

Page 131: ...Shaft Sensor Guide with the Guide Paper Set and Holder Adjust Sensor L in the direction of the arrow 9 Pull out the Guide Paper Set from the Shaft Sensor Guide and detach the Spring Friction Sen PG an...

Page 132: ...ess down the Holder Adjust Sensor L by pushing its top to insert the Spring Adjust Sensor L into the slit Since the width of the Spring Adjust Sensor L is wider than that of the slit it is required to...

Page 133: ...it Head Refer to 3 6 18 Unit Head and Unit PF 7 Remove the SA PF Motor Refer to 3 6 20 SA PF Motor Tips The gears can be removed without detaching the Unit PF and SA PF Motor 8 Disengage the 1 E ring...

Page 134: ...from the SA Main Plate R Note on reassembling When mounting the Lever Head Lock hook the Spring Head Lock as shown in the magnified view on the above figure Hook one end of the Spring Head Lock on the...

Page 135: ...Main Frame L Tips The Plate Peeler Block can be removed by simply opening the SA Top Cover Block 3 Peel off the Label Mark and remove the Sponge Peeler Plate from the Plate Peeler Note on reassemblin...

Page 136: ...Factory Service mode in Chapter 2 2 Sensor sensitivity adjustment Factory mode Since Factory mode menu includes essential items that can affect the printing accuracy etc DO NOT change the factory set...

Page 137: ...nd set the liner prepared in above 2 4 Correctly put the liner under the SA TRA Sen PCB For liner with black marks keep away the black mark from the SA TRA Sen PCB 5 Close the Head Block Procedure For...

Page 138: ...correct media setting position media active sensor etc and repeat from Step 3 8 Press any key of the printer Then the obtained value is saved into the printer and the screen returns to Step 3 9 When...

Page 139: ...e liner with no label on it on the SA Ref Sensor PCB reflective sensor Keep away the black mark from the SA Ref Sensor PCB 4 Close the Head Block When butt cut label media with black marks is used 1 P...

Page 140: ...nter Factory Setup mode The first submenu Init Thru Sen is displayed 3 Press the MENU key until Init Refl Sen submenu appears 4 Press the STOP key to enter IInit Refl Sen sensitivity adjustment mode 5...

Page 141: ...k for correct media setting position media active sensor etc and repeat from Step 3 8 Press any key of the printer Then the obtained value is saved into the printer and the screen returns to Step 3 9...

Page 142: ...bon Wrinkles 1 Ribbon Left Right Balance Adjustment Knob For user As you turn the Ribbon Left Right Balance Adjustment Knob the knob side right side of the SA Ribbon Tension Shaft F moves back and for...

Page 143: ...r when shipped 1 Front side Cam Tension Base Adjust position adjustment For service personnel By adjusting the position of the Cam Tension Base Adjust at the front the Ribbon Sensor Frame F Block rota...

Page 144: ...ure below 3 Loosen do not remove the 1 screw B and by turning C rotate the Cam Tension Base Adjust either in the clockwise or counterclockwise depending upon on which side the ribbon slants as viewed...

Page 145: ...ion a is inserted into the slotted hole a in the SA Ribbon Frame fixed part while the projection b is inserted into the hole b in the Ribbon Sensor Frame F Block movable part As you can see from the f...

Page 146: ...ting the left end of the Shaft Ribbon Guide of the SA Head ribbon wrinkle on the front side can be corrected Adjustment procedure 1 Loosen do not remove the screws A and B 2 Shift the left end of the...

Page 147: ...Right Balance Adjustment Knob adjustment For user Cam Tension Base Adjust adjustment Front side Shaft Ribbon Guide adjustment A part of the SA Head Cam Tension Base Adjust adjustment Rear side Stronge...

Page 148: ...nkles are observed 2 Back tension adjustment Left rear side Adjust the tension applied to the supply side ribbon by setting the parallel pin dial of the SA Ribbon Tension Unit R of the Unit Ribbon on...

Page 149: ...b counterclockwise If wrinkles are found at around the center find on which side the wrinkles are and turn the knob accordingly 3 Be sure that the adjusted position in Step 2 is at around the center o...

Page 150: ...on the front side take up side stated as above The adjustable part on the rear side is the Cam Tension Base Adjust only Refer to 3 7 2 2 Cam Tension Base Adjust position adjustment and perform adjust...

Page 151: ...Chapter 4 Troubleshooting 4 1 CL E700 series CHAPTER 4 TROUBLESHOOTING...

Page 152: ...rror Message and Corrective Actions 4 3 4 2 Troubleshooting 4 5 4 2 1 Problems in Powering Up the Printer 4 5 4 2 2 Media feed Problems 4 6 4 2 3 Problems in Printing 4 7 4 2 4 Ribbon feed Problem 4 9...

Page 153: ...ol Flashing in red Error PFMotor Hot Ribbon motor temperature abnormality Printing is impossible Wait until the SA Ribbon Motor F gets cool Flashing in red Error RBMotor Hot Cutter motor temperature a...

Page 154: ...ibbon feed Ribbon winding Problem Ribbon slacks on the take up side Error Ribbon Run is displayed on the LCD Defective ribbon sensor Replace the SA Ribbon Encoder or SA Ribbon Sensor Refer to Chap 3 D...

Page 155: ...inter Symptoms Checks Remedies No power to the printer 1 Check voltage on the input power line Acceptable supply voltage 100 to 240V AC 2 Is the power cord loosely connected 3 Is the SA Power Cable fi...

Page 156: ...Replace the SA PF Motor 5 Replace the SA Main PCB Irregular media feed pitch 1 Is the connector J5 for SA PF Motor connected firmly 2 Is dust or other foreign matter on the SA Platen 3 Does the media...

Page 157: ...utomatically 4 Turn OFF the power and then turn it ON No print 1 Is the head block securely closed The LCD displays Error Head Open 2 Is the interface cable firmly connected between the printer and th...

Page 158: ...om right of the SA Main PCB 1 Clean the head surface with the specified head cleaner 2 Adjust the media thickness adjustment dial according to media thickness to be used 3 Adjust the printing density...

Page 159: ...the temperature of the SA Ribbon Motor F exceeds a certain value If it does not check if the cable is firmly connected between the SA Fan and the SA Ribbon Control PCB J604 8 Does the ribbon tension...

Page 160: ...e up side Error Ribbon Run is displayed on the LCD 1 Is the SA Ribbon Tension Shaft F to give an adequate tension to the take up side ribbon correctly installed Push it by hand and check if it moves s...

Page 161: ...ntrol PCB J601 3 Is the cable firmly connected between SA Ribbon Control PCB J606 and the SA Ribbon Sensor 4 Failure in the ribbon tension sensor 5 Failure in the control circuit 1 Connect it firmly 2...

Page 162: ...for user Transparent Sensor Reflective Sensor on page 4 13 4 Connect it firmly 5 Connect it in the right orientation 6 Connect it firmly 7 Clean the LEDs on the SA Ref Sensor PCB to remove dust 8 Repl...

Page 163: ...is used peel off a label beforehand When butt cut label media with black marks is used leave the labels as they are NOTE Keep away the black mark from the reflective sensor 2 Close the head block Sen...

Page 164: ...firmly connected between the SA Main PCB J3 and SA Opepane PCB 2 Is the FFC Opepane inserted upside down 3 Failure in the SA Opepane PCB 4 Failure in the control circuit 1 Connect it firmly 2 Connect...

Page 165: ...B J14 To Interface Board Optional To Unit Power Supply Front To SA Opepane PCB J10 J12 J13 J2 To SA TRA Sen PCB To SA Ref Sensor PCB To SA Relay PCB To SA Head To thermistor of SA PF Motor To SA PF Mo...

Page 166: ...eshooting CL E700 series 4 16 SA Ribbon Control PCB J605 SA Ribbon Control PCB To SA Relay PCB Front To SA Ribbon Sensor J604 J603 J602 J606 J601 To SA Ribbon Encoder To SA Fan To the thermistor of th...

Page 167: ...Chapter 5 Parts Lists CL E700 series CHAPTER 5 PARTS LISTS...

Page 168: ...o 3 Parts List Location for Unit Mechanism 5 13 Drawing No 4 Parts List Location for Unit Head 5 16 Drawing No 5 Parts List Location for Unit PF 5 20 Drawing No 6 Parts List Location for Unit Sensor U...

Page 169: ...Chapter 5 Parts Lists 5 3 CL E700 series CL E700 series Recommended Spare Parts List Revision Up List Sheet No Rev No Date 1 1 0 Oct 10 2014...

Page 170: ...Main PCB 200CHN 1 For CHINA 4 2 13 3 PPS00219 0 SA Main PCB 200ASIA 1 For ASIA 5 3 9 PPK90020 0 SA Platen 1 6 4 6 PPM80015 0 SA Head 200dpi 1 7 5 1 PPF80010 0 SA PF Motor with Thermistor 1 8 5 11 JM66...

Page 171: ...Chapter 5 Parts Lists 5 5 CL E700 series CL E700 series Drawing No 1 Parts List Location for General Assembly Revision Up List Sheet No Rev No Date 1 2 0 Oct 10 2014 2 2 0 Oct 10 2014...

Page 172: ...Chapter 5 Parts Lists CL E700 series 5 6 DRAWING NO 1 General Assembly Rev 0...

Page 173: ...ont PBA00094 0 1 5 Case PBA00093 0 1 6 Logo Citizen L PAX30002 0 1 7 Cover Front Top PBA00096 0 1 8 Cover Window PRC70011 0 1 9 SA Top Cover PPA00038 0 1 10 Cover Hinge JN56209 0 2 11 Hinge JN59909 0...

Page 174: ...05 0 1 Ref Drawing No 7 24 Plate Holder Paper R PAC70073 0 1 25 Label FCC ICES VCCI A TZ99901 0 1 For CSA 26 1 Label Caution North EU PRX10006 0 1 For CSE 26 2 Label Caution CHINA FB99985 0 1 For CHIN...

Page 175: ...Chapter 5 Parts Lists 5 9 CL E700 series CL E700 series Drawing No 2 Parts List Location for Unit Base Revision Up List Sheet No Rev No Date 1 2 0 Oct 10 2014 2 2 0 Oct 10 2014...

Page 176: ...Chapter 5 Parts Lists CL E700 series 5 10 DRAWING NO 2 Unit Base Rev 0 13 1 13 2 13 3 11 12 25 22 23 14 15 16 6 10 7 19 17 24 18 2 1 3 4 8 9 20 19 19 19 19 19 19 19 19 19 21 19 18 19 5 DRAW NO 3...

Page 177: ...0 1 6 Cover Power PCB PAC80021 0 1 7 SA Power Cable PPS30049 0 1 8 Unit Power Supply PWT20011 0 1 9 Sheet Insulation Power PCB PRC00016 0 1 10 Plate Power PCB PAC70071 0 1 11 Plate I F Cover TA54107 1...

Page 178: ...2 Rev No 0 Location Part Name Part No Q ty Unit Remarks 2 19 Screw BH M3 0x4 NI E00530 040WF 24 20 Screw BH M3 0x6 NI E00530 060WF 3 21 Screw PH SW PW M3x5 E04030 050F 4 22 Screw NO2 FH M3 0x6 NI E002...

Page 179: ...Chapter 5 Parts Lists 5 13 CL E700 series CL E700 series Drawing No 3 Parts List Location for Unit Mechanism Revision Up List Sheet No Rev No Date 1 1 0 Oct 10 2014...

Page 180: ...Chapter 5 Parts Lists CL E700 series 5 14 DRAWING NO 3 Unit Mechanism Rev 0 6 1 2 5 4 16 10 14 3 11 13 9 15 8 7 DRAW NO 4 DRAW NO 5 DRAW NO 6 12...

Page 181: ...tion TZ99981 0 1 4 Label Head Balance JM99981 0 1 5 Label Head Adjust JM99982 0 1 6 Spring Head Up JM13601 0 1 7 Spring2 Head Up JM13605 0 1 8 Hook Head Up Spring 2 JM14112 0 1 9 SA Platen PPK90020 0...

Page 182: ...Chapter 5 Parts Lists CL E700 series 5 16 CL E700 series Drawing No 4 Parts List Location for Unit Head Revision Up List Sheet No Rev No Date 1 2 0 Oct 10 2014 2 2 0 Oct 10 2014...

Page 183: ...Chapter 5 Parts Lists 5 17 CL E700 series DRAWING NO 4 Unit Head Rev 0 1 22 2 3 24 6 7 8 23 9 10 12 19 20 21 1 4 25 25 25 25 13 14 15 16 17 18 28 29 11 26 27 5 22 25...

Page 184: ...0 1 6 SA Head 200dpi PPM80015 0 1 7 Spring Head L JM13603 0 1 8 SA Head Holder Base JM14704 1 1 9 Holder Guide Sensor U JM14211 0 1 10 Lever Head Balance JM14203 0 1 11 Sheet Cable Protect PRA90017 0...

Page 185: ...nit Remarks 4 21 Guide Head Cable JM14212 1 1 22 Screw BH M3 0x3 NI E00530 030WF 2 23 Screw BH M3 0x4 NI E00530 040WF 1 24 Screw PH M3 0x8 NI E00130 080WF 1 25 Screw BH M3 0x6 NI E00530 060WF 6 26 Scr...

Page 186: ...Chapter 5 Parts Lists CL E700 series 5 20 CL E700 series Drawing No 5 Parts List Location for Unit PF Revision Up List Sheet No Rev No Date 1 2 0 Oct 10 2014 2 2 0 Oct 10 2014...

Page 187: ...Chapter 5 Parts Lists 5 21 CL E700 series DRAWING NO 5 Unit PF Rev 0 12 3 7 2 26 1 19 18 9 6 27 27 28 28 5 27 25 28 26 26 4 18 29 29 11 14 13 10 17 23 31 22 20 26 21 8 16 15 26 26 26 32 30 24...

Page 188: ...Idle PBF00077 0 1 6 Gear PF 2 PBF00076 0 1 7 Label Mark JM99978 02 1 8 Plate Peeler JM44105 03 1 9 Holder Adjust Sensor L PBE00067 0 1 10 Guide Paper Set PBM30040 0 1 11 SA Ref Sensor PCB JM66730 10 1...

Page 189: ...1 22 Lever Head Lock JM44203 0 1 23 Spring Head Lock JM43601 0 1 24 Cover Paper Sensor JM24107 0 1 25 Sponge Peeler Plate JM57101 0 1 26 Screw BH M3 0x4 NI E00530 040WF 11 27 Washer Plain 5 2x10x0 25...

Page 190: ...Chapter 5 Parts Lists CL E700 series 5 24 CL E700 series Drawing No 6 Parts List Location for Unit Sensor U Revision Up List Sheet No Rev No Date 1 2 0 Oct 10 2014 2 2 0 Oct 10 2014...

Page 191: ...Chapter 5 Parts Lists 5 25 CL E700 series DRAWING NO 6 Unit Sensor U Rev 0 6 11 18 5 1 4 2 3 10 21 13 21 12 20 9 23 19 8 7 14 22 16 17 15...

Page 192: ...L 100 6 Cap Sensor Frame L JM24210 0 1 7 Holder Sensor U PBE00068 0 1 8 Cap Sensor Cable U JM24212 0 1 9 Spring Friction Sen U JM23605 0 1 10 SA TRA Sen PCB JM66725 0 1 11 Tape Sensor Cable U JM24105...

Page 193: ...LIST for CL E700 series TITLE Unit Sensor U Sheet No 2 2 Drawing No 6 Rev No 0 Location Part Name Part No Q ty Unit Remarks 6 21 Screw NO 0 TFH PT4 0 5 M2 0x4 E15920 040WF 2 22 Screw BH M3 0x6 NI E005...

Page 194: ...Chapter 5 Parts Lists CL E700 series 5 28 CL E700 series Drawing No 7 Parts List Location for Unit Opepane Revision Up List Sheet No Rev No Date 1 1 0 Oct 10 2014...

Page 195: ...Chapter 5 Parts Lists 5 29 CL E700 series DRAWING NO 7 Unit Opepane Rev 0...

Page 196: ...Part No Q ty Unit Remarks 7 1 Sheet Ope Pane PRN30010 0 1 2 Cover LCD PBA10002 0 1 3 Cover Ope Pane PBA00095 0 1 4 Holder Ope Pane Cover PAE00041 0 1 5 Window LED PBA10038 0 1 6 Key Ope Pane PBA10037...

Page 197: ...Chapter 5 Parts Lists 5 31 CL E700 series CL E700 series Drawing No 8 Parts List Location for Unit Ribbon Revision Up List Sheet No Rev No Date 1 3 0 Oct 10 2014 2 3 0 Oct 10 2014 3 3 0 Oct 10 2014...

Page 198: ...L E700 series 5 32 DRAWING NO 8 Unit Ribbon Rev 0 38 10 41 41 39 36 15 40 13 12 14 11 39 9 17 16 18 16 19 2 5 6 22 23 28 24 25 35 39 20 4 39 3 1 37 35 39 8 21 42 31 45 40 34 44 32 33 40 39 13 30 43 26...

Page 199: ...6 SA Ribbon Motor F PPF80004 0 1 7 SA Ribbon Cable PPS30048 0 1 8 Cover Ribbon Gear PBA00099 0 1 9 Shaft Tension Adjust JM32011 0 1 10 Lever F Tension Adjust JM34118 0 1 11 Holder2 Tension Spring PBE0...

Page 200: ...0 1 26 Gear 4 Ribbon JM30203 1 1 27 Gear 2 Ribbon JM30202 0 1 28 Gear 3 Ribbon JM30205 0 1 29 Gear Reduction Ribbon 1 PBF00079 0 1 30 Catch Ribbon Holder JM34203 0 2 31 Knob Ribbon Unit JM34204 0 1 32...

Page 201: ...3 Drawing No 8 Rev No 0 Location Part Name Part No Q ty Unit Remarks 8 41 Screw No0 BT4x0 5 M1 7x4 NI E13717 040WF 4 42 E Ring 4 0 E60340 000F 1 43 Screw PHT 2 M3 0x8 NI E10130 080WF 2 44 E Ring 3 0 E...

Page 202: ...Chapter 5 Parts Lists CL E700 series 5 36 CL E700 series Drawing No 9 Parts List Location for SA2 Ribbon Unit Fan Revision Up List Sheet No Rev No Date 1 1 0 Oct 10 2014...

Page 203: ...Chapter 5 Parts Lists 5 37 CL E700 series DRAWING NO 9 SA2 Ribbon Unit Fan Rev 0...

Page 204: ...IST for CL E700 series TITLE SA2 Ribbon Unit Fan Sheet No 1 1 Drawing No 9 Rev No 0 Location Part Name Part No Q ty Unit Remarks 9 1 Cover Ribbon Motor PBA00098 0 1 2 SA Fan JM68702 0 1 3 Plate Fan PA...

Page 205: ...Chapter 5 Parts Lists 5 39 CL E700 series CL E700 series Drawing No 10 Parts List Location for Accessories Revision Up List Sheet No Rev No Date 1 1 0 Oct 10 2014...

Page 206: ...Chapter 5 Parts Lists CL E700 series 5 40 DRAWING NO 10 Accessories Rev 0 3 2 4 1 1 1 2 1 3...

Page 207: ...rd Set CS87 00004605 1 For CSA 1 2 Cord Set CS87 00004848 1 For CSE 1 3 Cord Set CS87 00004611 1 For CHINA 2 Shaft Paper PBM30041 0 1 3 SA Paper Flange PPM30010 1 1 4 Ribbon Core 25x114 JM39902 0 1 Cl...

Page 208: ...Chapter 6 Circuit Diagrams 6 1 CL E700 series CHAPTER 6 CIRCUIT DIAGRAMS...

Page 209: ...ad Opepane Buzzer 6 8 SA Main PCB 7 12 Ribbon Cutter Peeler 6 9 SA Main PCB 8 12 PF Motor Drive Option I F 6 10 SA Main PCB 9 12 Media Sensors Head Up Sensor 6 11 SA Main PCB 10 12 USB I F DAC 6 12 SA...

Page 210: ...3 V 3 3 1 S N E S U D H 2 1 0 2 N C D N G 5 4 V 4 2 D N G 6 1 D N G 3 D N G V 4 2 V 4 2 V 4 2 8 9 E V A S R W P 2 7 3 1 J R E W O P T I N U Y L P P U S 1 1 0 0 2 T W P R E W O P A S E L B A C 9 4 0 0...

Page 211: ..._ F I D P S 1 _ D C _ D S D C _ C M M K L C T X E _ 0 D C L 0 _ 7 P 0 K C S _ I C S 4 A T A D _ 0 V 0 5 6 N O C T _ 0 D C L 2 S T R 5 Q R I 1 _ 2 D _ D S 2 D _ C M M U U M Q D 3 E W 7 _ 7 P 1 S T R 1...

Page 212: ...C V P 3 9 6 0 1 _ C C V P 6 0 1 9 0 1 _ S S V 9 0 1 1 1 1 _ C C V 1 1 1 8 1 1 _ S S V 8 1 1 1 2 1 _ C C V 1 2 1 3 2 1 _ S S V 3 2 1 5 2 1 _ C C V P 5 2 1 8 2 1 _ S S V 8 2 1 0 3 1 _ C C V P 0 3 1 4 3...

Page 213: ...S C 9 1 0 A B 0 2 1 A B 1 2 P A 0 1 A 2 2 0 A 3 2 1 A 4 2 2 A 5 2 3 A 6 2 4 A 9 2 5 A 0 3 6 A 1 3 7 A 2 3 8 A 3 3 9 A 4 3 1 1 A 5 3 2 1 A 6 3 E K C 7 3 K L C 8 3 M Q D U 9 3 C N 0 4 8 Q D 2 4 9 Q D 4...

Page 214: ...J 9 J _ T N I C C V 9 J 0 1 J _ T N I C C V 0 1 J 3 E _ 1 O I C C V 3 E 3 G _ 1 O I C C V 3 G 2 E _ D N G 2 E 4 G _ D N G 4 G 3 K _ 2 O I C C V 3 K 3 M _ 2 O I C C V 3 M 4 K _ D N G 4 K 4 M _ D N G 4...

Page 215: ...D C L 5 T S R D C L n 5 S C D C L n 5 E T I H W _ L K B D C L 2 E G N A R O _ L K B D C L 2 0 W S n 2 1 W S n 2 2 W S n 2 3 W S n 2 G _ 0 D E L 2 5 1 3 T 1 6 4 T 2 5 R 1 k 4 2 4 5 R 1 k 8 1 8 8 C 6 1...

Page 216: ...I R 2 2 R _ S N E S B I R 2 C N E _ S N E S B I R 2 B I R P M T 5 2 0 N O C T U C 5 1 N O C T U C 5 P H T U C 5 T U C P M T 5 2 0 P Y T P C 5 1 P Y T P C 5 L E E P S N S 2 6 6 R 1 k 3 3 8 2 3 T 3 0 1...

Page 217: ...P n T I N I n 5 S T R Y S U B 5 R T D K C A n 5 T L U A F n 5 T C L S 5 E P 5 T U O W S D 5 F I T S R n 2 1 2 K C S F I 2 I S D X R F I 2 R I D O S D X T F I 2 2 1 1 C 0 5 B u 1 0 2 L 1 7 4 G K 8 1 M...

Page 218: ...2 8 Q M E 4 1 1 C T D 7 Q 8 5 6 5 C S 2 A 4 1 U A N 7 9 R 1 k 0 0 1 0 0 1 0 0 1 R 1 1 Q M E 4 1 1 C T D 4 9 R 2 1 0 2 1 5 7 6 7 3 T 0 7 3 T B 4 1 U A N 9 7 3 T 2 7 3 T 8 7 3 T k 1 6 0 1 R C 4 1 U A N...

Page 219: ...3 T 9 3 1 C 0 5 B p 0 0 0 1 5 1 1 R 1 k 0 3 7 D 1 0 0 1 P B X 1 2 3 4 5 6 6 6 1 R k 1 0 4 1 C 0 5 B p 0 0 0 1 4 8 3 T 7 0 1 R 1 k 0 2 6 8 3 T 4 9 3 T 2 1 J 0 0 4 0 0 0 2 1 5 1 S U B V 1 D 2 D 3 D N G...

Page 220: ...1 5 1 R 2 1 0 2 0 1 2 Q 2 4 3 6 H C M 4 3 5 1 2 6 4 2 4 T 0 3 4 T 4 3 1 R k 1 5 1 4 T 9 2 4 T 9 L H u 7 4 3 2 Q M T 5 1 1 A T D 7 0 4 T 2 3 4 T 9 D 0 6 L 0 5 0 B R 6 5 1 C 0 1 B u 1 2 5 1 C 0 5 B u 2...

Page 221: ..._ A D D V 3 M X R 4 P X R 5 M X T 6 P X T 7 O X 8 XI 9 REXT 10 MDIO 11 MDC 12 RXD3 13 RXD2 14 RXD1 15 RXD0 16 O I D D V 7 1 V D X R 8 1 C X R 9 1 R E X R 0 2 P R T N I 1 2 C X T 2 2 N E X T 3 2 0 D X...

Page 222: ...X u 2 2 6 0 2 T 5 0 2 T 1 0 2 T 7 0 2 T 7 1 2 T 7 0 2 R k 3 3 3 2 2 T 8 1 2 T 5 1 0 2 W S 5 3 T 6 1 6 1 W S T 2 2 2 T 9 0 2 R 8 0 6 1 0 0 2 0 5 p 0 0 0 1 6 0 2 C 9 2 2 T 3 1 2 T 0 5 p 0 0 0 1 7 0 2 C...

Page 223: ...P Y T N O I T P O D N G D N G D N G C N D N G 1 _ E P Y T N O I T P O O I 5 V S N E S R E L E E P O I 3 V O I 5 V T M V T M V R _ P E T S _ B I R R _ R I D _ B I R R _ T M _ B I R _ A D B N E _ T M _...

Page 224: ...s SA Ref Sensor PCB 1 2 3 4 5 6 7 8 A B C D 8 7 6 5 4 3 2 1 D C B A Title Number Revision Size A4 Date Sheet of File Drawn By A REFLECTIVE SENSOR PCB 1 1 JM66730 CN501 CHP1505 0101 D502 GL100MN0MP D50...

Page 225: ...CL E700 series 6 18 SA TRA Sen PCB 1 2 3 4 5 6 7 8 A B C D 8 7 6 5 4 3 2 1 D C B A Title Number Revision Size A4 Date Sheet of File Drawn By A TRANSPARENT SENSOR PCB 1 1 JM66725 TR401 PT4800F6 CN401...

Page 226: ...00 series SA Head Up Sensor PCB 1 2 3 4 5 6 7 8 A B C D 8 7 6 5 4 3 2 1 D C B A Title Number Revision Size A4 Date Sheet of File Drawn By A HEAD UP SENSOR PCB 1 1 JM66715 PI201 SG 278 C201 1000p C202...

Page 227: ...B u 1 0 0 0 1 p 0 0 1 1 0 6 C 3 2 6 T 2 0 6 R 2 1 0 2 0 4 1 6 T 1 0 6 T 5 2 6 T 5 0 6 C 6 1 B u 1 0 0 1 6 T 8 0 6 T 3 0 6 T 5 0 6 J R K H P B 3 B 1 2 3 1 2 6 C 6 1 B u 1 0 6 2 6 T 7 1 6 T 6 1 6 T 1 0...

Page 228: ...5 6 7 8 A B C D 8 7 6 5 4 3 2 1 D C B A Title Number Revision Size A4 Date Sheet of File Drawn By A PPS00159 00 RIBBON SENSOR PCB V 3 3 1 S N E S 2 S N E S D N G 2 0 4 S P 4 9 0 S 1 P G 1 0 4 R 1 0 2...

Page 229: ...2 SA Ribbon Encoder 1 2 3 4 5 6 7 8 A B C D 8 7 6 5 4 3 2 1 D C B A Title Number Revision Size A4 Date Sheet of File Drawn By A PPS00160 00 RIBBON ENCODER PCB V 3 3 S N E S D N G 1 0 5 T P P 3 _ T P 1...

Page 230: ...Appendices AP 1 CL E700 series APPENDICES...

Page 231: ...A Mounting Diagrams AP 3 A 1 SA Main PCB AP 3 A 2 SA Opepane PCB AP 5 A 3 SA Relay PCB AP 5 A 4 SA Ref Sensor PCB AP 5 A 5 SA TRA Sen PCB AP 5 A 6 SA Head Up Sensor PCB AP 6 A 7 SA Ribbon Control PCB...

Page 232: ...Appendices A Mounting Diagrams AP 3 CL E700 series A Mounting Diagrams A 1 SA Main PCB 1 Parts side...

Page 233: ...Appendices A Mounting Diagrams CL E700 series AP 4 2 Solder side...

Page 234: ...ndices A Mounting Diagrams AP 5 CL E700 series A 2 SA Opepane PCB 1 Parts side 2 Solder side A 3 SA Relay PCB A 4 SA Ref Sensor PCB A 5 SA TRA Sen PCB D502 D501 TR501 A A C K K E CN501 C TR401 CN401 E...

Page 235: ...endices A Mounting Diagrams CL E700 series AP 6 A 6 SA Head Up Sensor PCB 1 Parts side 2 Solder side A 7 SA Ribbon Control PCB A 8 SA Ribbon Sensor A 9 SA Ribbon Encoder 1 2 3 4 1 3 CN201 PI201 C202 C...

Page 236: ...Br cken 17 Park House 643 651 Staines Road 70329 Stuttgart Feltham Middlesex TW14 8PA Germany United Kingdom Tel 49 0 711 49032 0 Tel 44 0 20 8893 1900 Fax 49 0 711 49032 45 Fax 44 0 20 8893 0080 htt...

Reviews: