background image

23

FRANÇAIS

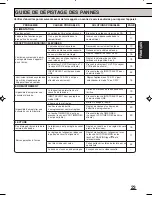
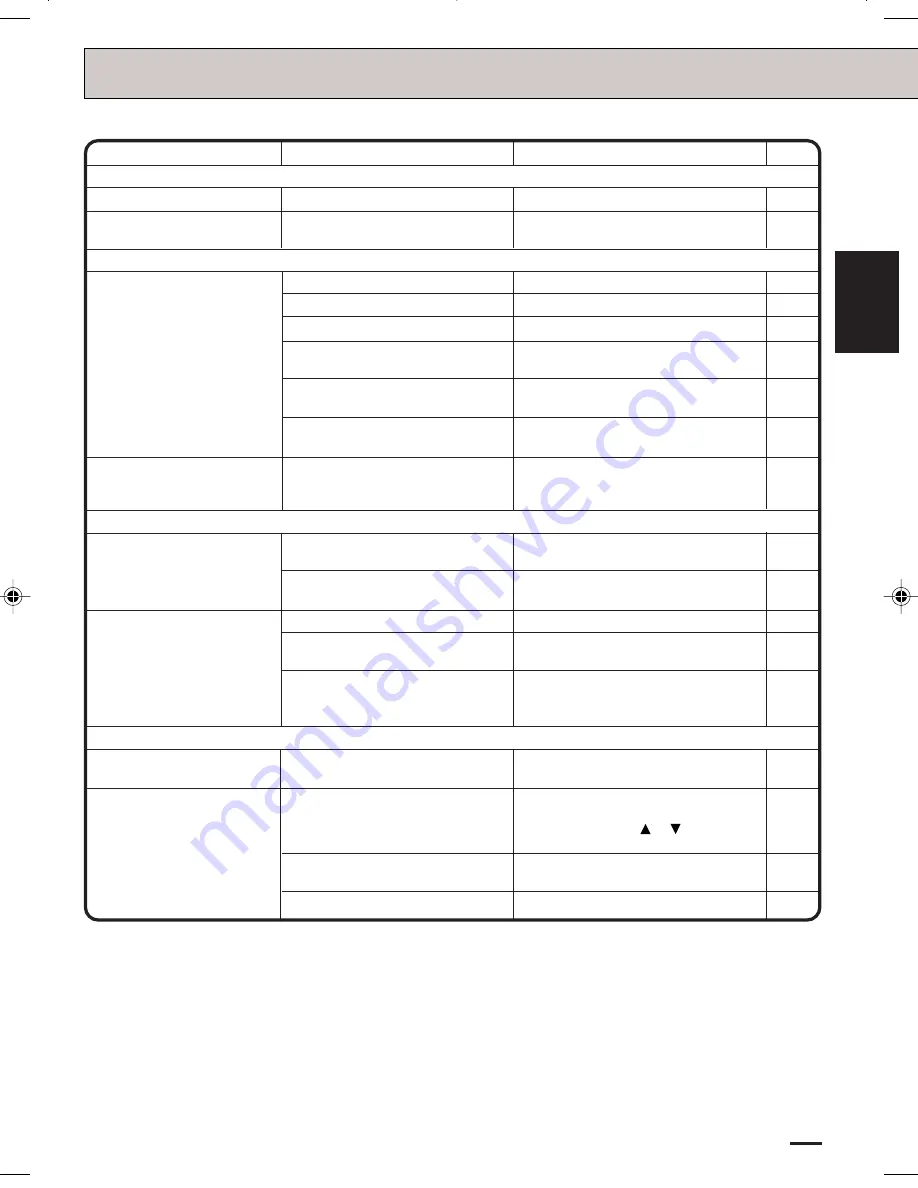
GUIDE DE DÉPISTAGE DES PANNES

Vérifiez d’abord les points suivants avant de faire appel à un centre de service autorisé pour réparer l'appareil.

PAGE

CAUSES PROBABLES

Pas de courant.

Le cordon du CA n’est pas branché.

Branchez le cordon sur la prise du CA.

L’appareil ne fonctionne pas,
bien qu'il soit en circuit.

RÉCEPTION D’ÉMISSIONS TÉLÉVISÉES

ALIMENTATION

Il n’y a pas de cassette dans le
compartiment.

Insérez une vidéocassette dans le
compartiment.

5

17

L’antenne est mal raccordée.

Raccordez correctement l’antenne.

Le câble d’antenne est déconnecté.

Reconnectez le câble d’antenne.

L’émission syntonisée à partir
du magnétoscope n’apparaît
pas à l’écran.

Le canal vidéo est mal réglé.

Réglez l’appareil au canal 3 ou 4.

Réglez le sélecteur de canal du
téléviseur à la position 3 ou 4.

Le téléviseur n’est pas réglé sur le
canal vidéo 3 ou 4.

Le sélecteur TV/VCR est réglé à TV
(le voyant VCR n’est pas allumé).

Pressez le sélecteur TV/VCR (le voyant
VCR doit être allumé).

INPUT SELECT est réglé au mode
LINE.

Pressez la touche INPUT SELECT pour
choisir le mode TV.

L’émission télévisée syntonisée
à partir du magnétoscope
n’apparaît pas en couleur.

La sélection TV/CATV n’est pas
effectuée correctement.

Réglez l'option menu TV/CATV pour
sélectionner le mode TV ou CATV.

10

10

15

15

15

22

16

ENREGISTREMENT

Impossible d’enregistrer une
émission télévisée.

La languette de protection de la
cassette a été brisée.

Collez un morceau de ruban adhésif sur
l'orifice.

19

INPUT SELECT n’est pas réglé au
mode LINE.

Pressez la touche INPUT SELECT pour
choisir le mode LINE.

22

L’heure a été mal réglée.

Mettez l’horloge à l’heure.

Impossible d’enregistrer une
émission avec la minuterie.

Les heures de début/fin
d’enregistrement sont mal réglées.

La touche TIMER REC n’est pas
pressée (le voyant VCR TIMER REC
n’est pas allumé).

Réglez de nouveau les heures de
début/fin d’enregistrement.

15

20

Pressez la touche TIMER REC
(Le voyant VCR TIMER REC doit être
allumé).

20

Barres parasites à l’écran.

LECTURE

Pas d’image à l’écran lors de la
lecture d’une bande.

Le téléviseur n’est pas réglé au canal
3 ou 4.

Réglez au canal 3 ou 4 ou réglez l’accord
précis du téléviseur.

15

Le réglage de l’alignement dépasse
la portée du circuit d’alignement.

17

Réglez manuellement l’alignement avec
la touche AUTO TRACKING ou les
touches TRACKING 

 et   de la

télécommande.

Les têtes vidéo sont sales.

La bande est usée ou endommagée.

22

SOLUTIONS POSSIBLES

PROBLEMES

Faites nettoyer les têtes de lecture par un
spécialiste.

Essayez une autre vidéocassette.

 4F70301A-F P20-BACK

22/12/04, 15:42

23

Summary of Contents for JVHS3987D

Page 1: ...MODE SELECTION SELECTION DU MODE TV CATV If you purchase a universal remote control from your local retailer please contact the remote manufacturer for the required programming code Si vous utilisez a...

Page 2: ...that may be of sufficient magnitude to constitute a risk of electric shock 2 1 READ INSTRUCTIONS All the safety and operating instructions should be read before the unit is operated 2 RETAIN INSTRUCTI...

Page 3: ...so that they are not likely to be walked on or pinched by items placed upon or against them paying particular attention to cords at plugs convenience receptacles and the point where they exit from the...

Page 4: ...es replacement parts specified by the manufacturer or those that have the same characteristics as the original parts Unauthorized substitutions may result in fire electric shock or other hazards 21 SA...

Page 5: ...ached power cord only 2 If the polarized AC cord does not fit into a non polarized AC outlet do not attempt to file or cut the blade It is the user s responsibility to have an electrician replace the...

Page 6: ...Power On When loading a cassette tape this VCR will automatically turn on Automatic Playback When loading a cassette tape with out the erase prevention tab this VCR will automatically turn on and play...

Page 7: ...rd Records two tape speeds SP SLP Front Audio Video In Jacks A VCR or other video device may be hooked up for dubbing CAUTIONS FEATURES 6 LOCATION OF CONTROLS 8 BASIC CONNECTIONS 10 CATV CABLE TV CONN...

Page 8: ...emote Sensor Signals from the Remote Control are received here 10 POWER indicator Lights up when the power is turned on 11 REC indicator Lights up during recording 12 T REC indicator Lights when the u...

Page 9: ...the screen During playback it stops the tape and displays a still image on the TV screen 24 ENTER button Used to enter the information in the menu mode 25 CANCEL button Used to clear the selected time...

Page 10: ...isconnect the antenna from the TV and connect it to the VCR Then connect the VCR to the TV Below are 3 common methods of connecting an antenna system to a VCR Find the type of antenna system you are u...

Page 11: ...input TV with 300 ohm UHF and 75 ohm VHF antenna inputs TV with 300 ohm UHF and 300 ohm VHF antenna inputs VCR TO TV CONNECTION After you have connected the antenna to the VCR you must connect the VCR...

Page 12: ...of one channel while watching another ALLOWS Recording of channels through the converter box scrambled and unscrambled Using the programmable timer to record only the channel selected at the converte...

Page 13: ...channels through the converter box PREVENTS Watching scrambled channels while recording another channel Using the VCR tuner to select channels VCR Splitter Converter Descrambler TV VCR Converter Desc...

Page 14: ...VIDEO OUT jack on the VCR to the VIDEO IN jack on the TV 2 Connect the AUDIO OUT jacks on the VCR to the AUDIO IN jacks on the TV 3 Set the VIDEO TV selector of your TV to VIDEO STEREO AMPLIFIER CONNE...

Page 15: ...RACKING SET or button to select the desired language English ENGLISH Spanish ESPA OL or French FRANCAIS then press the ENTER button 4 Press the MENU button until the menu screen is cleared ENTER MENU...

Page 16: ...VCR is equipped with a channel memory feature which allows channels to skip up or down to the next channel set into memory skipping over unwanted channels Before selecting channels they must be progra...

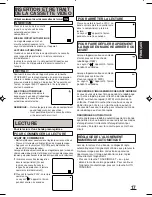
Page 17: ...ette tape without the erase prevention tab playback will start auto matically 2 Press the PLAY button Playback will start will appear on the screen for about 4 seconds Press the STOP button once The t...

Page 18: ...his VCR on and select the video input mode on the TV will appear if you press the CALL button To cancel press the CALL button again 1 Press the MENU button Press the TRACKING SET or button to select t...

Page 19: ...STOP mode While the VCR is recording press the TV VCR selector button to select the TV position The TV VCR indicator will go off and recording will continue Select the TV channel you want to watch by...

Page 20: ...S Press the REC OTR button to increase the time needed for recording See the chart To cancel OTR press the STOP button or turn off the power CH 125 The One touch Timer Recording feature provides a sim...

Page 21: ...TES If you rewind the tape from 00 00 00 a minus sign will be displayed in front of the time When you load a tape the counter will change to 00 00 00 The counter does not function on nonrecorded blank...

Page 22: ...t several times before requesting service DO NOT ATTEMPT TO CLEAN THE VIDEO HEADS OR SERVICE THE UNIT BY REMOVING THE TOP COVER NOTES It is recommended that you set the SPEED to the SP mode on the rec...

Page 23: ...he LINE mode The TV CATV menu option setting The erase prevention tab of the video cassette is broken off INPUT SELECT is set to the LINE mode The time is not set correctly The recording start end tim...

Page 24: ...ts 181 Channel Freq Synthesized VHF 2 13 UHF 14 69 CATV 14 36 A W 37 59 AA WW 60 85 AAA ZZZ 86 94 86 94 95 99 A 5 A 1 100 125 100 125 01 5A Channel 3 or 4 Switchable In RCA 1Vp p 75 ohm Out RCA 1Vp p...

Page 25: ...rmal environmental conditions improper unauthorized service improper maintenance modifications or repair by the consumer abuse misuse neglect accident incorrect inline voltage fire flood or any other...

Page 26: ...MEMO...

Page 27: ......

Page 28: ...PRISE DE COURANT OU UNE AUTRE SORTIE DE COURANT SAUF SI LES LAMES PEUVENT ETRE INSEREES A FOND SANS EN LAISSER AUCUNE PARTIE A DECOUVERT plusieurs fois de suite l appareil l utilisateur pourra tenter...

Page 29: ...r parer l appareil lui m me mais doit se limiter aux r glages d crits dans le manuel d instructions En cas de besoin confiez l appareil un centre de service autoris 8 Emplacement de l appareil Ne pla...

Page 30: ...toris es peut causer un incendie des chocs lectriques ou d autres accidents 21 V rification de s curit Apr s service ou r paration demandez au technicien d effectuer des v rifications de s curit pour...

Page 31: ...z pas ces orifices Evitez tout particuli ment de couvrir les orifices d objets mous comme du tissu ou du papier N ins rez pas les doigts ni aucun autre objet dans le compartiment cassette Ne vaporisez...

Page 32: ...progr s de la technologie VHS de pointe ll comprend un dispositif de perfectionnement de l image qui accentue les d tails du signal enregistr et offre une image de la meilleure qualit possible la lec...

Page 33: ...e l enregistrement ou l avance rapide quand la bande arrive au bout de sa course elle s arr te automatiquement se rebobine s arr te puis la bande est ject e et le magn toscope se met hors circuit Syst...

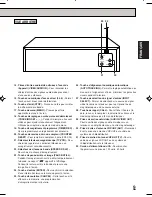
Page 34: ...5 Interrupteur d alimentation POWER Pour mettre le magn toscope en ou hors circuit 6 Touche d enregistrement enregistrement simplifi REC OTR Pressez une fois pour commencer un enregistrement ordinaire...

Page 35: ...fichage Pendant la lecture arr te la bande et procure une image fixe l cran 24 Touche d entr e ENTER Pour confirmer la s lection d une information lorsque le menu appara t l cran 25 Touche d annulatio...

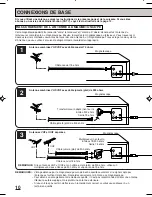
Page 36: ...ri REMARQUES L image obtenue par le magn toscope sera de bonne qualit seulement si le signal capt par l antenne est suffisamment bon Raccordez correctement l antenne au magn toscope Pour obtenir un en...

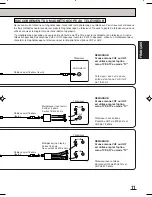
Page 37: ...HF et UHF T l viseur avec entr es d antenne UHF de 300 ohms et VHF de 300 ohms REMARQUE Si une antenne VHF ou UHF est utilis e r glez l option menu TV CATV au mode TV T l viseur avec une seule entr e...

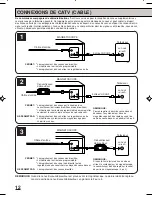
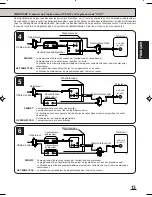
Page 38: ...nal choisi au moyen du convertisseur NE PERMET PAS L enregistrement d un canal tout en regardant un autre L utilisation du syntonisateur du magn toscope pour choisir les canaux T l viseur Entr e VHF U...

Page 39: ...nt de tous les canaux par l entremise du convertisseur L enregistrement d un canal brouill ou non tout en regardant un autre canal brouill ou non L utilisation de la minuterie programmable pour enregi...

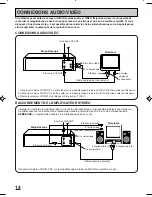
Page 40: ...gn toscope la borne AUX IN du syst me de son CONNEXIONS AUDIO VID O Si le t l viseur est dot de bornes AUDIO IN entr e audio et VIDEO IN entr e vid o il est possible de raccorder le magn toscope ces b...

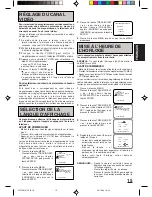
Page 41: ...des informations en 3 langues anglais fran ais ou espagnol l cran du t l viseur S LECTION DE LA LANGUE D AFFICHAGE 3 Pressez la touche TRACKING SET ou pour choisir la langue d sir e fran ais FRANCAIS...

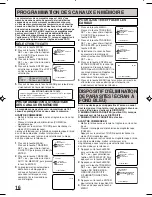
Page 42: ...la touche MENU pour retourner au visionnement de l mission t l vis e Le syntonisateur de ce magn toscope est dot d une m moire de canaux qui vous permet de faire d filer les canaux dans un ordre crois...

Page 43: ...qu une deuxi me pression jectera la bande L indication appara tra sur l cran Le voyant EJECT appara tra l cran pendant environ 4 secondes EJECTION AUTOMATIQUE Si le magn toscope rebobine la bande jus...

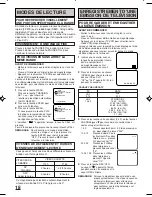
Page 44: ...oscope l aide d un c ble audio vid o mettez le t l viseur et le magn toscope sous tension puis s lectionnez le mode d entr e vid o sur le t l viseur POUR RECHERCHER VISUELLEMENT UNE PORTION SP CIFIQUE...

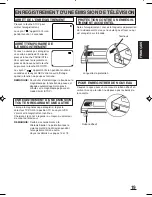
Page 45: ...secondes Lorsque le magn toscope enregistre r glez le s lecteur TV VCR la position TV Le voyant VCR s teint et l enregistrement continue Choisissez le canal regarder au moyen du s lecteur de canal du...

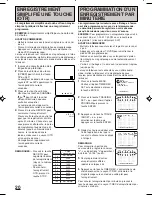
Page 46: ...he STOP PROGRAMMATION D UN ENREGISTREMENT PAR MINUTERIE 1 Pressez la touche MENU V rifiez si l option TIMER REC SET est s lectionn e et pressez la touche ENTER L enregistrement par minuterie avec affi...

Page 47: ...touche ENTER pour afficher la liste des programmations d enregistrement par minuterie Appuyez deux fois sur la touche MENU pour retourner l cran normal POUR CONFIRMER LES R GLAGES Lorsque l on r gle l...

Page 48: ...streur Ins rez une cassette pr enregistr e dans le magn toscope ou le cam scope lecteur 2 Pressez la touche INPUT SELECT pour choisir l entr e AUDIO VIDEO LINE appara t sur l cran pour indiquer la s l...

Page 49: ...tion TV CATV n est pas effectu e correctement R glez l option menu TV CATV pour s lectionner le mode TV ou CATV 10 10 15 15 15 22 16 ENREGISTREMENT Impossible d enregistrer une mission t l vis e La la...

Page 50: ...s direct 2 piles AAA non comprises 5 C 40 C 41 F 104 F 20 C 60 C 4 F 140 F T l commande C ble coaxial 75 ohms Les caract ristiques peuvent changer PAGE CAUSES PROBABLES SOLUTIONS POSSIBLES PROBLEMES T...

Page 51: ...usif une mauvaise utilisation de la n gligence un accident un raccord un r seau lectrique de tension inad quat un incendie une inondation ou tout autre d sastre naturel le nettoyage des t tes vid o si...

Page 52: ...J4F70301A 03 02 U Printed in Thailand Imprim en Tha lande...

Reviews: