3
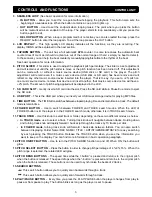
3. SEAMLESS LOOP
(See basic operation for more information.)
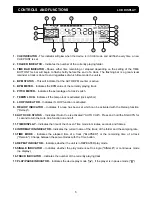
IN BUTTON
– Allow you to set the cue point without stopping the playback. This button also sets the
beginning of a seamless loop. When the button contains a cue point it lights up.
OUT BUTTON
– Used to set the endpoint when looping music. The point where you press the button
will be memorized as an endpoint of the loop. The player starts to loop seamlessly until you press this
button again to exit.
RELOOP BUTTON
–When a loop is programmed but not active you can also restart the loop. press the
RELOOP button to enter the loop again. To exit the loop presses the OUT button.
4. LCD DISPLAY
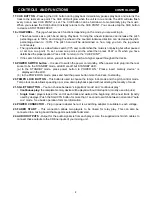
– This high quality LCD display indicates all the functions, as they are occurring. The
display ICONS will be explained in the next section.
5. TAP/BPM BUTTON
– The unit has a full automatic BPM-counter. In some rare cases the automatic beat
counter doesn't count as it should do (beat are out of the normal range or there' s simply no beat to detect).
In these cases you can help the beat counter by manually tapping this button to the rhythm of the beat.
See basic operation for more information.
6. PITCH SLIDER
–This slider is used to adjust the playback pitch percentage. The slider is a set adjustment
and will remain set until the pitch slider is move or the pitch function has been turned off.
This adjustment
can be made with or without a music source device (USB stick or SD card) in the player. The pitch
adjustment will remain even if a music source device (USB stick or SD card) has been remove and will
reflect on any other music source device inserted into the player. That is to say, if you set a +2% pitch on
one music source device, remove that device and insert another, that music source device too will have a
+2% pitch. The
a
mount of pitch
being applied will be displayed in the LCD.
7. SD CARD SLOT
– Gently insert a SD card into the slot. Press the SD card while in Pause/Cue mode to eject
the SD card.
8. USB PORT
– This is the USB port where you insert your USB mass storage device for playing MP3 files.
9. TIME BUTTON
– The TIME button switches between elapsed playing time and remain time in a track. The default
mode is remain time.
10. FOLDER BUTTON
– Use to switch between FOLDER and TRACK search modes. When the LED of
FOLDER button is lit, the player is in the FOLDER search mode, otherwise it is in TRACK search mode.
11. TRACK KNOB
– Use this knob to select track or folder, depending on these two different modes as below.
In TRACK mode
, use to select a track. Turning track knob will navigate between tracks. Holding down
and turning track knob will rapidly forward / back skip through the tracks by 10 tracks per click.
In FOLDER mode
,
turning track knob will forward / back skip between folders. You can also switch
between displaying Folder Name/FILE NAME / TITLE / ARTIST/GENRE/BITRATE for easy searching
by each pressing the TRACK button. Release the TRACK button when you see the information you
want to keep on the display. You can find more information in basic operation paragraph.
12. PITCH ON/OFF BUTTON
– Use to turn the PITCH SLIDER function on and off. When ON, the button will
glow.
13. PITCH SELECT BUTTON
– Press the button in order to change pitch percentage of 4%,8%,16%.
When the
pitch range is selected, the related LED will glow.
14. PITCH BEND BUTTONS
– The speed rises while the “+button” is pressed and returns to the original pitch
when the button is released. The speed drops when the “–button” is pressed and returns to the original pitch
when the button is released. These buttons can be used to synchronize the beats of 2 tracks.
15. SEARCH BUTTONS
This search button allows you to quickly scan backwards through a track.
This search button allows you to quickly scan forwards through a track.
16. PLAY/PAUSE BUTTON
– Every time you press the PLAY/PAUSE button the player changes from play to
pause or from pause to play. The button blinks as long as the player is set to pause.
CONTROLS AND FUNCTIONS
CONTROL UNIT

