background image

ELECTRIC CREAM SEPARATOR  FJ  600_v 6                                            USER`S  MANUAL


Page 10 


10.  TOP BOWL CLEANING PROCEDURE 

 
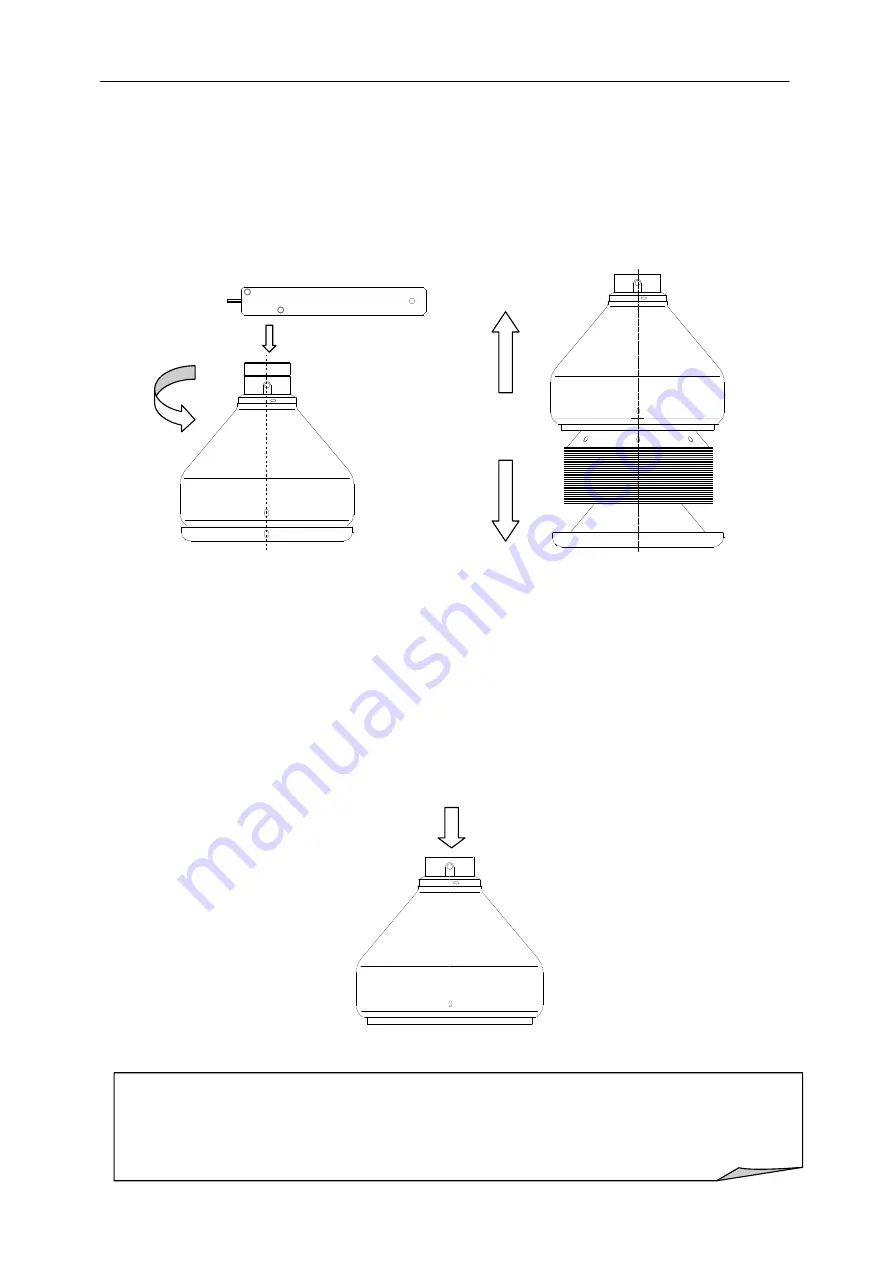
With the key, which is packed with the cream separator, unscrew top bowl fixing nut as it is 
shown on the picture. 


The easiest way to perform this procedure is: 


Fix key into the holes, which are on the top bowl fixing nut 


With stronger press on the other key end turn fixing nut until you release it. After that 
you can unscrew the nut easily with hand. 


Dismount  the  top  bowl  cover  with  help  of  fixing  nut  key  and  separate  all  different 
pieces you will find under the cover - plastic partition, metal discs and rubber washer 
and clear them with hot water. To achieve better results, cleaning neutral detergent can 
be added to the hot water. 


Wash all the parts with hot water and dry them with dry and soft duster. 


Please note! 
After use clean the bowl parts thoroughly with a neutral detergent that does not effect the 
aluminium, the rubber washer and other parts of the bowl. Do not use an acid or alkaline 
or other aggressive detergent. 


Summary of Contents for FJ-600

Page 1: ...ge 1 Cream separator FJ 600 long life 17591 users manual Version 1 1 Dezember 2008 CLAIR Produktions und Vertriebs GmbH Tel 43 0 42 62 22 51 0 Eisenstrasse 81 Fax 43 0 42 62 22 51 23 A 9330 Althofen I...

Page 2: ...afety recommendations 2 2 Technical specifications 3 3 Unpacking and set up 3 4 Accessories 3 5 Assembling procedure 4 6 Top bowl assembling procedure 5 7 Skimming procedure 6 8 Skimming regulation 7...

Page 3: ...s noticed It should never be rigid The top bowl is situated right at the centre of the machine and at a good height The suspension can be adjusted but should not be modified under any circumstances Be...

Page 4: ...e in the milk If the flow of the skimmed milk is reduced than the discs and the bowl must be cleaned 3 UNPACKING AND SET UP Unpack the device carefully and check nothing is left in the cardboard box P...

Page 5: ...lace floating device in it Then place container on the container holder Fix all parts together with fixing part with handle Place closing cork in the hole situated in the middle of milk container The...

Page 6: ...iscs will find their place very easily Put the plastic partition in the upper part of bowl Make sure that mark 0 on upper and bottom part are in the same direction Screw the bowl fixing nut with hand...

Page 7: ...and flow is opened The skimmed milk must leave the bowl through the four holes in the top bowl and flow out on the lower milk outlet The cream must leave the bowl through the cream adjusting screw and...

Page 8: ...of the rotation Cream adjusting screw details and function Smaller cream volume and higher cream density Higher cream volume and Smaller cream density 8 2 SKIMMING REGULATION BY CHANGING SPEED The cre...

Page 9: ...s parts cleaning brush is strongly recommended Other parts of the separator that come in touch with milk should also be cleaned with hot water in which some detergent is added Then rinse parts in clea...

Page 10: ...screw the nut easily with hand Dismount the top bowl cover with help of fixing nut key and separate all different pieces you will find under the cover plastic partition metal discs and rubber washer a...

Page 11: ...nths after date of shipment prove to be defective after our examination Motor and speed controller are warranted for period of 36 months Defects or injuries of the device which are result or improper...

Page 12: ...ELECTRIC CREAM SEPARATOR FJ 600_v 6 USER S MANUAL Page 12...

Reviews: