background image

TAKE-DOWN INSTRUCTIONS 


1.  Close all windows. Leave one or both doors open to allow 
air to escape. 
 
2.  Remove all ropes and ice anchors and store them in the 
provided pouch or in the carry bag side pocket.  In windy 
conditions, remove ice anchors after collapsing the roof and 
walls. 
 
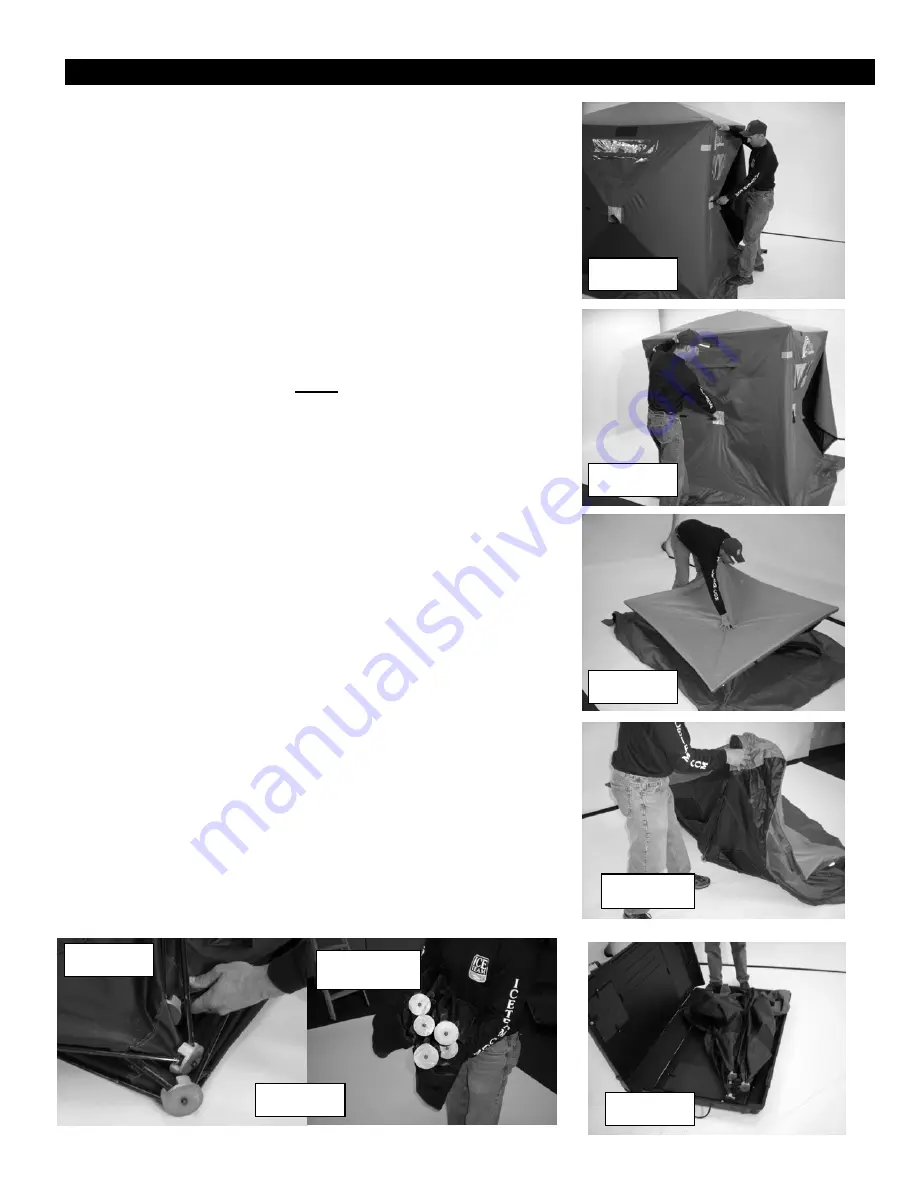
3.  Step on the skirt of the short (5 foot) side.  Push the center 
hub until the wall collapses inward 

(Photo 14)

.


Continue either 

clockwise or counter-clockwise pushing each wall inward until 
all the walls are collapsed 

(Photo 15)

.  The shelter will fall to 

the ice on its own. 
 
4.  Push the hub of the roof down until it collapses 

(Photo 

16)

 
NOTE:  Make sure the roof collapses all the way.  You may 
have to pull up on the edge of the roof to get the roof hub to 
collapse.  


TAKE-DOWN 

INSTRUCTIONS 

5.  Unclip the shelter from the base on FLR models.  Fold up 
the shelter 

(Photo 17)

 
6.  When folding the Expedition up for storage, inspect the hub 
systems and poles for entanglement.  
 

NOTE:  The Expedition hub systems may tangle when 
taking it down.  It is extremely important to untangle the 
hub systems and poles before completely folding the tent 
up for storage (Photo 18).   

 
7.  Once the hub systems and poles are free and the tent is 
completely folded, store in carry bag.  Place the folded shelter 
and the ice anchor/rope pouch into the carrying case with the 
hubs toward the bottom end of the bag.   
 
8.  For Expedition FLR models, simply place the folded 
shelter and the ice anchor/rope pouch inside of the base and 
close the base 

(Photo 19)


Make sure your ice shelter is completely dried out after
each use and before storing. Store your ice shelter in a
cool, dry place. Keep away from rodents. 


Page 7 

Photo 14 

Photo 15 

Photo 16 

Photo 17 

Photo 18 

Photo 19 

Tangled 

Untangled 

Summary of Contents for 108396

Page 1: ...31 4121 Email customerservice clamcorp com Warranty cannot be honored without an original dated receipt IMPORTANT PLEASE READ Warranty Information This product is warranted to the original retail purc...

Page 2: ...substance may render the flame retardant properties ineffective Night time exterior reflectors must be visible to reduce risk of collisions This tent is made with flame resistant fabric which meets CP...

Page 3: ...ke a few practice times to get the set up process down Lifting straight up on the side walls is critical to set up of the Expedition This alleviates binding of the hubs poles 3 Stand on the skirt of t...

Page 4: ...the ice anchor and cinch the strap tight Photo 10 Repeat for each anchor drilled into the ice In windy conditions you may need to screw an anchor outside the shelter several feet away from the hub on...

Page 5: ...the bottom of the base place the grommeted hole from the buckle strap onto the bolt add the washer and the nut and tighten with a 7 16 wrench and Phillips screwdriver Place female buckles with short s...

Page 6: ...lter fit inside of the base Photo 12 Attach the four male buckles affixed to the inside of the tent to the female buckles attached to the floor and adjust tension Photo 13 In windy weather anchoring o...

Page 7: ...5 Unclip the shelter from the base on FLR models Fold up the shelter Photo 17 6 When folding the Expedition up for storage inspect the hub systems and poles for entanglement NOTE The Expedition hub s...

Page 8: ...helter Injury or death may result from fire if tent fabric is exposed to open flame The tent is not fireproof but the fabric is treated with a fire retardant that meets CPAI 84 specifications Applicat...

Page 9: ...Is there anything can be put on outside of the tent to prevent water from coming through when we are using it A Customers have been known to spray or apply water repellant on the outside of the shelte...

Page 10: ...10 FREQUENTLY ASKED QUESTIONS...

Reviews: