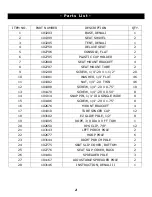
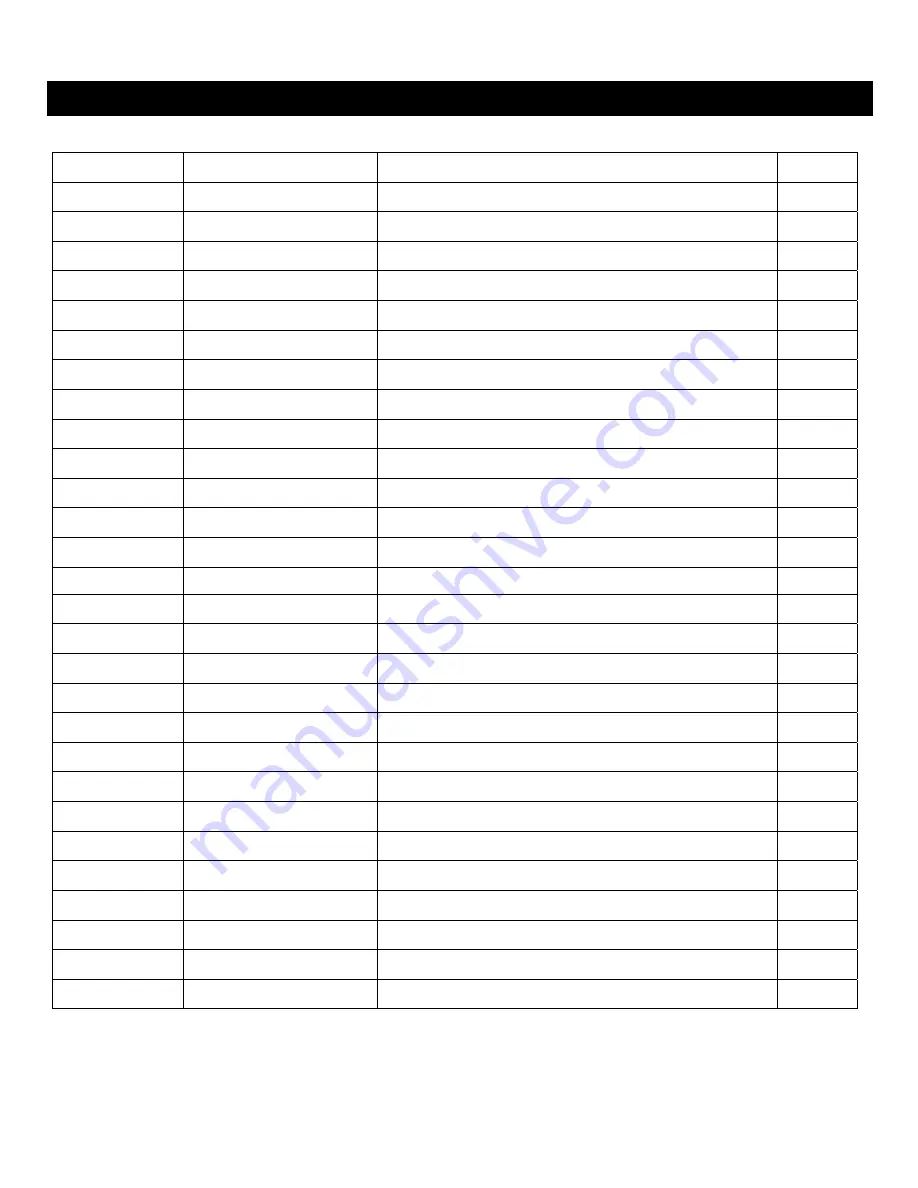
background image


2

-   P a r t s   L i s t   -  


ITEM NO. 

PART NUMBER 

DESCRIPTION 

QTY. 

1 103203 

BASE, 

DENALI 

2 101399 

SEAT 

SWIVEL 

3 103205 

TENT, 

DENALI 

4 102759 

DELUXE 

SEAT 

5 102796 

CONSOLE, 

FLAT 

102795 

PLASTIC CUP HOLDER 

102808 

SEAT MOUNT BRACKET 

102707 

SEAT MOUNT TUBE 

101208 

SCREW, 1/4"-20 X 1-1/2" 

20 

10 

101081 

WASHER, 1/4" FLAT 

46 

11 

101082 

NUT, 1/4"-20  THIN 

46 

12 

101088 

SCREW, 1/4"-20 X 0.75" 

18 

13 

101470 

SCREW, 1/4"-20 X 0.50" 

14 

101314 

SNAP PIN, 1/4" DIA SINGLE WIRE 

15 

101486 

SCREW, 1/4"-20 X 1.75" 

16 102676 

MOUNT 

BRACKET 

17 

101010 

TUBE SPACER CAP 

12 

18 

103102 

EZ GLIDE POLE, 1/2" 

19 

101095 

ROPE, 3/8 DIA X 9 FT TOW 

20 

102650 

RPS CLIP, 7/8" 

12 

21 

103143 

LEFT PORCH POLE 

22 102677 

HOOP 

POLE 

23 

103144 

RIGHT PORCH POLE 

24 

102775 

SEAT SLIP COVER, BOTTOM 

25 

102776 

SEAT SLIP COVER, BACK 

26 101481 

SPREADER 

POLE 

27 

101167 

ADJUSTABLE SPREADER POLE 

28 

103146 

INSTRUCTION, DENALI II 


Summary of Contents for 8398

Page 1: ...submit a Warranty Claim Request please use one of the following methods Email CustomerService ClamCorp com Preferred Method Fax 763 231 4121 Write Customer Service Warranty Department 600 Clydesdale...

Page 2: ...HIN 46 12 101088 SCREW 1 4 20 X 0 75 18 13 101470 SCREW 1 4 20 X 0 50 8 14 101314 SNAP PIN 1 4 DIA SINGLE WIRE 8 15 101486 SCREW 1 4 20 X 1 75 8 16 102676 MOUNT BRACKET 4 17 101010 TUBE SPACER CAP 12...

Page 3: ...3 27 21...

Page 4: ...4 Install pole mount brackets item 16 Install seat mount brackets item 7...

Page 5: ...at swivel item 2 as shown and assemble to seat mount item 8 Install console item 5 Install seat slip covers Install back slip cover item 25 Install bottom slip cover item 24 Seat covers installed Swiv...

Page 6: ...6 Install seats console assemblies to front and rear seat brackets Secure with snap pins item 14 Install seat assemblies item 4 and insert cup holders item 6...

Page 7: ...7 Base completed with seats consoles Install the tube spacer caps item 17 to the EZ glide poles item 18...

Page 8: ...e even with the ends of the thin lock nuts Install RPS Rapid Pole Slide clips item 20 to the hoop poles item 22 by snapping them in the correct position as shown DO NOT OVERTIGHTEN The poles must slid...

Page 9: ...es as pictured with the spreader poles The shelter will now be stable enough to drape the tent over the poles Install tow rope item 19 Knot the ends of rope after routing through pre drilled holes in...

Page 10: ...t the tent for proper fit IMPORTANT When collapsing the Denali it is very important to collapse the two porch hoop poles first to relieve tension on the tent when folding Failure to collapse the floor...

Page 11: ...t in premature wear of the base In windy conditions it is advised to secure your shelter to the ice using Clam s Ice Anchor Kit PN 108064 and Ice Anchor Installation Tool PN 108348 Make sure your ice...

Page 12: ...e sticking is there anything I can put on these poles to help them slide better A Apply Zipper Lube silicone spray or bar soap When the poles get slid up and down sometimes burs will get created If th...

Page 13: ...ing Q Do you ship outside of the United States A We will take phone orders for any item or parts required to MAINTAIN the shelter tents poles parts patch material etc We will charge for the product pl...

Reviews: