background image


-  T i p s  f o r  U s e  -


Folding and transporting your Clam Ice Fishing shelter is easy:


▪ 

Unsnap the spreader poles and lay them in the bottom of the base.


▪ 

Push the Rapid Pole Slide push buttons and retract each hoop, starting with the floor hoop and working


towards the middle.  Rotate all retracted hoops to the resting position.  Tuck the tent into the base and


between the hoops so that no material is left hanging on the ground for transport.


▪ 

Cover with the Travel Cover* PN 109741-to help prolong the life of the unit.


▪ 

We  recommend  the  optional Runner  Kit* (PN  109934) be  mounted  to  the  base  of  your  shelter (NOTE:


Pulling behind an ATV or snowmobile may result in premature wear of the base).


▪ 

In  windy  conditions  it  is  advised  to  secure  your  shelter  to  the  ice  using  Clam’s  Ice  Anchor  Kit  (PN


108064) and Ice Anchor Installation Tool (PN 108348).


Make  sure  your  Ice  Shelter is  completely dried  out  after  each  use.  Store  your  Ice  Shelter in  a  cool,  dry 
place. Keep away from rodents.


*For replacement parts, frequently asked questions, shelter information, and all of your ice fishing needs 

visit our web site at www.clamoutdoors.com.


-  S a f e t y  I n s t r u c t i o n s  -


Please  fully  understand  and  follow  all  safety  instructions  as  outlined.   Failure  to  do  so  could  result  in 

severe injury or death.


▪ 

Do not use  open flame heaters in your ice shelter. Injury or death may result from fire if tent fabric is 

exposed to open flame. The tent is not fireproof, but the fabric is treated with a fire retardant that meets 

CPAI-84  specifications.  Application  of  any  foreign  substance  may  render  the  flame  retardant  properties 

ineffective. Ice Armor fabric will melt when contact is made with hot surfaces (i.e., heaters).


▪ 

Death from  asphyxiation may  result from  use  of oxygen depleting heaters. Open all vents  for  fresh air 

ventilation.


▪ 

Never leave shelter unattended when set up.


▪ 

Due to the increase in traffic (snowmobiles, autos, etc.) on area lakes, ice fishing can be hazardous at


night.  If  you  choose  to  fish  at  night  or  in  poor  visibility  conditions,  be  sure  to  take  precautions  with


lights or reflectors to show drivers your whereabouts. Night time: exterior reflectors must be visible to 
reduce risk of collisions.


Death  from  asphyxiation  may  result  from  use  of oxygen  depleting  heaters.  Open  all  vents  for 
fresh air ventilation. 

Injury or death may result from fire if tent fabric is exposed to open flame. 

Tent  fabric  is  not  fireproof.  Fabric  will  burn  with extended exposure to open flame.   Do  not 
use  open  flame  products  inside  tent.  Tent    fabric    is  treated  with  fire  retardant.  Application  of 
any foreign  substance  may  render  the  flame  retardant properties ineffective. 

Night time: exterior reflectors must be visible to reduce risk of collisions. 

This tent is made with flame resistant fabric which meets CPAI-84 specifications. 

Summary of Contents for X4 TC

Page 1: ...riday Central Standard Time Clam Corporation Attn Customer Service Warranty Department 12135 Brockton Lane Rogers MN 55369 Phone 763 231 4120 Fax 763 231 4121 Email customerservice clamcorp com Websit...

Page 2: ...8 78 ALUM EXT 2 101900 BRKT RH X4 CANOPY 2 101901 BRKT LH X4 CANOPY 4 101803 TUBE X4 SEAT RAIL 8 101429 PLUG 1 16 DIA TUBE 8 101048 BLOCK SLIDE CIRCLE 8 104674 BLOCK SLIDE SLOT 4 103696 ASSY PORCH TU...

Page 3: ...STEP 1 Install the right and left hand Brackets PN 101900 and 101901 STEP 2 Start the Seat assembly Tip Rotate the Swivel PN 101399 45 degrees to aid in the installation process...

Page 4: ...t Covers PN 102775 and 103638 on to the Seat Attach them under the seat with the Velcro straps that are attached to the cushions STEP 5 Assemble the first side of the Seat Slide TIP Leave the fastener...

Page 5: ...ompleted in Step 3 STEP 7 Assemble the second side of the Seat Slider assembly Tighten all of the fasteners left loose at this time Assembled view STEP 8 Install the Seat assemblies by hooking the ass...

Page 6: ...t slide freely inside the brackets STEP 10 Assemble the Hoop Poles by sliding the end of the Hoop Pole into the Collar PN 103605 STEP 11 Assemble the Light Bar PN 109560 There will be instructions inc...

Page 7: ...ll the Rope PN 101249 by routing it thru the Holes in the Base and knotting each end The light Poles PN 109560 can be mounted in any of the Hoop Pole locations The recommended location is directly abo...

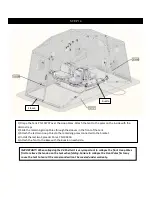
Page 8: ...oop Poles to the remaining poles connected to the bracket 4 Install the last two Spreader Poles PN 101836 5 Attach the Tent to the Base with the Buckle on each side IMPORTANT When collapsing the X4 Sh...

Page 9: ...nd slide each canopy Hoop Pole in as far as it will go Fold down the Poles starting at the inner most pole on either side then the inner most on the other side etc Alternating the sequence of folding...

Page 10: ...rs in your ice shelter Injury or death may result from fire if tent fabric is exposed to open flame The tent is not fireproof but the fabric is treated with a fire retardant that meets CPAI 84 specifi...

Page 11: ...base This is a necessary step for proper installation and failure to do so will void the warranty Q I am trying to attach the V channel molding to my shelter but am having difficulty getting it start...

Page 12: ...n Are these clips available for purchase A These clips called Quick Connects may be purchased through our On line Store at clamoutdoors com Q What is the proper way to set up and take down my Fish Tra...

Reviews: