background image

7

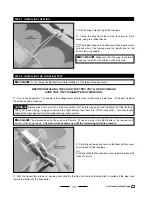
IMPORTANT


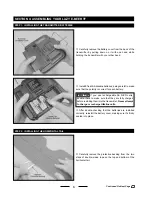
Make sure that when you install the horizontal tail the clear plastic control horn is toward the TOP

of the fuselage.

Carefully slide the horizontal tail into the slot in the back

of the fuselage.  When aligned properly, the horizontal
tail should be pushed forward completely and the outside
edges of the strips of double-sided tape should be centered
with the outside edges of the fuselage, on both the top and
the bottom.

When satisfied with the alignment, gently press the top

and bottom of the fuselage against the horizontal tail to
secure the horizontal tail firmly into place.

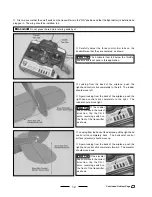
STEP 3:  INSTALLING THE RUDDER

Carefully slide the front of the rudder into the two plastic

tabs in the back of the fuselage, then adjust the rudder so
that the predrilled holes in the rudder line up with the molded
holes in the two plastic tabs.

With the holes in the rudder lined up with the holes in

the plastic tabs, carefully install and tighten the two small
wood screws to hold the rudder securely in place.

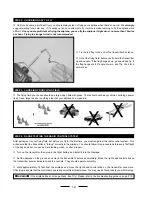
The wood screws thread into one side of the plastic

tabs, through the rudder, then tighten into the other side of
the plastic tabs.

IMPORTANT

  Tighten the screws firmly enough to

hold the rudder securely in place, but not so tight that
you crush the rudder.

Continued On Next Page


Summary of Contents for lazy-e-bee

Page 1: ...ches Weight RTF 9 5 Ounces Wing Loading 5 7 Ounces Per Square Foot Molded from Durable Plastic and Foam Preinstalled 4Ch FM 27Mhz Radio System Rechargeable NiMH Flight Battery 2 Hour 110V AC Flight Battery Charger Geared Motor with Heatsink Propeller Replacement Parts Available The Clancy Aviation Lazy E Bee RTF is distributed exclusively by Global Hobby Distributors 18480 Bandilier Circle Fountai...

Page 2: ...transmitter before turning on the airplane and always turn off the airplane before turning off the transmitter Always unplug the flight battery when not flying the airplane Never cut the receiver antenna shorter or you could lose control of the airplane during flight When flying the airplane make sure the transmitter antenna is completely extended Never attempt to disassemble or modify any of the ...

Page 3: ... are held on with rubber bands and the front of the fuselage and the spinner are rubber so this airplane is made for taking risks and pushing the envelope Of course if you push it too far repairs are easy and replacement parts are accessible Never before has an Andy Clancy Bee design become a park flyer with such fun and delight Remember we also offer extra batteries fast battery chargers replacem...

Page 4: ...e area before turning on the radio control system No two models can operate near each other if they are on the same frequency SECTION 3 BECOMING FAMILIAR WITH YOUR LAZY E BEE RTF Antenna Transmits the signal from the transmitter to the receiver inside the airplane Crystal Mount This is where the transmitter s crystal is located The radio s frequency is printed on the crystal mount Elevator Rudder ...

Page 5: ...plane forward Rudder Provides stability for the airplane during turns Also turns the airplane right and left when the rudder moves right and left Wing The wing has a special airfoil shape and provides the main source of lift for the airplane The flight battery included with your airplane comes from the factory partially charged DO NOT charge the flight battery until after testing the motor This wi...

Page 6: ...the batteries are installed correctly reinstall the battery cover making sure it s firmly seated into place Carefully remove the battery cover from the back of the transmitter by pulling down on it with one hand while holding the transmitter with your other hand SECTION 4 ASSEMBLING YOUR LAZY E BEE RTF STEP 1 INSTALLING THE TRANSMITTER BATTERIES STEP 2 INSTALLING THE HORIZONTAL TAIL Carefully remo...

Page 7: ... tail to secure the horizontal tail firmly into place STEP 3 INSTALLING THE RUDDER Carefully slide the front of the rudder into the two plastic tabs in the back of the fuselage then adjust the rudder so that the predrilled holes in the rudder line up with the molded holes in the two plastic tabs With the holes in the rudder lined up with the holes in the plastic tabs carefully install and tighten ...

Page 8: ...le in the control horn IMPORTANT We suggest installing the pushrod wire into the outermost hole in the control horn for your first few flights This will make it easier to control the airplane Once you re proficient at flying the airplane you can move the pushrod wire into the middle or innermost hole to increase the control response STEP 5 INSTALLING THE LANDING GEAR IMPORTANT When you insert the ...

Page 9: ... washer up against the propeller and thread on the second hex nut Tighten the hex nut using an adjustable wrench to hold the propeller in place Install the rubber spinner cone over the front of the propeller as shown So that the rubber spinner cone is secured into place properly make sure to push it firmly over the propeller WARNING Do not operate the motor or fly the airplane without the rubber s...

Page 10: ... the green safe area If it doesn t replace the batteries with a fresh set Always make sure you turn on the transmitter first before plugging in and installing the flight battery After you re done flying unplug and remove the flight battery first then turn off the transmitter This will prevent unexpected radio signals from interfering with your radio system WARNING The airplane does not have an on ...

Page 11: ...ol sticks When you pull the throttle control stick all the way back the motor will turn off and the airplane will begin to slowly descend To make the airplane descend faster you can also push forward on the elevator control stick This will make the elevator move down causing the airplane to pitch down and descend Right Turn A right turn is done by moving the rudder control stick the right hand sti...

Page 12: ...der should move left Again looking from the back of the airplane push the right hand control stick completely to the right The rudder should move right If the rudder does not move in the correct direction flip the CH 2 servo reversing switch on the front of the transmitter as shown PRO TIP Looking from the back of the airplane pull the right hand control stick completely back The horizontal contro...

Page 13: ...E RTF STEP 1 CHARGING THE FLIGHT BATTERY To unplug the connectors squeeze the tab on the flight battery connector and pull the two connectors apart After completely charging the flight battery install it into the fuselage using the same techniques as when you installed it previously WARNING Always remove the flight battery from the fuselage for the charging process Plug the flight battery connecto...

Page 14: ...check the controls They should operate smoothly Walk approximately 75 feet from the airplane and move the right hand control stick on the transmitter once more Check to make sure that the controls are operating smoothly at this distance You may need a friend to help you with this step WARNING If the airplane does not range check don t fly Please refer to the troubleshooting guide on page 19 The fl...

Page 15: ...ight the airplane gets stuck up in a tree in power lines or on a roof top DO NOT attempt to retrieve it yourself The airplane is not worth the risk We strongly suggest contacting your local fire department for assistance Attempting to retrieve the airplane yourself in any of these cases could potentially result in extreme harm or even death With the transmitter turned on and the flight battery ins...

Page 16: ...Remember for now to keep the motor at full power and use gentle control inputs to keep the airplane level throughout the entire flight Also remember to keep in mind that when you make turns the airplane will want to lose altitude so you ll need to pull back gently on the control stick to keep the airplane level If there is any wind when you are flying you will notice that when the airplane turns i...

Page 17: ...rim tab back a couple of clicks If the airplane turns right Move the right hand control stick horizontal trim tab left a couple of clicks If the airplane turns left Move the right hand control stick horizontal trim tab right a couple of clicks You can make these trim tab changes while you are flying but we suggest having a friend move them for you so you don t lose sight of the airplane We also re...

Page 18: ... double check that you ve extended the transmitter antenna completely Never cut or otherwise shorten the receiver antenna or you will lose control of the airplane in a very short distance Let the antenna hang behind the back of the fuselage Before each flight do a quick motor test to make sure that the motor is producing full power If it isn t you may need to charge the flight battery longer Do no...

Page 19: ...ch wind A Fly when there is no wind right or left without any B The airplane is out of trim adjustment B Adjust the transmitter trim tab as control input described on page 17 5 Airplane constantly climbs or A You are flying in too much wind A Fly when there is no wind descends without any B The airplane is out of trim adjustment B Adjust the transmitter trim tab as control input described on page ...

Page 20: ... us by United Parcel Service Federal Express or by Insured Mail Postage is non refundable Send your package to Clancy Aviation guarantees this kit to be free from defects in both material and workmanship at the date of purchase This does not cover any component parts damaged by use misuse or modification In no case shall Clancy Aviation s liability exceed the original cost of the purchased kit In ...

Reviews: