background image

Doc ID --197 • REV 05 


3 / 5 

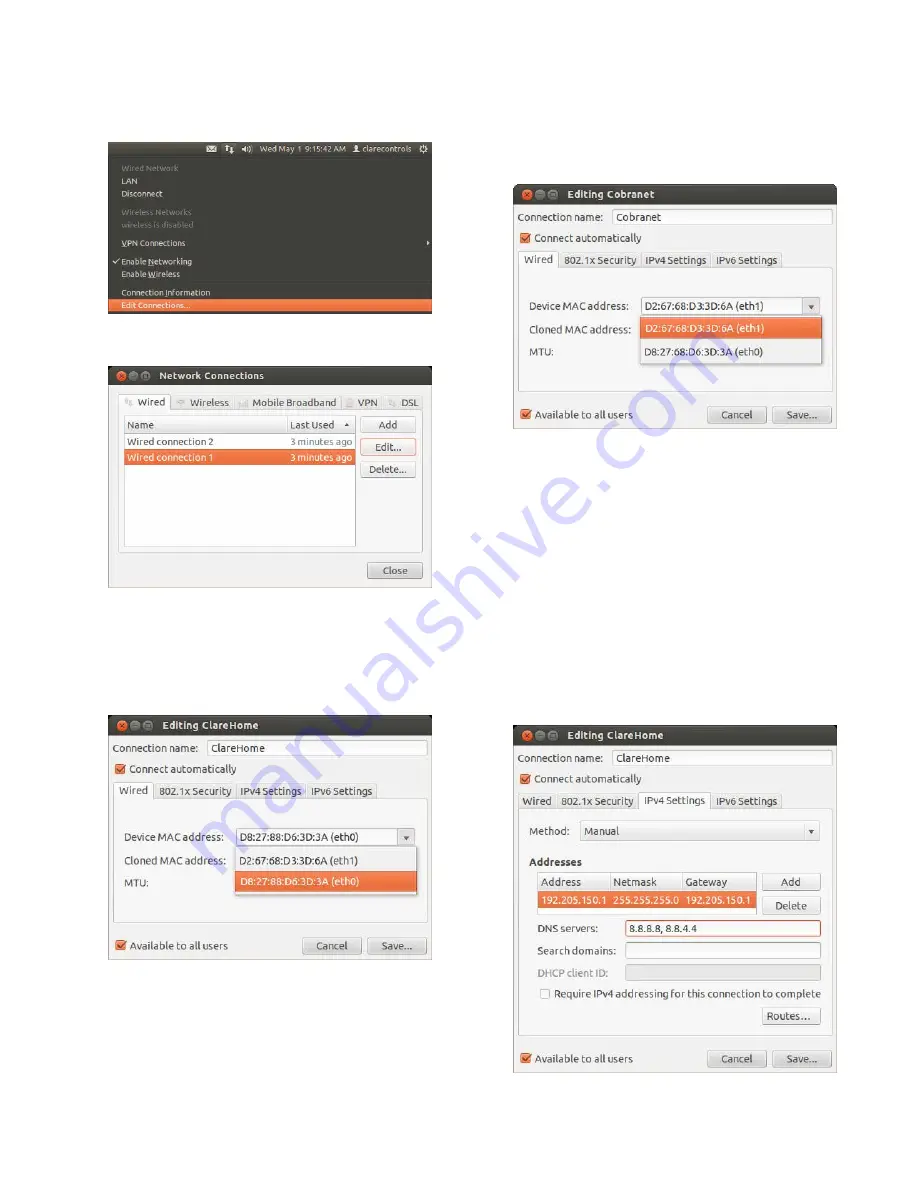
To configure the CH-OS-L: 

1.  Click the Up/Down arrow icon located in the title bar to 

display the drop-down list, and then select Edit 

Connections.  


2.  In the Network Connections dialog, select the Wired tab.  


Note:

 Normally, the system will show two wired 

connections. If you do not have active profiles, click the 

Add button and add it. 

3.  Click Wired connection 1, and then click Edit to display the 

Editing dialog. 


4.  In the Connection name field, enter a meaningful name, 

such as “ClareHome.” 


5.  Select the Connect Automatically and Available to all 

users check boxes, if they are not already selected. 
 

6.  In the Device MAC address field, click the drop-down 

arrow, and then select your connection’s MAC address 

and system name “eth0”. This is the main network 

connected to the Internet. 


7.  Click Save. 
8.  Click Wired Connection 2, and then select the Edit button. 


9.  In the Connection name field, enter a meaningful name, 

such as “CobraNet.” 

10.  Select the Connect Automatically and Available to all 

users check boxes if they are not already selected. 

11.  In the Device MAC address field, click the drop-down 

arrow and select your connection’s MAC address and 

system name “eth1”. This is the Media Network. 

12.  Click Save. 

To set up the static Internet connection: 

1.  Click the IPv4 Settings tab to edit your connections. 
2.  In the Method field, click the drop-down arrow, select 

Manual from the list, and then click Add. 


Summary of Contents for CH-OS-L

Page 1: ...ng with a CS iMR multi room audio device Use the mounting bracket included to mount the CH OS L in the panel To mount the CH OS L in the structured panel 1 Place the mounting bracket inside the structured panel under the CS iMR ensuring that you allow at least 5 in 1 3 cm of clearance space at sides and bottom of the bracket and at least 2 in 5 1 cm at the top See Figure 1 2 Using four 6 20 3 8 in...

Page 2: ...he power adapter to the power input port and then plug the other end into an electrical outlet See Figure 3 item 7 6 To power on the CH OS L press the power button on the front of the CH OS L See Figure 4 item 7 Figure 3 CH OS L rear connections 1 RF port not used 2 USB ports 3 Display Output port VGA 4 HGMI port not used 5 Network port 6 S PDIF out port not used 7 Power input port Figure 4 CH OS ...

Page 3: ...y selected 6 In the Device MAC address field click the drop down arrow and then select your connection s MAC address and system name eth0 This is the main network connected to the Internet 7 Click Save 8 Click Wired Connection 2 and then select the Edit button 9 In the Connection name field enter a meaningful name such as CobraNet 10 Select the Connect Automatically and Available to all users chec...

Page 4: ...ller comes preloaded with the Ubuntu operating system and is preset to the Eastern Time zone If you are installing your CH OS L controller in a different time zone and you wish to change the system time and date follow the directions below To change the time zone 1 From the desktop click the Gear icon in the upper right corner select System Settings from the drop down menu and then click the Time ...

Page 5: ... a new project with all Gateway settings and MAC address 2 Create areas for the project 3 Configure one device and then create a service 4 Deploy the project to the Gateway and test it in the Clare Controls App Specifications Power 65 W Dimensions W H D 7 5 1 0 5 3 in 19 0 2 5 13 5 cm Weight 15 8 oz 45 kg Warranty information Clare Controls offers a three 3 year limited warranty on original Clare ...

Reviews: